I realize I’m soo late to the party, but I’ve just now discovered the free designer patterns from SHOWstudio. They’ve been publishing these pattern downloads since 2002, and I never knew about it! You can find several interesting patterns from Yamamoto, McQueen, Galliano, Owens, and so on. There’s even a dress pattern from Iris van Herpen.
The only caveat is that the patterns come only in one size, and that seems to be the sample size (=tiny). At least that was the case for each pattern I took a closer look at. So unless you’re an XS, you will need to figure out how to grade up.
Obviously, I wanted to try making one of these designs for myself. It was quite difficult to choose, as there were so many cool designs, but in the end I went with an origami jacket by Lee Alexander McQueen. It’s a kimono-inspired jacket from his A/W 03 Scanners collection. I think it’s really wearable. I could make it a jacket for the coming autumn.
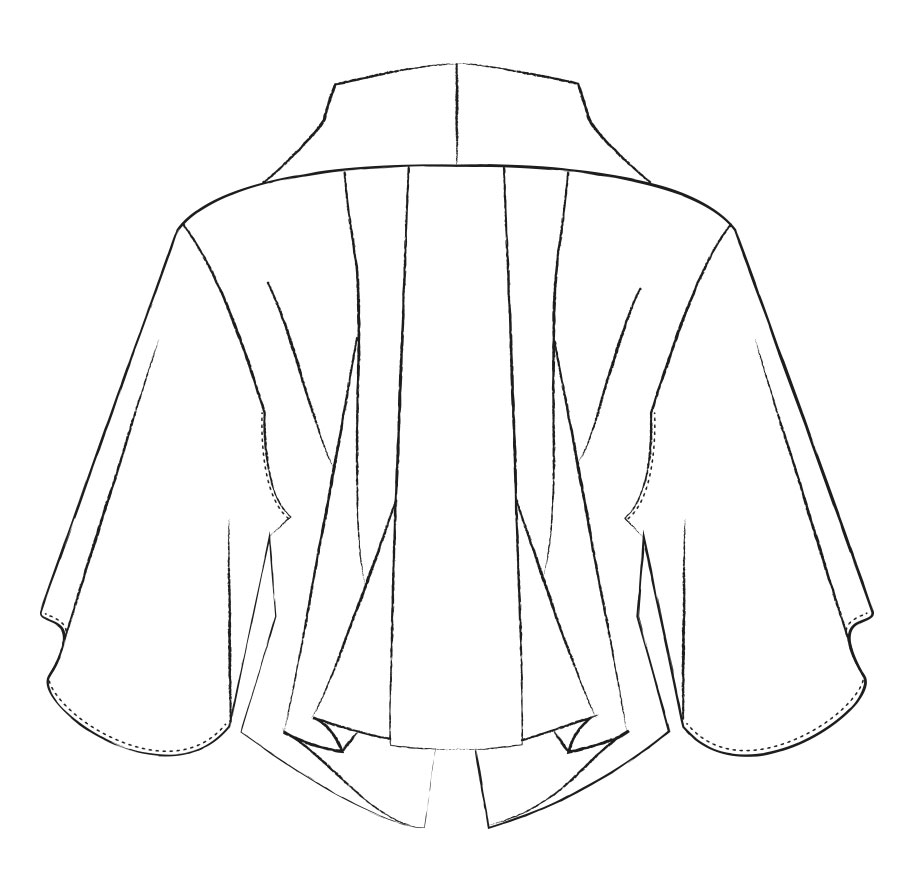
Here’s a flat I drew of the backside. Where the origami is.
Preparations
So, I downloaded the pattern and sewing instructions. You print the pattern with your home printer and tape the pages together as usual. There’s a picture that shows the shapes of each pattern piece so you know what you’re aiming for. 😀 This was the easy part.
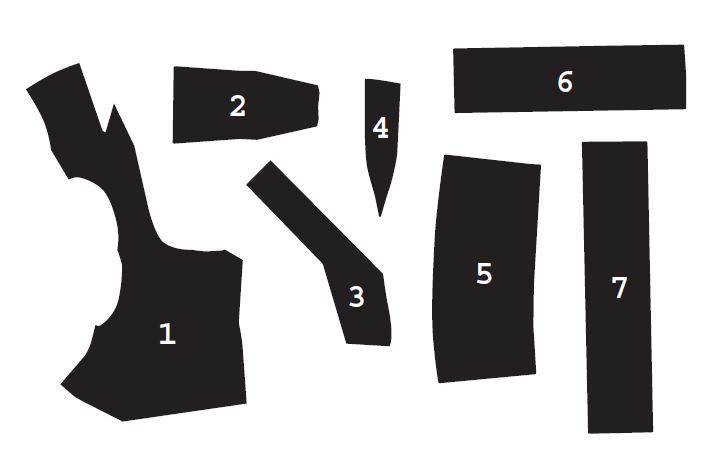
The pattern looked quite complicated! It comes with seven pieces. I started by naming each piece and writing how many times it needed to be cut. You can figure these out by reading through the sewing instructions and by looking at the photos of the finished jacket.

The front and back bodice are both included in the same pattern piece. There’s a dart at the shoulder. This is the largest pattern piece, and it needs to be cut twice.
There’s a separate back panel piece that will be cut only once.
The third piece is a back-hemline facing, and it needs to be cut twice.
Number 4 is an additional triangular piece that goes under the collar at the front. I don’t know what to call it, but you need two of these.
Piece number 5 is the sleeve, and it will obviously be cut twice. The sleeve will remain open under the arm.
6 and 7 will form the collar, which is longer on one side. These will be cut one time each.
The Strategy
My strategy was going to be the following:
- Grade up the pattern.
- Make a partial toile to understand how the pieces will be sewn and to check the fit.
- Make the required changes based on the toile.
- Decide what color and fabric I want to make the actual jacket in (the original is black silk). Then get the fabric.
- Sew the final piece.
Luckily, I managed to find this website. There was some more info on the pattern, more pictures, and a link to an archived sewing tutorial, which turned out to be really useful. Let’s just say the instructions that come with the pattern are not very exhaustive. I did manage to understand most of them, but there were a few passages I only managed to resolve because of the tutorial. So, shout-out to Blithe, if you ever happen to see this text. 🙂
The Initial Changes
On the aforementioned website, I found out that the pattern comes with a 1cm seam allowance and that the finished garment size is bust 81cm – waist 61cm. Some serious grading-up was needed!
Considering all the origami folds and the fact that I didn’t even know how it was all going to be sewn, I decided to make the simplest alteration I could think of: add more width to the front and back side seams, and some to the armhole. Then, if more was needed, I’d add to the c-back and c-front as well.

In the pictures above, you can see how much I added and where. Keep in mind these will double once you cut the other side as well. I wanted to get close to size M.
The armhole comes with two darts: one at the shoulder and the other at the front armhole. If you add extra width here, you must draw the new armhole shape with these closed. Moving the bust dart would be quite a hassle, so I really hoped it would work as it was (spoiler alert: it did!).
These changes will also influence the back-hemline facing. Add the same amount to its side seam as you did to the back piece.
You might need to adapt the sleeve, too. There’s no ease, so the measurements between the double notches should be identical for the sleeve and armhole. “Walk” the sleeve pattern along the armhole and move the notches, if needed.
Marking the Toile
First of all, I only made half a jacket because I didn’t have enough fabric. I left out the collar, too. However, it was enough to check the fit and figure out how to sew the piece.
As this was just a toile, I marked the points with a red marker pen on the right side of the fabric. The pattern comes with convenient little X-marks that help you draw the stitch and fold lines. (You’ll also need the X-mark dots.)
I first marked the points with pins and then with the pen. I even wrote the reference letters!

For the final fabric, I was planning on using the basting thread.
Remember to cut all the notches! They will be really useful.
Sewing the McQueen Origami Jacket Toile
I sewed the toile as best I could, sometimes referencing the official instructions and sometimes the archived sewing tutorial. I think the end result is quite good. Close enough, I’d say. So, I took several pictures along the way in the hopes these will be useful to others.
We start off easy: attaching the back panel to the back seam of the bodice. There are notches, so it’s quite difficult to get it wrong. I only had one bodice piece.
Then, we attach the back-hemline facing. For a full jacket, first sew the two facing pieces right sides together at the C-back. For me, the facing starts at the C-back point of the back panel. That’s why it looks weird.

Trim the seam allowance and turn the right sides out. Press the hemline flat.
At this point, I also sewed the shoulder dart, and while I was at it, I sewed the P-dart, too (passages 6 & 7 in the instructions).
Next, let’s sew the bust dart(s). There are two folds.
Start by uniting the short lines marked with A. Stitch along the line. This will create a fold that ends at point C at the armhole. Bring the point C up where the second C is. Pin, matching the edges at the armhole.

Then, bring the already-united A’s to the remaining point A and pin the lines together. I noticed the lines are not the same length. Stitch along the line. This will create a second fold. Stitch down the previous dart along the armhole, too.
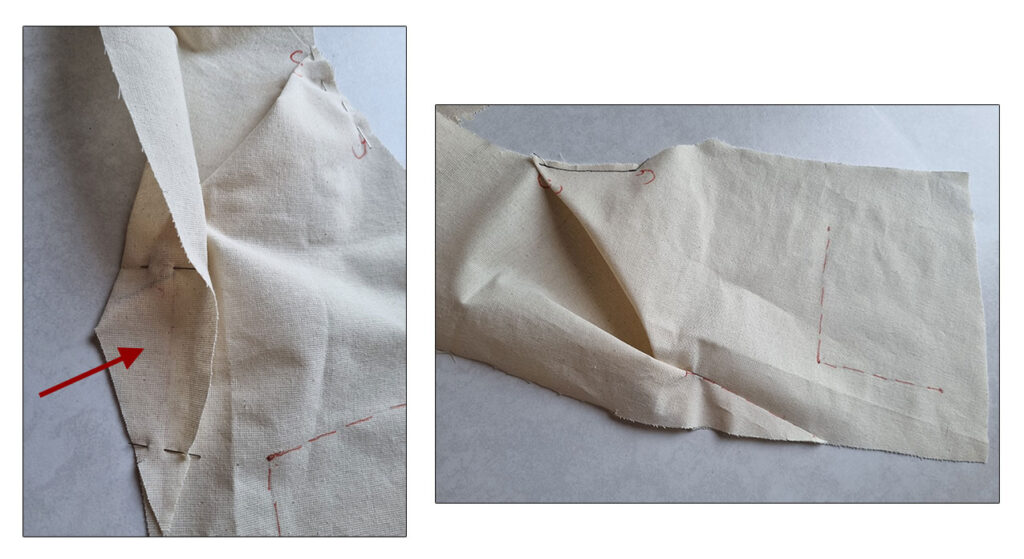
Now the bust dart is done.
The Origami Folds
It’s time to do the origami folds! This is where it gets a bit tricky. I’d say just take a step, and then the next step will reveal itself! Or something. 😀
The first picture on the left is the P-dart I mentioned earlier. This is on the wrong side. I guess that’s part of the origami, too.
Anyways, then, unite points D&D and R&R. Sew between the points. You should get a large fold.

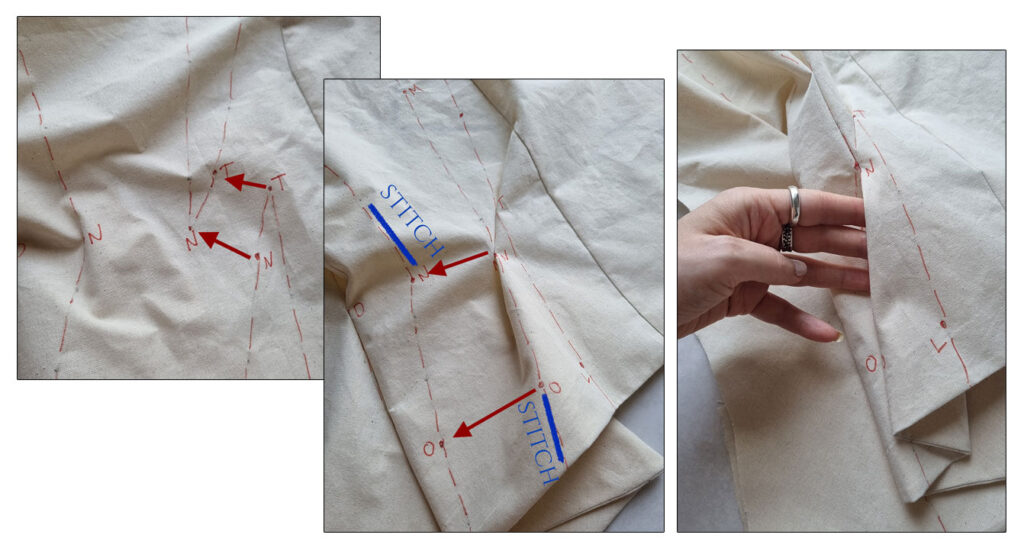
Next letters are N and T. We actually have three N’s. First, we are interested in the ones that are closer to the c-back. Unite N & N and T & T. Stitch between the points.
Then, bring the united N’s to the remaining point N and unite the two O’s, too. This time, stitch away from the points (see the blue lines). This will leave the fold open between the points.
The point M was probably the most difficult to understand. Apparently there’s an M-dart. The instructions tell you to sew it after you’ve stitched the two M points together. I decided to sew the dart first. This is a little dart. Then, bring the remaining point M to the dart and stitch 1cm down along the line.
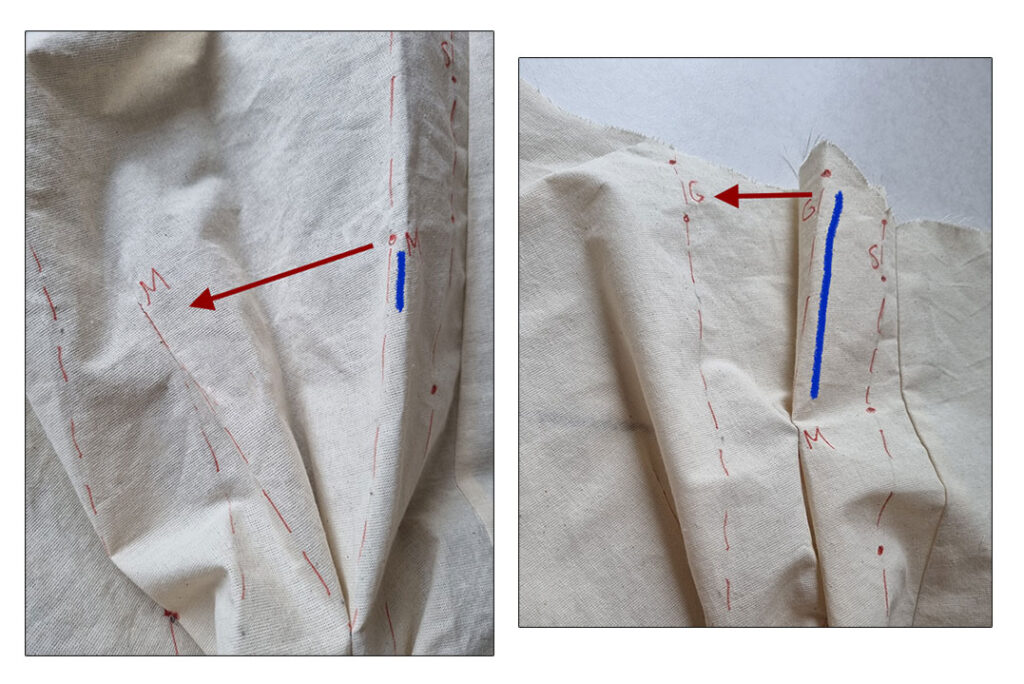
Next, we’ll bring the points G together and “stitch to the second dot down”. I was unsure which dot it was, as the two sides have different dots. So, I went with the one that was further down. Here I also had trouble with the neckline not aligning. I just trimmed off a bit of excess fabric to resolve the issue. But maybe there was a mistake somewhere.
Finally, there’s point S. According to the archived tutorial, you fold the back panel to the S line. There’s a notch at the top that tells you where to fold. You stitch three dots down. But will the first dot be counted, too?

The origami is ready. Obviously, you do the same steps on both sides.
Close the side seams. I think the front piece has a 1cm hem allowance. I will probably add a facing for the front hemline, too.
The Last Details
At this point, I only had two more pieces remaining to complete my toile. The front “flaps” and the sleeve.
Before attaching the flaps, close the short edges by folding the piece in half, right sides together.
Trim the seam allowance, turn the right sides out, and press the piece flat. Then you can sew it to the c-front of the bodice, placing it on the right side. The notches match really nicely. The seam allowance will remain hidden once you attach the collar.

As I mentioned, I didn’t include the collar for my toile. But it seems to be easy enough. Just unite the two collar pieces at the c-back and sew to the bodice neckline. The collar is folded lengthwise in half. The longer piece goes to the left side and extends over the jacket hemline. There are notches to match.
Lastly, there’s the sleeve. This was pretty straightforward, too: close the inseam and fold the edge of the section that remains under the arm, as it won’t be attached to the armhole. Finish the hemline.
The sleeve has two double notches that match those of the bodice armhole. In addition, there’s a notch to be matched with the shoulder dart. No ease.

My Finished McQueen Origami Jacket Toile
So how did it go? I was surprised to see the jacket fit me pretty well. There was no need to add any extra room. The bust dart worked as it was. Phew! Imagine a rectangular collar piece that’s attached all along the neckline and c-front.
I only noticed there was a bit of extra length at the front neckline. That was an easy fix: add a dart and remove it. You can see the dart pinned in the picture below. I adapted the collar pattern pieces accordingly by “walking” the pattern along the bodice neckline. I needed to move the notches a bit and trim off a slice at the hem.

The origami looks a bit strange, but it’s probably just a question of material and being more precise with the folds. I think it will look good in the final fabric. I’m really tempted to make the jacket black!
For the rest, adding a crinoline to the back hemline could look great. I’ll test it for sure. I imagine the hemline with waves.
Here’s a summary of the folds and stitches I marked on the pattern piece. I will use these as a reference when sewing my jacket.

The Final Version
Here’s an update, over two months later. I have now completed the final version of my McQueen origami jacket! I took some pictures along the way.
In the end, I picked a grey duchesse satin. Another fabric I considered was taffeta because that would’ve been more similar to the original.
I kind of hoped duchesse would’ve been easier to sew with, as it’s heavier-weight. You see, I had recently been fighting with lightweight stretch satin and didn’t want to go through that again. But unfortunately, satin is satin, and the struggle was real! The stitches kept pulling no matter how much I decreased the tension. Sometimes everything seemed to go fine, but then the stitches decided nope a bit later. It was driving me nuts.
I was about to abandon the project various times, but luckily managed to resist.
That’s why it took me this long to finish the piece.
Oh, and don’t even get me started with photographing the jacket! More on that soon. 😀
The Extras
As in, what else, besides satin, did I get to make my jacket? There’s no lining, so I decided to finish the inside edges (the facing and the seam allowances) with black bias binding.
I also got 2 cm-wide crinoline tape for the back hem, as planned.

Depending on your fabric, you might also want to get interfacing for the collar and hemline facing. Mine was quite heavy-weight, so I only added an extra layer of fabric inside the collar.
Marking the Pieces
This time, I had two layers of fabric because I was cutting both sides, so I marked all the points with basting thread.
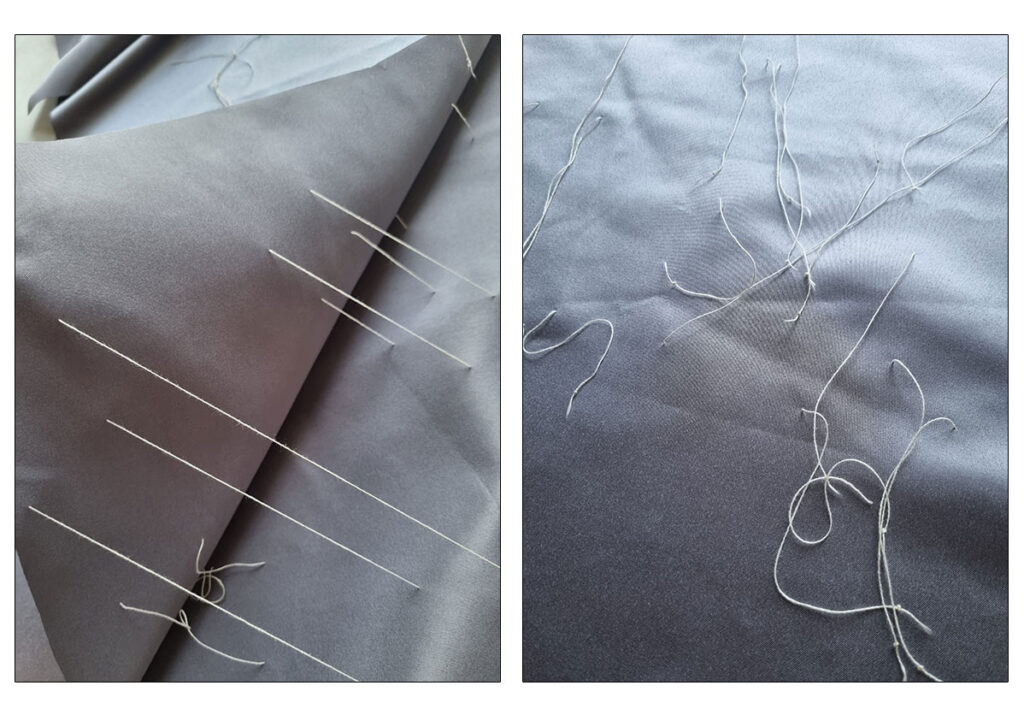
And naturally, I couldn’t write the reference letters on my fabric, so I kept the pattern close by to know which point was which. Here you can see how I marked all the various points, not just where the letters were.

Sewing the Front
I started by closing the shoulder darts and stitching the front folds as I did with the toile. The only difference was, that I now needed to do the opposite side in the opposite direction.

The Back
After attaching the back panel, I pressed the seam allowances toward it and finished the edges with bias tape.
Then, I closed the c-back seam of the hemline facing and pressed it open. To avoid creating bulk, I finished the edges with the serger. After all, these were going to remain hidden.
I continued the hemline facing to cover the front piece, too. You can trace its shape directly from the jacket pattern’s front hemline. So there’s also a little side seam to close and finish with the serger.
Here are a few process pictures I took while I had the bias tapes pinned to the back seams and the top edge of the hemline facing.

Then, I attached the facing to the back hemline, stopping a bit before the side seam so it would be easier to sew the origami folds (=the jacket side seams remained open still). I trimmed the seam allowance in half and pressed it towards the facing. After this, I sewed the crinoline tape to the remaining seam allowance and pressed the hemline edge flat.

You actually need to attach the crinoline tape in three parts because the hemline has little pointed shapes where the outermost origami folds are.
Then you can just follow the same steps as with the toile to sew the origami folds. Only this time, mirror the steps to finish the other side, too.
Here you can see how the hemline facing gets caught into the stitches.
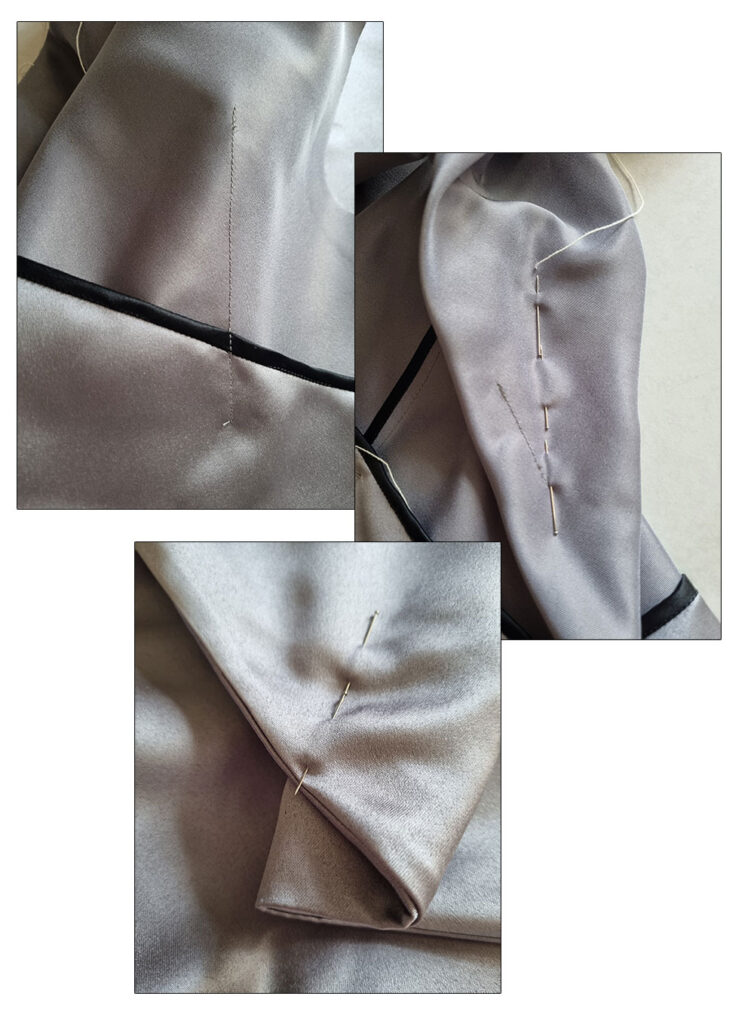
I needed to redo quite a few of these because the fabric was pulling. For example, if the hemline facing moved a bit in either direction, it created tension. Or if the row of stitches was slightly off.
And also, the two sides needed to look the same.
The Rest
After the origami was completed, I closed the side seams, pressed them open and finished the edges with bias tape. At this point, I could finally attach the rest of the hemline facing.
Next, I sewed the lower edge of the front “flaps”, turned the right sides out, and pressed flat. Then, I stitched them to the c-front. The wider edge goes towards the hem.

The sleeves were easy: Close the inseam and sew the hem. There’s also the section that won’t be attached to the armhole that needs to be hemmed.

Attach the sleeve to the armhole where the notches are.
Folding the underarm edge of the armhole wasn’t easy. I think it would be better to bias tape it, but oh well. A narrow double fold was kind of doable, although the armhole has a pointed shape, so it doesn’t come out that well. Maybe other materials will behave better.

The last thing was the collar, which consists of two rectangular pieces. The left side is the one that extends past the jacket hemline.
Close the c-back seam and press it open. I had a layer of cotton inside the collar for more structure. Close the section that extends past the hemline.
Then, attach one edge of the collar to the jacket neckline (the side that remains on top), right sides together, matching all the notches. Trim the seam allowance in half and press towards the collar.
Pin the remaining edge and stitch in place. I opted for hand-stitching as I didn’t want to struggle with any more thread tension. 😀
Here’s the collar before attaching, and how I sewed the inner edge by hand.
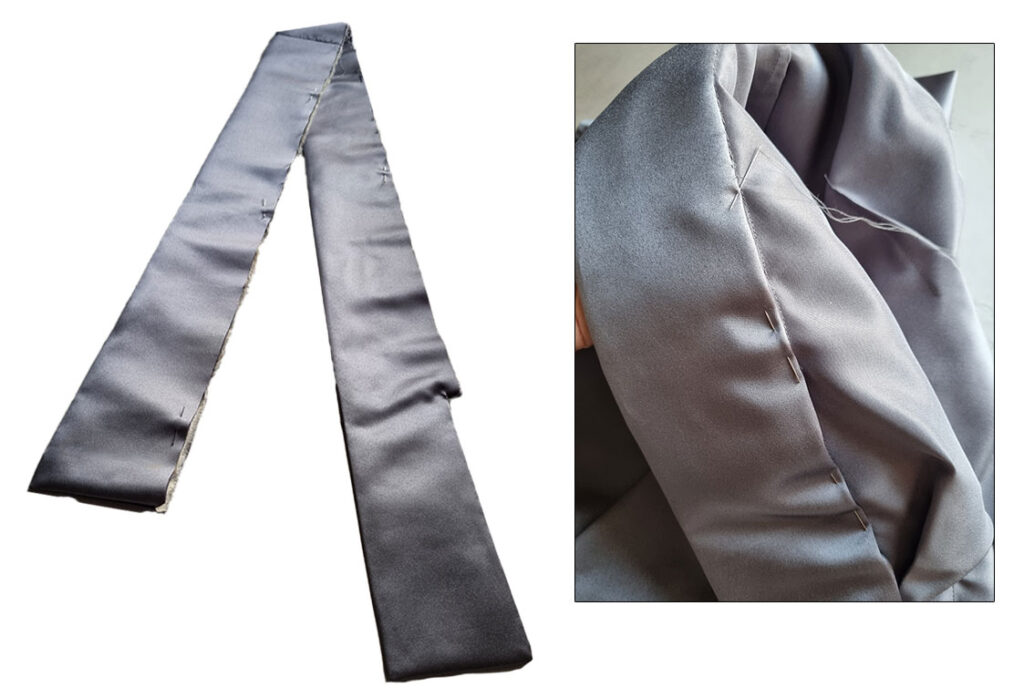
Trying the jacket on, I thought the collar was too high at the back, so I lowered it by 1,5cm starting at the shoulder darts, as you can see here.

The Final Touches
Lastly, I put the jacket on my mannequin and organized the folds. They required a few hand-stitches here and there. I also stitched the hemline facing to the side seams.

Then, I spent quite a while pressing the folds.
Done! (phew)
And so in the end, I managed to complete my McQueen origami jacket. Now we can talk about photos.
So, this satin has only a slight sheen, but for some reason it ends up looking too shiny in pictures. The camera also picks up ALL the puckered seams and wrinkles. Even ones you can’t really see with the naked eye.
Well, here it is in any case.
That’s me wearing the jacket! I took a few pictures from different angles. I believe this is the first kimono-style jacket I have. Even with the lowered c-back, the collar remains quite high.

I might make another one after a sufficient number of months have gone by. But not out of satin! What do you think about dark red?
Have you ever used any patterns from the SHOWstudio website? Did you know about them?
Well, if you haven’t downloaded this pattern yet, here’s a link to the page. Maybe you will join the fun! 😉

10 Comments
Wowee, will need serious concentration. It would be good if there was a photo of the finished article, better still worn by the author or someone willing to do so. Many thanks for the pattern. Jane
Yeah, I’m always a bit concerned about copyright so I avoid including pictures I haven’t taken myself as much as I can. There will be a picture of the finished jacket in the second part once I complete it. 🙂 For now, you’ll find several examples at the links. The original is difficult to see however, as it’s so dark. Fun fact: It was worn by the Outlander actress Caitríona Balfe on the runway!
Hi, I have been following you for a while. I always get excited when I see a new post. I have photos from the Melbourne McQueen exhibition from 2023 (I travelled there to see it and Australian museums are fine with photography of their exhibits) including a jacket from the same collection which is in red patterned fabric and is a variation. Would you like the photos, they are only from my phone but my classmates at design school liked them? The whole folder is 1.4Gb or I could send just the pic if there isn’t an easy way to send it all.
Lili.
I’m so pleased to hear that you enjoy my posts. 🙂 Wow, lucky you for seeing the exhibit! I’d love to see pictures. You can email a few to info(a)theshapesoffabric.com Or if you use wetransfer, just a link. You can share larger amounts through that.
Oooh! I have been thinking about this pattern for so long but since I’d have to grade it up a lot (I’m a UK 22/24) I have been put off.
Any thoughts on how you could increase the size further?
Yeah, it’s really small. I was thinking about adding extra width to the c-front of the bodice where the collar will be attached. And then maybe in the center of the back panel. But I didn’t need to in the end so I haven’t tested what happens. It should be alright. Just modify the collar and the hemline facing pieces, too. The correct way would be to move the origami folds, too, but that’s way too much hassle! 😀
Oooooh ! What a wonderful work. Yes please make another from burgundy worsted wool. Before forgetting all about this tricky pattern :).
Thanks so much! 🙂 I will start planning a new version soon. After I’ve recovered from this one! 😀
I honor your skill! that is beautiful work but in SATIN too?!? I made a satin pencil skirt once- couldn’t have been a simpler pattern and … let’s just say I learned a lot.
Thank you for inspiring me with your skill and talent.
Yes, satin is definitely one of Those materials! What a challenge but I’m glad I did finish.