Waistbands and yokes allow you to add little details to your skirt and pant designs. This tutorial will show you ten ideas. I made a little sample piece of each. The pants are all short, but obviously, you can make them in any length you want. Most of the designs work for both skirts and pants.
I used the basic skirt and basic pants block as a base.
Paperbag Waist Pattern
It’s not exactly a waistband, but it gives the illusion of one. This paperbag waist is formed by adding elastic inside a casing at the waist. The skirt continues above the elastic, creating a ruffled edge at the top.
Here’s how to draft the paperbag waist. This construction works with skirts. For pants, you need to add volume with the slash & spread method.
As this skirt has a gathered waist, you can ignore the darts. Measure the waist, front, and back pieces separately, and add half of that measurement at the c-front and c-back, as shown. You can also add some flare at the side seam.

Then, raise the waist by 5cm (for example), going straight up at the c-front, c-back, and at the side seam. The elastic will end up at the original waistline. Draw the casing shape around it, making the casing 0,5-1cm wider than the elastic you plan on using. For example, here the elastic is 2cm wide, so the casing should be 2,5-3cm. Trace the casing pieces.
All the pieces will be cut on the fold. Mark where the casing will be sewn. The side seam notches will help you sew the pieces together.
Here’s what this skirt looks like. I hemmed the upper edge of the skirt.

Overlapped Waistband
Next, we have an overlapped waistband: it’s overlapped at the c-front and creates a little V-shape. The opening is at the c-back but it could be at the side seam, too.
The waistband is shaped, which means you get it directly from the main pattern piece. More on different waistbands here.
I made the waistband 8cm high, and it conveniently covers the entire back dart. Later, I will show you what to do when the dart length doesn’t match the waistband’s edge.
Create a slanted line at the c-front by extending the lower edge of the waistband 4cm over the c-front line. The upper edge ends 3cm before the c-front. The dashed line shows where the opposite end of the waistband will go. This helps you see how the overlap will look. You can adjust the measurements to alter the size of the V-shape. Mark a notch.

Cut or trace the back waistband piece, close the dart, and adjust the lines. Your pant block might have more darts, so do the same with each.
Here are the pattern pieces. The waistband will have two layers which means that you need to cut each piece four times. Interface one layer. Mark a notch at the c-front of the waistband. It will help you match the pieces when sewing. There’s a zipper at the c-back, ending at the hip level.
Handstitch the overlap near the V-shape to keep the two edges better in place.

Asymmetrical Yoke Pattern
For this pattern, you’ll need both sides of the front and back pieces. Draw the yoke shape on top. Make it a continuous line between the front and back. Add some flare at the side seams.
Here you can see different ways to deal with the darts when the yoke (or waistband) edge doesn’t pass through the original dart tips.
You can adjust the dart length. Lengthening the darts shouldn’t be a problem. Just don’t go under the hipline! If you’d need to shorten them by a lot, it’s better to just leave the dart tip where it was and deal with the rest of the dart in another way.

Separate the yoke pieces, close the darts, and adjust the lines.
We will also add volume to the lower section with the slash & spread method. So, draw lines from the dart tips to the hem, cut, and spread by 10cm.
If part of the dart is included, slash all the way to the top along one dart leg and overlap the two sides at the top edge as you spread by 10cm. This way, you close the remaining part of the dart while freeing the piece to spread by any amount you want.
Adjust the lines and re-draw the hemline.
Here’s the final piece and the pattern. Mark notches at the c-front and c-back points along the yoke seam.

Pants with a Yoke
While we’re at it, here’s a pants pattern with a yoke. Adding a yoke allows you to cut the upper section of the pants on the fold. However, the yoke should remain above the hipline, as the front seam of the pants starts curving after that.
Draw any yoke shape you want onto the pattern pieces, making it a continuous line between the front and back pieces. It can be an asymmetrical shape, too, you’ll just need both sides of the pattern for that. If part of the dart remains below the yoke seam, remove its volume at the side seam, as shown here.
Then, cut or trace the yoke pieces, close the dart, and adjust the lines.

Cut the front yoke piece twice on the fold and the back piece four times, if the zipper will be at the c-back. Interface one layer.

Scalloped Waistband
This waistband has been made using the layering technique because that way, it’s easier to sew. It means, the scalloped edge is a separate layer and the skirt is attached at the base of it’s narrow facing.
First, let’s turn the basic skirt block into an A-line skirt to remove the darts: rotate the darts towards the hemline and add some flare at the side seam. If you’re new to patternmaking, you’ll find step-by-step instructions in this post.

Then, draw the scalloped waistband shape at the top edge of the pattern. I made mine 5cm high. To make the scallops symmetrical, you can measure the circumference and divide it evenly between the scallops. In the illustration above you can see how the shapes continue between the front and back pieces.
Tip: Less curved scallops will be easier to sew.
Then, add a narrow facing (see the colored area). Trace the waistband piece and its facing. If you don’t mind a weird grainline at the back, you can even make it a one-piece so that there won’t be a side seam.
The skirt starts at the base of the facing, which means the top edge of the colored area.
Here’s the resulting skirt. You can make decorative top stitching vertically between the scallops or hidden hand stitches at the angles to prevent the skirt from collapsing.

Pleated Waistband
Pleats are a great way to decorate the waistband if you’re looking for a texture.
I’m taking this opportunity to throw in a low-waist pattern.
Lowering the waist works pretty much the same way as separating a shaped waistband from the pattern: draw a parallel line below the original waist. Here, I’m lowering the pants’ waist by 4cm. After this, you probably need to take in a bit at the top edge of the side seam. Even just 0,5cm both front and back.

Now that we have the new waist, we can separate the shaped waistband. In this example, it’s 6cm high. You can lengthen the remaining part of the back dart so that it reaches the lower edge of the waistband.
Cut or trace the waistband, close the dart, and adjust the lines.
The waistband will then be divided into smaller sections. Measure both long edges of the waistband and divide it. In this case, there won’t be a side seam. Center the first piece evenly at the c-front. Number the pieces.
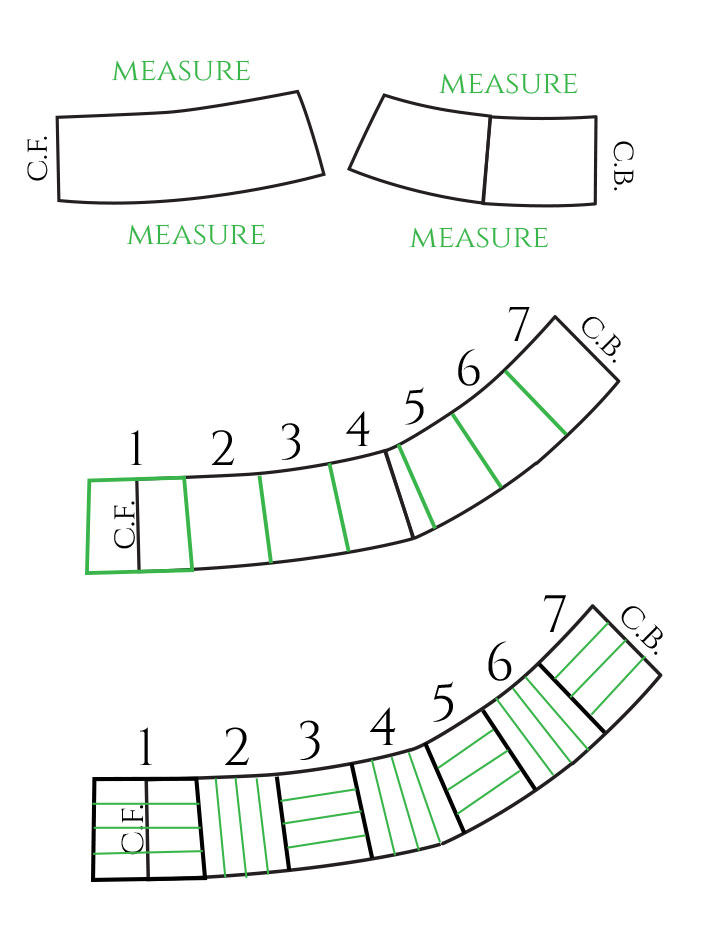
Then, draw lines to each piece where the pleats will be. Here, I alternated between horizontal and vertical pleats. Use the original waistband pieces as a facing or trace them.
Add pleat allowance to each little piece. It can be a maximum of twice as much as the distance between the lines. For example, here the waistband is 6cm high and the lines are 1,5cm apart. So, I added 2cm of pleat allowance. When folded, the depth of pleat will be 1cm.
I included pieces 1 and 2 as an example. Cut the pieces with the pleats folded. It’s a good idea to add seam allowance this way, too. Add notches on both sides of the pleat allowance so that you’ll know where to fold.

More on pleats here.
Here’s what the pants with a low waist and pleated waistband look like. The waistband has a smooth facing piece under it. As this is quite a bulky construction, you should avoid heavy-weight materials.

Layered Waistband
Let’s add a layered waistband to the mix! This time, I’m using a straight waistband.
Turn the basic skirt block into an A-line skirt, if you prefer. In this case, you can also keep the darts.

Then, measure the waistline of the skirt so that you know how long the waistband needs to be.
The waistband is a long rectangle. The maximum height for straight waistbands is 3cm, but you can always cheat a little.
Divide the waistband length evenly into little slots of about 2cm. These will be your guidelines. You can also add a horizontal one in the center. Draw the triangular shapes between the guidelines, as shown. They should all be identical, so, you only need to draw a couple. Although, drawing all of them will make it easier to count how many you’ll need.

Then, trace the main piece and its facing. I colored the areas in the illustration. The target piece is the third one from the left. Count how many you will need and write it onto the pattern pieces. The shape will also work perfectly for a button closure if you create a little overlap.
Here’s the skirt. The waistband has a smooth facing piece. Just mark the side seam position with a notch.

As you might be wondering how to sew the piece, I took a few pics.
First, sew each facing piece to the pointed edge of the main pieces. Stop at a seam allowance distance from the edge. Trim the seam allowance around the tip and clip where the arrows are. This way, when you turn the right sides out, the seam allowance of the top and bottom edges of the waistband is ready to be used.
Once you’ve sewn all the facing pieces in place, unite the layers by attaching each piece to the base of the previous piece’s facing.

When the waistband is ready, sew the facing to the top edge, and then you can attach the waistband to the skirt or pants as usual.
Partial Waistband
The shaped waistband can also cover just a part of the waist. Here’s an example.
Separate the waistband from the top edge of the pants back normally. When drawing the front waistband, stop somewhere in the middle of the pattern piece.
Close the darts and adjust the lines. Ensure that the waistband flows smoothly between the front and back pieces.

You can either make one single waistband piece or a separate front and back piece, each with its own grainline.
The best way to finish the top edge of the pants is to create a facing piece that also covers the area without the waistband. Add a decorative button where the waistband ends to complete the look!

Partial Waistband for High Waist
Here’s a variation on a skirt I have shown in another tutorial years ago.
It’s a semi-high-waist skirt with a partial waistband and a little ribbon detail.
Raise the waist by 5cm, straight up at the c-front, c-back, and the side seams. Do the same with the dart legs. This is the maximum height you should work with for this kind of high waist pattern.
Separate the colored areas: the entire back waistband, uniting the two pieces (adjust the lines), and part of the front waistband. The area between the c-front and the dart will be united with the skirt front piece.

As you can see, this waistband ends at the front dart. The ribbon will be sewn into the seam: Mark a notch in the center of the front waistband piece.
The waistband’s facing covers the entire waist. This means, you need a separate facing piece for the front.

High-Waist Lace-Up Waistband
The final design has an even higher waist and a lace-up detail at the sides.
This waistband starts 4cm below the waistline and extends 8cm above it. Remove the remaining volume of the dart at the side seam.
Raise the waistband straight up at the c-front and c-back. Measure your body circumference 8cm above the waist (or however high your waistband will be) and divide the measurement by 2. This way, you can now adapt the side seams and the dart width so that the top edge of the waistband will have the correct measurement.
The back piece is already divided into two sections. Just mark notches where the two loops will go. Divide the front piece in half and add notches. You can curve the seam a bit, if needed. This will probably be easier to do while fitting the piece.

Here are the pattern pieces and the finished shorts. There’s a zipper at the c-back.
The waistband consists of two layers and the loops are sewn into the seams where you added the notches.

So these were my 10 waistband/yoke ideas for you to try. Feel free to mix and match and make your own variations, too! 🙂


6 Comments
Great article, as always !
I had one of those aha moment when reading the asymmetrical yoke graphic.
Partial waist band patterns might come in handy quite soon 🙂
Thanks again
Julie
How awesome! 🙂 Glad it was helpful. These were fun little makes.
excellent
Thank you. 🙂
I love these ideas so much. Thank you!
Appreciate it. You’re welcome. 🙂