The long-awaited basic pants pattern tutorial is finally here! It’ll be in good company with my other basic pattern tutorials. You can find them here.
This pattern will work as a starting point for all kinds of different women’s pants designs. My personal favorite is the palazzo pants.
The Measurements
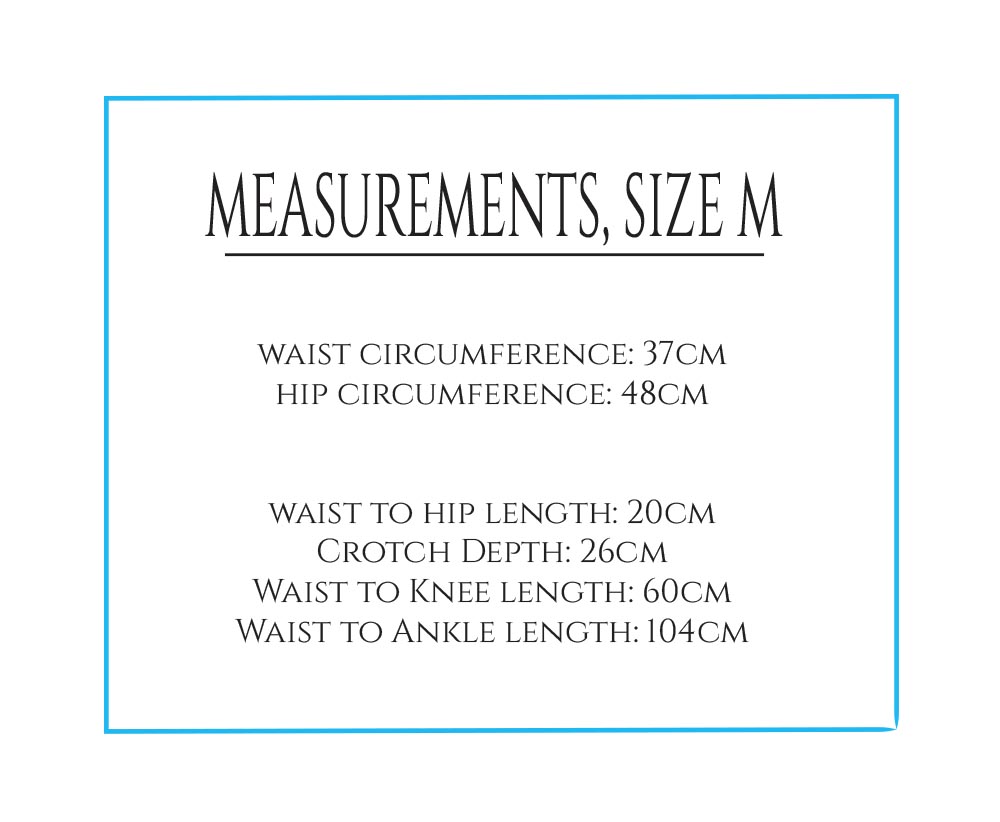
As usual, let’s start from the measurements you’ll need to draft the basic pants pattern.
- Waist Circumference
- Hip Circumference
- Waist to Hip Length
- Crotch Depth
- Waist to Knee Length
- Waist to Ankle Length
Of these, the crotch depth is probably the most difficult one. If you get it wrong, your pants won’t fit right. Take the measurement sitting down on a chair. Keep your back straight. You should have an elastic tied around your waist so that you get the correct starting point for the measurement. Then measure between the waist and the chair seat.
Here are the measurements we’re going to be using in this example. They are for a CA 170cm tall person. The two horizontal measurements have already been divided in half.
The Basic Pants Pattern
Now that you have the measurements, let’s start drafting!
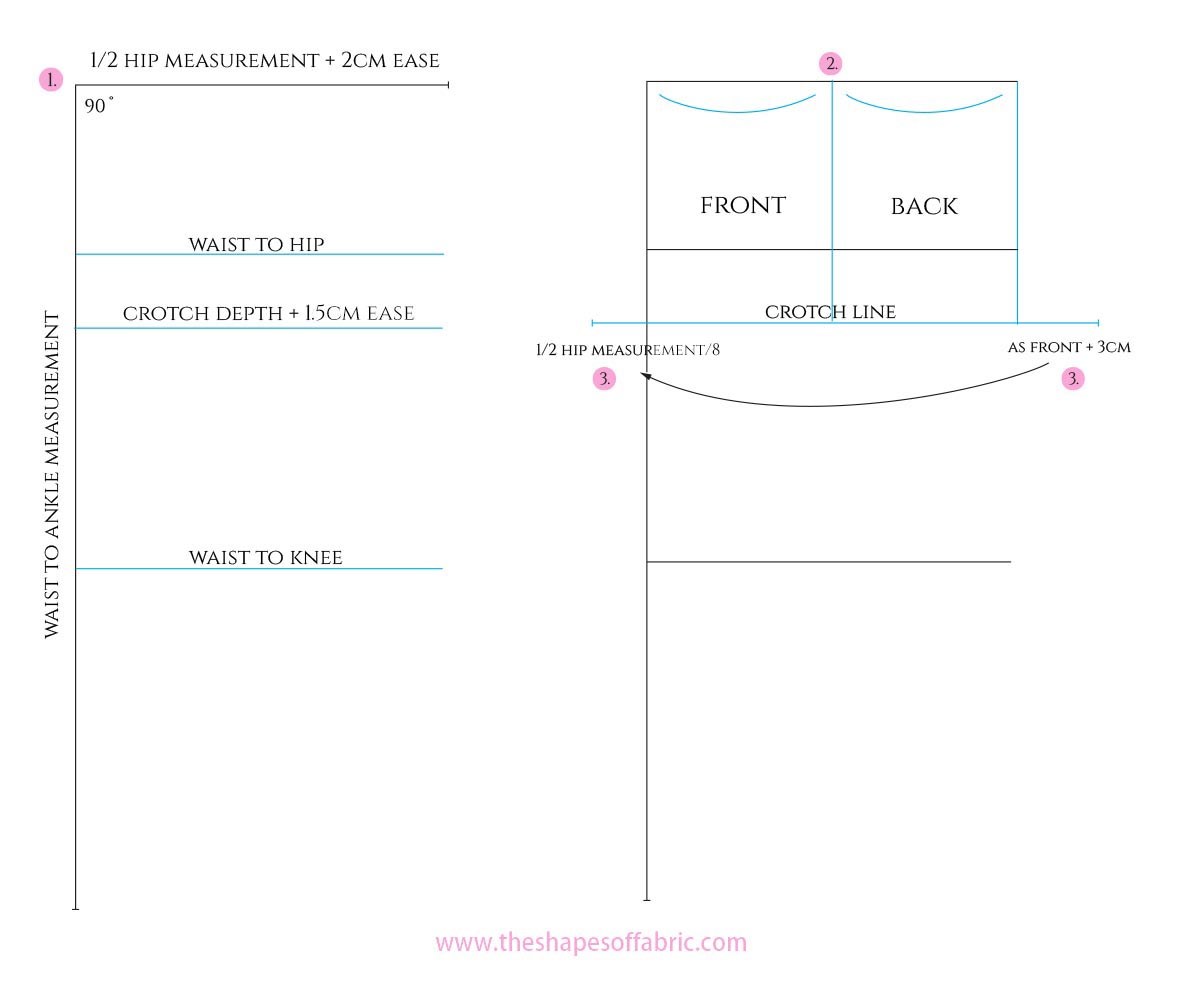
1. Draw a right-angle using your ½ hip measurement + 2cm of ease for the width, and waist to ankle measurement for the height.
In this example, the width is 50cm and the height 104cm.
Then add the other 3 measurements: waist to hip, crotch depth + 1.5cm of ease, and waist to knee.
Going in order: 20cm, 27.5cm, and 60cm.
2. Separate the front and the back pieces by dividing the total width in two as shown in the picture. Square down also at the upper left corner, going all the way to the crotch line.
3. To find out where the crotch points will be, starting from the front, calculate ½ hip measurement divided by 8 and extend the front crotch line to the left.
For example: 48cm /8 = 6cm.
Then use the same measurement and add 3cm. Extend the back crotch line to the right.
In this example: 6cm + 3cm = 9cm.
For more fitted pants, you can leave the back crotch line slightly shorter.
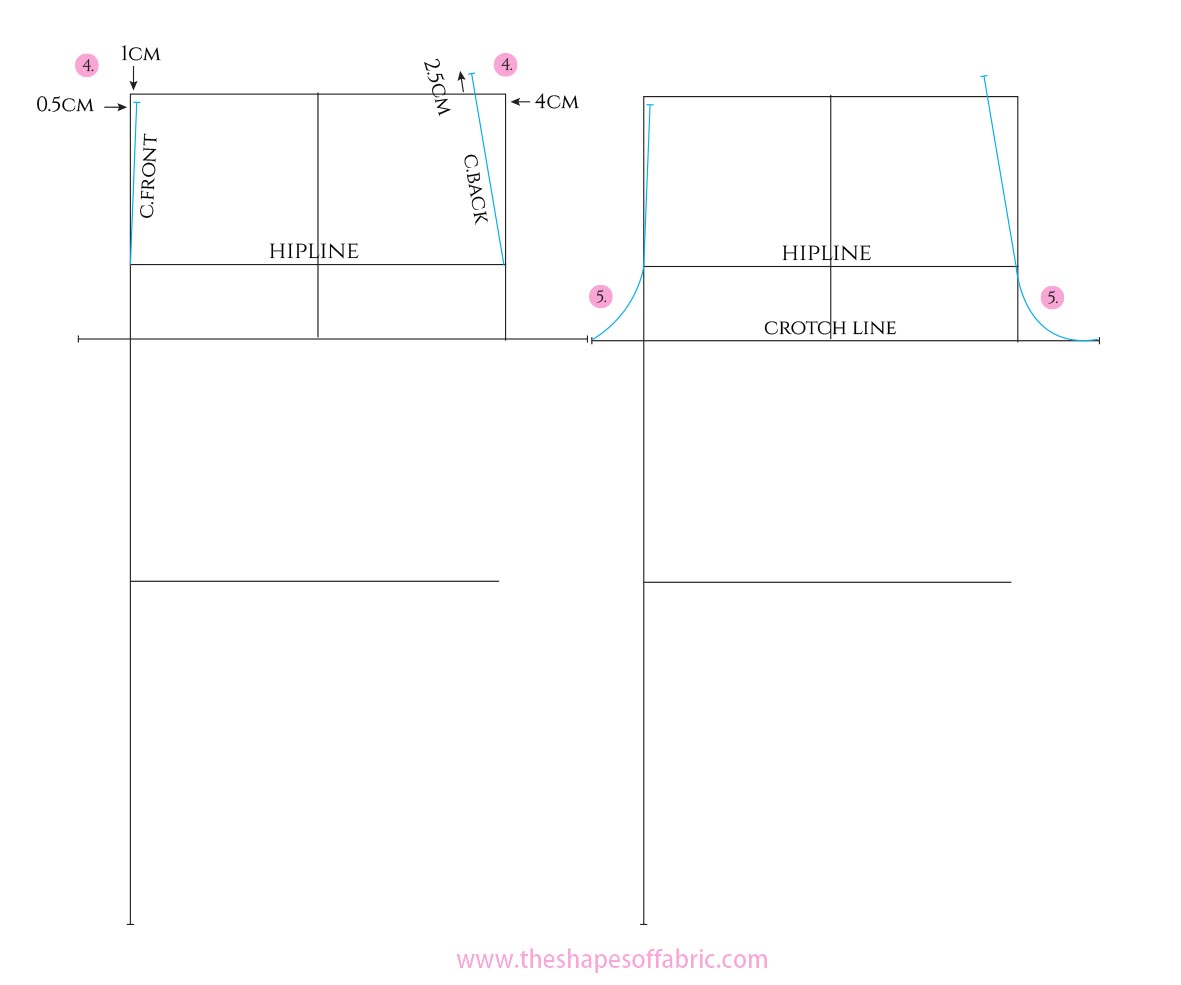
4. Measure 0.5cm inward at the upper left corner and square down 1cm. Unite this point to the hipline to create the c.front line of the pants.
Measure 4cm inward at the upper right corner. Draw a line from the hipline to this point, and continue 2.5cm upwards, as shown in the picture. This is the c.back line.
5. Continue the c.front and c.back lines down by adding the crotch curve. The front should be only slightly curved, whereas the back crotch curve should be deeper.

6. Now you can draw the waistline: calculate ½ waist measurement/2 + 1.5cm for the front, and ½ waist measurement/2 + 0.5cm for the back.
For example: 37cm/2 = 18.5cm +1.5cm = 20cm (front) and 37cm/2 = 18.5cm + 0.5cm = 19cm (back).
These measurements take into account a 2cm wide dart that will be placed at the back. The front waistline is slightly wider than the back.
Both waistlines end along the horizontal line you draw in the beginning. The waistline is higher at c.back as you need some extra length for sitting down.
7. Unite the waistline to the hipline with a straight line, both front and back. We’ll draw the hip curve later.
8. You know how classic pants have a crease in the middle of the leg? Well, that is called the crease line. It’s also the grainline of the pants.
To find out where it is, measure the distance between points A and B along the crotchline of the front piece, and divide it in half. Square up and down to complete the crease line/grainline.
Then measure the distance between the side seam and the crease line of the front piece, and use the same measurement for the back piece.
9. Next, let’s draw the hemline of the pants. The front side is slightly smaller than the back, because the calf needs more space. So decide on the hemline circumference and divide it in two.
In this example, for size M pants, the total circumference is 46cm (for reference). So, divided in two, it’s 23cm.
For the front, detract 1cm. For the back, add 1cm. Mark the hemline width evenly on both sides of the grainline.
Here, the front hemline is 22cm, 11cm on both sides of the grainline. The back hemline is 24cm, 12cm on both sides of the grainline.
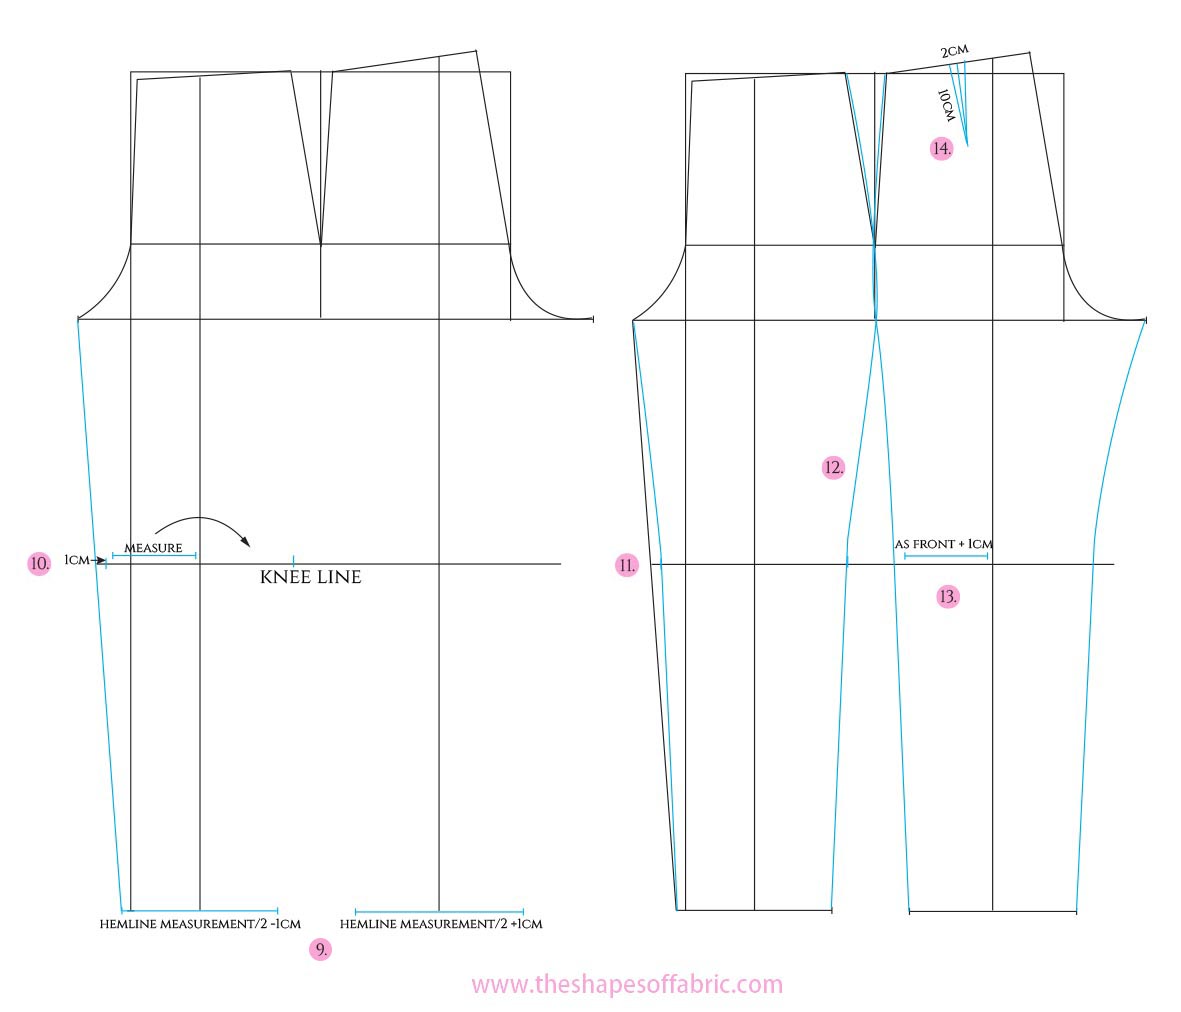
10. Starting from the inseam of the front piece, first unite the hemline to the crotch point with a straight line. Then enter 1cm at the knee level and mark the point. Measure the distance between this point and the grainline along the kneeline to get a guide mark for the side seam, too. (The pant leg sides are identical between the ankle and the knee.)
11. Draw the final inseam of the front piece: draw a straight line from ankle to knee level and then a slightly inward curved line to complete the inseam at the crotch point.
12. As for the side seam, draw again a straight line from ankle to knee level, and then continue with a slightly curved line as shown in the picture; first an inward curve, then outward. You should get a smooth line that continues all the way to the crotch level, and then you can complete the side seam by adding a slight hip curve.
13. Now, use the kneeline measurement of the front piece again. Just add 1cm and sign guide marks on both sides of the grainline at the knee level of the back piece.
Complete the inseam and the side seam of the back piece the same way as you did with the front piece. The inseam can now be more curved.
14. Add a 10cm long, 2cm wide dart in the middle of the back waist.
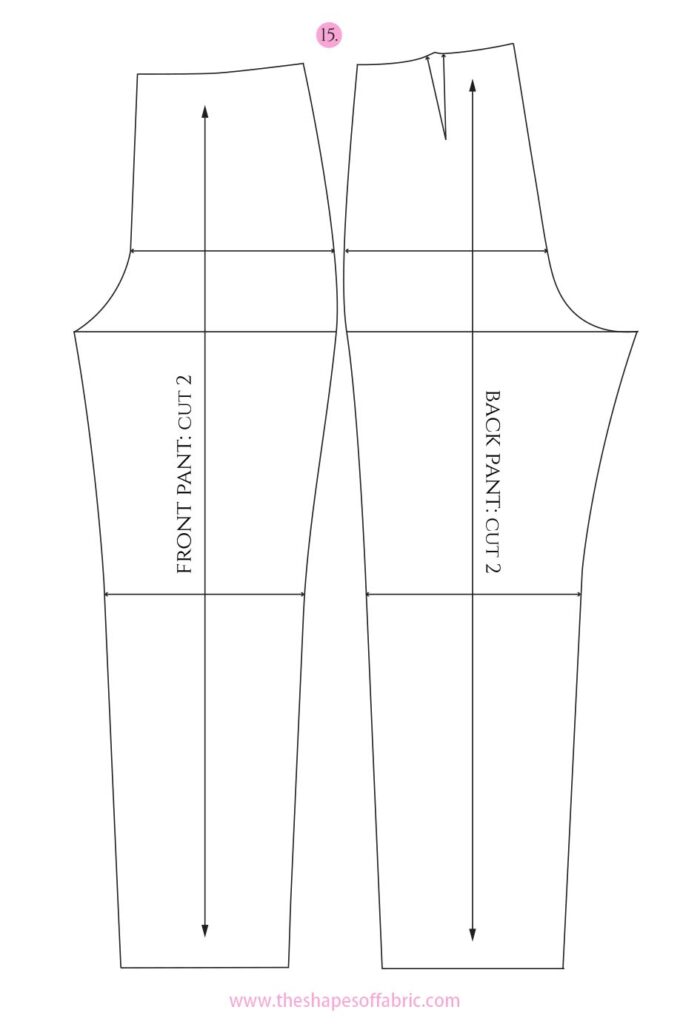
15. Finally, draft the waistline curves. The waistline should start in a right-angle both at the c.front and c.back.
Checking the Basic Pants Pattern
Copy the two pattern pieces and check that the side seams and the inseams are the same length both front and back:
Place the pattern pieces one on top of the other, right sides together and first ”walk” the inseams from the kneeline to the hemline and then from the kneeline to the crotch point and equalize the lines so that the hemline and crotchline run smoothly between the front and back pieces. It’s OK if doing so causes you to lower the back crotch curve slightly. The back inseam is more curved, so it’s likely that it’s also longer than the front inseam.
Then ”walk” the side seams, first from the kneeline to the hemline and then from the kneeline to the waistline and equalize the lines so that the hemline and waistline run smoothly between the front and back pieces.
You can make a straight waistband for your pants. The pattern piece is a rectangle where the width is twice the waistband height (max. 3 + 3cm) and the length is ½ waist circumference. Mark the side seam position with a notch.
Make a toile to check the fit and then correct your pants block accordingly. After this, it’s ready to be used!
I have a Patternmaking Guide on Women’s Pants, when you feel ready to test your pants block in action.


149 Comments
Thank you so much!!
You’re welcome. 🙂
I am Pattren designer but your draft design to much helpful for me
Very pleased to hear that. 🙂 Thank you.
I want to learn more about pattern making.
You can find all the tutorials divided by topic here: https://www.theshapesoffabric.com/contents/
yes it’s very useful..
Thank you. 🙂
much appreciate your website and all the knowledge you share. a clarification question: in step 5 it says to use 1/2 hip measurement/8.
if the hope measurement is 48, should it not be 48/2= 24, then 24/8=3?
rather than the 48 (full hip measurement provided in example) divided by 8?
thank you, hope I didn’t misunderstans
I’m happy you’ve found the tutorial helpful. 🙂 The 48 is already half hip measurement, so there’s no need to divide it in half again in this case.
I think you need to clarify this on the drawing as it says hip circumference =48, not 1/2 hip measurement.
Thanks
You mean the picture with the measurements? It’s because above I’m mentioning the horizontal measurements have been divided in half. 🙂 The pattern covers just half of the body, so I find it quicker to divide the measurements right away.
Thank you so much
It was so helpful indeed
I’m glad it’s turned out to be a helpful tutorial for so many. 🙂
really appreciate your designs thanks it help a lot …..if you have more information please email me
Thanks so much! 🙂 Will do.
Can you teach us how to draft low waist pants.
I’ll keep that in mind. 🙂 There’s a pants theme month coming up very soon! But for now, you can use the same instructions as for the skirt: https://www.theshapesoffabric.com/2019/03/04/simple-skirt-pattern-alterations/
Thank you so much
You’re welcome. 🙂
Gratitude, this is complete pack.
Thank you so much! 🙂
Am so happy to learn here
Thank you! 🙂 And welcome.
Very nice illustration 😊.
Do you have a YouTube channel?
Thank you so much. 🙂 No, I’m mostly on Instagram and Pinterest.
Thanks for this drafting pant pattern. Your calculation method is easy for understanding.
You’re welcome. 🙂 Glad you found it helpful.
Thank you for sharing…. trying to go back to sewing and teach my daughters. Thia was very helpful.
That sounds awesome. 🙂 Was happy to share.
You mentioned industrial size M. I take it that that is a medium size. Can you tell me what the other sizes are in terms of measurements ie. My waist is 89.5cm and hip 106.5. What size does that fall into?
The industrial measurements aren’t directly comparable to the RTW garment measurements, as each brand has their own typical customer measurement chart and they tend to make the sizes bigger to make them fit more people. You can find industrial measurement charts in patternmaking books. Usually you need to modify them to fit a person. That’s why you get the best results using your own measurements to start with. If you don’t have any books, I can take a picture of a measurement chart from one of mine and email that to you. 🙂
Thanks. The explanation is more simple than other one that I read in books and in You tube.
Appreciate
Oh yeah? Glad to hear. 🙂 It’s my pleasure.
Thank you so much for this…I tried this and it perfectly fits for me..again thankyou so much for your guidance
Fantastic! 🙂 I’m glad that my tutorial was helpful. You’re welcome.
Thank you so much
You’re welcome. 🙂
Thank you, I am looking forward to trying this out. Best wishes. Penny 🙂
You’re welcome. 🙂 Enjoy.
Thank you so much this was great help, one of the easiest ive seen x
Happy to help! 🙂
Where can I watch your videos
Every now and then I post Reels on Instagram under @behind_shapesoffabric. 🙂
Thank you so much for this, is there a way I can get it as pdf
You’re welcome. 🙂 You mean the instructions? I believe there are websites that create PDFs of articles. You just need to provide the URL. I have the basic pants block drafting instructions as a PDF, but it’s part of the Women’s Pants guide that’s in the shop section.
Thank you. I have been struggling with some pants issues and this really helped.
Excellent. 🙂 You’re welcome.
Thanks so much for this wonderful information ❤️
You’re welcome. 🙂
Very generous of you!
Thank you 😍
You’re welcome. 🙂 I’m planning on a sequel to this article: how to fit the pants pattern. Hope to get it done soon.
Thank you for this tutorial. I’ll definitely be trying it out and hopefully this will give me a perfect fit, as I have had issues with trousers fitting properly in the past. At what point do I take the waist measurement (low waist)? How do I go about the band to sit properly and also avoid the waist gapping at the back(major issue in most draft I’ve done)?
You’re welcome. 🙂 I hope you’ll get a good fit. The basic trouser block should arrive all the way up to the natural waist. Then you can alter the waist level afterwards, when you’re using the basic block to draft your actual trouser patterns. Take the low waist measurement at the level you prefer, remembering to measure the distance from the natural waist, too. To avoid gaping at the back, you can take the waistband in a little bit at the upper part of the waistband at c-back, if you don’t mind having a seam there. Otherwise you can only resort to taking in at the side seams. Personally I like making a shaped waistband, separating it from the top section of the pants block. This pants block is constructed in a way that it’s already narrower at the c-back, so you might not have much gaping. 🙂
Thank you so much
You’re welcome. 🙂
Thanks so much. You’re blessed💯
You’re welcome. 🙂
Thanks for your positive impacts on lives.
You’re welcome. I’m happy to inspire. 🙂
Olá,
I’m from Brazil.
Adoro calça Flare
Nice to meet you. Welcome to my blog. 🙂
This is very helpful indeed 👊👊👊 do u have a t video tht u meant share a link to or ur YouTube channel link
That’s awesome. 🙂 Unfortunately I haven’t ventured into YouTube, at least for now.
I am very aprieciate
Glad you enjoyed the tutorial! 🙂
Would this tutorial work for men’s trousers or just womens? Also If one wanted to make a pleated pair of trousers where would that extra material come from? I have been looking around online a while for a good pattern or tutorial on making a pattern. I’ve never made trousers so it is all quite new and I appreciate all the information and knowledge that you have given out here.
-Thanks, Asher
Hi Asher. 🙂 Unfortunately I only write about women’s patterns, as that’s what I’m specialized in. So also this pants block is not for menswear. If you want to add a pleat, you can use the original pants block and pivot it from the knee line up to add extra width on both sides of the front piece waistline: the side seam and the c-front. That way you get the extra volume needed for the pleat.
Hello! I clicked on this from the “You Made It!” email dated 1/15/2110 (One week later today).
My question is- (please forgive my ignorance) how does one measure. around their waist with elastic? Can this be done if you don’t have anyone measuring you? (by yourself)?
Hi! The elastic is placed on the waist just so it’s easier to see where the most narrow point is, so it’s not being used to taking the measurement. You’ll need the measuring tape, too. 🙂 You’ll probably be able to take most of the measurements yourself, but you’ll need help with the back width, back waist level, and armscye depth, as they are measured from the back side.
This all looks so helpful. I am looking forward to trying it out. Just wondered if the basic pattern includes seam allowances, or is that measurement up to the sewer?
Awesome. 🙂 Basic patterns are usually without seam allowance, as they are only the patterns used for drafting the actual patterns. It’s easier without seam allowance. So you need to add the desired amount of seam allowance when you’re cutting your toile fabric.
Ran across this blog while watching WithWendy on Youtube. Thank you for making this easy. My toile was a perfect fit for my niece! I feel accomplished as a beginner.
That’s awesome! I’m glad your pants block turned out perfect. 🙂 You did a great job.
Hi, I’m having an issue with regards the back waistline of the pattern. I’m making one for my cousin who is in the plus side of sizes and the back waistline extends past the line that separates the front from the back pattern. What do I do now? Thank you!
You could eliminate the dart, or make it smaller, and maybe incline the c-back seam a bit less. This way the back side seam moves inwards.
Are seam allowances included in this pattern?
No, unless you add them yourself afterwards. But generally the basic pattern blocks are without seam allowance.
Why the back cut always bigger and higher than the Front cut
The back side needs more fabric because it’s bigger. And it also needs to be higher because when you sit down, the back waistline gets pulled downwards due to the crotch seam.
Am I the only one that thinks the measurements provided for the extension at the crotch line for the front and back are possibly switched? My front looks larger than my back.
The front is on the left side. It should automatically become larger than the back, because the back side measurement is “front crotch extension measurement+3cm”
THANK. YOU. Listen, I have tried on a million pants and i have a curvy figure and a very high waist. So no industry pants or pant patterns have ever fit me, and i couldn’t seem to do anything to make them fit, even if i bought them a size up and tried to tailor them. I always got the dreaded camel toe or crotch wrinkles. Your tutorial was so easy to follow for what is actually a very complicated, somewhat intimidating thing to do. I followed this to a T and got a very well fitting muslin, just a little too tight. I took out the seams a quarter of an inch and voila, perfect fit. I can’t tell you how excited i am- i can finally wear pants now! Brb while i make ten pairs of my new pattern.
You’re welcome! 🙂 Wonderful! Yes, it can be tricky to find well-fitting RTW pants. I’m happy to hear that this pattern worked for you without struggles. Happy sewing! 🙂
Whoops. Forgot to mention the confusing part where you show your sample measurements and indicate the circumference of your hip is 48cm (I believe that’s half the circumference). Later you mention take 1/2 the hip measurement and you use the 48cm as an example… which would be correct. So 48 cm can’t be full circumference while at the same time 1/2 hip measurement. Glad to see all the success, but I feel like mine is just a little off.
I’m sorry you’re finding the instructions confusing. Yes, the 48cm is 1/2 hip measurement, as mentioned above the measurement box. I think it’s easier to divide the horizontal measurements in half right at the start, because the pattern only covers half of the body, so you don’t need the full circumference measurements at all. Also this way you already have the half measurement ready for the subsequent calculations.
Hello! Just found your sight and I love it! May I ask if you will be creating/putting up for sale a basic pants block like you have done with the basic bodice block? Thank you!
Hi there! 🙂 Thank you. To be honest, I’ve been a bit reluctant about the pants block, because it’s more complex and therefore I find it’s always better to draft with one’s own measurements. The industrial measurements are quite restricting for a pant.
Hello,
I would like to ask about the back crotch calculation. You say divide hip measurement by 8 then add 3cm.
Your example 48cm/8 = 6cm. Back 6cm + 3cm = 9cm.
If the measurement was 64cm/8 = 8cm would I still use the calculation of 3cm?
Example 8cm + 3cm = 11cm or would it be 8cm + 4cm = 12cm.
I do hope, I have made myself clear.
Many thanks
Tricia
Hi! The 3cm remains the same for different sizes, because you automatically get a larger number when the hip measurement grows. Then you can adjust the pattern when doing the fitting, if needed. 🙂
Hi, thanks for your great tutorial – could you please tell me on the grain/cresaeline
“To find out where it is, measure the distance between points A and B along the crotchline of the front piece, and divide it in half. Square up and down to complete the crease line/grainline.”
Where are points A and B – I’ve looked and looked but cant see them!
Many thanks
Dawn
You’re welcome. 🙂 The points are at both ends of the front crotchline, so the second point is at the side seam. You should see them where there’s number 8 in the picture.
Hi, thank you for this great reference! I’m a little stuck before cutting out my pattern pieces. In steps 12 and 13, it looks like the hip curves (between the waist and crotch) overlap. How is it possible to cut out two overlapping curves along the straight line drawn in step 2? Thank you!!
Hello! You’re welcome. 🙂 You need to trace the pattern pieces onto another paper. You shouldn’t cut the original draft. This way the overlaps won’t matter.
Very clear and concise! Thank you for sharing your knowledge 🙂
You’re welcome. 🙂
Hello! I tried this tutorial and almost everything went perfectly! I just had a few questions:
1-I’m assuming the finished pattern needs the seam allowance to be added, correct? I imagined yes, sorry if it’s a dumb ask!
2- When it comes to the first fit…it’s meant to be pretty body shaping, right? I had to unpick the side seam all the way to my upper hip so that I could pull the toile pants over my hips. (it was a cotton muslin). Since there is no stretch, I should assume I’d add ease somewhere of like, a zipper?
I’m definitely buying the pants pattern making guide! I want to try and understand pants construction better, then adapt a vintage pattern I own and modify my block pattern to suit it, instead of the other way around if that makes sense…. thank you for the tutorial!!
Hey! 🙂 Glad that you managed to draft the pants pattern.
Here are the answers if you still need help:
1. The pants block will remain without seam allowance, so you only add it when cutting the fabric. If you prefer, you can add it to the paper pattern you use for the toile to test the fit, but once you have the final version, leave it out. That way the basic block is easier to trace for your actual pant pattern projects, plus it’s easier to make pattern alterations without having to think about the seam allowance. 🙂
2. Yes, this pants pattern is quite fitted at the top section. Below the hipline it’ll be more loose-fitting. You can add a zipper at the side seam or at the c-back for a simple style. The fit can be then altered based on your project, as you’ll find out in the pants guide.
Hey it was really helpful.
Just a question .
there are basic trouser blocks that have darts on both front and back. how do we do that ?
and the back dart is big lengthwise compared to right dart?
Correct me if I am wrong.
Hi. 🙂 If you want to add a dart to the front, too, just add that extra width to the side seam of the front piece, so that you can then remove it when you close the dart. It could be even just 1cm wide. Yes, the front dart is smaller than the back dart.
I am a little bit confused from number 9 ,is the hemline the Ankle circumfrence?,how is thr hemline circumfrence mensured?
It’s a standard measurement for a classic pant hem size M. So it’s not the ankle measurement. You can take any basic/classic pants that you already have and like the fit. Measure the hemline circumference and use it as a reference for your pattern. 🙂 Otherwise you can use the one in the tutorial for the toile and see how it goes once you try it on. Then adjust it. In any case, you’ll end up modifying it once you get to drafting your actual pant patterns using this block, as each pants style can have different hemline sizes.
What does “walk” the inseam mean?
It means basically checking the pattern pieces the way the seams will be sewn together. You’ll find an explanation here: https://www.theshapesoffabric.com/2021/05/04/pattern-making-basics/ If you’re on my mailing list, there are links to a basic bodice tutorial video in one of the first emails. In the video you’ll see the walking method in action. 🙂
Hi, and thanks for the post!
The waist and hip circumference are strangely small. Did you mean inches instead of centimeters?
Also, should you divide the waist circumference by four instead of two in the example waistline calculation?
You’re welcome. 🙂 Yes, the initial measurements have already been divided in half because the pattern only covers half a circumference. They are centimeters. As a consequence, I’m then only dividing them by 2 instead of by 4. I think it’s easier this way. 🙂
I really appreciate that.
You’re welcome. 🙂
If I would like to sew for a different size how would I know how long and how wide my back dart would be? Is there any formula? How did you know for he size it was 10 cm. Thank you so much for the very good instructions for which I was looking for a long time and you haven’t over complicated it.
Thank you. 🙂 I usually always add a 2cm wide dart, unless there’s not a lot of difference between the waist and hip circumference. Otherwise the back side seam will not look right. Once you draw it, you’ll see if that happens. Then you can make the dart smaller or even leave it out. There isn’t really a rule on the dart length. The wider the dart, the longer it is and vice versa.
First of all, I wanted to thank your for this tutorial. Retail doesn’t suit me, neither do premade patterns and I had no idea how to make my own. Thanks to you, I know where to start.
I didn’t follow the whole tutorial as I was only trying to get the basis for maternity pajamas drawstring shorts. So no darts, no fitted legs, no crease… and I wanted something really loose fitting. I added 8 cm to my 1/2 hip measurement (it rounded nicely) and figured that would be plenty. Then I followed steps 1-7 and went straight down to the desired length. I made a toile, tried it on, and was surprised to find it quite tight around the back (and ridiculously loose at the front).
It made sense when I checked my “back hips” and “front hips” measurement : my 120 cm circumference doesn’t divide in 60+60 but in 70+50 ! So instead of separating my 70 cm-wide rectangle in halves of 35 cm in step 2 (remember, I arbitrarily added 8 cm to the 1/2 width), I guess Ishould have done something like 40 (back) + 30 (front). Would that fix the issue ? Are there other things I should consider modifying ?
Thanks again !
Hi Auriana. Sorry for the late reply. I suppose you’ve already figured this out, but just in case you haven’t.. It’s always a good idea to draft the basic pants block first and then do the modifications. You’re right to add more ease for pajamas. To decide how much ease to add, you can place a measuring tape around your hips adding the full ease (in this case 2x8cm) to your full hip circumference. I think even just 2x4cm might be enough here as we usually don’t want too much extra bulk around the hips. You can straighten the side seams from the hipline up. The back leg should be wider than the front leg because there’s more volume on the back side. You could move the side seam so that the back side gets more volume and the front side less. It sounds like you might need to shift the crotch points as well: shorten the front and lengthen the back.
Thank you, it was really useful and practical and I really enjoyed your explanation because it was easy and understandable 🙏😍❤️
You’re welcome. 🙂 I tried to explain the pattern as simply as possible.
Maybe my body is weird but my waistline passes over the halfway line of the hip line, so a dart is non existent.
If there’s not a lot of difference between your waist and hip measurements, the dart might not be needed at all. You can also reduce the inclination of the c-back line slightly. These instructions are for women’s pants, but if you google men’s pants pattern pictures, you’ll notice that the back side seam is often quite inclined, especially when there are darts. I’m using this as an example because men typically don’t have as much difference between the waist and hip measurements.
Hello! Thank you so much for this tutorial. May I ask how do we put a zipper on this block?
You’re welcome. 🙂 I prefer to put the zipper at the c-back, ending at hipline. You could also place it to the side seam but that’s slightly curved so it’s a bit trickier.
Hi!
Thank you for a clear and descriptive guide! My measurements puts my hip line below my crotch line… is this okay? How would I go about drafting the pattern for example in step 4 and 5?
You’re welcome. 🙂 Hmm..I’d probably use a so-called visual hipline initially to draft the pattern and then enlarge the side seams by the required amount after the rest of the pattern is done. Just take another hip circumference measurement somewhere around 20cm below the waist so that you know how wide the pants need to be at this level. I have a pant fitting tutorial. It should be linked below this article.
Hi, a late thank you for your answer!
I am picking up the pattern making again and used the visual hipline as you said and made the pattern but I got stuck at checking the seams. The inseam was okay, I had to lower the back a bit but not by much, but the front side seam is about 1 cm longer than the back side seam. How should I fix this?
I am wondering if I need to add in a dart at the front also? That would make the side seam line straighter which would make it shorter if I am correct… My waist circumference is 63 cm and my hip circumference is 91 cm at the visual hipline and 93 cm a bit lower. Is there too much of a difference between the measurements? I don’t fully understand when and why to add a dart in the front.
Super thankful for help!
1cm isn’t that much. Is it at the waist or at the hem? For example, if it’s at the waist, you can draw a new waistline that balances the lengths at the side seam: remove 0,5cm from the front and add 0,5cm to the back side seam. However, as your waist is quite small, you can also add a dart to the front and straighten the side this way. 🙂
Hey! Can you please share a few tips on how to convert this draft method to a kids trouser block? Loved how easily and pictorially convenient method you’ve shared for drafting trousers. All love!
Thank you so much. 🙂 Unfortunately I’m only specialized in womenswear (adult) so I’m not able to help with kidswear patterns. I’ve seen a few books dedicated to those, so if you’re interested in learning more, you could start with one of them.
Hello, i have a question about the side seam. Should it extend the side leg seam all the way up to the waist, or should it blend between the side leg and the side waist?
I am asking because i notice at my waist, the side seams of my toile are not at the true side seam at waist.
Hi. If you haven’t resolved this yet: the easiest way to adjust the side seam position is to make a toile, wear it, and draw the side seam where you want it to be. Then, modify the pattern pieces accordingly. 🙂
Wonderful tutorial!! Thank you for sharing all this information!
Is there a reason you recommend the zipper to be at the center back instead of the center front? Is there any reason that this method wouldn’t work for a straight instead of curvy body other than perhaps not needing the back darts? In other words, would this method work for drafting a basic pants pattern for a man as well?
Thanks so much! 🙂 Yes, you can place the zipper to the front or side seam as well. The basic blocks usually have the opening at the c-back.
This one is for women’s pants. The men’s trousers are a bit different due to the different body shape. I haven’t tested this for men but you can try. You’ll probably need to adjust it while fitting.
Hi Minna! Thanks for sharing and putting in so much detail and effort into your tutorials, I’ve followed your corset style bodice tutorial before and love how mine turned out.
At the moment, I’m wanting to up-cycle a pair of jeans that are too big for me and thought I could pull them apart and recut the pattern to fit me, but I want to make them more fitted from waist to knee, then slightly flared from knee to ankle, like a sort of shaping bootcut jean.
Would you happen to have any advice on how I might be able to change the basic pattern around to create that design? Any help would be very much appreciated please!
Thank you! Xx 😊
That’s wonderful! 🙂 I’m happy to hear your fitted bodice turned out great. As for the pants, the basic block is rather snug at the top, so you’d probably just need to shorten the back crotch curve a bit to remove extra volume, and also reduce the side seam width below the hipline. Then, start curving out slightly above the knee line to get that flared look. Add the same amount to the front and back pieces so you maintain the proportions (the back piece should be larger). And also, add the same amounts on both sides of the leg from the knee line down. It’s a good idea to test the pattern so you get the correct fit. Pants can be quite tricky.
Thank you very much Minna! Pants are definitely tricky for me so I really appreciate your help and advice for this pattern, you explain things so well! I’m looking forward to starting this project soon! Thanks again! Xx 😊
You’re welcome! 🙂 I hope your pant project turned out successful.
Had to come and say THANK YOU. I’ve been struggling with pants patterns and finally decided to draw my own. This was so easy to draw and I just fitted my first draft – couldn’t believe my eyes when I realized it was almost perfect! Tiny adjustments to the crotch and I’m ready to replace all my ill-fitting pants with these ones! ❤️
Amazing! 🙂 I’m so happy my tutorial was helpful and now you’ll can sew pants that fit.
Thank you for the great teaching. I want to ask, while dividing the half of the hip to get the crotch extension. please is the ease added to the hip measurement also included while dividing to get the crotch ext? example hip 48cm ÷ 2 =24cm + ease of 2m. which will be 26. my question is this 26 we are dividing by 8? or we are dividing the exact hip which was 48÷2 = 24 then divide by 8? please I want to know. thank you as are awaiting your reply.
You’re welcome. 🙂 In this case, you use your half hip measurement directly and divide it by 8. So, 48cm /8 =6cm. That 48cm used in the examples is already half hip circumference. 🙂
Thank you 😊
You’re welcome. 🙂
Awesome tutorial. Love that these are written instructions. I hate watching videos.
This might be a dumb question, but do these instructions work for men’s pants too?
Glad to hear! So many people watch videos nowadays. This is more old-school. 😀 The men’s patterns are not exactly the same because of the different body shape. These instructions are specifically for women’s pants, so you might find more fitting issues to fix.
hello please I will like to know the best choice of fabric to use for this pattern. stretchy or non stretchy fabric?
This will work best with a non-stretch fabric. 🙂
Thank you so much. you are such a kind person. you are always taking out time to reply to every questions asked.
You’re welcome. 🙂 I try to get to all the questions, although sometimes it might take a while.
In step 6, on the second measurement, I’m getting a number that extends past the center line, which, according to the graphic, seems like it shouldn’t be the case. I’ve gone back and checked all my measurements and everything seems to be right up until here. Any advice? Or something I’m not doing right?
Don’t worry. That might happen sometimes. Especially if there isn’t much difference between your hip and waist measurements. For example, if you look at the men’s trouser pattern, it leans quite a lot towards the back side seam. You can reduce the waist dart measurement or incline the c-back seam a bit less to make the back side seam move towards right.
Hello! Thank you so much for this tutorial! I am walking the seams and, while the total seam length is the same on both pieces, a couple of the lines are a little off. The side seam from the hip line to the crotch line is two mm longer on the back and the crotch to the knee line is two mm longer in the front. Is this an issue?
You’re welcome. 🙂 If you’re still wondering this, it’s a good idea to start “walking” the pattern from the hipline. Go upward and downward. If some lines don’t match, find the point that’s halfway between the two and correct both lines. For the knee line, first check that it’s perpendicular to the grainline.