As the title suggests, this is a compilation of various raglan pattern alterations I have posted on Instagram over the years. A few of them you’ve seen here at my blog, too. But I included them in this tutorial as well, so you can find them all in one place.
There’s also one brand-new raglan pattern. We can start with that!
Raglan Cap Sleeve with Texture
The raglan construction works great with cap sleeves, as it already includes a conveniently placed seam that unites the front and back sleeve pieces.
I’ll show you how to draft the cap sleeve first. You can use a basic bodice or a dartless bodice; the idea is the same.
Trace your bodice pattern. You’ll need to add extra room at the shoulder point, so raise it by 1cm following
the grainline, and extend 0,5cm to the side, both front and back. Draw the new shoulder lines.
Then, unite the armhole notch to the new shoulder tip with a straight line. Measure these lines.

Trace the upper section of the basic sleeve pattern that goes with the bodice. For a cap sleeve, we don’t need more than that.
Unite the armhole notches with a straight line, extending 1cm on both sides, and then move the notches.
Draw a guideline on top of the sleeve cap. Then, using the measurements from the bodice, draw straight lines from the sleeve armhole notches to the guideline. These will not arrive at the existing central notch.
Find the new center of the sleeve along the guideline, as shown in the picture, and draw a line straight down from this point.
At the armhole notch level (the dashed line), mark notches at a 0,5cm distance on both sides of the central line. The one on the left is for the back sleeve, and the one on the right is for the front sleeve. Unite them to the sleeve cap with slightly curved lines, as shown. The cap sleeve draft is now ready to be traced.

Trace both pieces and attach them to the bodice as shown below. Match the armhole notches and adjust the shoulder curves if needed.
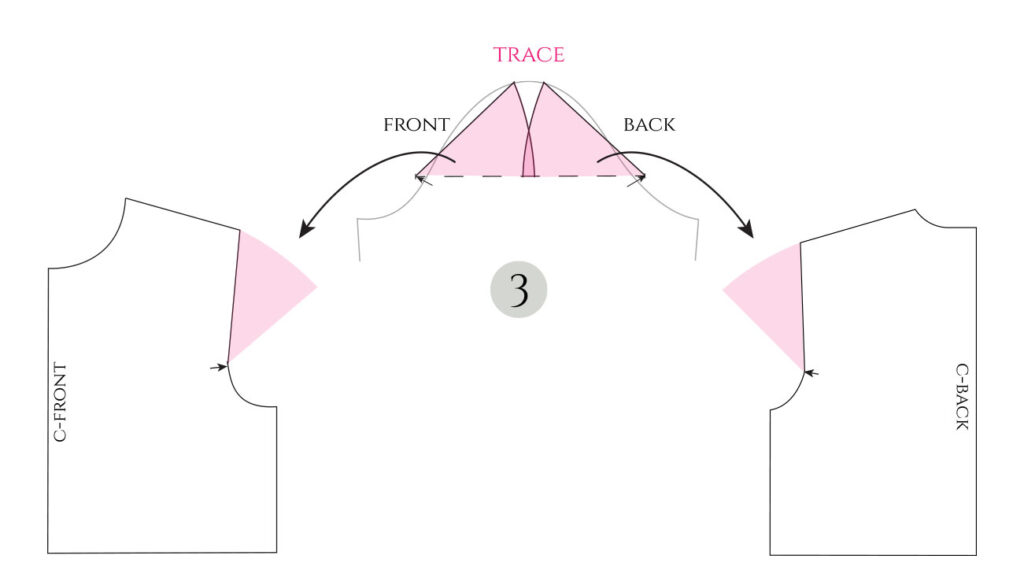
Now that we have the basic cap sleeve pattern, we can add the raglan seams and texture. In this example, we’ll divide both sleeve pattern pieces (or the upper section of the raglan bodice) into four panels and add a zig-zag shape to each. These will then be stitched at their base.
Decide on the length of your cap sleeve. In this example, the hemline is located only 5cm from the shoulder point. Draw the new hemline starting at the armhole notch.
Then, let’s draw the raglan seam. To create space for our panels, the front raglan seam starts 6cm down the neckline, and the back raglan seam at the c-back, 6cm below the back neckline. Both end at the armhole notch (although the illustration might suggest otherwise…). Make the lines slightly curved.
I also changed the front neckline shape a bit.
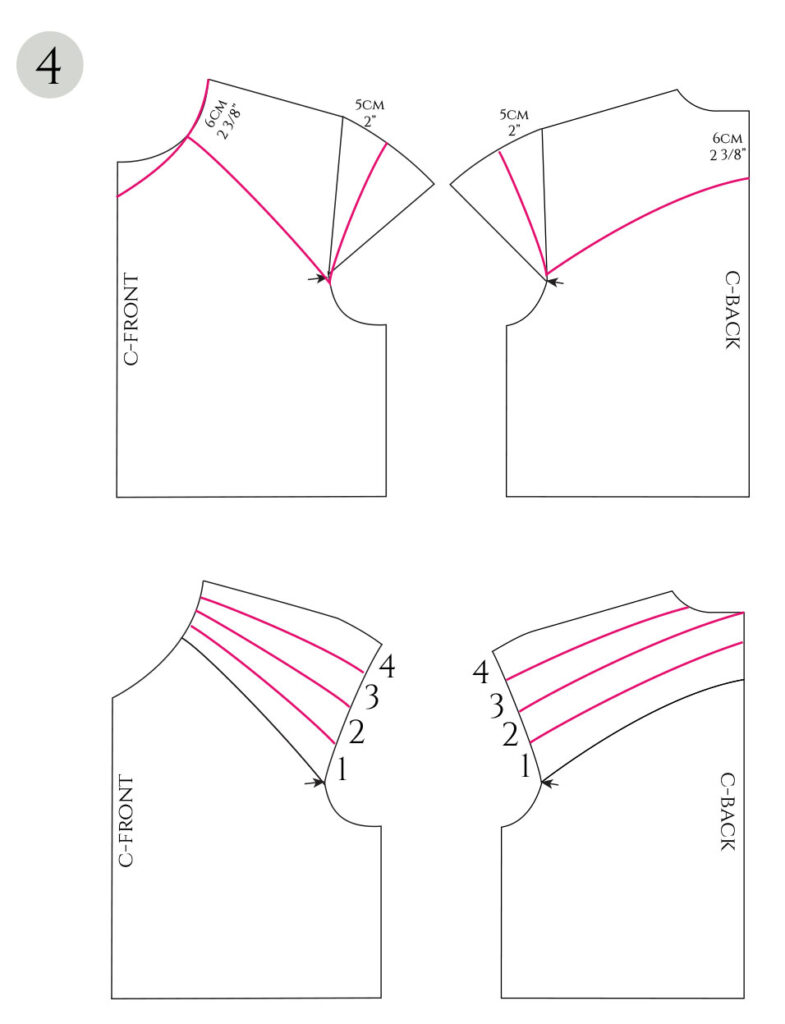
Divide the front and back sleeve pieces evenly between four panels. Try to make the lines as straight as possible to make it easier to add the zig-zag shapes.
I drew the zig-zag shapes on only one side of each panel, starting at the shoulder, and when it was time to trace the pieces, I turned each piece upside down to mirror the corresponding panel shapes from the panel to be attached to the one I was tracing. It’s because the pieces that will be sewn together need to match.
The bodice pieces will have a zig-zag-shaped raglan seam. My zig-zag lines extend only 3cm above the straight lines, by the way.

You can also include a facing, in case you want to create something more sculptural with the panels and need something underneath to maintain the original shape. Alternatively, just line the whole piece.

Sewing the Textured Raglan Cap Sleeves
There’s also a little video I filmed during the sewing process.
Here are all the pieces I cut, organized in the correct order.

Pin and stitch the panels right sides together. They look pretty similar, so it’s easy to mix them up. I stitched the sleeve sections separately first, and then attached the back pieces.
Trim the seam allowance around the tips and make a cut at each corner (see the arrows) before turning the right sides out. Press flat.
Then, attach the right and left side sections to the front piece and complete the last panel seams. I found that it was easier to keep the two sides separate for as long as possible.

After pressing all the panels flat, we’ll stitch along their base, where the zig-zag shapes start. With larger panel designs, you can also skip this step and create a more sculptural look. This one is more like a texture.

At this point, the side seams are still open. But now you can close them.

And here’s the result! As this example is made in a non-stretch fabric, it needs an opening at the c-back.

Raglan Bolero with Texture
Let’s continue with textures. This might look familiar. It’s from last year. I used the bamboo petal TR cutting technique to decorate the sleeves.
We’ll just use the upper section of the bodice.
I modified the front raglan seam so that it reaches the c-front and added an overlap for a button.
In the back, there’s a separate little bodice piece that will be cut on the fold. Check the fit of the back piece as it might gape.
Before adding the bamboo petal folds, separate the undersleeve section so the folds appear only on the visible area. The bamboo petals prefer a smooth surface anyways. The armhole notch is a good reference point. You can make the sleeves any length you want.

Divide the sleeve length evenly between the folds and match the lines along the outer seam between the front and back pieces. Then add volume with the slash-and-spread method. The amount is twice as much as the final bamboo petal width at its base: The bamboo petals are folded like box pleats, but they have a conical shape. They form symmetrically around the lines you drew. See the dashed line.
Remove the underarm pieces and slash towards the outer seam to add volume.

Trim off excess paper with the bamboo petals folded to get the correct shapes. Mark notches where the folds are, as well as at the tips of each bamboo petal.
With long sleeves the pattern pieces might end up overlapped as you add volume. This means you need to add an extra seam or two at the base of a bamboo petal (so it will remain quite hidden).
The half-scale toile made in cotton looks like this. The sleeves are elbow-length. You’ll find a few pictures on the sewing process here.

Here’s an update on that neoprene bolero I was making. It’s now ready! This one has long sleeves. I lined the whole thing using a plain version of the pattern (without the folds) to cut the pieces. Neoprene required stitching all the edges flat.

Here’s me with a black jersey dress and the bolero. The dress has short sleeves so with the bolero I kind of swapped the upper section of the dress and got long sleeves with a different texture.

Nyokitto Raglan
Here’s a raglan pattern that looks quite similar to the previous example on paper but turns into a sculptural sleeve when sewn. Nyokitto is a technique I picked up from the second Pattern Magic book. You can find another example here. It’s a skirt.
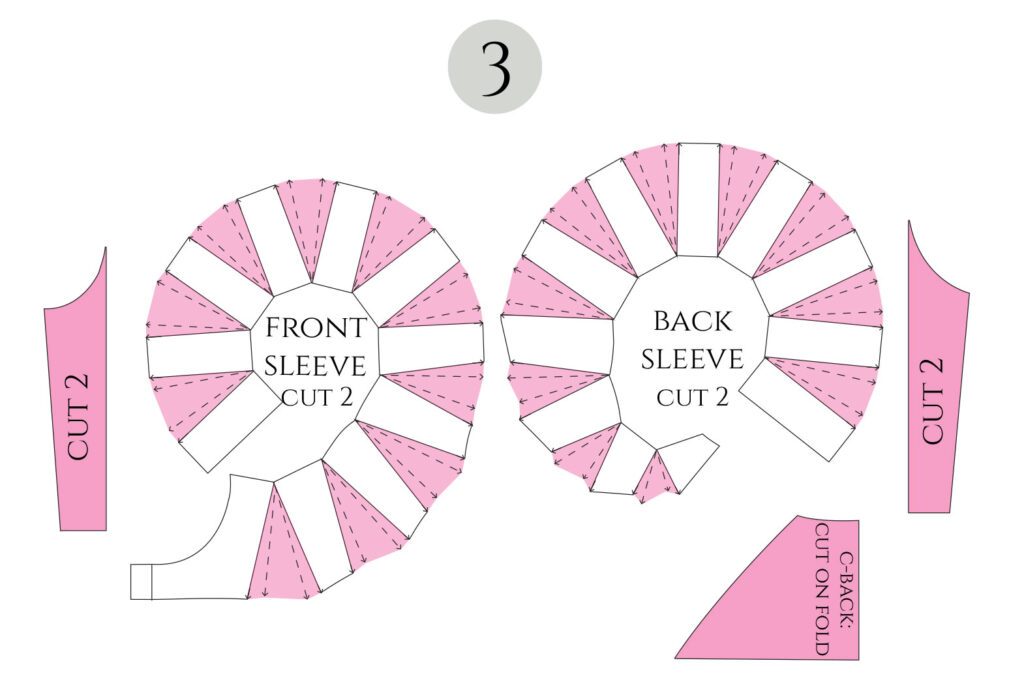
First, I separated a slice of the front and back sleeve pieces, parallel to the outer seam, so that I could add volume for the nyokittos. If you need to move the raglan seam to create more space for the sleeve pattern, remove the same amount from the bodice’s raglan seam.
Then, I drew diagonal lines to both pieces, matching them along the outer seam. This is where I then added volume with the slash & spread method.
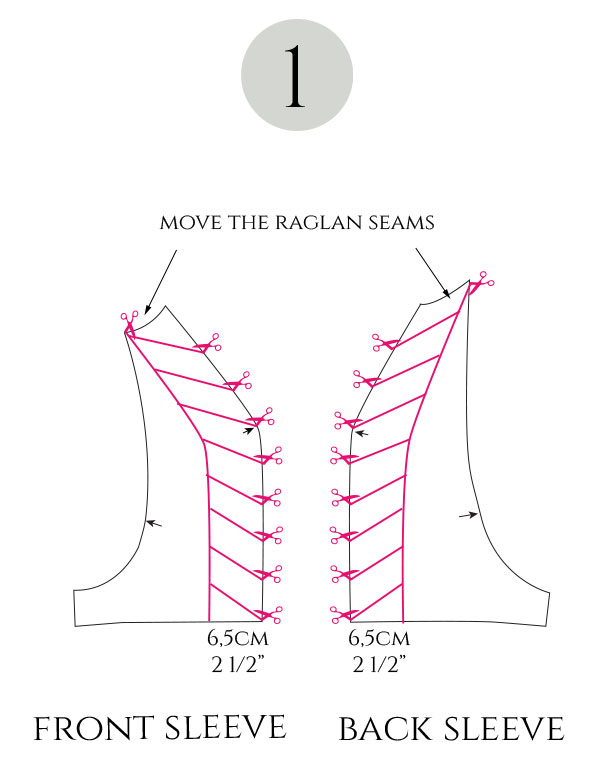
You see the amounts of volume I added in the illustration below. Add the same amounts to the front and back so the seams will match.
Additionally, I added an extra 2cm in the center of each volume to raise the pointed tips some more. As you can see, with the nyokittos you don’t cut the pattern folded like we do with the other kinds of pleats.
These pieces will quickly overlap, so you must divide them into two or more sections. My sleeves are short, and two pieces were enough.
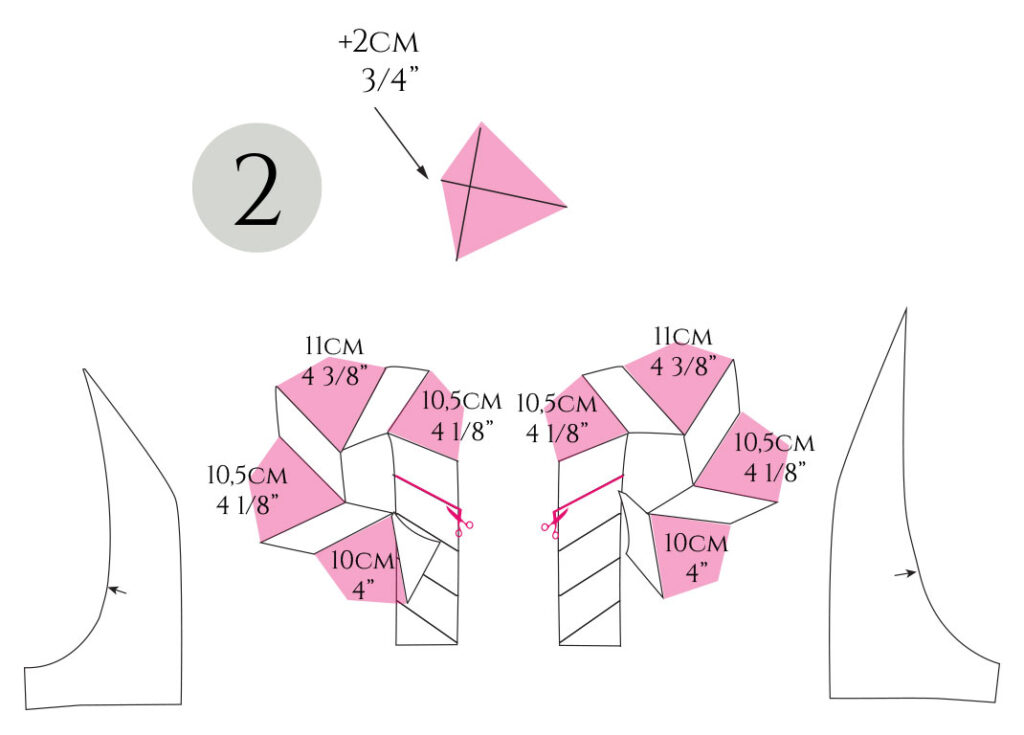
Here you can see how the separated pattern pieces continue by adding the volume right away. This way, the seams will end up at the base of the nyokitto. If you find it confusing, you can just complete the whole pattern first (even though it becomes overlapped), and separate the sections in the end.

Similar to the skirt I show in the article linked earlier, the nyokittos need to be stitched down on the wrong side where the tips are. I also have a video on YouTube where I sew the skirt if you’re interested to see how to stitch these.

The resulting look of this raglan pattern! The nyokittos kind of look like flames.

Sculptural Panel Raglan Sleeve
I’ve featured this sleeve before, in this article where I wrote about designs inspired by geometric shapes.
I started with a basic raglan pattern that was quite fitted. The edge of the front sleeve pretty much follows the raglan seam, but the front bodice piece ends at the armhole notch height to create this neckline shape together with the sleeve. The back pieces maintain their original raglan seam.
Both the front and back sleeves consist of three panels. The bodice pieces have also been divided into panels, absorbing the darts. I added an extra panel at the c-front. You might need to take in at the top of the front panel seams to remove neckline gaping.

Then draw curved shapes around the sleeve panels on both sides of each seam. You can see the measurements in the illustration below.
I made the central panel the highest. It’s at the shoulder, where the front and back sleeves will be sewn together. Try to make the curves as identical as possible.

Trace the six panel pieces of the sleeves. You can see the piece number 2 colored as an example. Adjust the panel shapes as you go, so that the seams that will be sewn together match. Some of these are a bit tricky to match.
These are the final pattern pieces:

The sculptural raglan sleeve looks like this. It’s in full scale here. I made the piece in rather heavy-weight cotton which helps maintain the shapes.
The whole bodice is lined. I used the original pattern pieces as they were, without the panels, only taking into account the neckline shape and sleeve length. You can skip the panel seams in the bodice and just sew darts.

Polyhedron Raglan
Of course, there’s a polyhedron design here, too!
You’ll need the basic raglan pattern. The sleeves are elbow-length.
Align the front and back sleeve pieces as shown, and then draw the central polygon shape at the top (the colored area).
Then fill the remaining area with polygons and triangles. Don’t worry if you go outside the sleeve, as I did here. Just keep it above the armhole notches.
Fill the rest of the sleeve center. The area to the left and right of the armhole notches will remain under the arm, so there’s no use adding polyhedrons there.

Decide where the highest point of each polyhedron will be, and draw lines from the corners to that point.
Align the bodice pieces with the original raglan seam of the sleeve and trace the new shapes.

I also modified the neckline to go with the polyhedrons, making it more angular.
Separate the two sleeve pieces, 9 and 10, and keep the rest of the sleeve pattern as a reference so that you’ll be able to sew the polyhedron pieces together in the correct order.

You then need to complete all the polyhedron pattern pieces as shown below, because otherwise the shapes will remain flat. Start by measuring all the lines and deciding the height for each polyhedron. In my example, there are various heights, depending on the size of the polygon.
Name the 3-4 sections of your polygon shapes and decide where to place the seam.
Then convert the inner lines (with the dots), so that the measurements will take into account the height. I have a video here for the technique that requires less maths. Alternatively, you can convert the measurements using the Pythagorean Theorem, as explained here.
After converting all the diagonal line measurements like this, redraw sections A-D using the new measurements and put them back together. Yes, this is a bit time-consuming…

This is what I got after preparing all the polyhedron pieces and sewing everything back together.

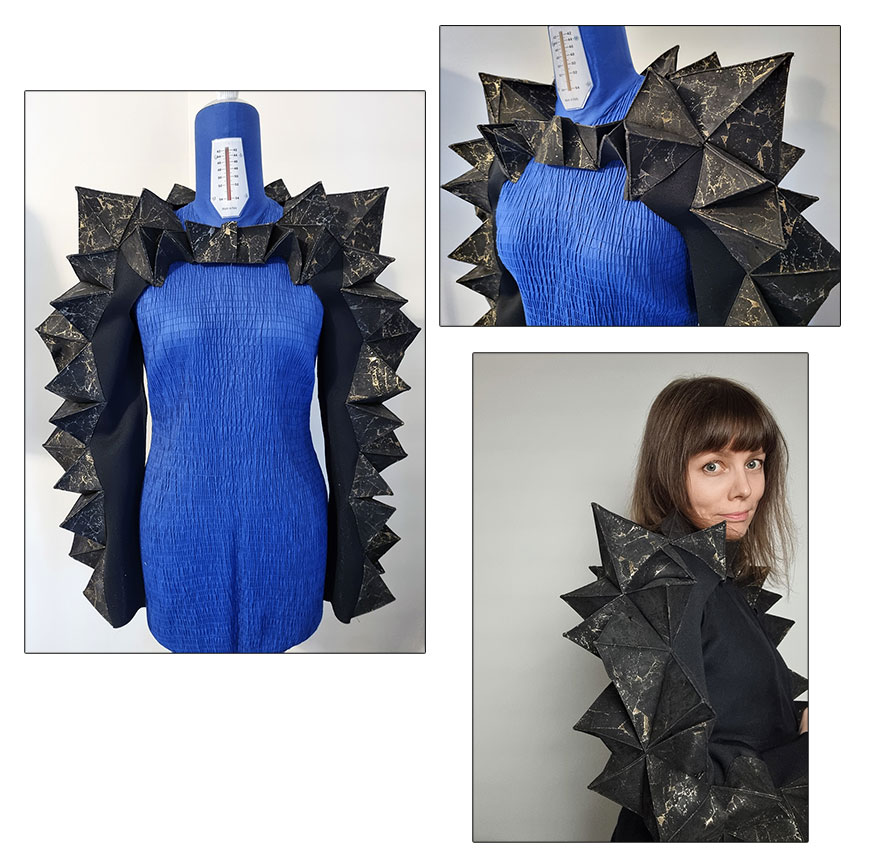
Later, I used this idea to make another raglan bolero with full-length sleeves. I found this gorgeous black cork fabric with golden details and combined it with neoprene.
Raglan Claws
Lastly, I’m including this raglan pattern with three claw shapes at the shoulder.
Since this is a short sleeve, you’ll need only the upper sections of the front and back raglan sleeve pattern.
The claw shapes will have a seam at the top edge, ending at the original shoulder line. Whereas the remaining (lower) edges end at the raglan seam. In this example, the first claw extends outside the raglan pattern by 8cm.
Draw the overlapping shapes as shown, making them as symmetrical as possible, front and back. They should fit in the area above the armhole notches. At this point, all the top edges end at the shoulder line.

Then, add a facing to pieces 1 and 2 (see the colored areas). These should be about 3-5cm wide at their narrowest points. After this, finish claws 2 and 3, completing the upper edges so they end at the raglan seam. The facing pieces will follow this line. It’s probably easier to understand by looking at the illustration.
Mark notches where the shoulder seams end.
Claw 3 doesn’t have a separate facing piece. Just cut two layers directly.
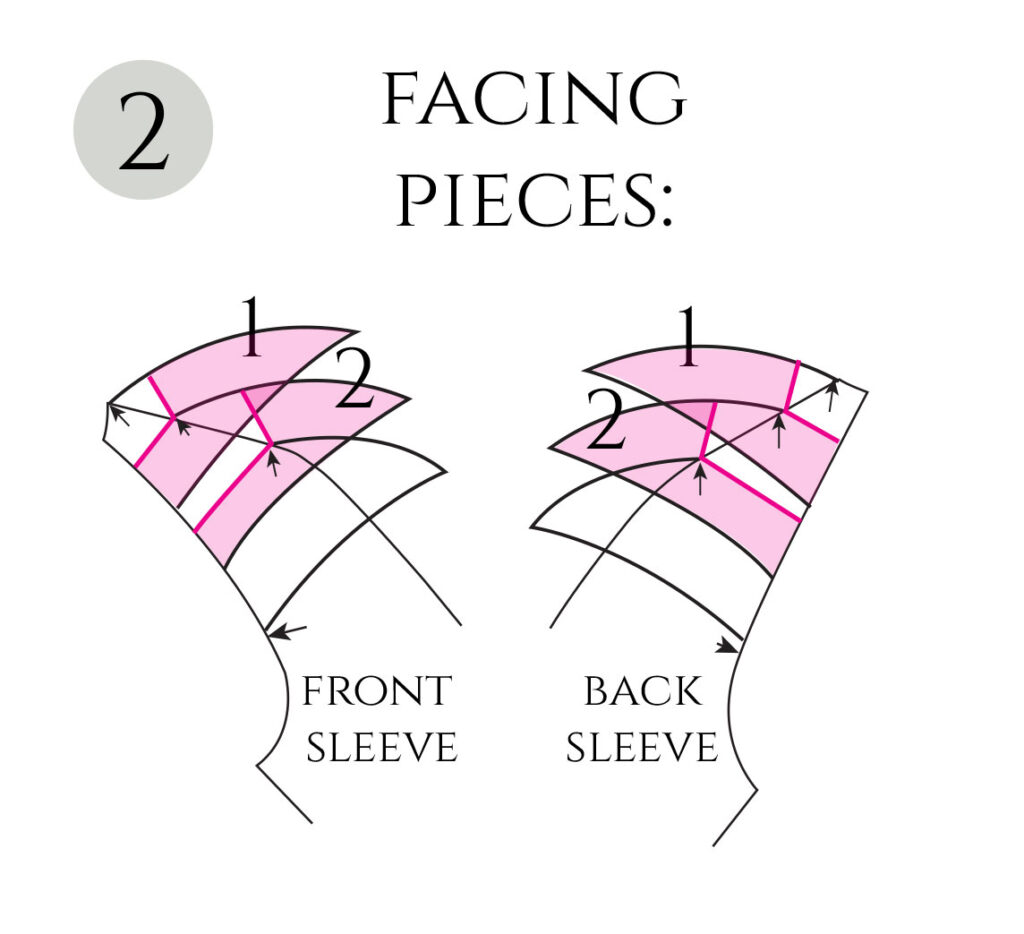
Trace the pieces. You’ll need two of pieces 1 & 2 and four of piece 3.

How to put all of this together? Start by sewing the facing to each claw’s outer edge and then unite the claws, following the notches. Each claw is attached to the base of the previous claw’s facing, starting at the notch you marked. After that, attach the 3-claw sleeves to the raglan seams.
I took a picture of the inside of the sleeve. The arrow points to where I “stitched in the ditch” to secure the facing to the main layer.

Here’s the piece on the mannequin.

There might be a few other raglan pattern designs hiding somewhere on my blog and Instagram, but these were the ones I managed to find. I hope you got a few ideas. 🙂


10 Comments
As always, your blog posts are so inspiring and detailed. I have really enjoyed your classes and I always anticipate opening up your emails with excitement as I know you will have something amazing to share. Thank you so much for your generosity in sharing so much of your work. ~ Stephanie.
Wow, thank you so much for your lovely comment! 🙂 I’m very pleased to hear this. My posts tend to become rather long so I always wonder if I’m rambling too much. 😀
I enjoy looking lat your pattern .Ty ! , for the beauty 😊
Thanks so much, Kathleen. 🙂 It’s my pleasure.
I LOVE ALL OF YOUR BLOGS!!!!! I am in the US, and I keep all of your emails, instructions and information. Thank you sooo much. I am going to try creating a few of the designs. They look like fun to make.
Peace and blessings.
Wow, thank you so much! 🙂 I’m very pleased that my tutorials are turning out to be helpful for so many people around the world. And yes, these were fun to make. 😉
Wow, amazing tutorial 🤩
The Bolero With Texture looks so great, I can’t wait to try making something like that.
And no, you are not rambling : you are explaining incredibly complex things with a lot of grace, and they became magically manageable.
Thanks A LOT 💖
Thank you so much, Julie! 🙂 So happy to hear. And I can’t wait to see what you come up with! Do send a picture.
I love when you give these challenging designs.
Glad you like them, as these kinds of things are my favorites! 😀