As anticipated, I indeed couldn’t resist leafing through the second Pattern Magic book after being so inspired by the first one. It yielded more ideas, and as a result, I have prepared another tutorial for you!
This book by Tomoko Nakamichi contains more interesting patternmaking techniques. In fact, the book’s cover immediately shows a sleeve made of accordion pleats, which are a fantastic way to create sculptural designs. I’ve used them quite frequently myself.
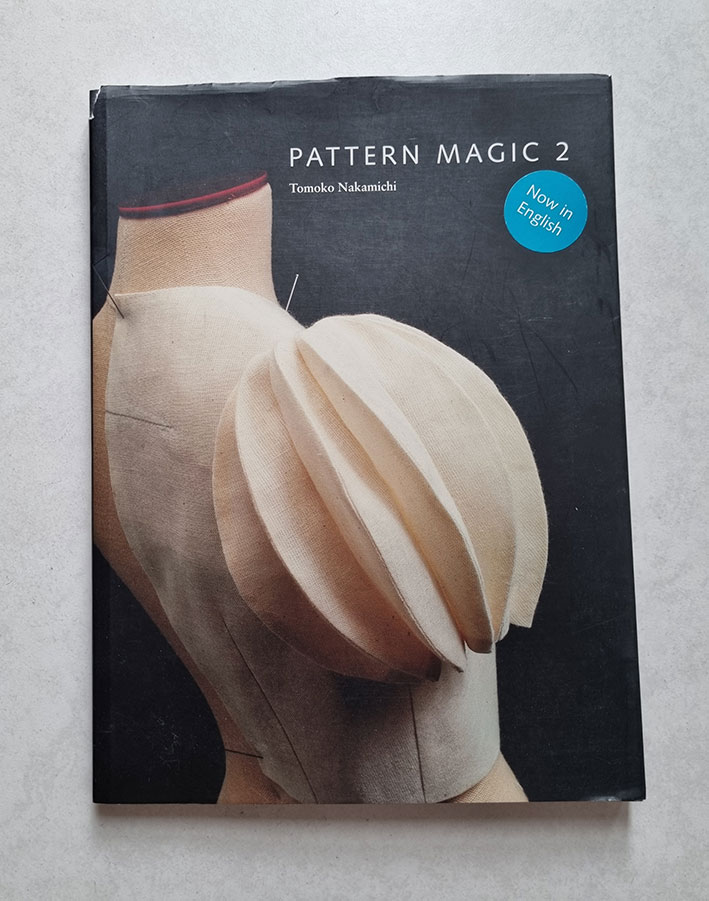
So, obviously, the accordion pleats inspired yet another design. Besides these, I explored the nyokittos, ending up with something quite interesting. However, there will be a few more subtle designs as well, don’t worry! 😀
The Knot Sleeve
Actually, let’s begin with one of the subtle designs. The book presents a couple of designs that feature knots as decorative elements, and these made me think of something.
Besides having the knot, tying it creates slight gathers around it, too. You can utilize the existing dart volume if you’re adding knots to a bodice with darts. Alternatively, you can add a bit of volume with the slash & spread method.
As a sleeve doesn’t come with a dart, I opted for the latter option.
The Pattern
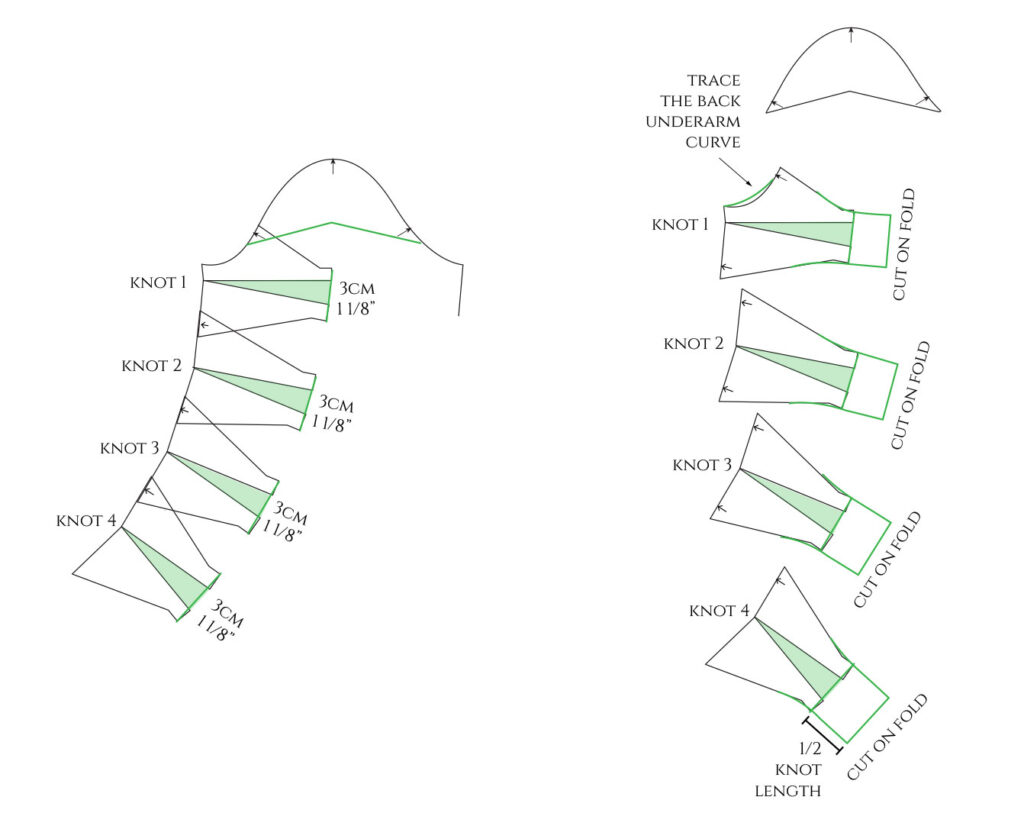
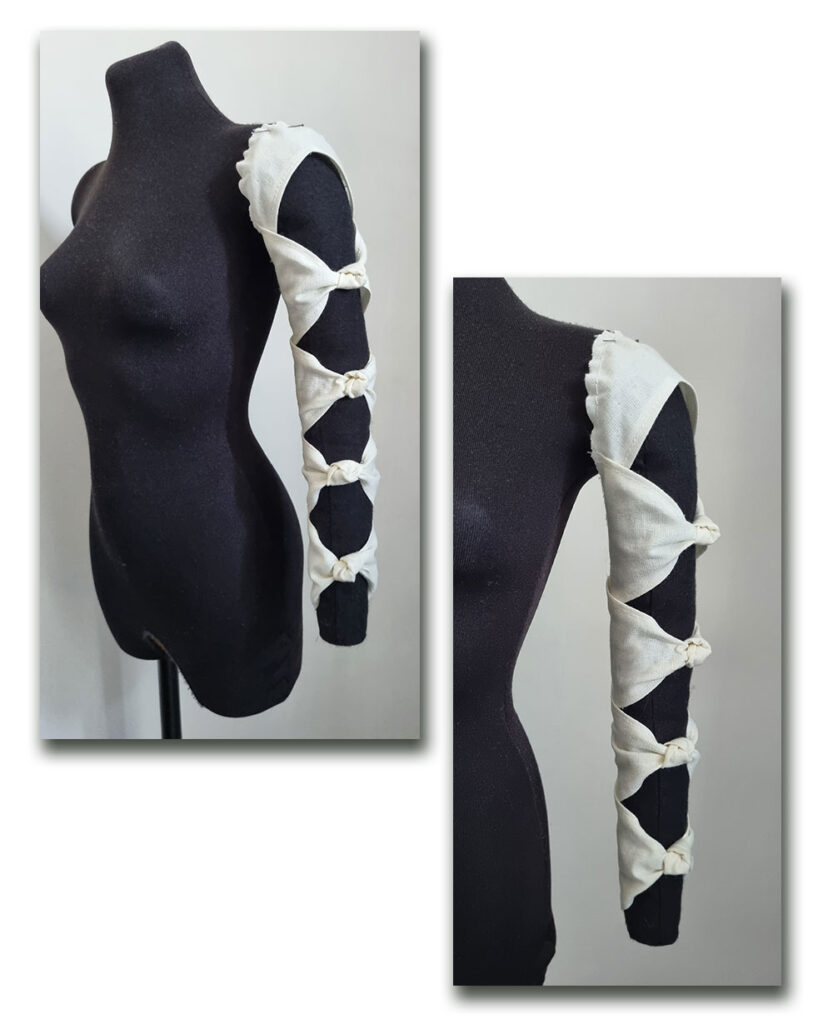
This is a long sleeve, so I added several knots. Four, to be exact. They are all separate pieces that will be partially overlapped.
The basic sleeve pattern is identical on both sides below the bicep line, meaning you only need to draft one side and cut the pieces on the fold.
Start by dividing the sleeve length between the number of knots you want it to have. Each line represents the center of the knot.
Draw a parallel line 2cm to the left of the sleeve’s central line (=grainline). This is half of the knot width.

Then, draw the shapes of the pieces around the horizontal lines. I colored knot 3 as an example, so it’s easier to see the shape. These shapes should be partially overlapped and end 2cm from the center of the sleeve, where you drew the vertical line. From there, they will turn into the strip that will be tied into a knot. Here, the strip is 3cm wide (for now).
You can opt for a cold shoulder look or include the sleeve cap, too. I attempted to replicate the gaps remaining between the knotted pieces when drafting the sleeve cap piece shape.
After this, you add volume to each knot by slashing & spreading where you drew the central lines. I doubled the strip widths by adding 3cm to each. Straighten the short edges of the strips when you’re done.
Mark notches along the inseam where the pieces overlap. You need to trace half of the pieces onto another piece of paper, including the notches.
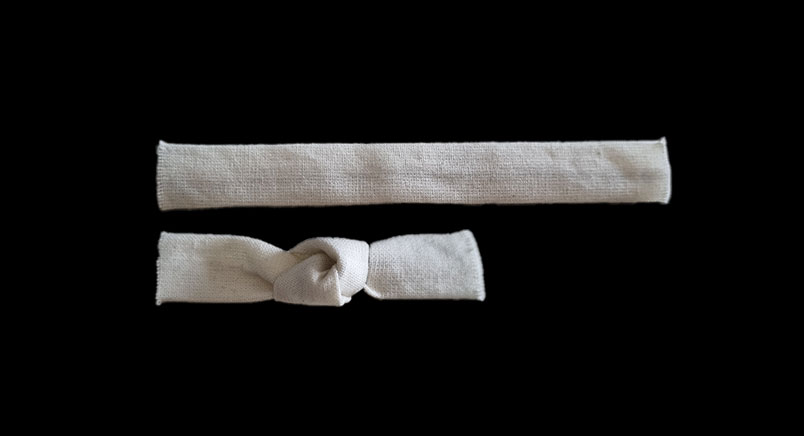
Before completing the pattern, you need to make a test knot: Now that you know the final strip width, which in this example is 6cm, cut and sew a random-length strip. For example, 15cm. It’s important to know the initial length.
Once you’ve turned the right sides out and pressed the strip flat, tie a knot. Then, measure the strip length again to discover how much extra length you need for the knot.
Add half of this length to your pattern pieces. (They will be cut on the fold.) At this point, you can finalize the shapes and remove any remaining angles.
The uppermost knot piece includes the underarm curve, so you either need to draft the entire piece or just trace the back armhole curve to the same pattern piece and trim off the excess fabric after cutting on the fold.
Sewing the Knot Sleeve
Here is one of the knot pieces that I cut on the fold. Besides at the inseam, cut notches also where the knot section starts and ends.
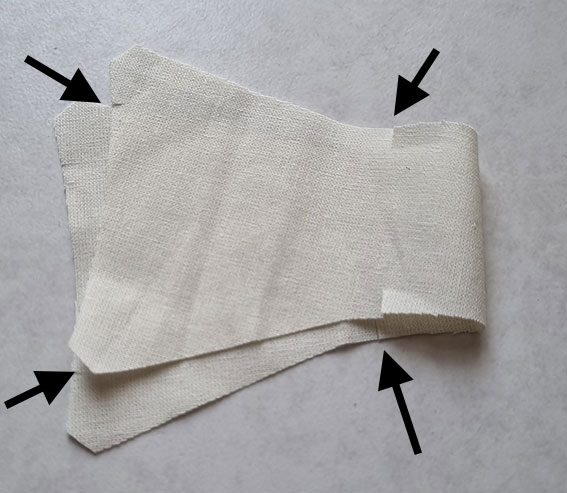
Hem the curved sections and close the middle section between the notches. The seam will end up under the knot. Then, tie the knot and check the size of the piece so it matches your original sleeve pattern width.
If it’s too narrow, tighten the knot; if it’s too wide, loosen it.
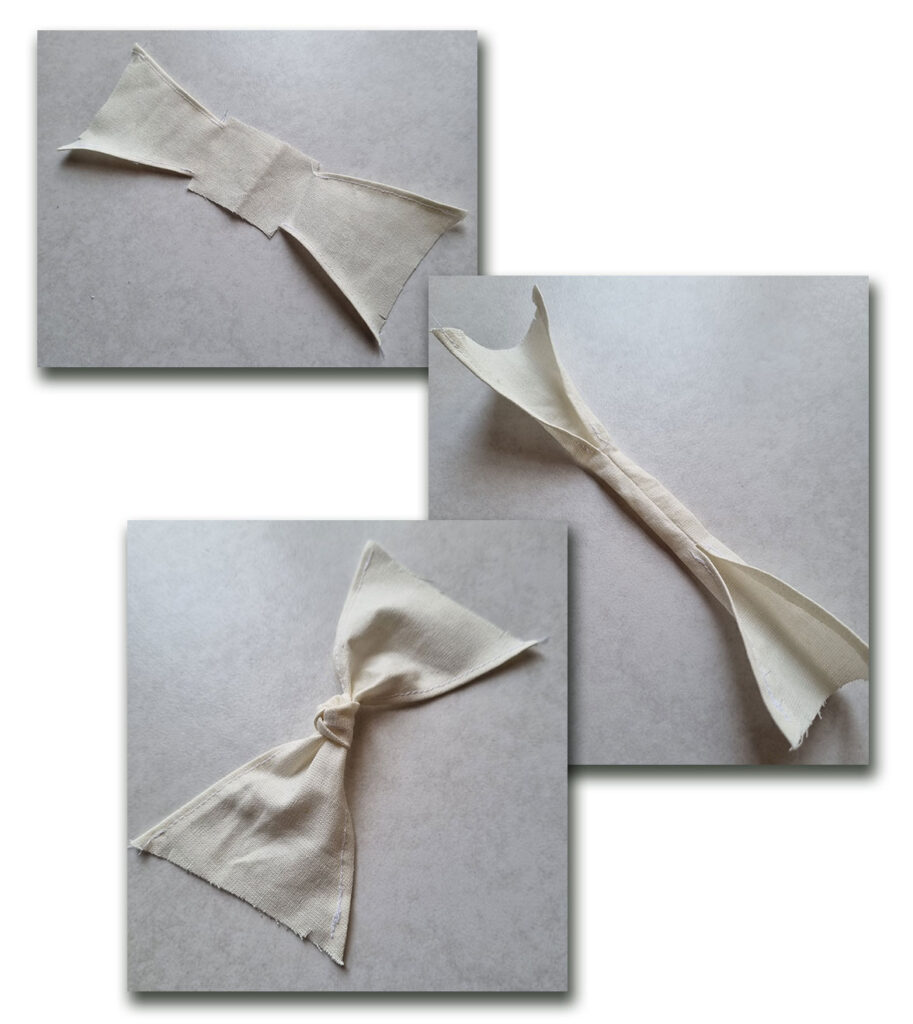
After preparing all the pieces in this manner, pin them together, matching the notches, and sew them to keep the pieces in place. Then, close the inseam of the sleeve. Finish the sleeve normally.
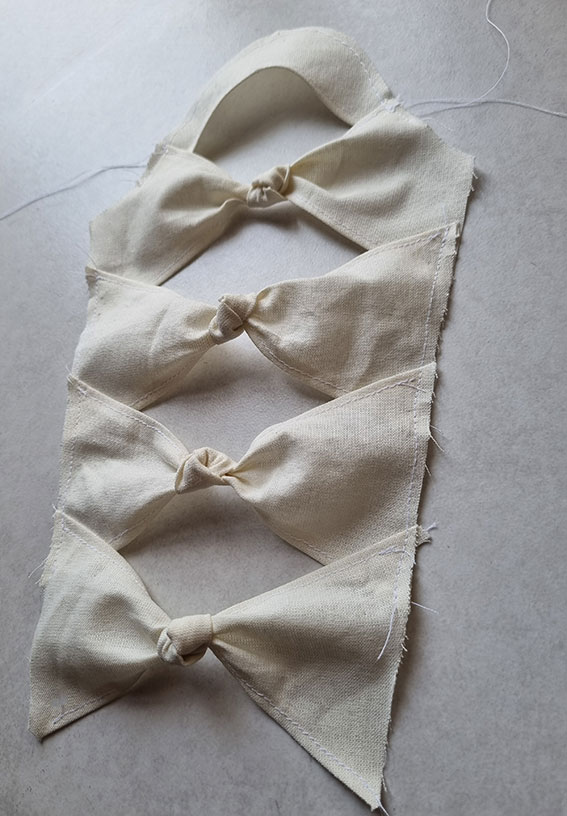
You can add more stitches if the overlapped sections tend to open too much. In my case, the sleeve is pretty snug, so the tension keeps the sections where they should be. I think a snug sleeve made in a fabric with a bit of stretch might work.
Like A Jungle?
Seeing this technique, I always kind of thought it would be great as an extra layer, because it leaves a lot of holes, and therefore you’d anyways need something underneath.
So, I decided to use it simply as a way to decorate the fabric. As in, stitching the extra pieces on top.
This might slightly deviate from the original idea but I think the basic technique remains the same: you draw the overlapped pattern piece shapes on top of the main pattern and trace them. In the book, these shapes cover almost the entire area.
I’ll show the simpler version first. This is a dartless bodice back, so the surface is completely smooth, and there’s no need to incorporate the darts into the design.
Decorated Bodice Back
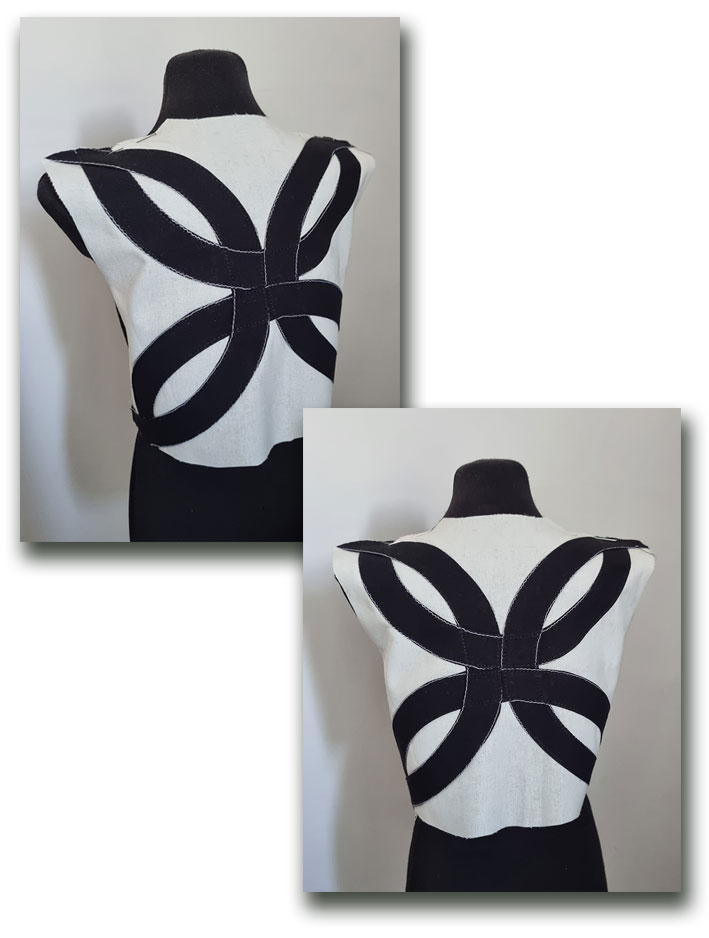
The design is symmetrical, which means you only need half a bodice. I drew these three curved bands that overlap in the center and at the outer edges. Pieces 1 and 3 will be cut on the fold.
You can draw any shapes you’re willing to sew and as many as you want.
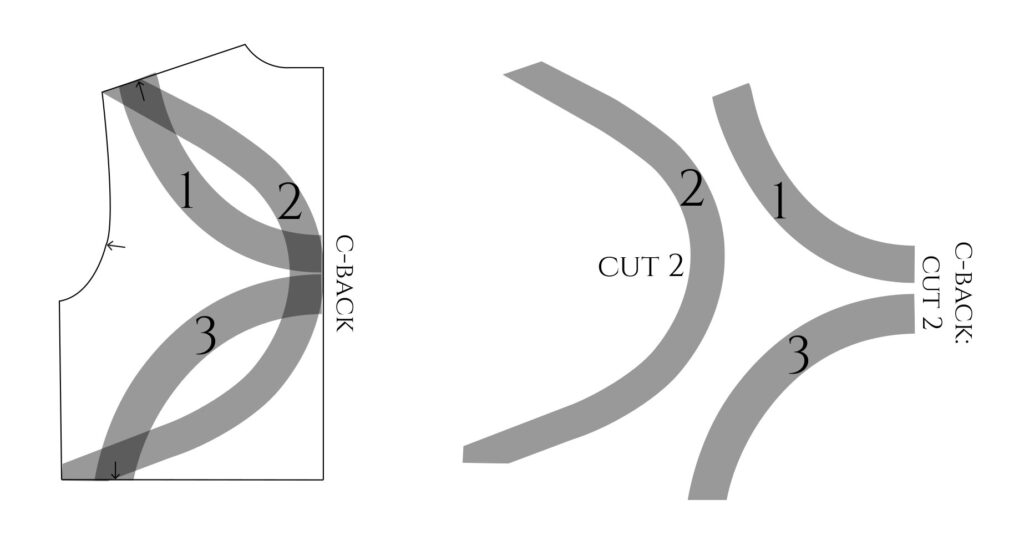
Trace the shapes onto another piece of paper and mark notches onto the bodice pattern where the bands will be sewn.
As mine are curved, I decided to sew a row of stitches where the edges will be folded down to make it easier to press. I used a white thread so you can see better where I pressed.
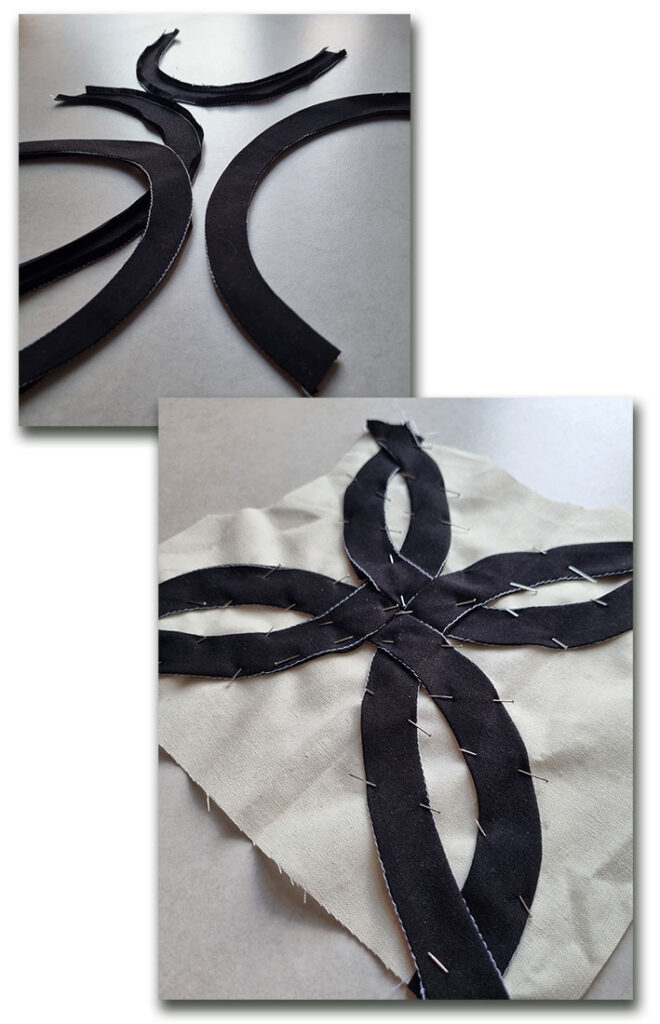
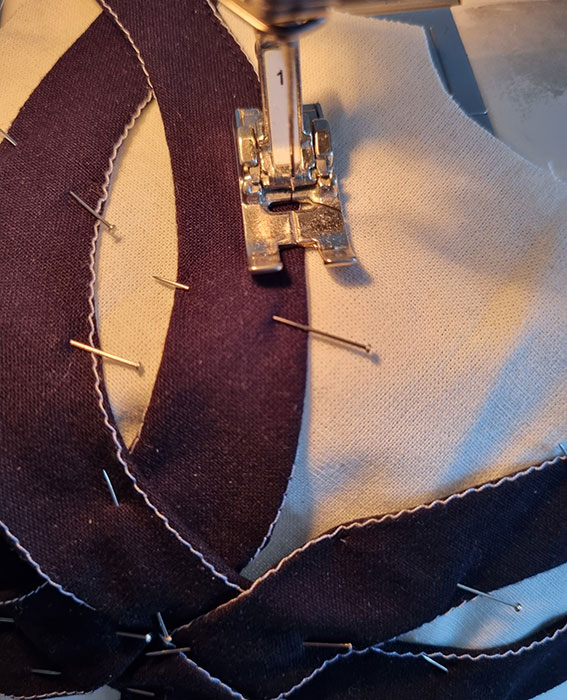
After pressing the strips, pin them in place and sew near the edges.
Here’s the resulting bodice back. As you can see, with just three curved shapes, we have created a Celtic knot motif. Or similar at least!
Puff Sleeve
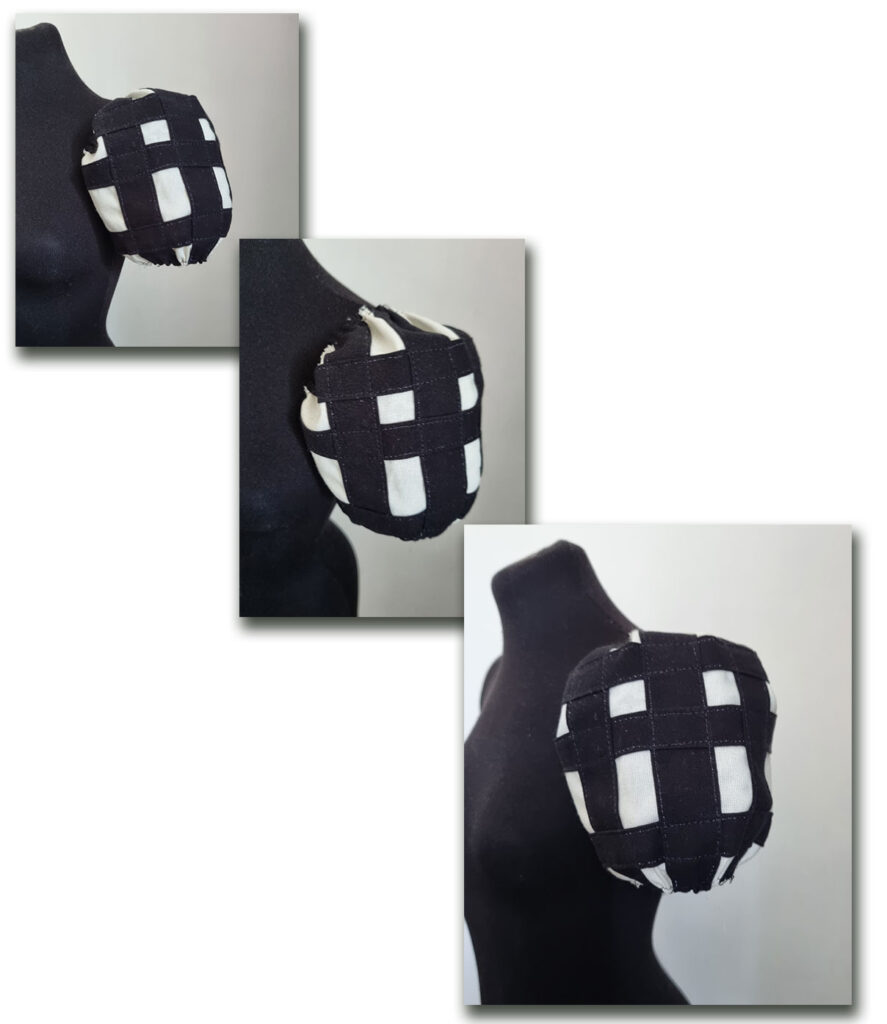
My second idea was a balloon sleeve with a box weave motif. This of course means the strips are completely straight. But there’s a tiny twist: gathering the sleeve brings them closer together.
First, we need to turn the basic sleeve pattern into a balloon sleeve pattern. I didn’t add much volume: Only 3x 5cm vertically, plus I raised the sleeve cap by 5cm.
Additionally, you need a sleeve cuff piece, but that’s just a rectangle.
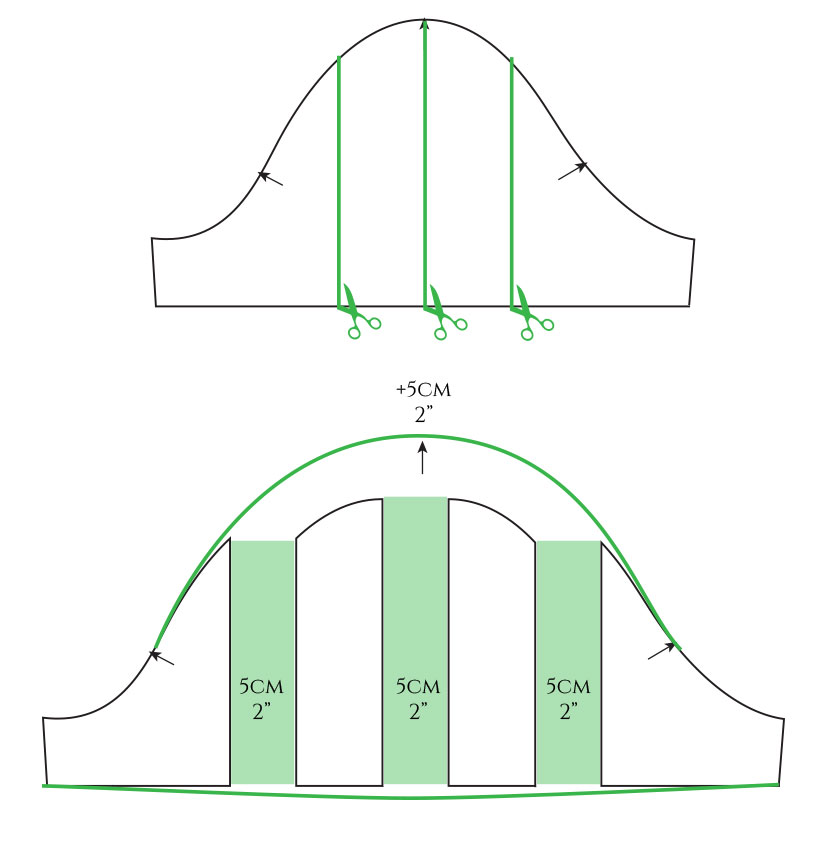
Now that we have our balloon sleeve pattern, we can draw the basket weave pattern on top. However, first, measure the bodice armhole lengths between the armhole notches and the shoulder tip, separately for the front and back.
This is approximately the total measurement that will be covered by strips 1-5, as shown below. If the front and back measurements differ (which they usually do), use the smaller measurement.
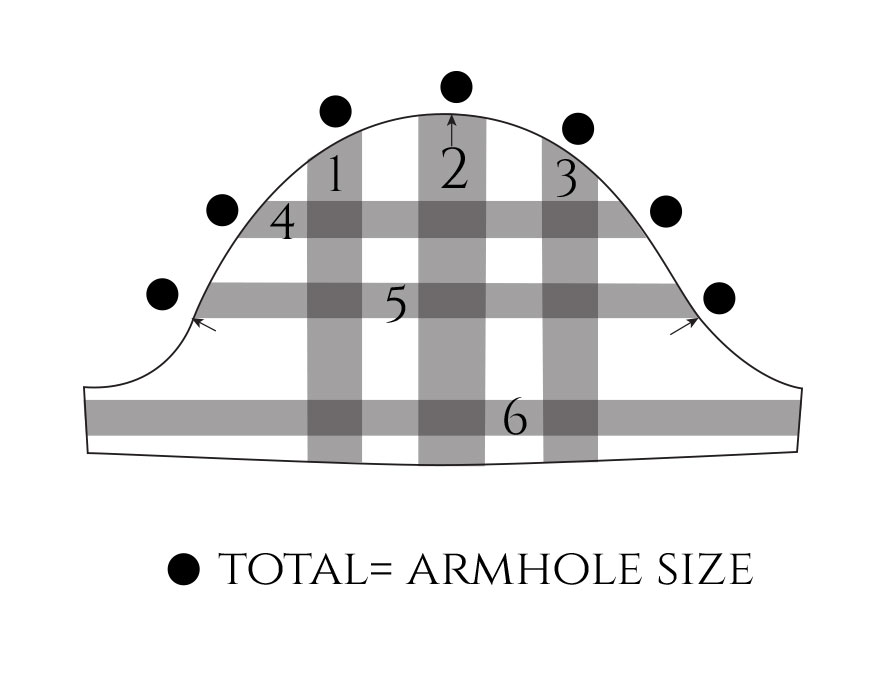
Trace the strips onto another piece of paper. Add notches along the sleeve cap where they will be sewn.
The edges will be folded before pinning and sewing the strips in place. If you don’t care about the sizes, you can even use ready-made ribbons. I created a basket weave by overlapping the strips.

Sew two rows of gathering stitches along the hem and between the armhole notches at the sleeve cap. Mine is half-scale, so I only sewed one row.
Gather the hem to match the sleeve cuff length and attach it. Gather the sleeve cap to match the armhole of the bodice. Close the inseam and finish attaching the cuff. Mine is just a sample so I didn’t bother with the cuff.
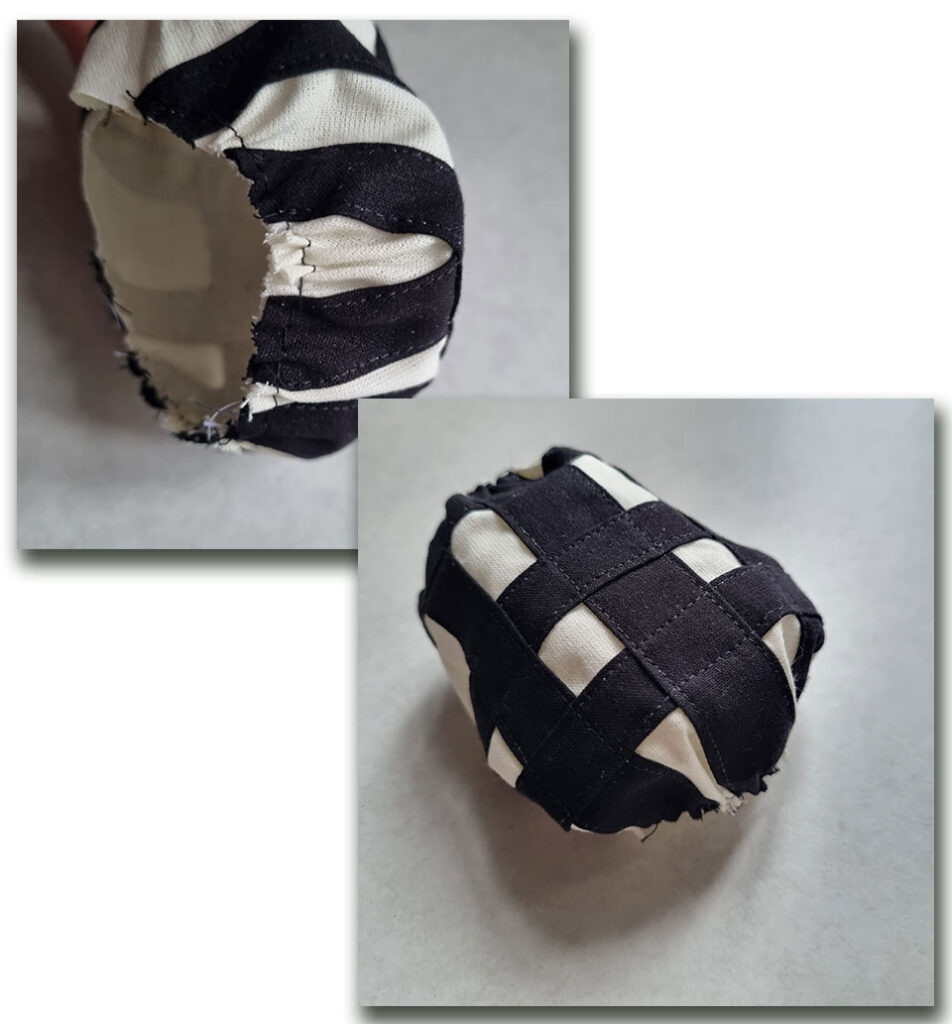
Here’s the sleeve on the mannequin. I like how the strips brought extra structure to the sleeve.
Accordion Pleat Skirts
It’s time: here are my accordion pleat ideas. The first one came directly from the cover of the second Pattern Magic book. The round sleeve looked like it would make a cool skirt. This is called the ball-shaped jabara.
The second skirt is based on the square jabara technique, and I thought it would work nicely for a panel skirt.
These books sometimes make you use more maths I’m willing to use, so I try to skip those parts when possible. Here, my method consisted partially of “winging-it”.
The Round Accordion Skirt
Instead of drafting a skirt pattern, you only need to draft one accordion pleat pattern, which will be cut several times to cover the entire circumference of the skirt.
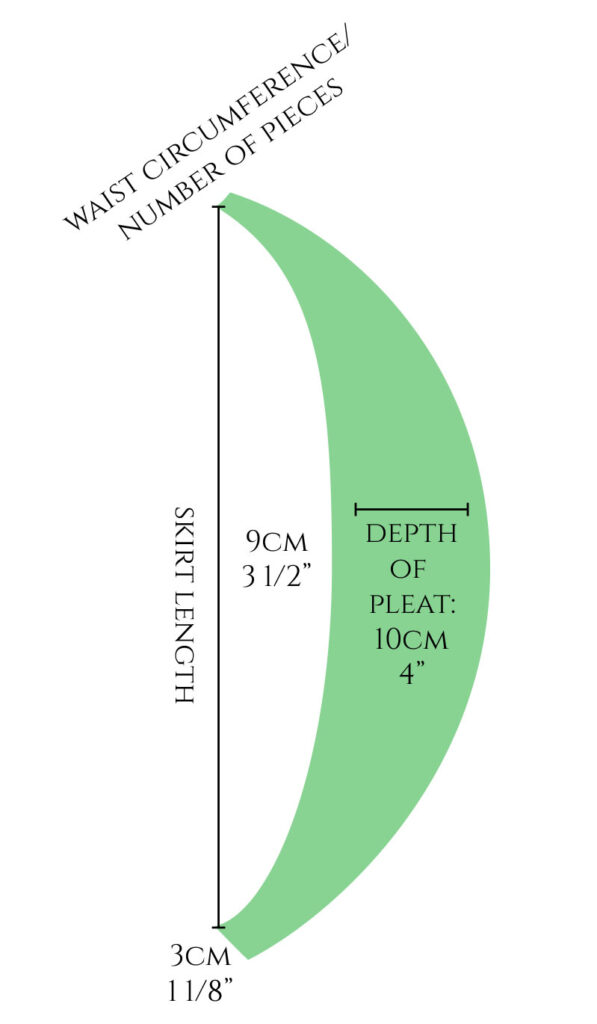
The only measurements I was interested in were the waist measurement and the length of the skirt. In the illustration below, you can see where the measurements go. Notice that the length might slightly change, depending on how pouffed you want your skirt.
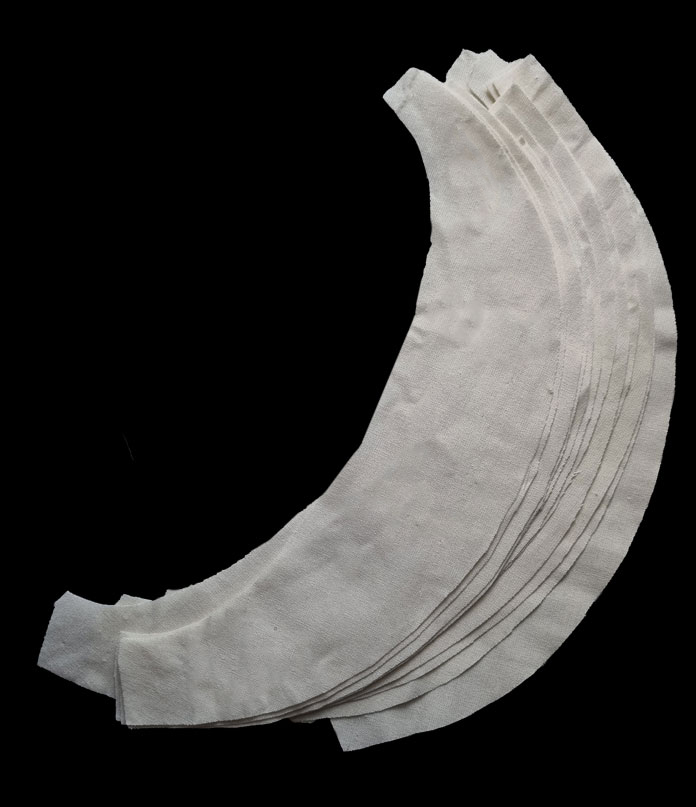
The pattern actually looks like a banana! You need to decide how many pleats you want so that you can divide the waist measurement by the number of pieces. You need two pieces per pleat. Alternatively, you can work in the opposite direction and choose a number close to 1,5-2cm and see how many you will need to cover the waist circumference.
The hem should remain larger, but as it won’t be stitched down, you don’t need an exact measurement. My maximum depth of pleat was 10cm. Curve the inside edge enough to fit the hips, preferably leaving a wide margin.
Sewing
Cut the required number of pieces, two per pleat. I’d recommend cutting and sewing just a few of them first to test.
Start by sewing pairs of these pieces together along their outer edges. Trim off part of the seam allowance before turning the right sides out and pressing flat.
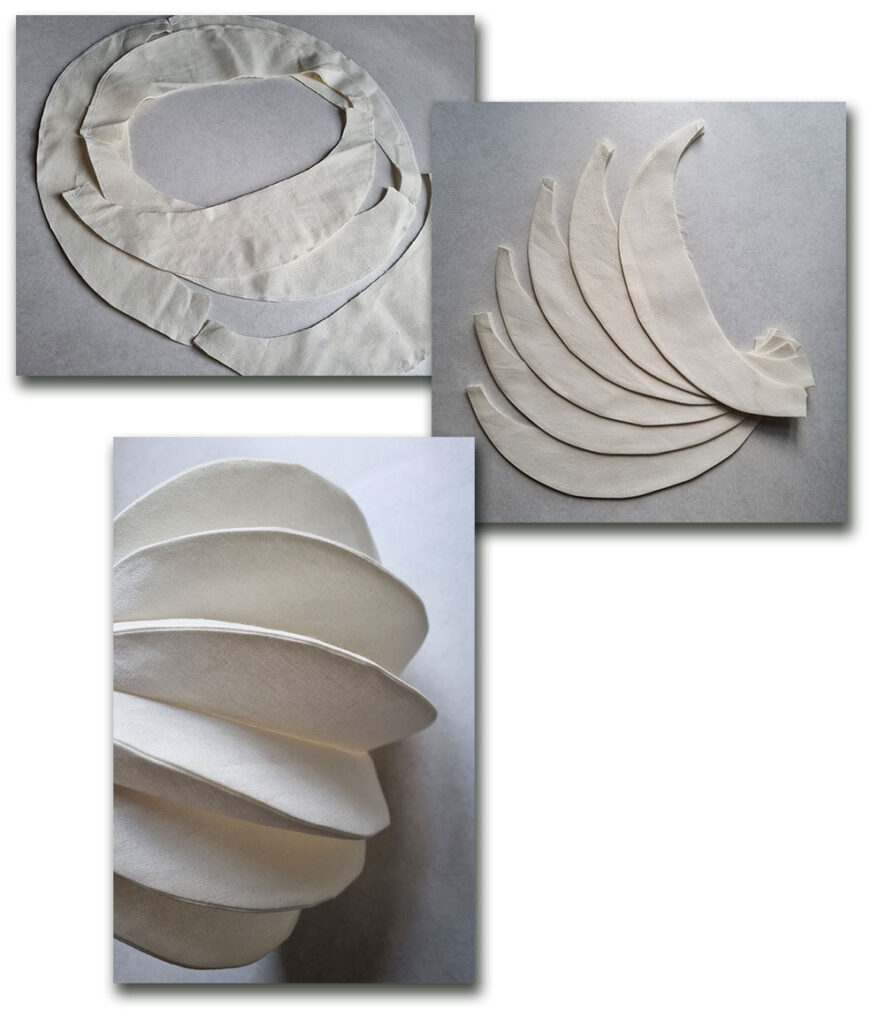
Then, sew the pairs together along their inner edge to complete the accordion pleats.
Once you have enough pleats, the waist should be large enough to cover the whole circumference. Leave an open slit at the c-back and add a straight waistband or a facing.
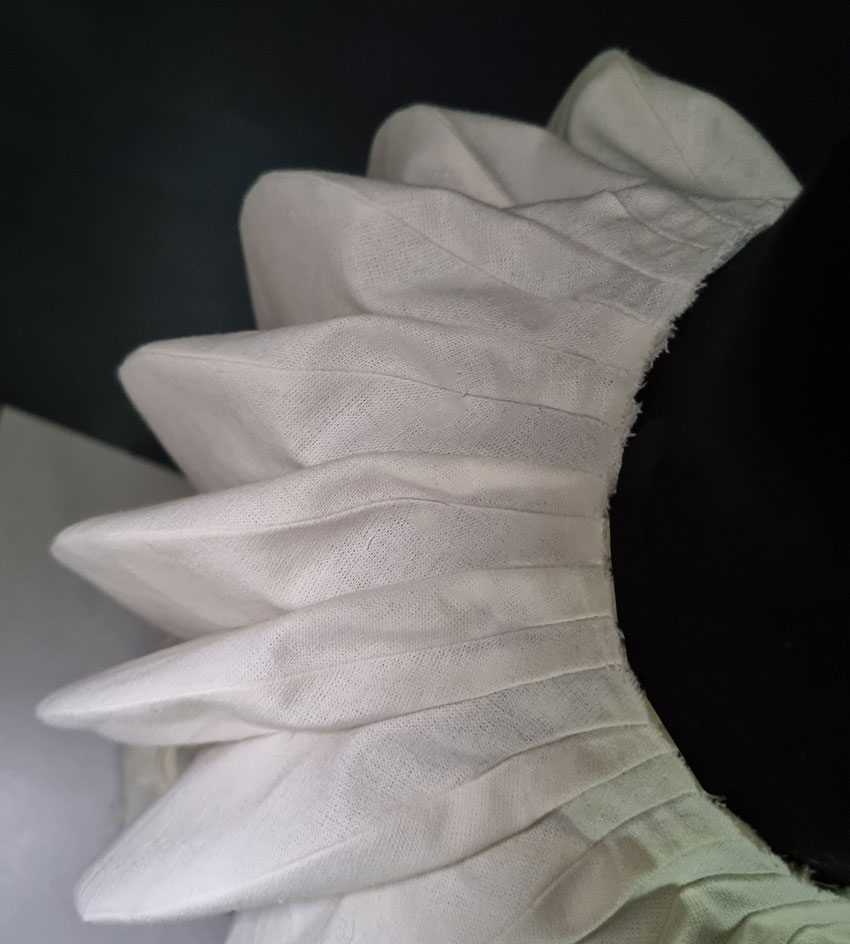
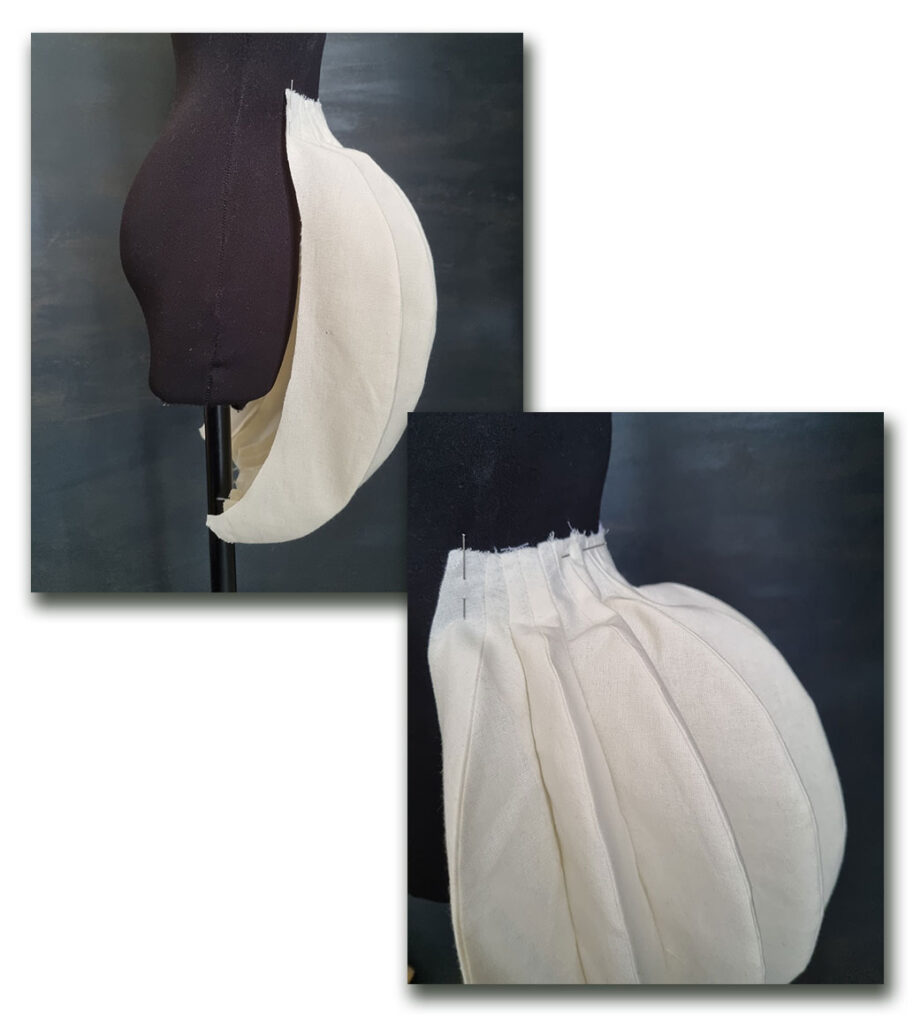
This type of skirt requires at least one hoop to maintain its shape. As you can see in the picture below, the hemline will collapse inward towards the legs if a hoop is not inserted.
Another issue arises when you do add a hoop: the top of the curve will get squashed. I don’t mind too much about that, however.
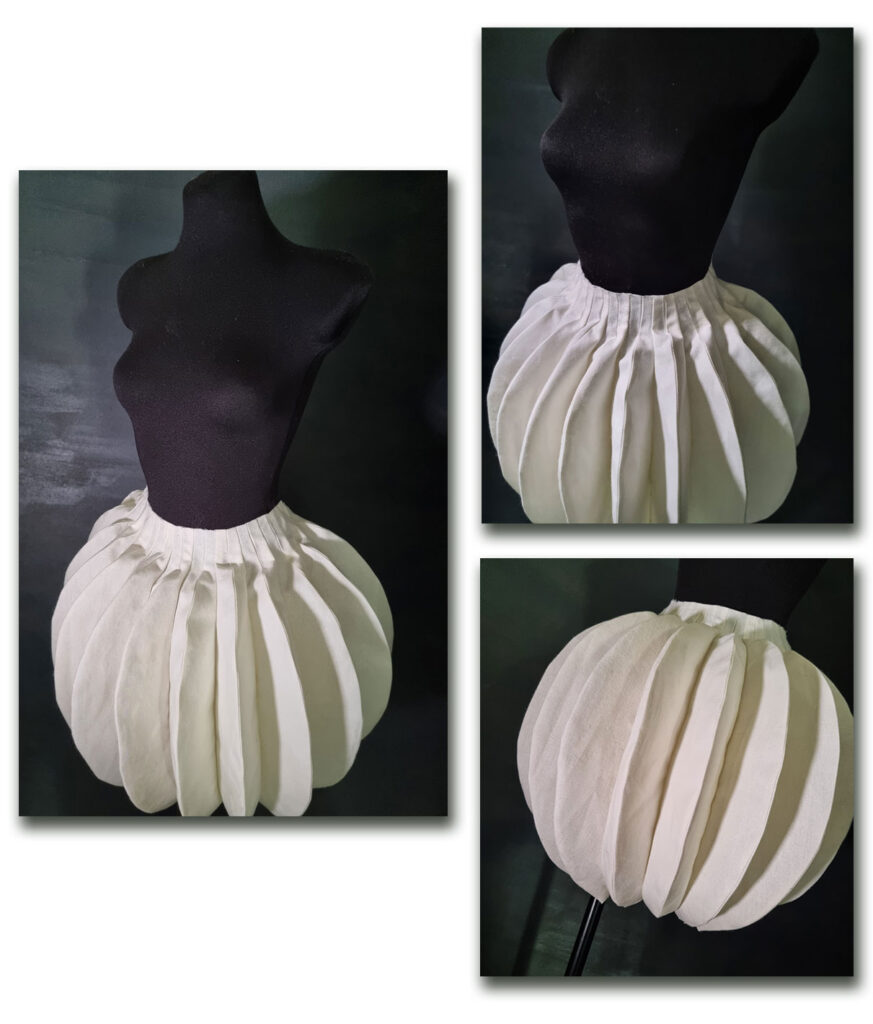
Here’s the final look. The skirt looks a bit like a pumpkin now!
The Square Jabara Panel Skirt
My second idea was to add dimension to flat panels by incorporating a few accordion pleats around the edges.
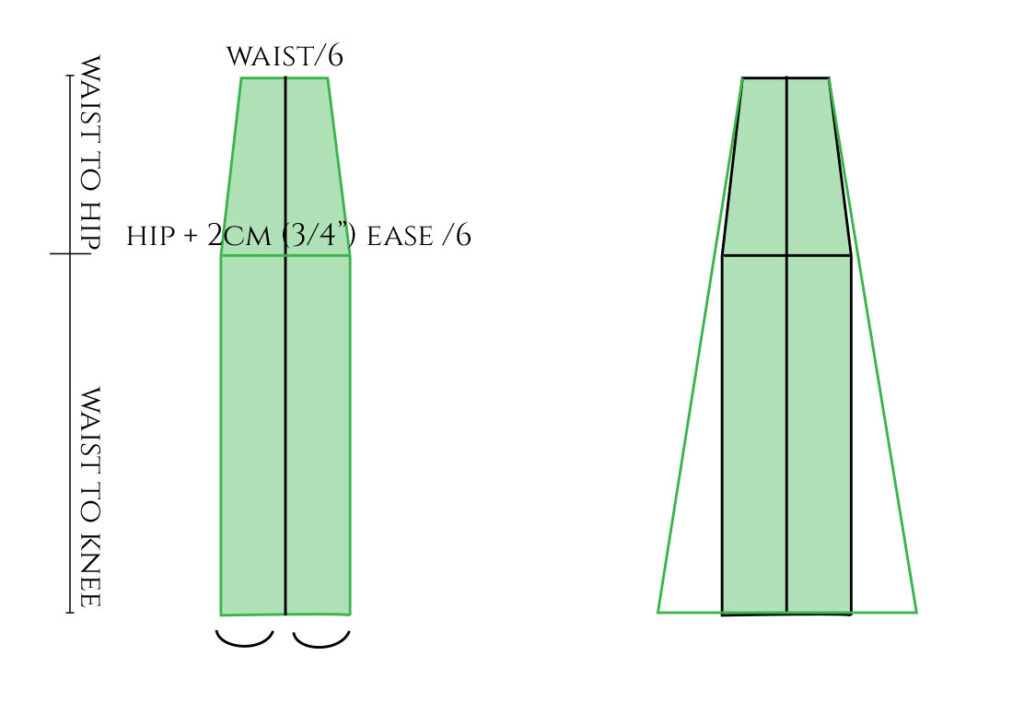
To do that, you first need a single-panel pattern. This skirt will have six panels, which means you divide your waist and hip circumference by 6. Note that you also need to add 2 cm of ease to your hip measurement before dividing it. This skirt is knee-length.
Draft the pattern as shown below. Add flare to both sides so that you end up straightening the sides completely while adding a bit of extra ease at the hip.
Now we can draft the accordion pleats. This time, they are straight, so we only need one pattern piece per pleat because we can fold the edges.
The waist width will determine the maximum depth of pleat for us. Start by drawing a parallel line around the three edges of the panel. Let’s refer to the underside of the pleats as a facing, so it makes more sense.
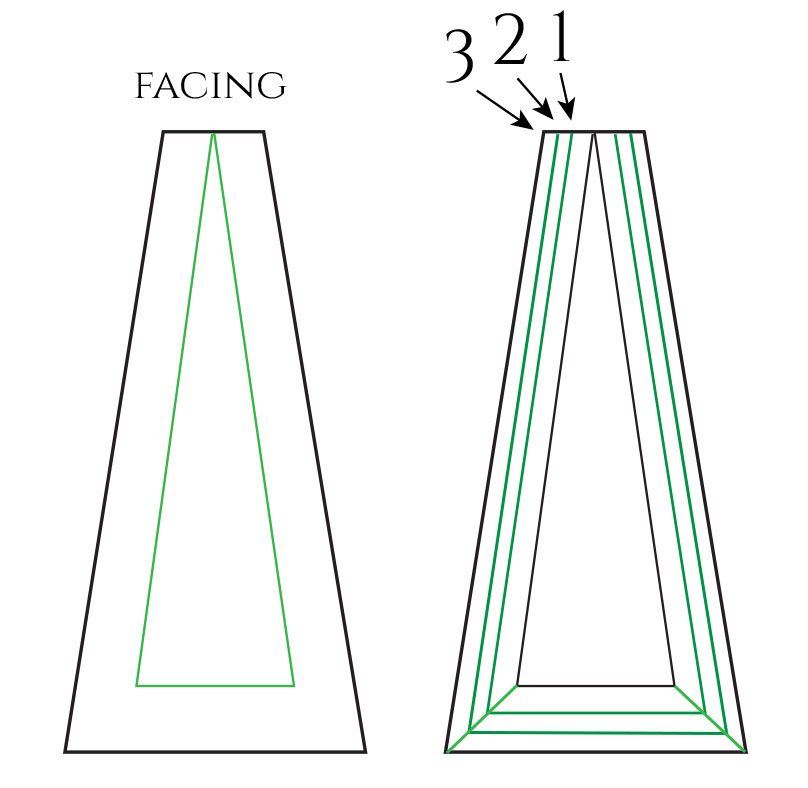
Then, draw two more parallel lines between the previous line and the outer edge of the panel. These will be the pleats. There will be a total of three pleats; the last one arrives at the outer edge.
Unite the corners with diagonal lines.
Trace the pieces. I colored the sections 1-3, each with a facing. I called them layers as they are kind of layered one on top of the other, and each layer starts at the base of the previous layer’s facing, just like when using the layering technique.
You just need to flip the facing sections around while tracing. This is where the diagonal lines become handy. All the facing pieces start at the same point. This is why layer 3 has a wider facing than the other two. Cut all the pieces 6 times.
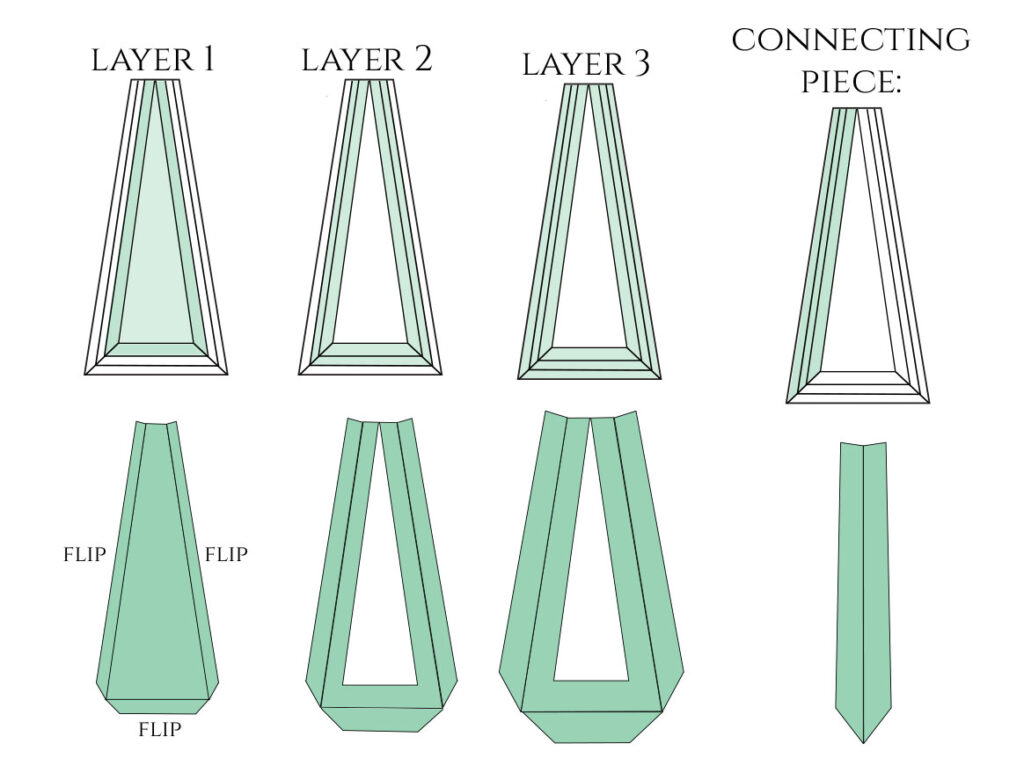
Lastly, you’ll need to trace a connecting piece that will be sewn between the panels to keep them together. You’ll cut this piece 5x plus once divided in half, so you can insert a zipper.
Sewing the Panel Skirt
I’ll show you one panel. Here are all the pieces. You can’t add any seam allowance to the inner edge, so it won’t get overlapped. I already pressed the facings under to get a crease.

Take pieces 1 and 2 and close the corners, right sides together. The seam ends at a seam allowance distance from the edge. This will make uniting the layers easier.
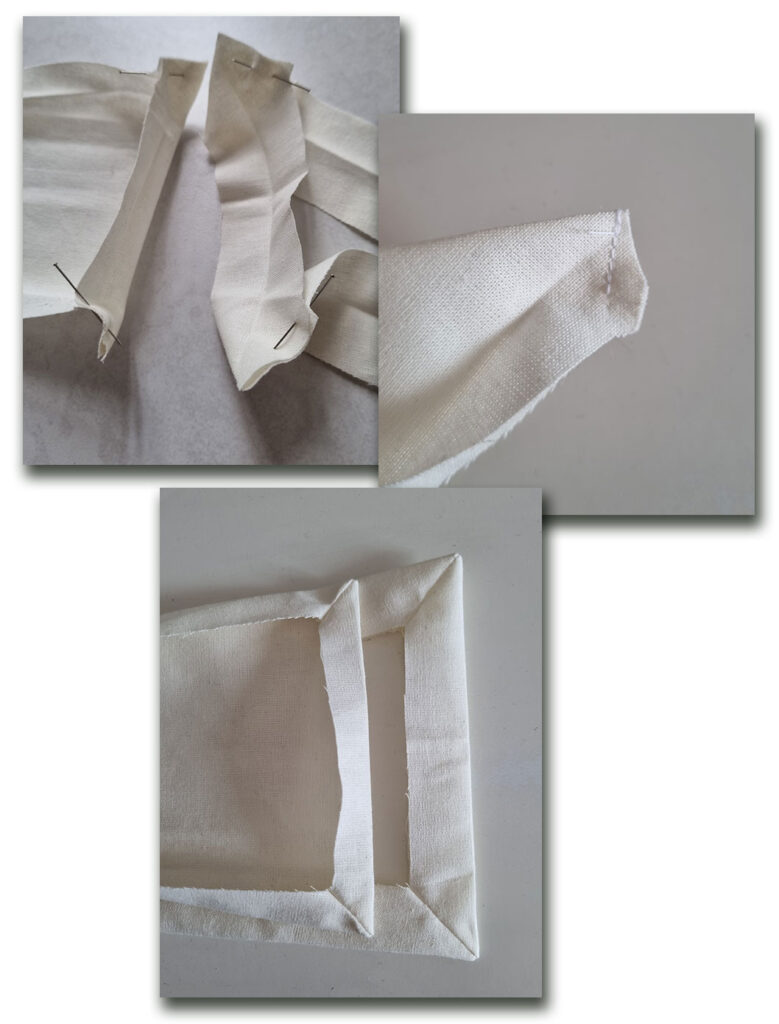
Cut the corners and turn the right sides out.
Then, sew the first two layers together, pinning layer 2 to the inner edge of layer 1 facing, matching the corners. If you cut the corners of layer 2 beforehand, you can even sew the entire seam in one go.
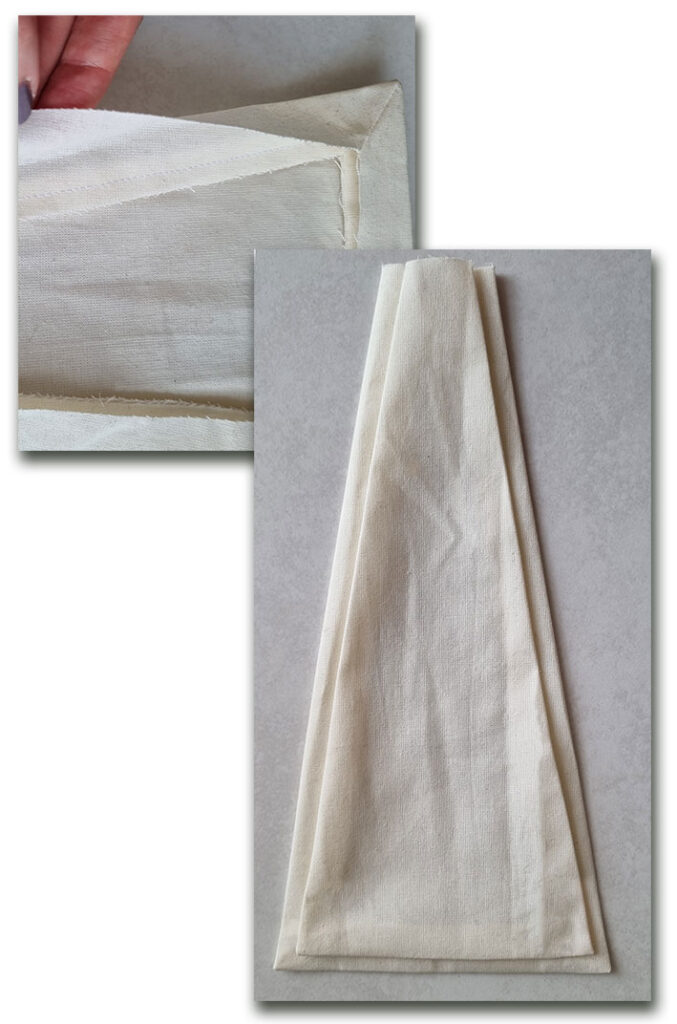
Attach layer 3 in the same way. It’s just that the corners will be closed afterwards. Here, you can also see how I cut the corners beforehand, making it easier to sew.
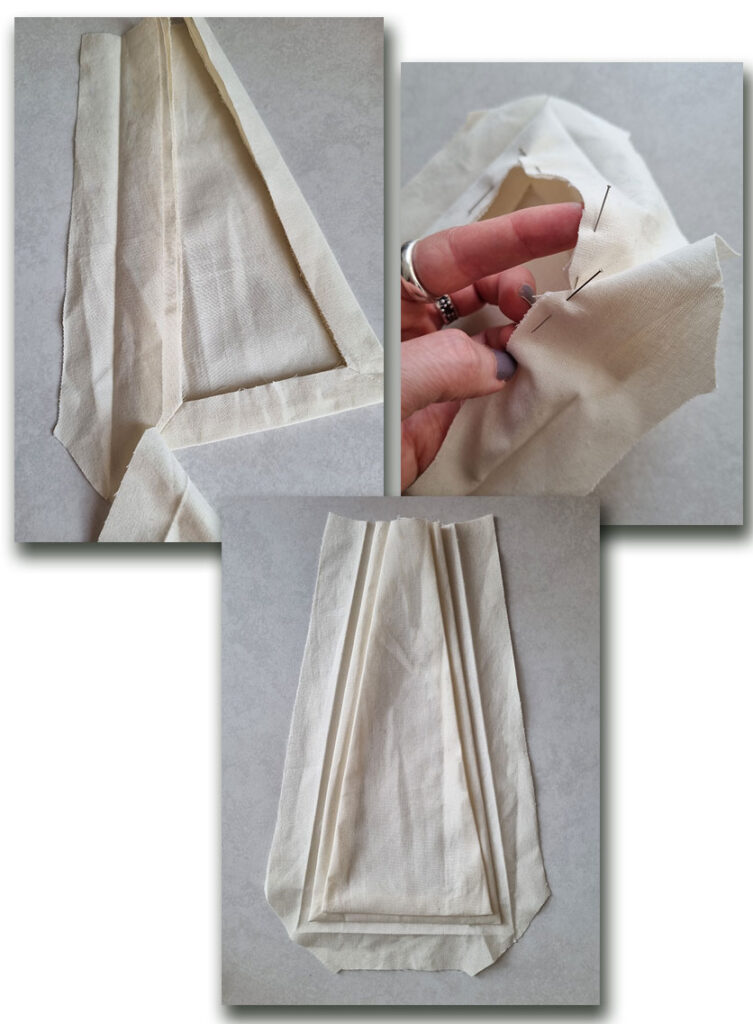
Prepare all six panels in the same manner and then attach the connecting pieces to the long edges that remain open. We didn’t close the corners earlier because these pieces will be sewn into the seams.
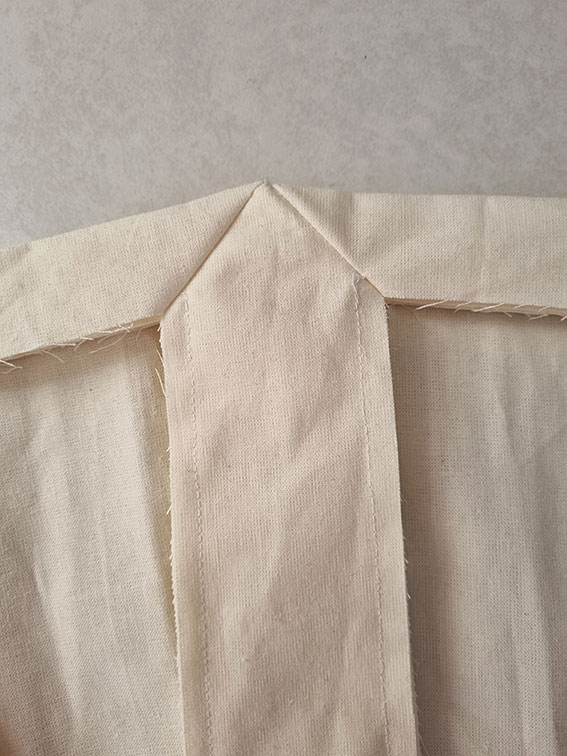
Finally, pin and stitch the layers in place along the waist and attach a waistband.
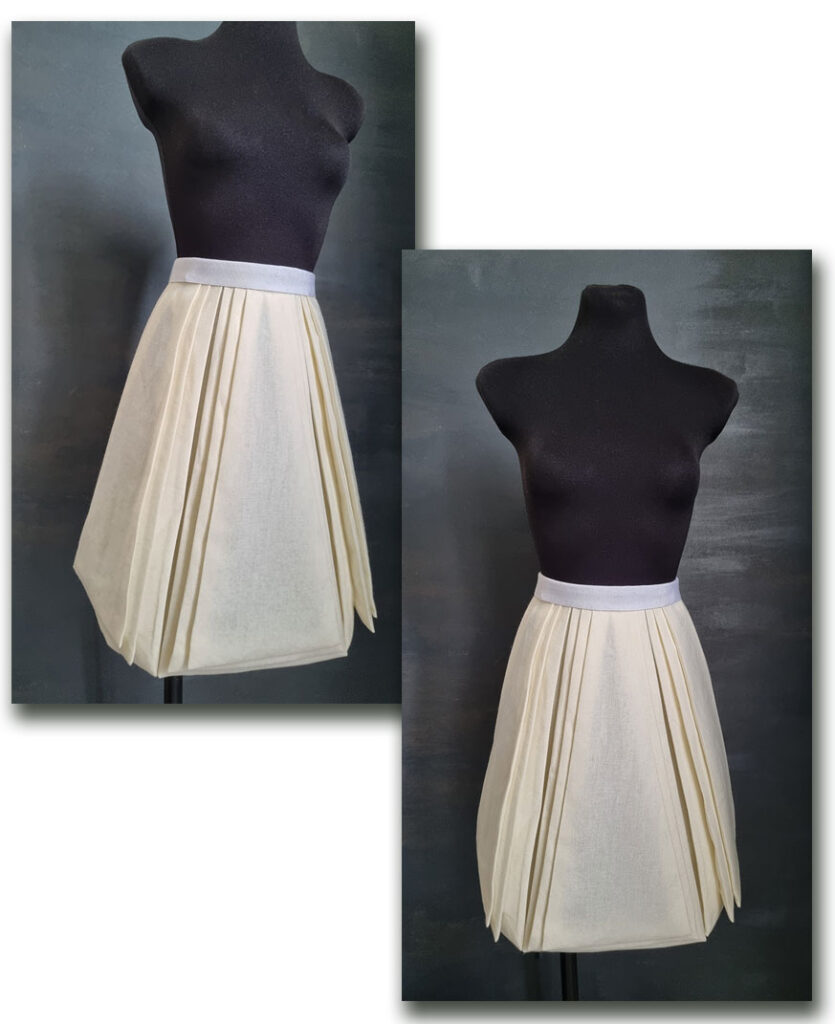
Here’s how my skirt came out. You can adapt the number of panels and pleats to create different designs.
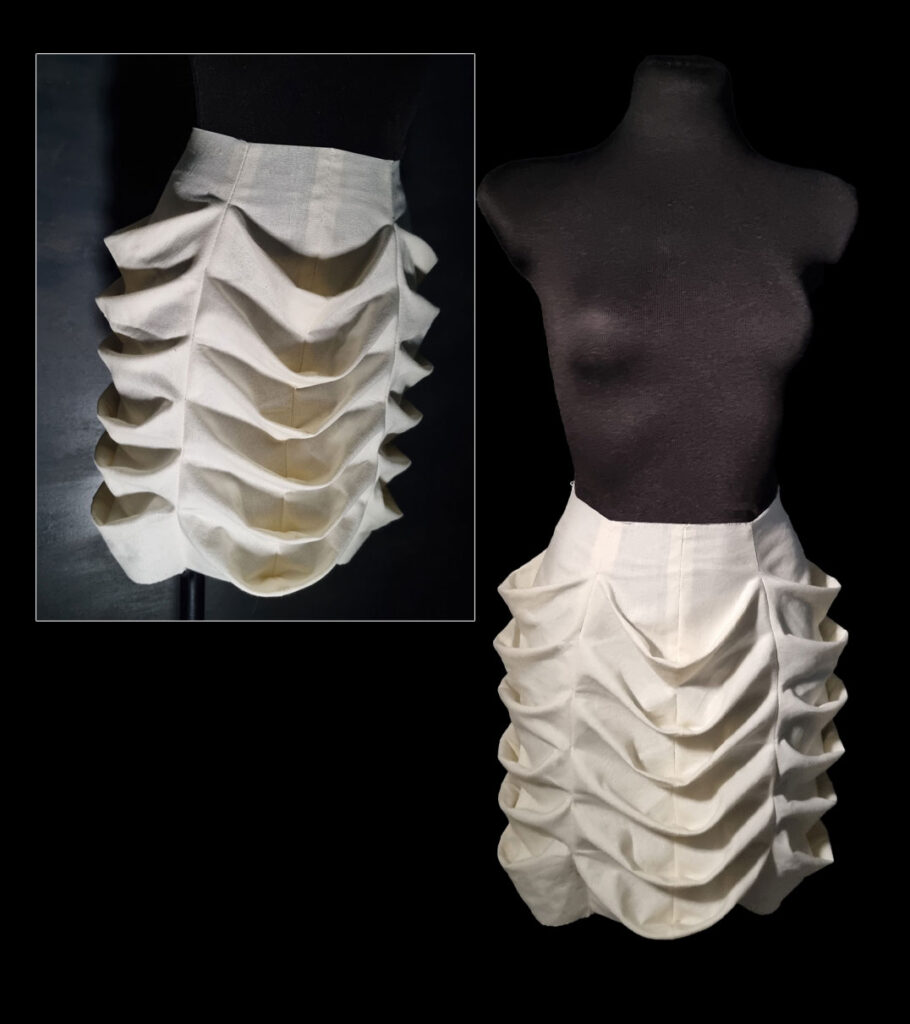
Nyokitto Skirt: Because More is More
Here’s the last example of designs inspired by the second Pattern Magic book. It’s all about nyokittos. Literally. I filled the whole entire pencil skirt with them!
You add nyokittos diagonally with the slash & spread method. There’s a seam in the middle, and the amount of volume you added will be folded in half.
The examples in the book only include one nyokitto, which means you manage to cut part of the design on the fold. However, as I’m adding several of them, I’ll need a seam that covers the whole length of the skirt.
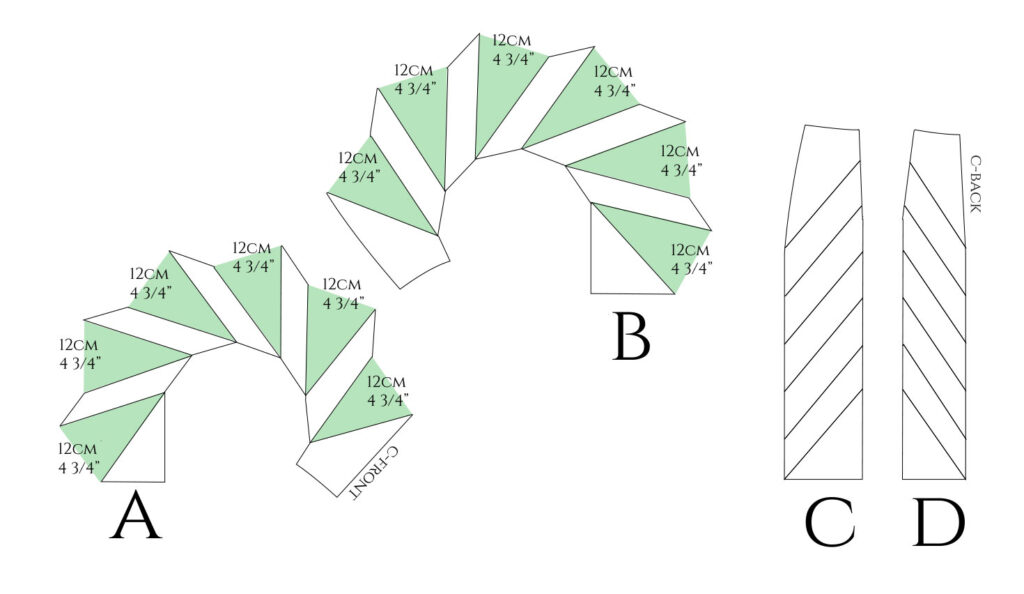
Luckily, it’s easy to add vertical seams to a pencil skirt. I divided both pieces in half, absorbing the darts into the seams. This gave me pieces A-D.
I decided to add 4 rows of nyokittos around the skirt: c-front, c-back, and side seams. To create a symmetrical design, I began by adding guide marks where I would draw the diagonal lines to then slash & spread. The uppermost line should start at about hip level at the c-back, so you can attach the zipper.
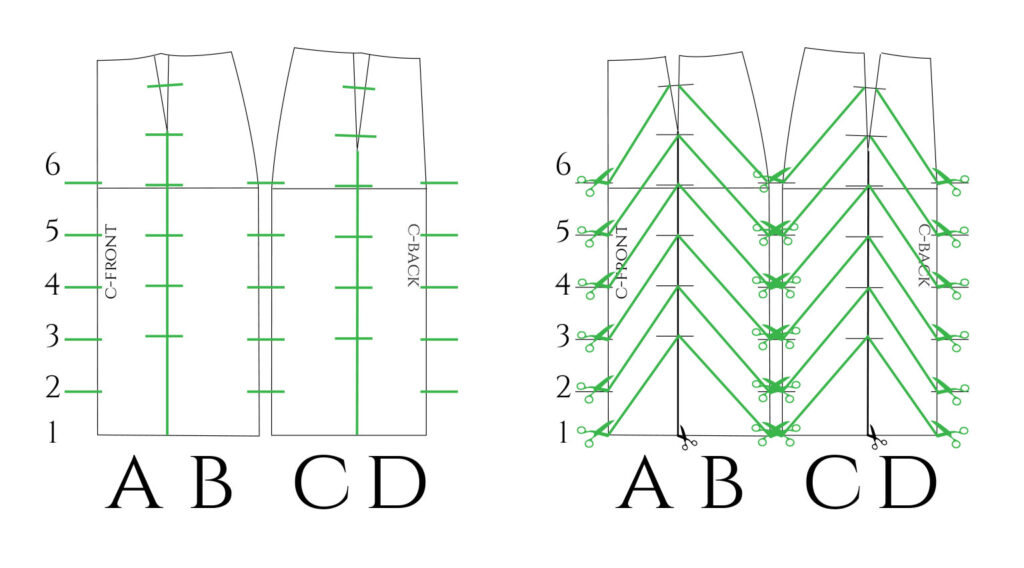
I have 6 nyokittos per row, starting at the hem. The nyokittos form, where the maximum amount of volume is. Therefore, I cut from the c-front, c-back, and side seams towards the panel seams.
I added 12cm of volume. These will then be folded in half. Depending on the amount of volume you add and the length of your skirt, the piece might become overlapped. In that case, you’ll need an extra seam.
There are a few different ways to shape the nyokittos, as you will see in the book. But in this case, I made them completely straight. No need to fold before cutting.
Sewing the Piece
Cut two of each piece. Cut notches at each of the three corners of the nyokittos.
Sew the pairs together: the front pieces, the back pieces, and the side seams. The back seam begins at the hip line. Trim the corners and reduce the seam allowance in the center of each nyokitto where they will be folded to reduce bulk.
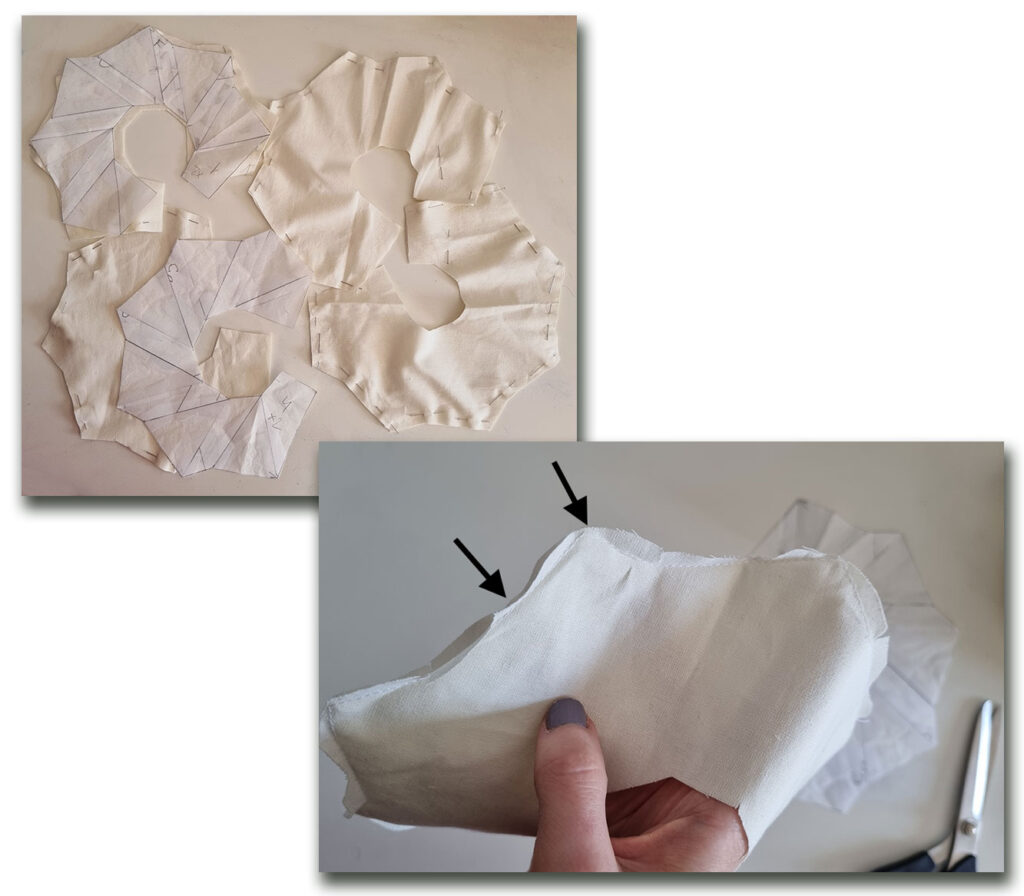
Press the seams open and fold the nyokittos in half, bringing each tip to the notch below. Stitch the tips in place along the seam allowance. Either by hand or with your sewing machine. (See the arrow.)
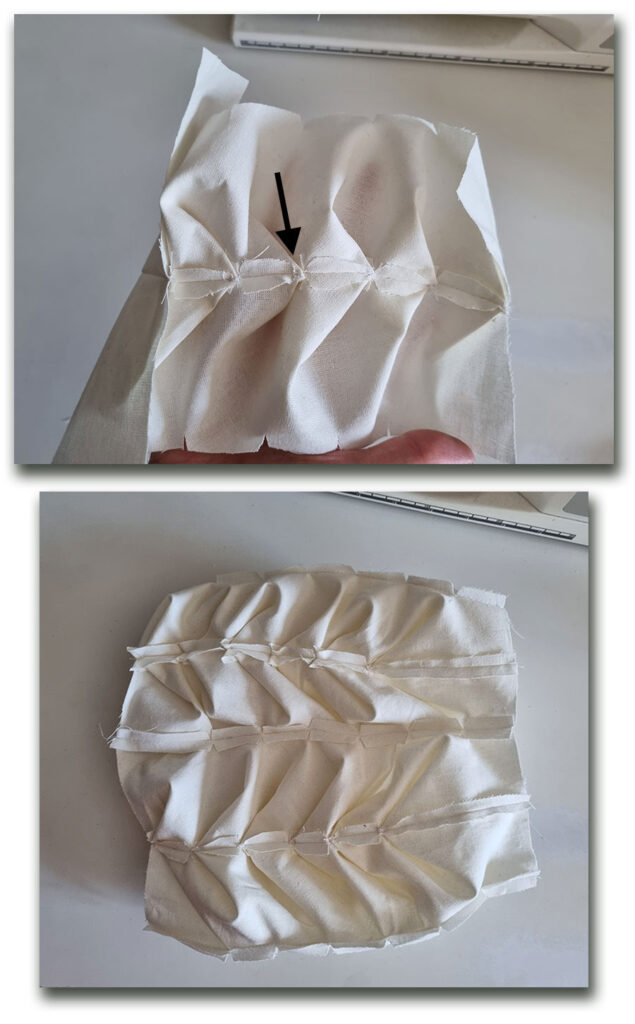
After completing all four sections like this, sew them together. Press the seams open. The nyokittos should now form on the right side.
Attach a waistband or a facing, and the zipper. Here you can see where the zipper would be attached, just above the first nyokitto.
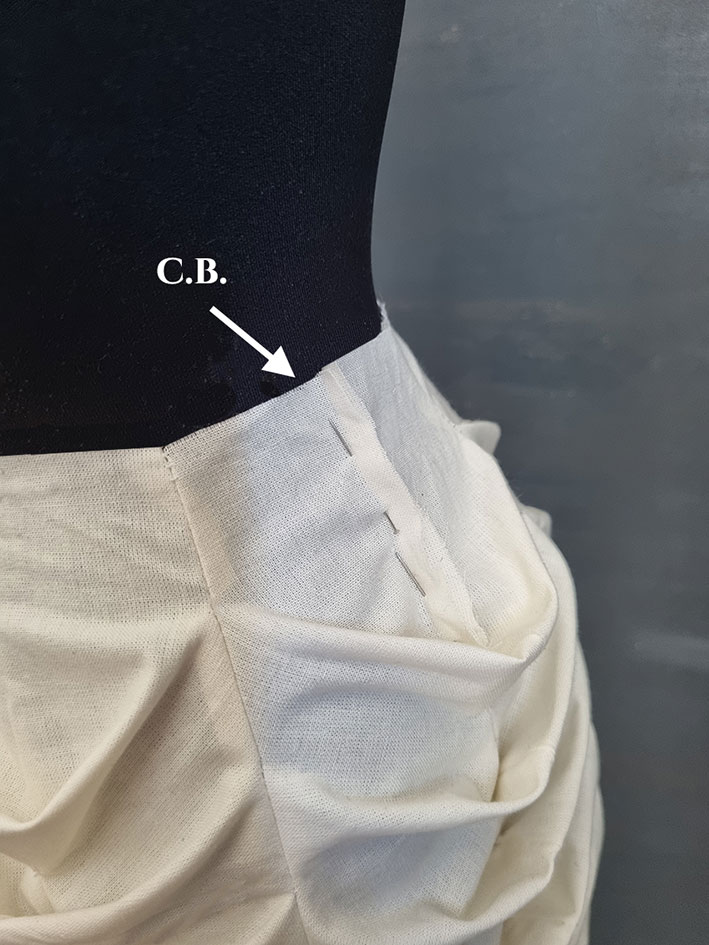
Here’s what the skirt looks like on the mannequin. It became quite sculptural!
That was the last design I made (for now), based on the second Pattern Magic book. There’s still one book left for woven fabrics. So, let me know if you’d like to see more!





4 Comments
A-mazing! Love seeing all the patterns and how they transform into these delightful sculptural pieces.
Would definitely like to see more please!
Thanks so much! 🙂 Well, book number 3 definitely has some cool techniques so I will probably make one more post.
thanks for a great and inspiring post….I love the pattern magic books! love your posts and have quite a few book marked
Thank you so much! 🙂 I’m glad you found my article inspiring. The Pattern Magic books somehow always manage to yield new design ideas. 😀