

I started my blog back in 2018, and my very first posts were about Pattern Magic. These books were my gateway to Japanese patternmaking techniques.
So, when I got a request to do a tutorial about Pattern Magic patterns, it was a no-brainer. This time, I decided to explore a few techniques I hadn’t tried before.
Pattern Magic books give you all the measurements and steps to follow to create the designs present in the book, so if you want to test before venturing into your own experiments, that’s a good option. But when it comes to this post, all the designs are my own versions of the designs. I think the key to learning is to pick the essence of a specific technique and apply it to your own design, rather than copying the exact look.
All the pieces in this article come from the first Pattern Magic book by Tomoko Nakamichi. It was initially published 20 years ago, in 2005. There are two more books for woven fabrics and one for stretch fabrics. I will do at least one more post on these later.

Basics: Dart Manipulation through Style Lines
One of the first things you learn when you open this book is dart manipulation through style lines, where the darts get absorbed into seams. There’s a specific Bunka-style sloper that goes with this series. You can find instructions at the back of the book to help you draft your own. There’s also a half-scale block to trace.
However, I’m using the basic bodice block I already had. You see, the techniques will work with another type of bodice block, too. There’s no need to draft a new one.
The idea of this exercise is that the style lines need to start at the edge of the pattern and pass through the dart tips. You can even pass Near the dart tips if your desired style line shape will look better that way.
In that case, you’ll have either ease or a tiny dart near the seam. I’d say ease is the better option if you want to keep your design clean and simple. You can also adjust the dart length if it’s not too far.
I recommend using a bodice block with two darts: one at the waist and the other pointing towards the side seam. Rather than having united both darts, that is. Also, if the bust dart starts at the shoulder, it will get in the way. So, rotate it towards the side seam first. No idea how? Check out this tutorial.
The Playing Cards Exercise
Want to play? I made my own little exercise by absorbing the darts into the four suits of playing cards: hearts, diamonds, clubs, and spades. There are videos of these on my YouTube channel.
Hearts
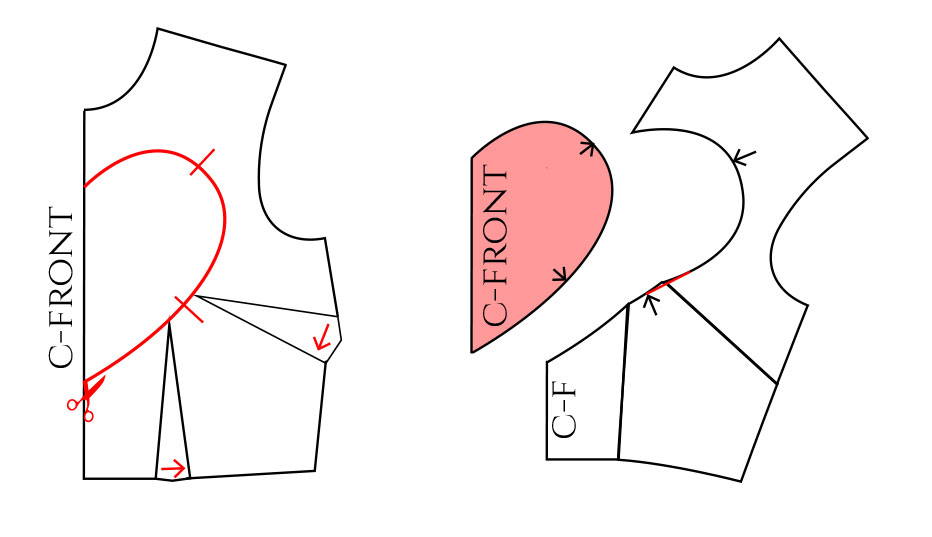
Here’s what the Hearts pattern looks like. This is probably the easiest shape to draw passing through the dart tips. You can also mirror the pattern if you prefer to see the whole shape.
Before cutting out the shape, add a few notches. Then, close the darts and adjust the lines to remove any angles.
In this case, the lower section of the bodice will be cut on the fold, and there’s a seam at the upper edge. This is what connects the heart shape to the edge of the pattern.
Diamonds
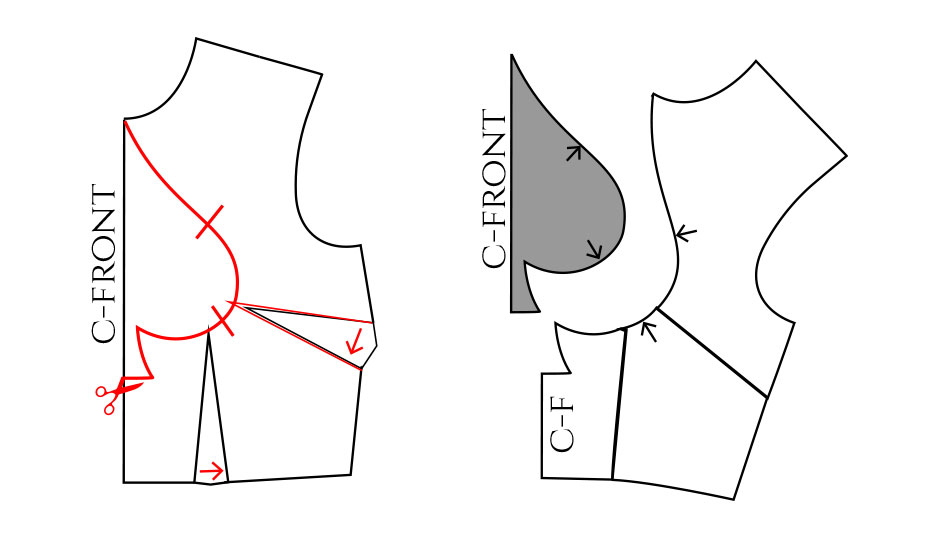
With the diamond shape, draw a horizontal guideline in the middle to center the shape. In this case, I decided to lower the neckline so the shape would reach the edge of the pattern.
Here you can see what happens if the style line doesn’t pass through the dart tip. In this example, it’s quite near, so you could simply lengthen the dart. Alternatively, you can draw a line between the dart tip and the style line to rotate the dart.
After cutting the diamond shape out, you can cut the little line you drew and close the bust dart. As a result, you get a tiny dart pointing towards the center. Then, you can choose to keep it as a dart or turn it into ease (use gathering stitches).

Also here, cut the bodice on the fold along the remaining c-front line.
Spades
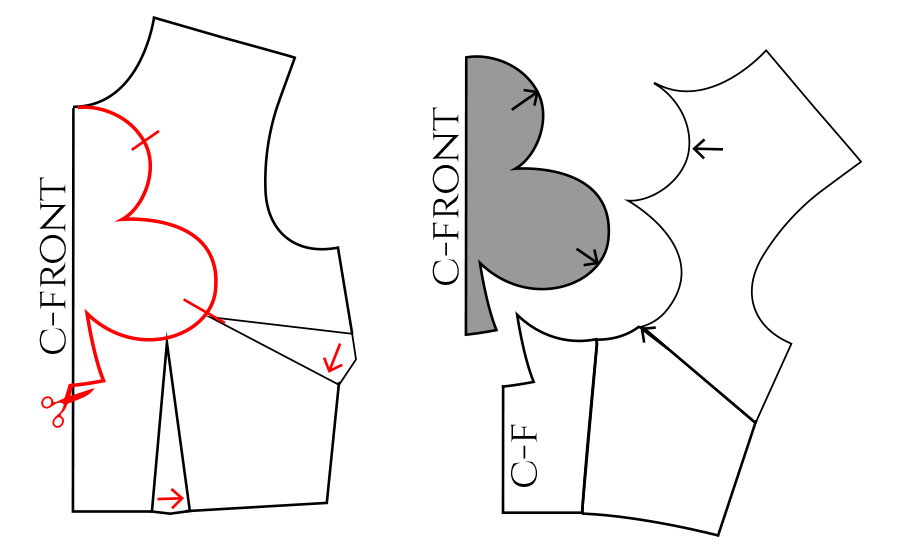
This shape is kind of like an upside-down heart. I made it narrower than the heart, so I needed to lengthen the dart slightly. Also, in this case, I started the shape at the upper edge of the bodice.
Add notches before cutting the shape out, and ensure you end the style line in a right angle at the c-front.
Clubs
This shape reminds me of a clover. It’s the most difficult of these four shapes to draw, but at least it was easy to pass through the dart tips. Be sure to start and end the style line at a right angle. Add a few notches.
This one might be easier to draw as a whole shape rather than working on one half, so just mirror the bodice to get the other half.
Sewing the Playing Card Tops
This is actually both a pattern and a sewing exercise.
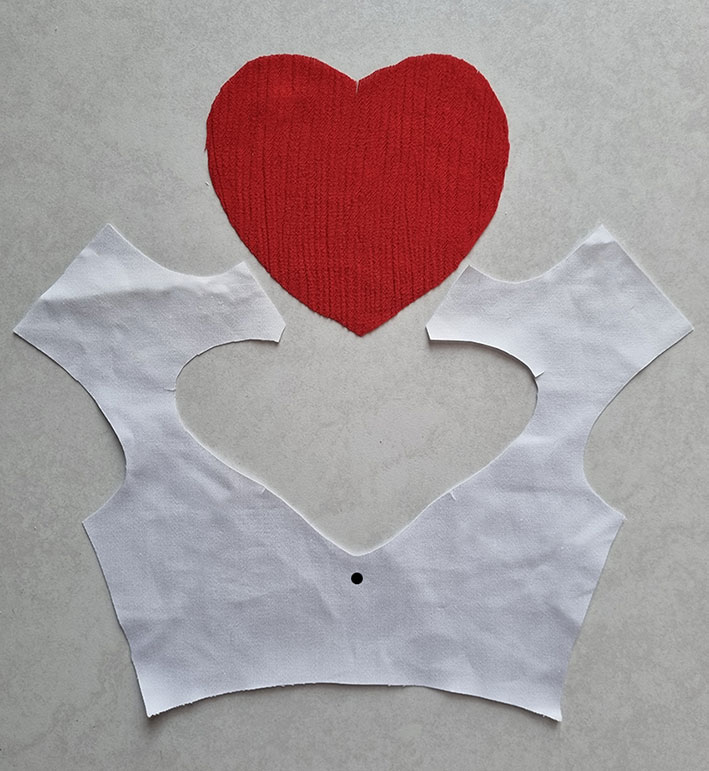
Here, you can see the two pieces of the Hearts-top cut. Remember the notches and mark the corners.
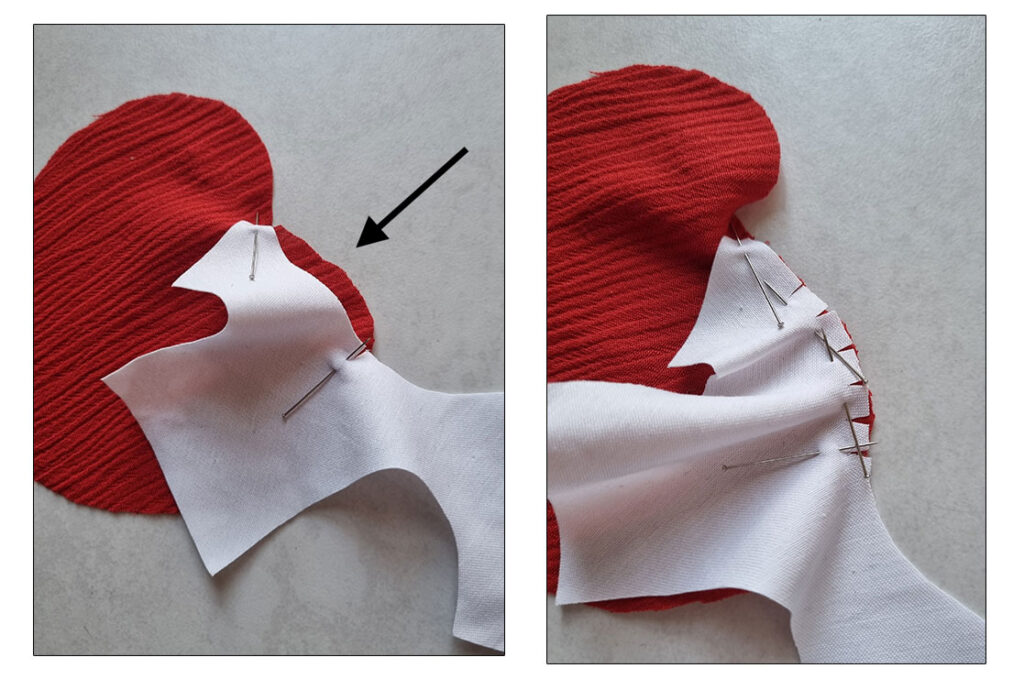
To sew this and the ones that follow, you need to familiarize yourself with the concept of mountain and valley curves. You see, it’s easier to sew with the valley curve on top.
Start by adding a few pins at the start and end points of the curve, matching the notches. Then, clip the seam allowance of the valley curve until you can spread it around the mountain curve.
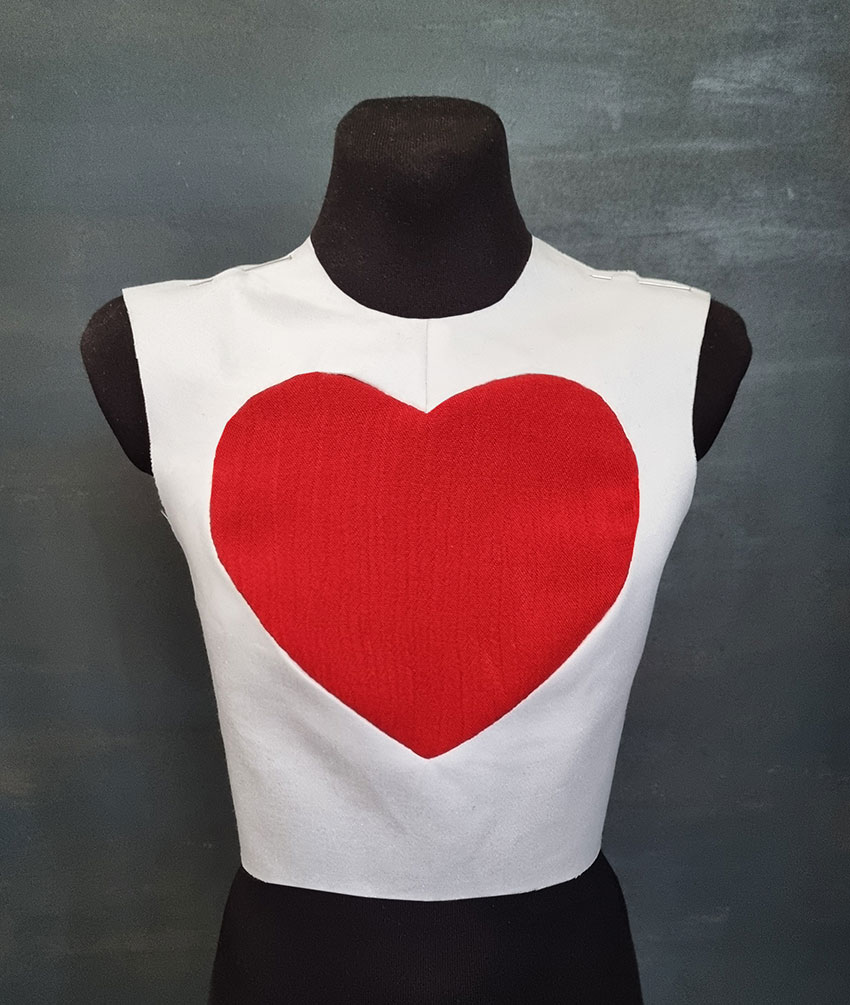
Here’s the finished piece.
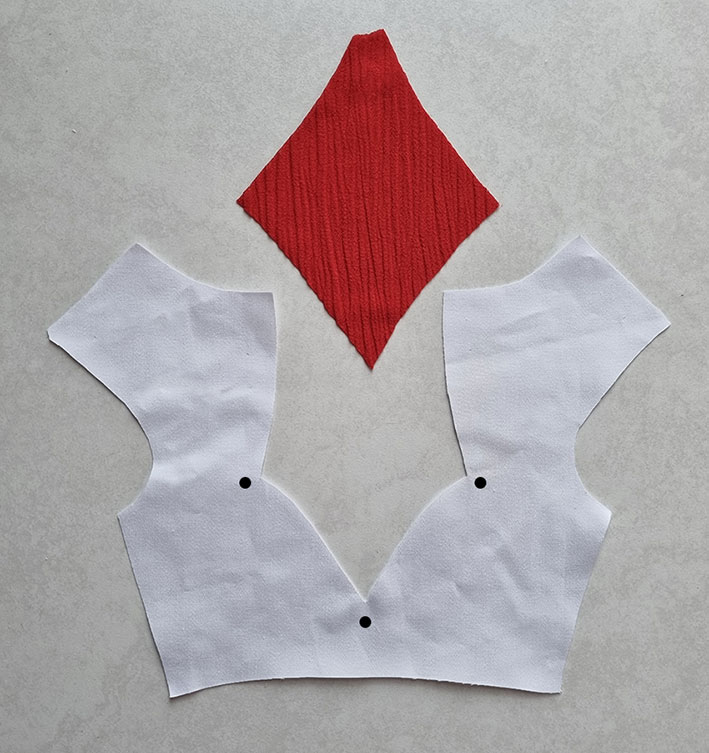
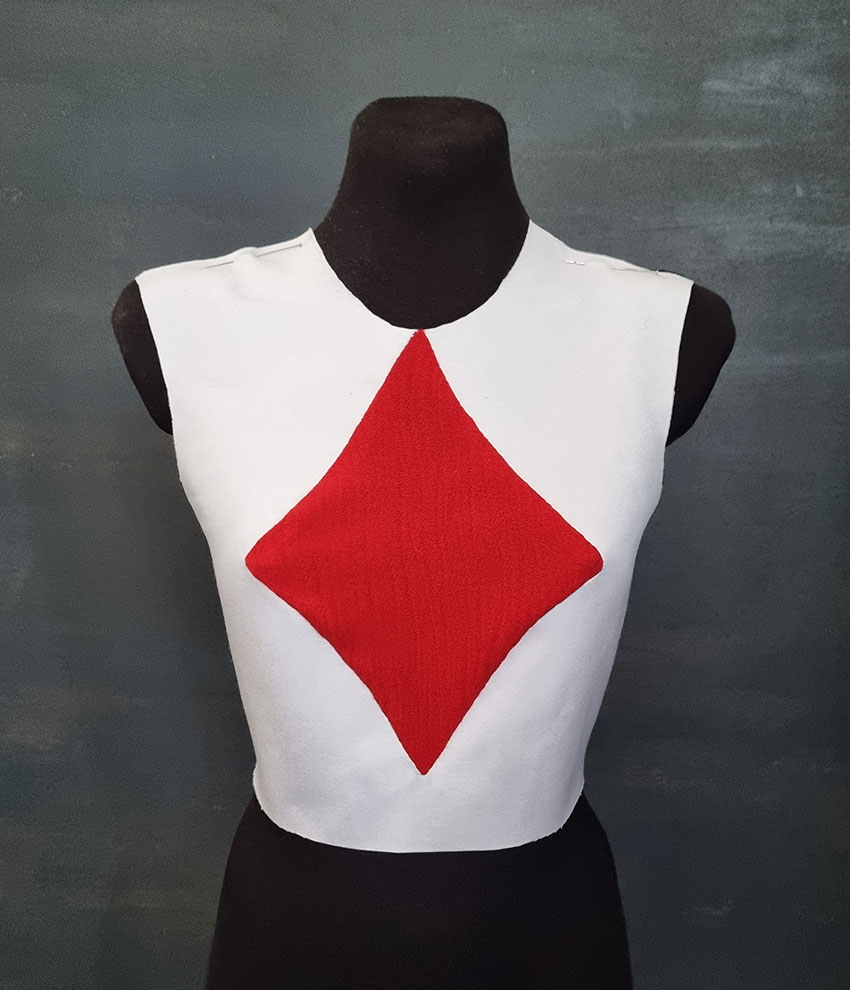
Let’s have a look at the diamond shape. This time, I have no notches, but I did mark the corners.
Sew one section at a time. In this case, the diamond shape goes on top as it’s the one with the valley curve. When you arrive at a corner, stop and cut the seam allowance (without cutting into the stitches). This way, you’ll be able to turn and pin the next section.
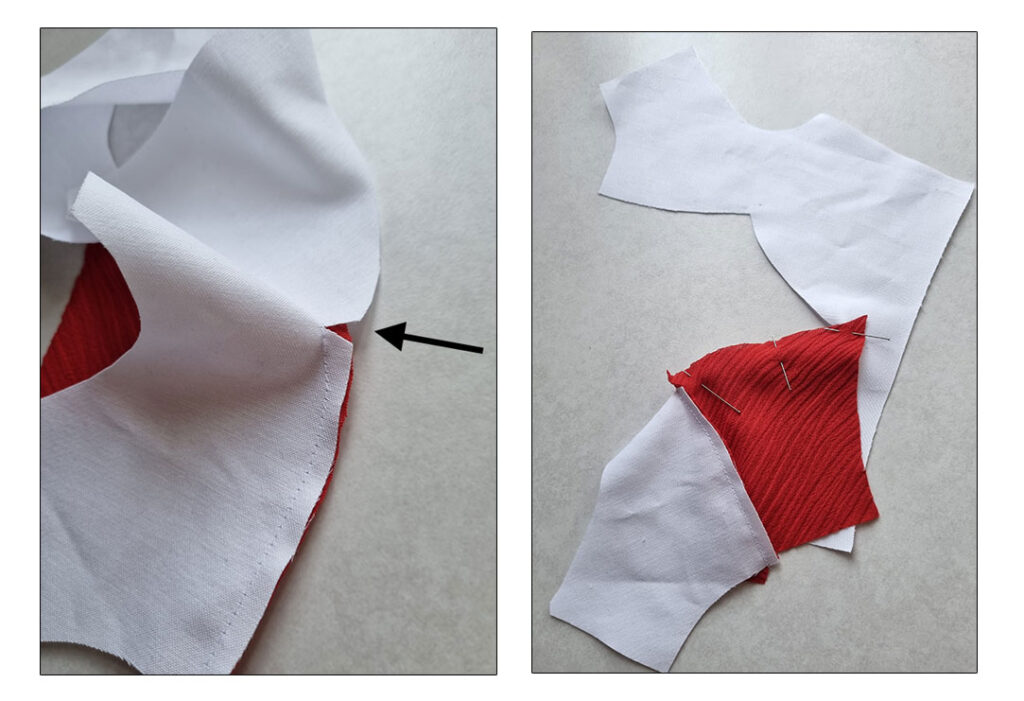
The result:
Also, with the spades, remember to cut the notches and mark the corners.
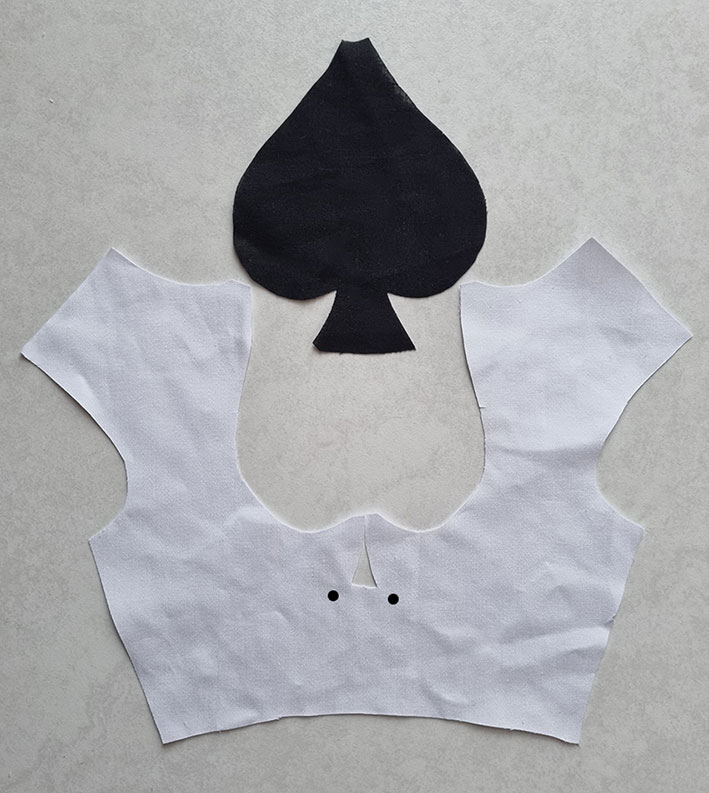
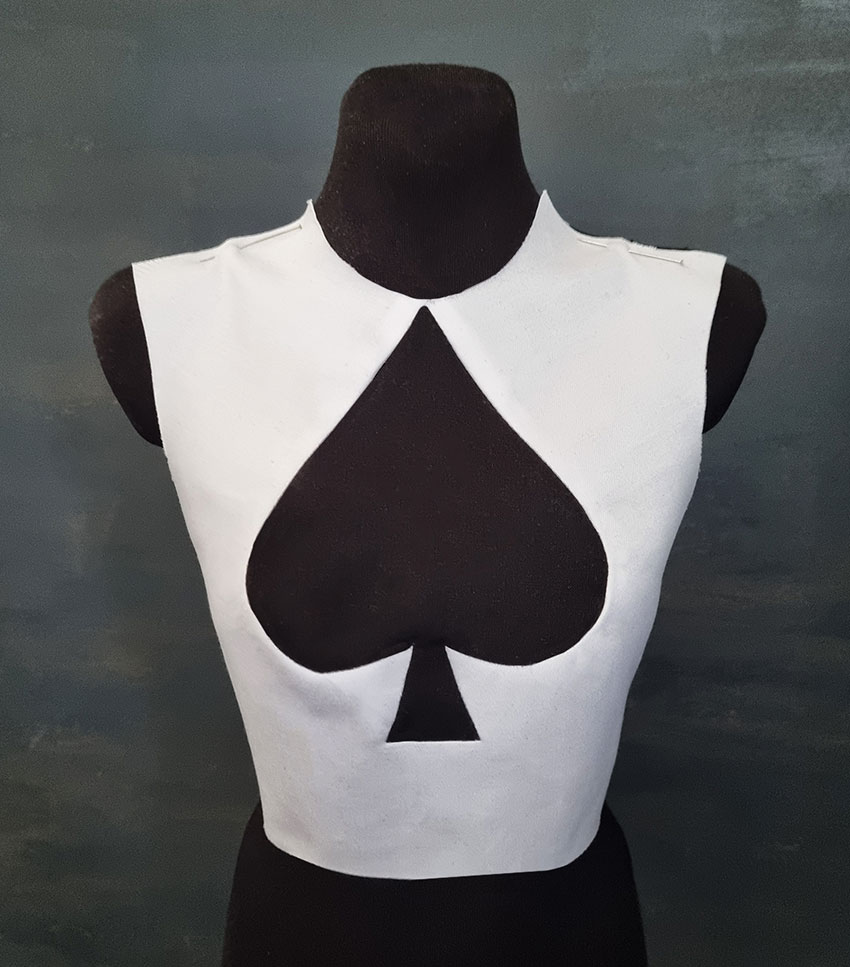
This is similar to the heart shape: sew with the valley curve on top and make cuts to the seam allowance to match the lengths. You also need to cut the corners, sewing one section at a time when you get to the stem.
Here’s the finished piece.
And finally, there’s clubs. Also here, we have both notches and corners. The sewing involves the same shapes as before: curves and corners. It’s just that there is more of both!
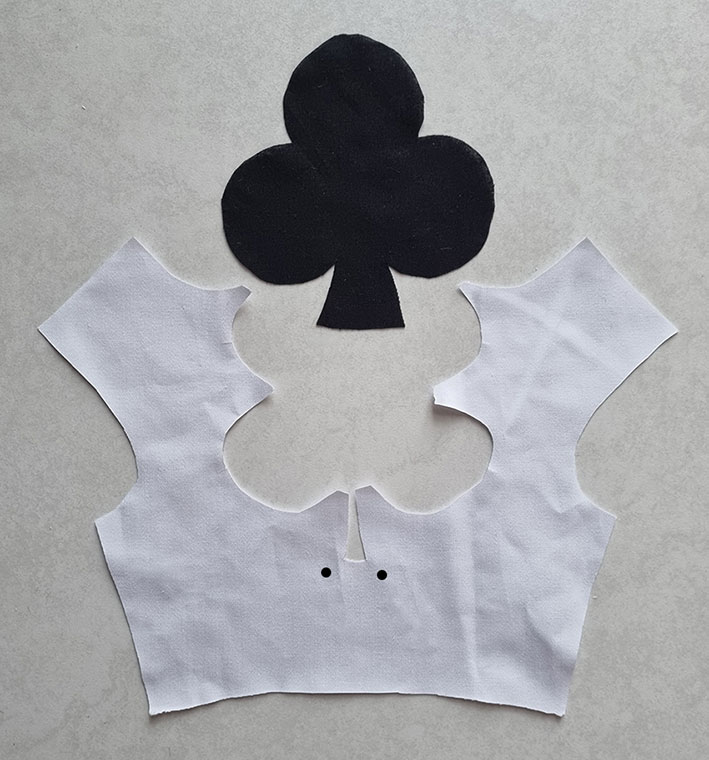
In half scale, this was a bit tricky to sew, but I think in full scale it’ll be alright.
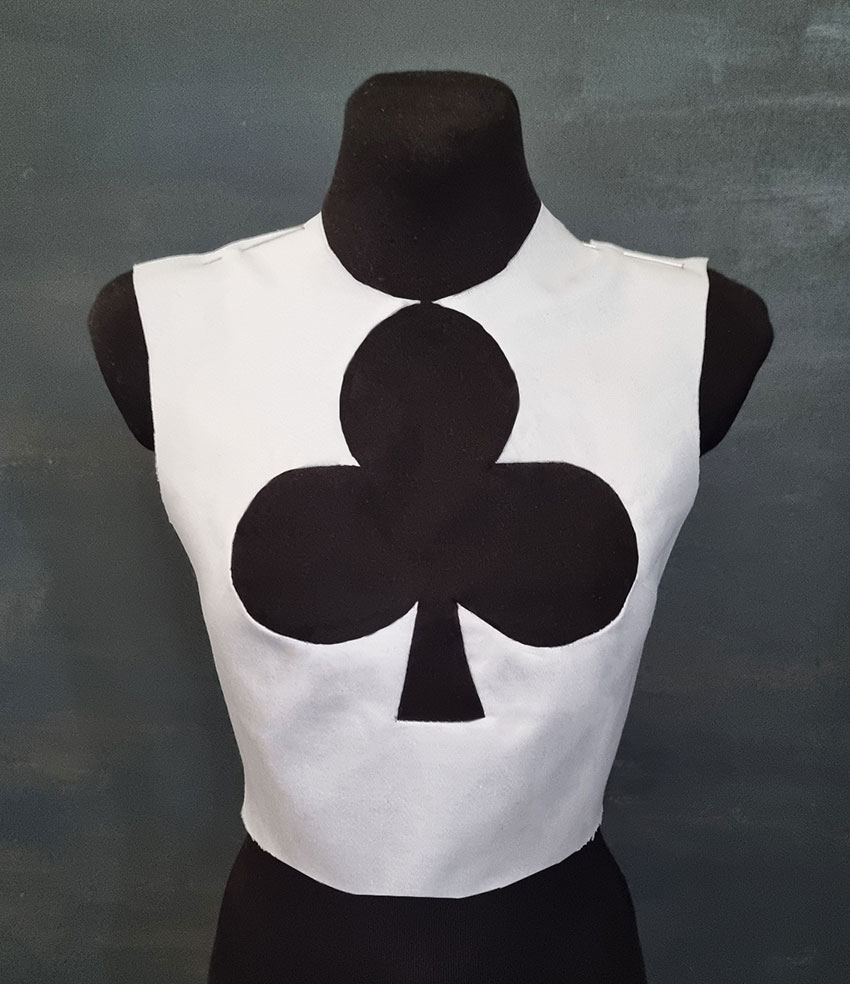
Naturally, you can draft and sew many other shapes as well. Asymmetrical shapes, too (working on the full bodice). Just ensure you start at the edge of the pattern and pass through or near the dart tips.
Now that we’ve talked about the basics, let’s move on to something a bit more complex.
Hide and Seek
This is one of the designs I had never tried before. In the book, Tomoko Nakamichi first introduces a jabot pattern, which I found very helpful in understanding the Hide and Seek – or kakurenbo – design.
The Jabot
So, let’s have a look at the jabot. This is basically a flounce that will be inserted vertically along the c-front of a blouse, for example.
Instead of utilizing the slash & spread method, you make a flat drawing of the jabot and then trace the sections one after the other. Like this:
- Start by drawing a straight line. The length is the same as the seam length where the jabot will be inserted.
- Then, draw a zig-zag line around the initial line, creating triangular sections on both sides (A-F)
- Complete the flat drawing by adding diagonal lines (see the illustration below right). Each of these ends at the central line. Now you should see the jabot design. You can keep adjusting the lines until you’re happy with the look.

Then, trace each section. Those on the left side can be traced as they are. Those on the right side must be traced wrong side up. I colored sections B and E as an example.
Trace the sections back to back. Each section starts where the previous section ends. Together, they will create almost a half-circle. You might get to a full circle, too, depending on your design.
Adjust the outer edge to make it rounded.

Here’s my original pattern and resulting jabot. As you can see, this remains quite flat.

Kakurenbo Skirt
The jabot pattern will help you understand how to copy the sections of the kakurenbo design. But other than that, it’s not very similar. The previous valley and mountain curve sewing exercises will be helpful when sewing the piece.
The idea of this technique is to turn a flat design into a 3-dimensional one.
The book introduces a dress design. I made a skirt instead.
You’ll need the entire front of the skirt. Start by drawing a wavy style line that passes through the dart tips. You can adjust the dart lengths. It’s important to create the kind of curves shown below. Don’t leave them shallow. The whole style line has to remain above the hip line. This way, we create a yoke.
Add notches. The amount shown below is the minimum.
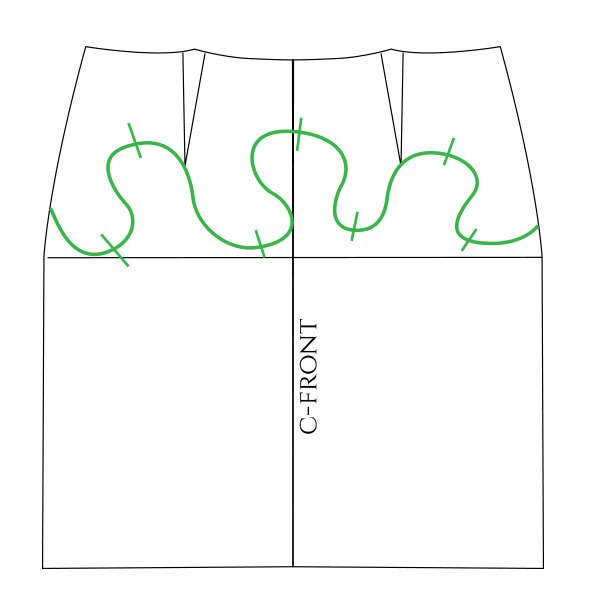
Before separating the yoke, we prepare the lower section of the skirt. Divide it into sections, as shown. You need an extra section where the curves “overlap”. This is how we create the 3-dimensional look. You can try imagining the lower edge of the yoke pointing outward. Maybe that helps. I got sections A-I.

Then, trace the sections back to back, just like with the jabot: flip every other section wrong side up as you trace.
When tracing section A, also include section B. Section C includes section D, and so on. Just like the jabot sections. Remember to include the notches. Here’s what the pattern should look like.
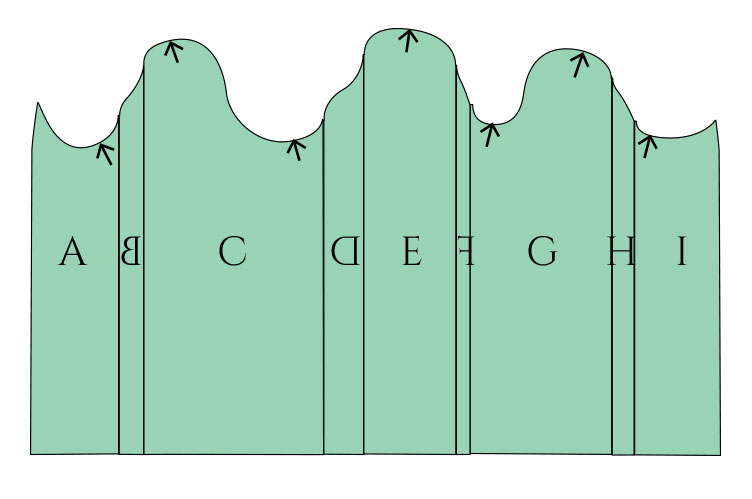
After this, we’ll add flare to the skirt. I added 5cm to both side seams and used the slash & spread method to add more flare in the middle, where the valley curves are.

I needed to add different amounts of flare to different points: Where the curves were wider, I could add more flare. For the smaller curves spreading at the hem caused the curve to become even narrower at the top, so I couldn’t add too much flare.
After separating the yoke piece, you can close the darts.
I just made a partial skirt to test the design. But if you want to make a whole skirt, draft the back piece in the same way.
Sewing
A narrow seam allowance is enough. Cut the notches.
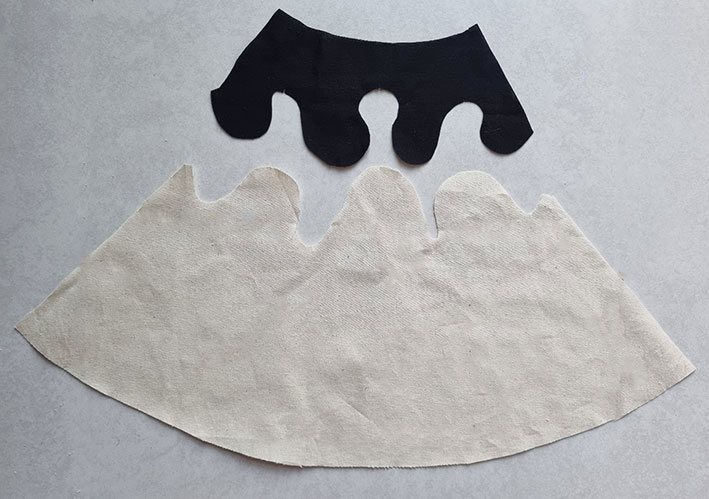
When sewing the yoke to the rest of the skirt, work on a small section at a time. Always with the valley curve on top. Match the notches and clip the seam allowance. Sew the section. Then, stop and flip the piece so that the valley curve is on top again. Clip, pin, and sew. And so on.

Once you’ve finished the piece, press the seam allowances outwards at each curve.
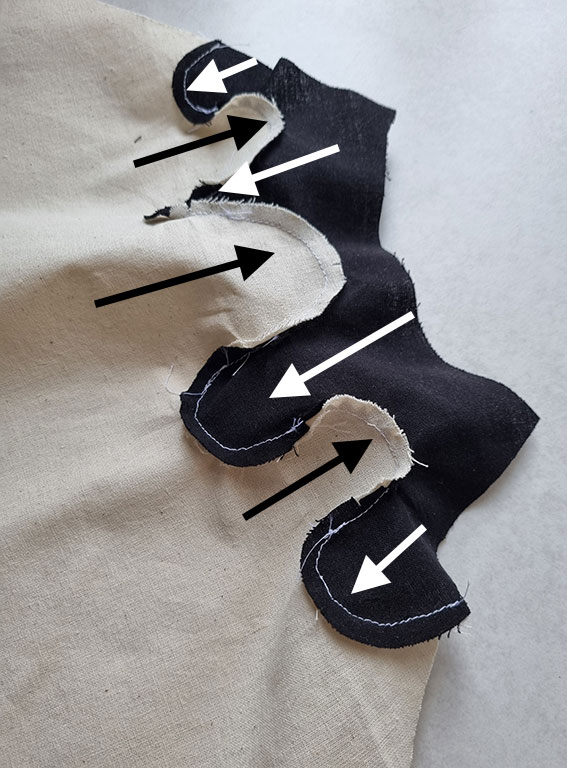
Here’s the resulting 3-D look. This was quite difficult to photograph in a way to show the effect. The yoke seam isn’t flat, but kind of undulating.
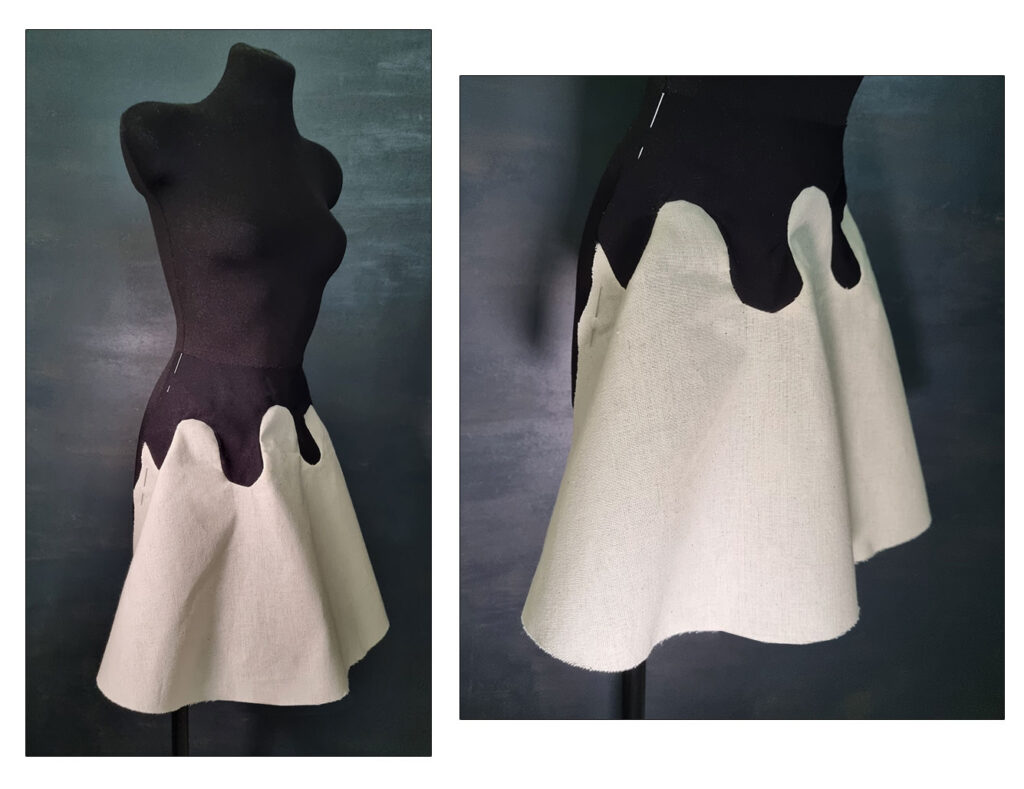
Deppari Skirt
Let’s do an easier Pattern Magic design next. Deppari are accents you can add to your design. This technique takes advantage of the darts. Or rather, of ignoring the darts.
Basically, you ignore the darts when drafting the deppari, which makes it a flat shape that doesn’t follow the body shape. The rest of the garment does. So in the end, you have two layers.
This is probably easier to understand if you draft the pattern. I made a skirt. It has both darts and side seam curves to ignore and not ignore at the same time.
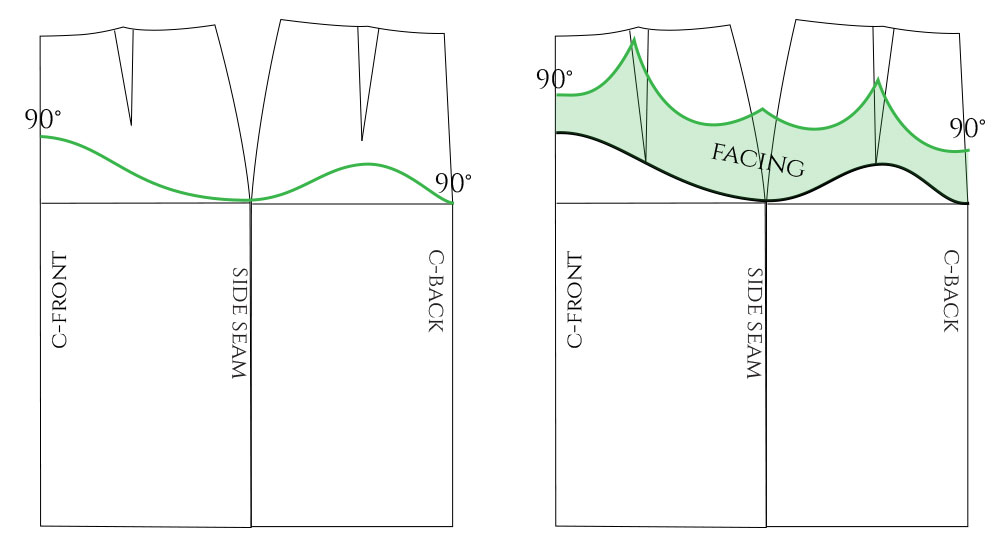
The starting point is a basic skirt block. Trace the front and back pieces so that they are aligned along the side seam.
If you’re familiar with the layering technique, it will make the pattern easier to understand. Begin by drawing a slightly curved line that stays above the hip line. Start and end at a right angle. The endpoint is at the hipline.
This will become the lower edge of the facing. Adjust the dart lengths so they touch the curved line.
Draw a line with curves and pointed tips to create the deppari. Trace the facing piece, ignoring the darts.
Trace the two layer pieces, as shown. Close the darts in layer 2. Layer 1 shares the upper edge with the facing piece.
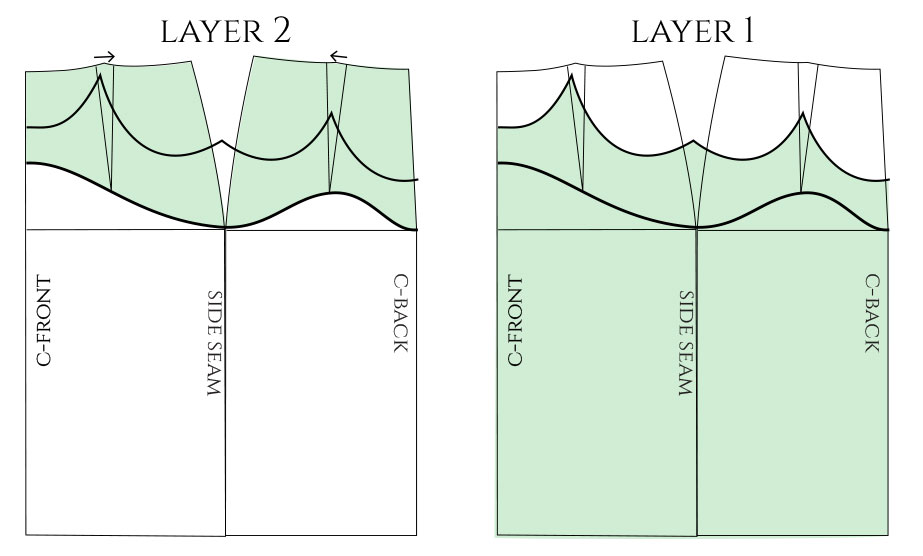
Here are the final pattern pieces:

Sewing
This was quite easy to sew. Start by sewing the facing to the upper edge of layer 1. Clip the seam allowances and trim around the tips to reduce bulk. Then, turn the right sides out and press flat.
Close the side seams of layer 2.
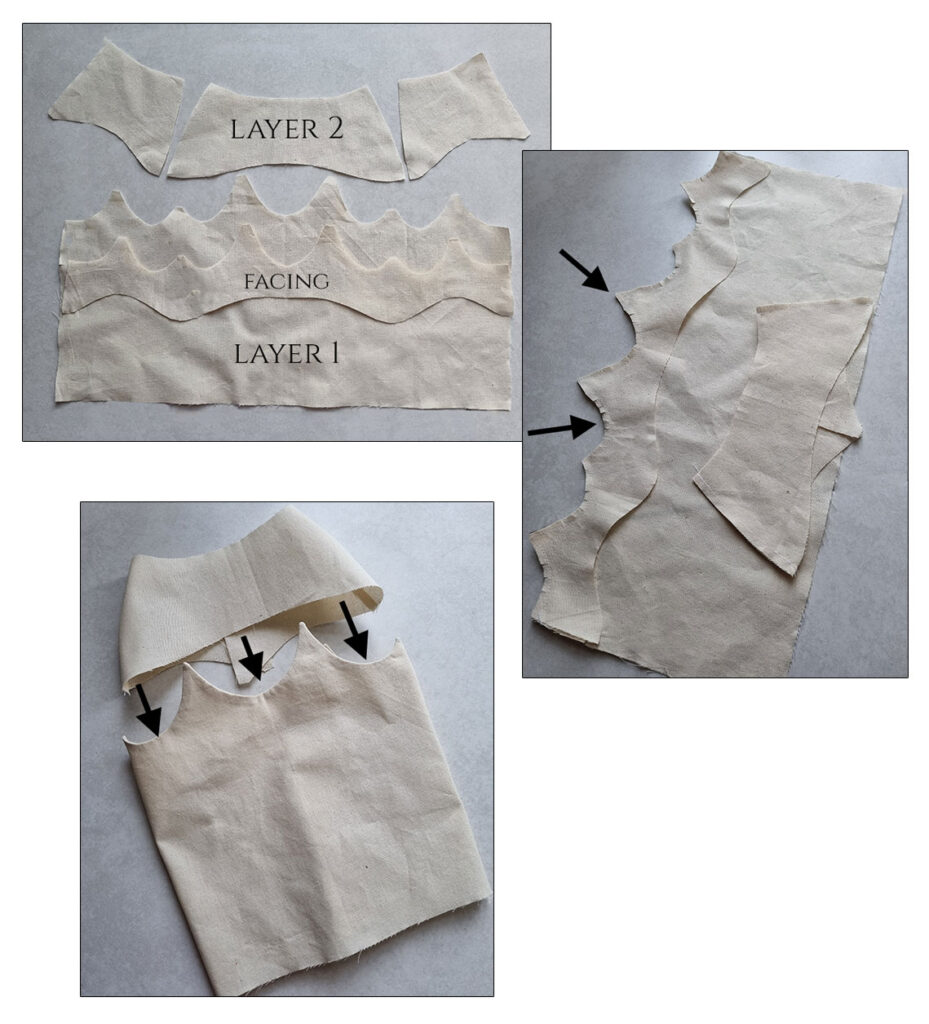
Close the c-back seam of layer 1. Then, attach layer 2 to the base of layer 1 facing. Add a few hand stitches here and there to hold the layers in place. The zipper will go to the c-back.
Here you can see how the first layer, containing the accents, is not following the body shape, as we ignored the darts and the side seam curves.
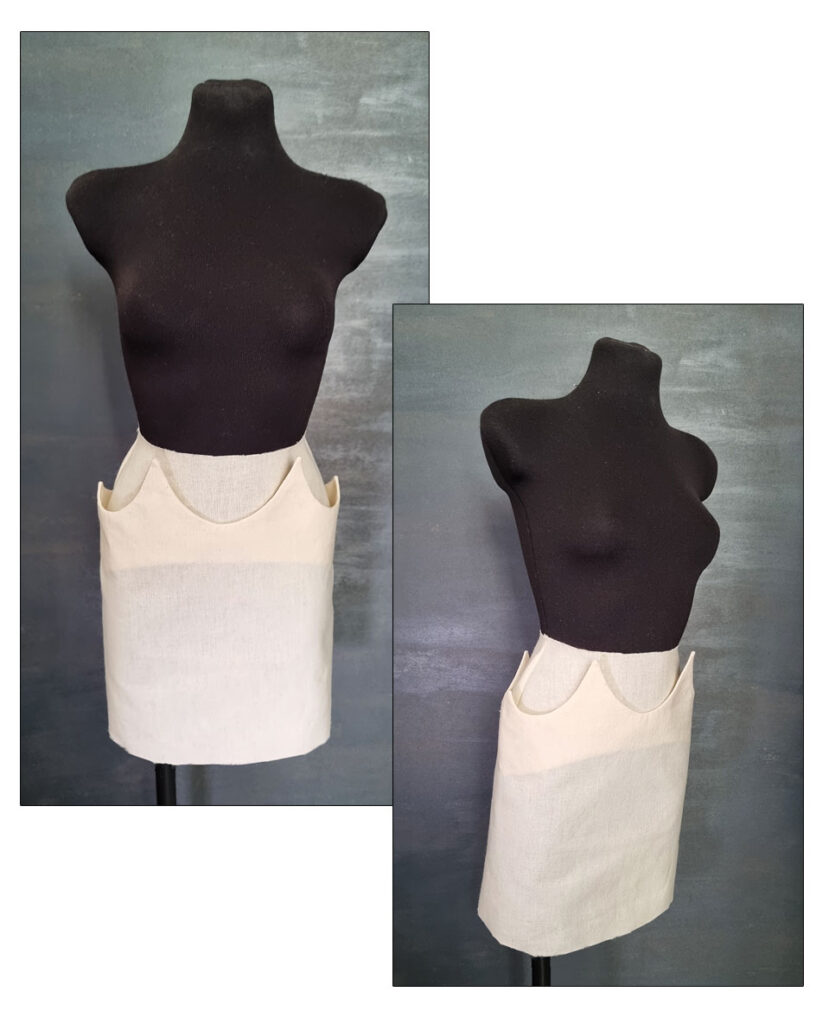
Dekoboko Top
While I’ve done several designs with box shapes, I had never quite followed the instructions in the Pattern Magic book. This technique is pictured on the cover. I’m using regular paper for this pattern as it won’t rip so easily.
The dekoboko top is a typical example of creating a sculptural pattern first in paper, and then flattening the shapes utilizing style lines.
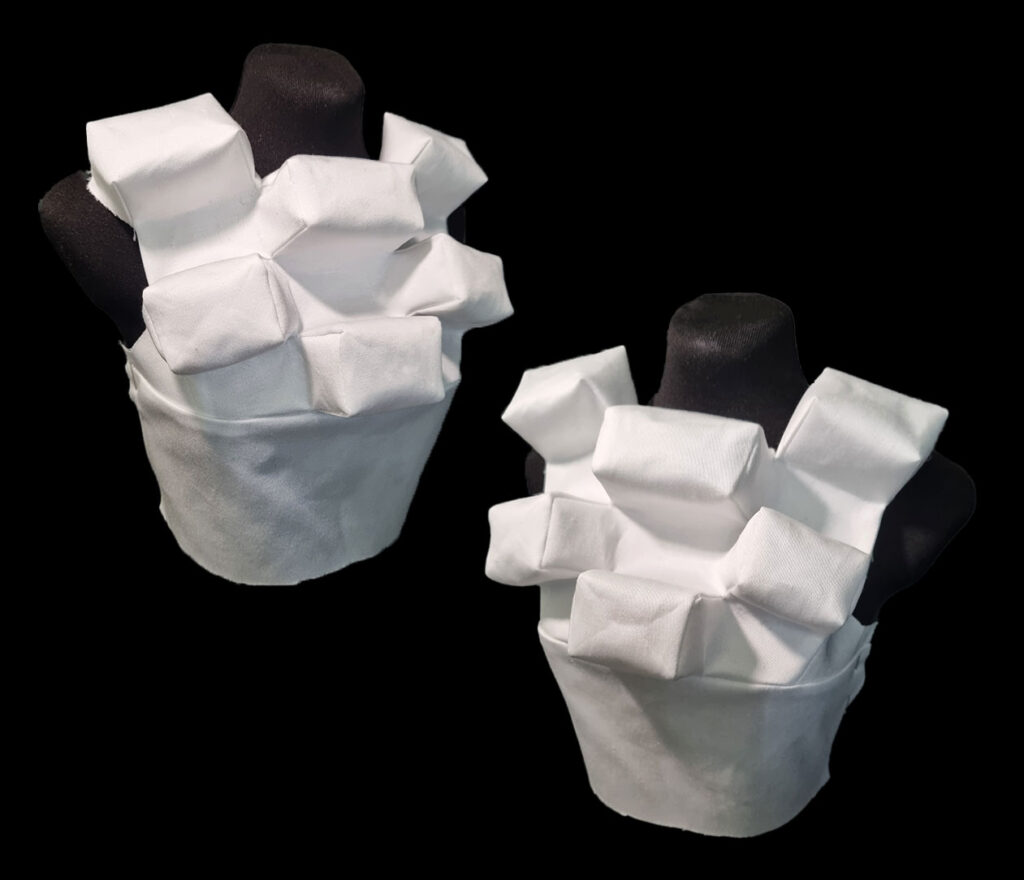
Meaning, you create the actual box shapes and then tape them onto your bodice pattern where you want them to appear. Then, you draw style lines to absorb the shapes into the seams, so you manage to flatten the pattern pieces. When you sew the pieces together, the box shapes will appear again.
I decided to create my own design, where the boxes form a checkered pattern that covers the upper half of the bodice.
First, divide the bodice into two sections by drawing a horizontal style line that absorbs all the darts into the seam. After separating the sections, close the darts and adjust the lines. Add notches where the dart tips were.
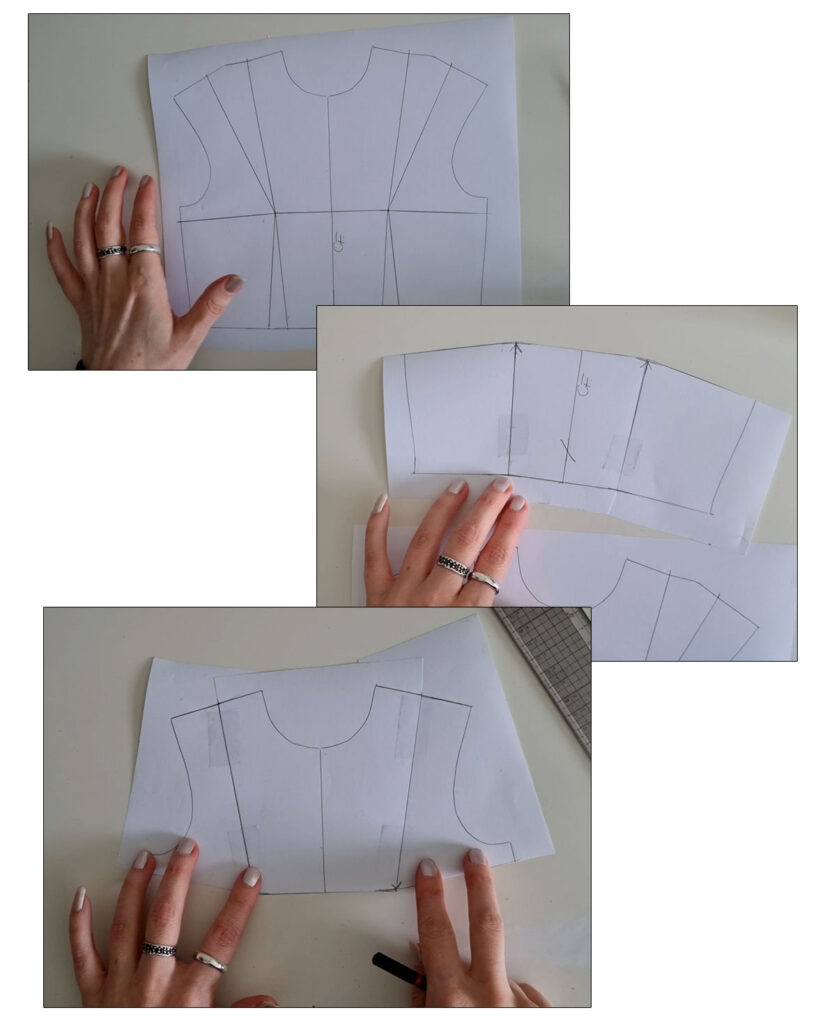
Then, we will draw the checkered design onto the upper section piece. Adjust the neckline and the armholes so you get straight lines. Draw the two sides symmetrical. I got six boxes.

Currently, the boxes are all flat. To make them three-dimensional, we need to add height. This is actually quite simple: Start by tracing the flat shape on another piece of paper.
Decide on the height. I went with 5cm. Add it on each side of the square shape at a right angle. Cut, leaving a bit of extra paper on the sides as shown below, so that it’s easier to construct and tape the box.

Prepare all the boxes in the same way and then tape them onto the bodice pattern, matching the flat shapes. Finally, cut off the base under each box.
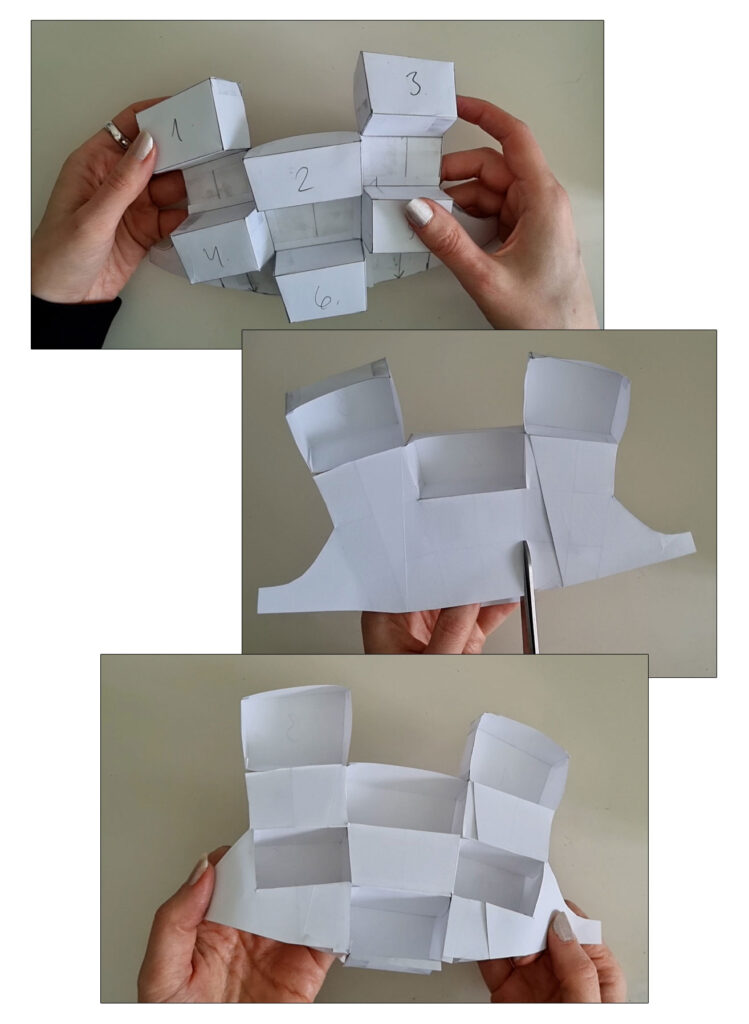
If you want to see the design on your dress form (or yourself), go ahead and tape the lower section in place, too. Then, draw style lines to flatten the shapes. They must pass through each corner of the boxes, both the top corners and those at the base of the box.
Another option is to just open little seams at each corner. You can also do a mix of the two.
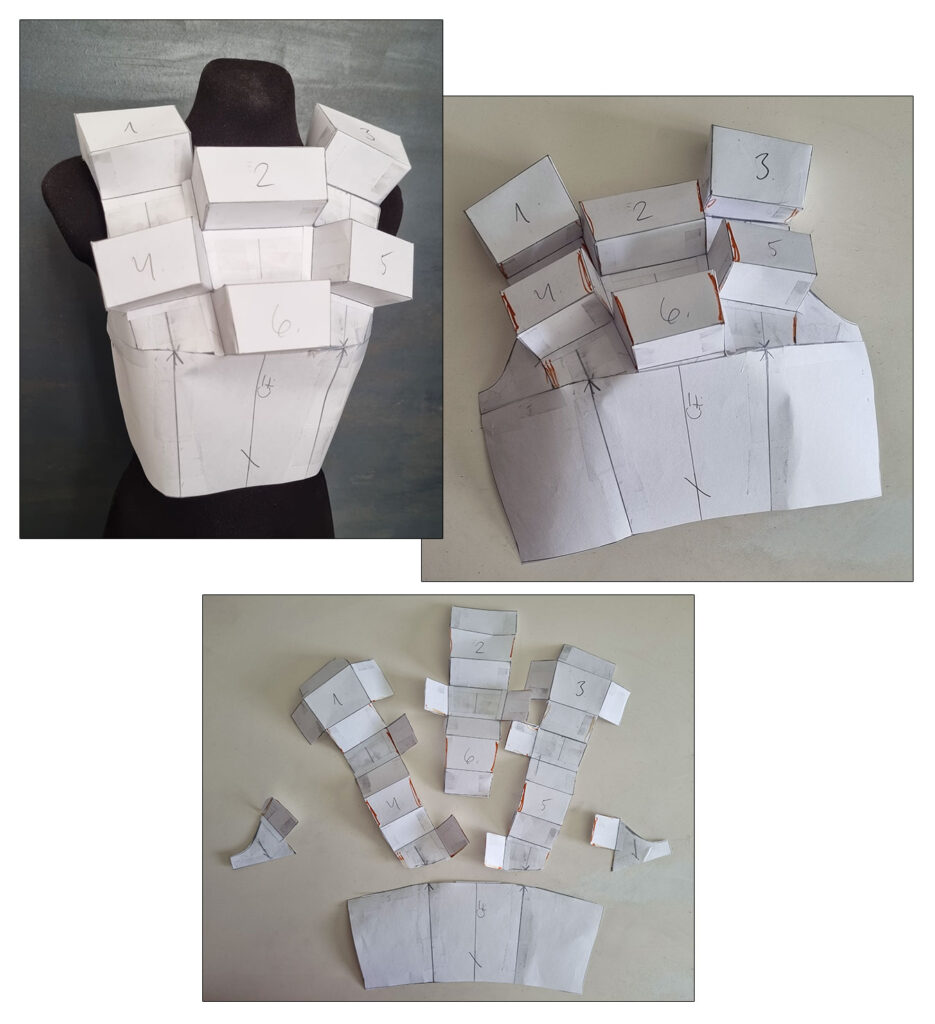
Above, you see the final pattern pieces I got. If you’re wondering about the back piece, I’d leave it plain. Just ensure that you match the neckline and armhole shapes.
Sewing the Boxes
Cut the pieces. Make little notches where the box shapes start and end, so you know where the seams go. Keep the pattern nearby to make it easier to understand which sections will be sewn where.
I started by closing the four corners of boxes 1 and 3 (see the arrows).
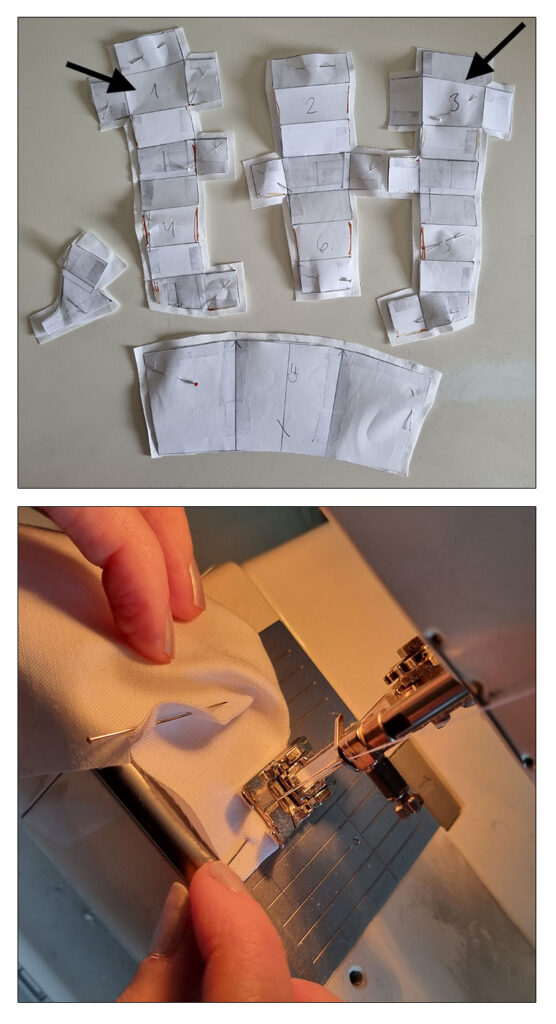
Then, I figured out how to unite the sections and sewed those seams (see the first two pics below). Here, the notches will be useful.
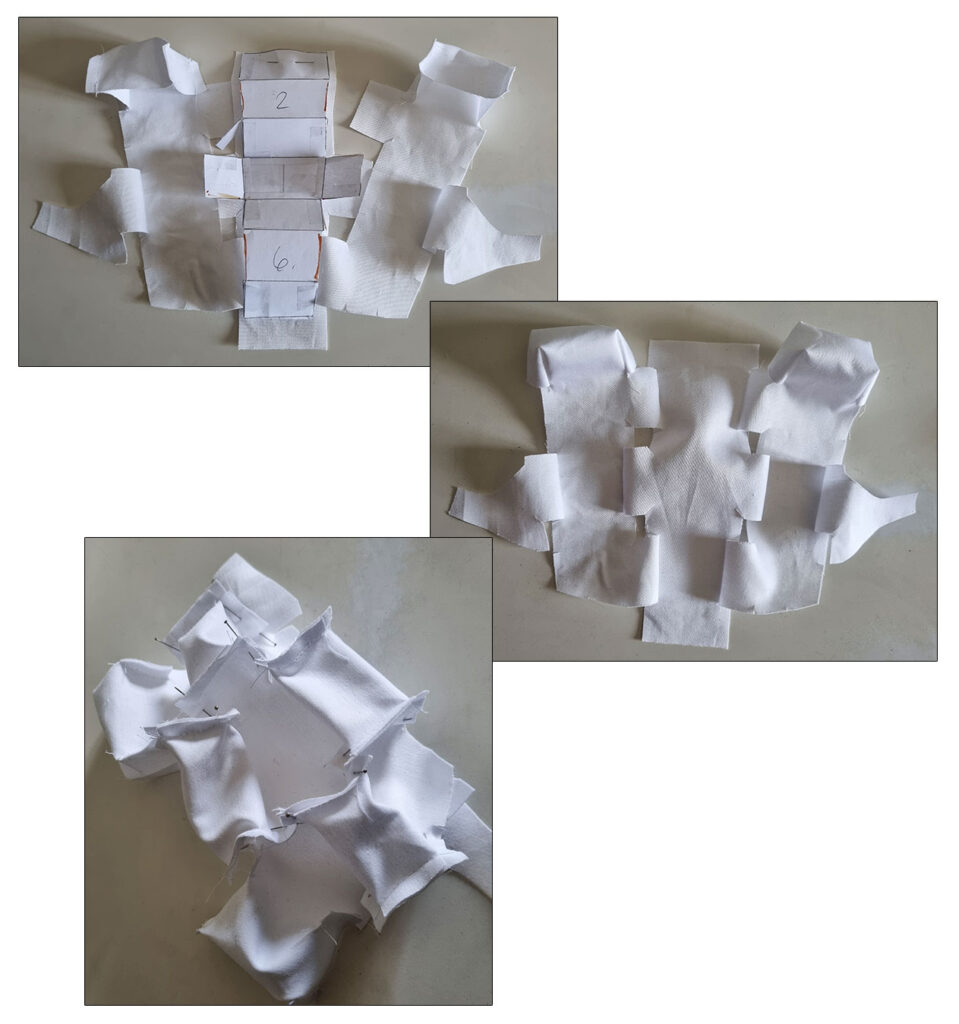
Once the sections were all united, I closed the short edges of each box shape to make them three-dimensional again. Lastly, I sewed the lower section of the bodice in its place.
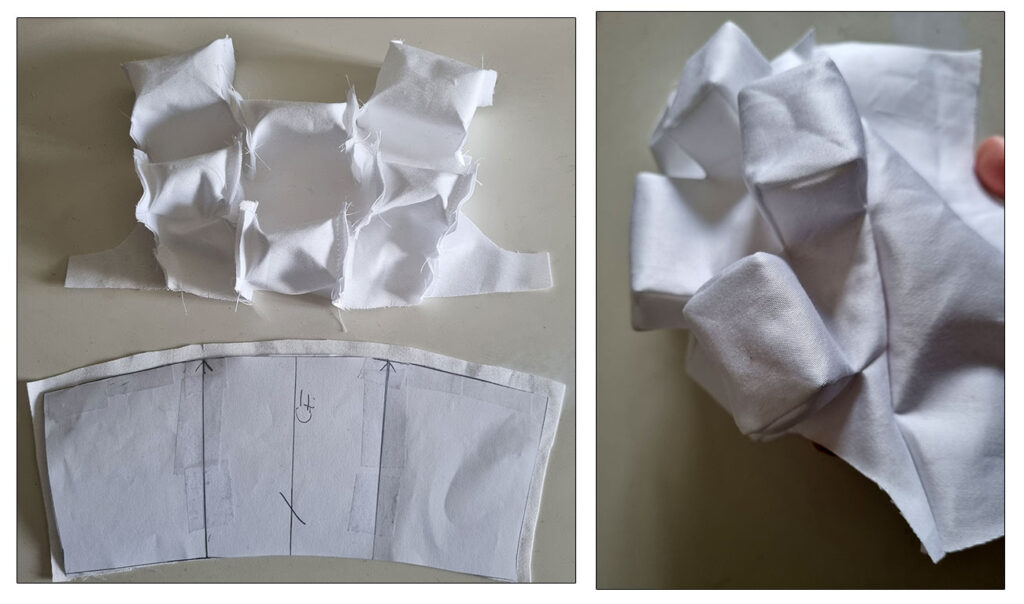
Press the seams. You can either leave the boxes as they are or even press the original square shape at the top of the box to make them “crispier”. I left them as they were, only pressing the seams.
For an actual wearable garment, you should line the top using the original flat pattern of your bodice so you get identical neckline and armhole shapes.
Here’s my version of the dekoboko top from Pattern Magic.
The Otoshiana Skirt
Last, but not least, I will show you the drop hole – or otoshiana – skirt. This was my first time testing the technique.
Similar to the previous design, you construct the hole on paper first, or rather, the tube that is below the hole. Then, cut a hole in your skirt pattern and tape the tube to the underside. Finally, absorb the shape by drawing a series of style lines.
As usual, I did my own version of the design, opting for two drop holes instead of one. I used a half-circle skirt pattern as a base. The hemline is slightly longer at both side seams, as that’s where I placed the holes.
Begin by drawing and cutting out your half-circle skirt pattern. The book suggests you cut it in muslin so you can create the entire pattern in fabric instead of paper. But I was lazy and worked with paper only…
Decide where you want to place the holes and draw their shapes onto the pattern. I drew bean-shaped holes approximately around the side seams.
Measure the circumference of the hole. Cut the hole shape out.
Then, take another piece of paper and create the tube. The width of the upper edge should match the circumference of the hole. The tube should also become narrower towards the end.
Tape the tube to the hole so it’s slightly slanted towards the hemline of the skirt. This will require some adjusting.
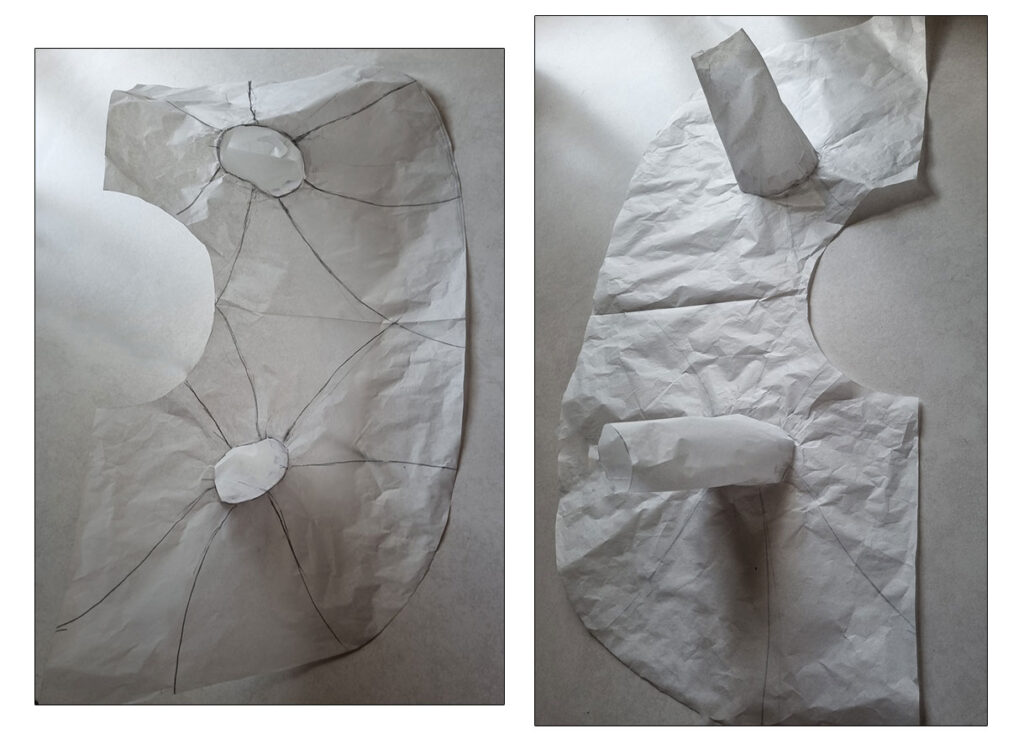
Then, draw style lines, spreading them evenly around the hole. I ended up with seven lines per hole. The lines should each end at the edge of the skirt pattern. Add notches to make it easier to sew the pieces. Number the sections.
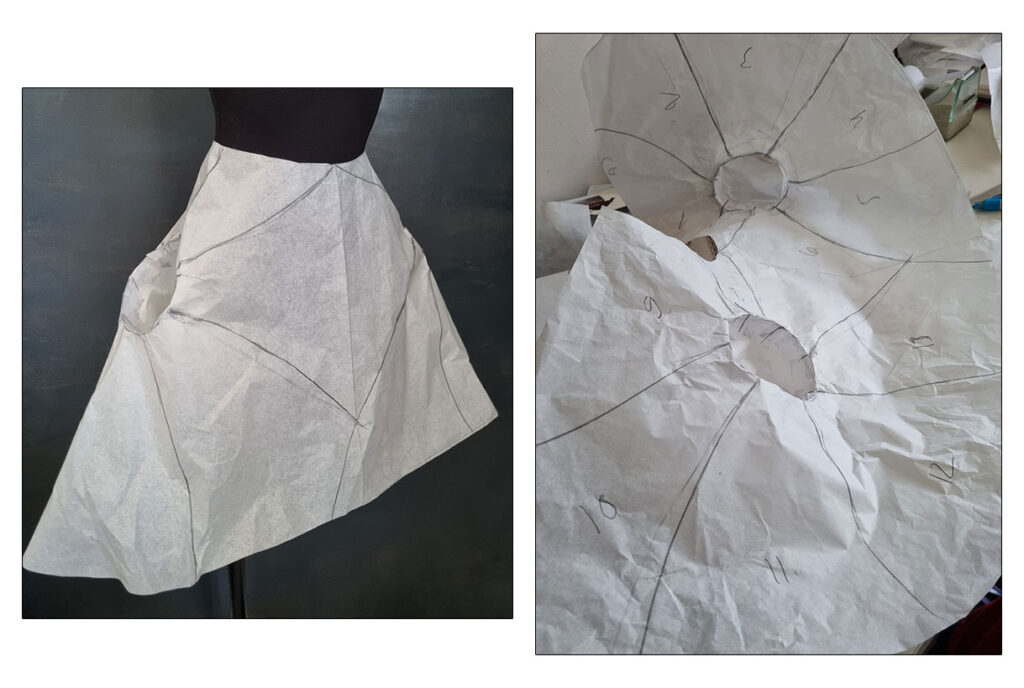
The style lines will continue down the tube. It will be easier to draw if you cut the tube open. I drew one style line and cut it open. Then, I drew the rest.
Before separating the pieces, I suggest you take a picture of the pattern. Because even with the numbers, it will be quite a mess once you’ve separated them. You should also mark the locations of the hemline and c-back lines so you can add an appropriate amount of seam and hem allowance.
So, these were my final pattern pieces.
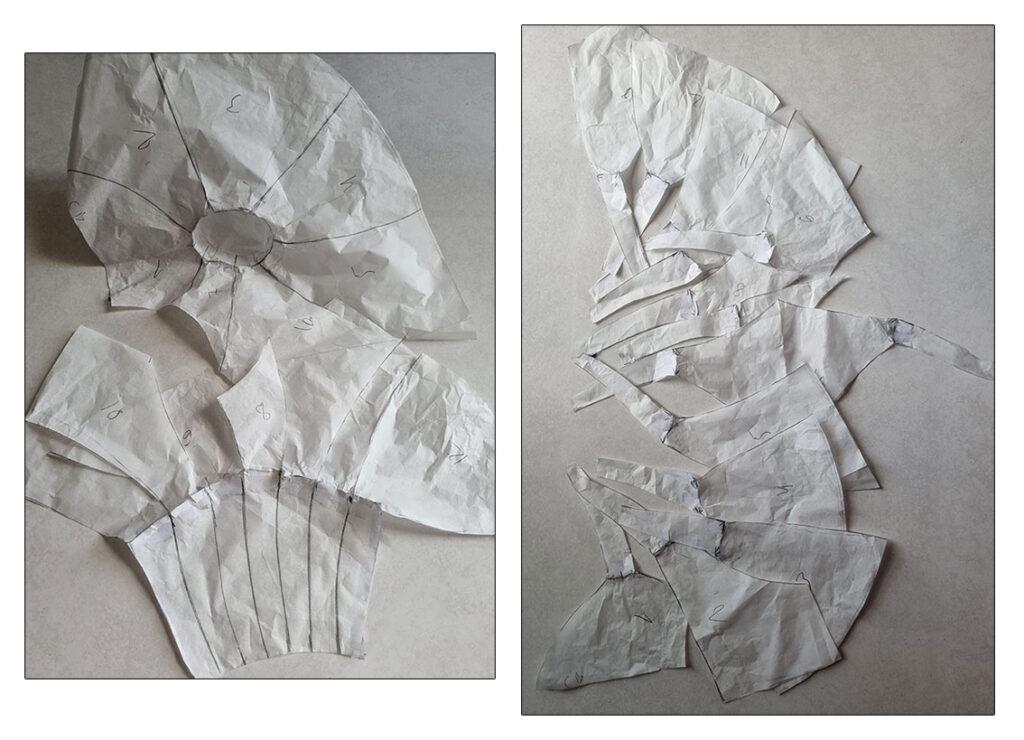
Sewing the Drop Hole
Leave a narrow seam allowance and remember to cut the notches. I added extra notches where the hole is because this is where you need to ease the fabric:
When you pin the patterns to the fabric, you’ll notice that there’s extra volume that won’t lay flat at these points. So, cut the pieces in a way that these points end up on the bias. Then, stretch the fabric using a steam iron.
If there’s an actual corner, you can simply make a cut (see the piece on the right).
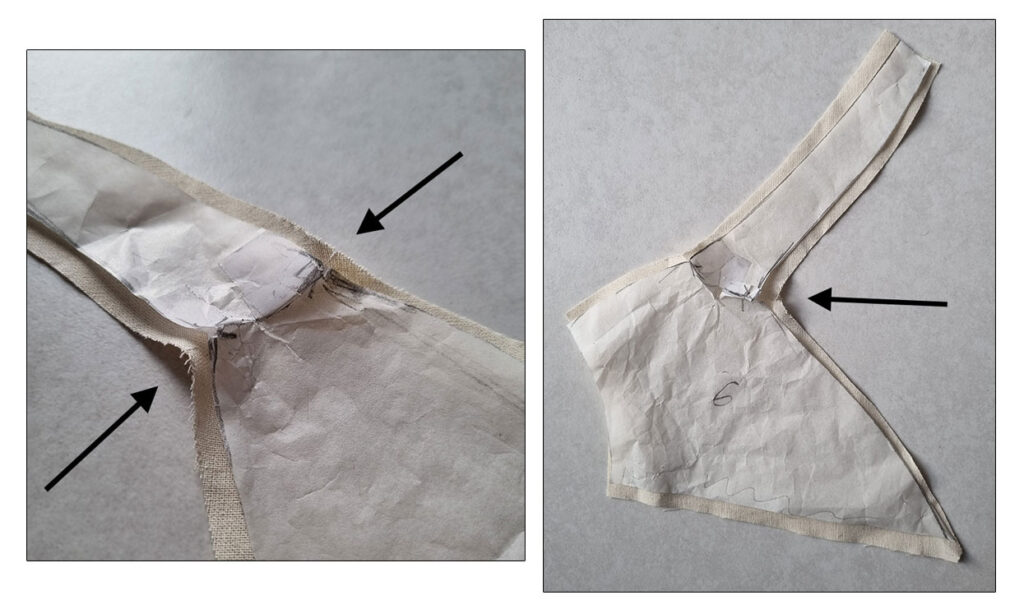
Whatever you do, don’t remove the patterns until you’ve pinned the pieces in the correct order. Use the picture you took as a reference.
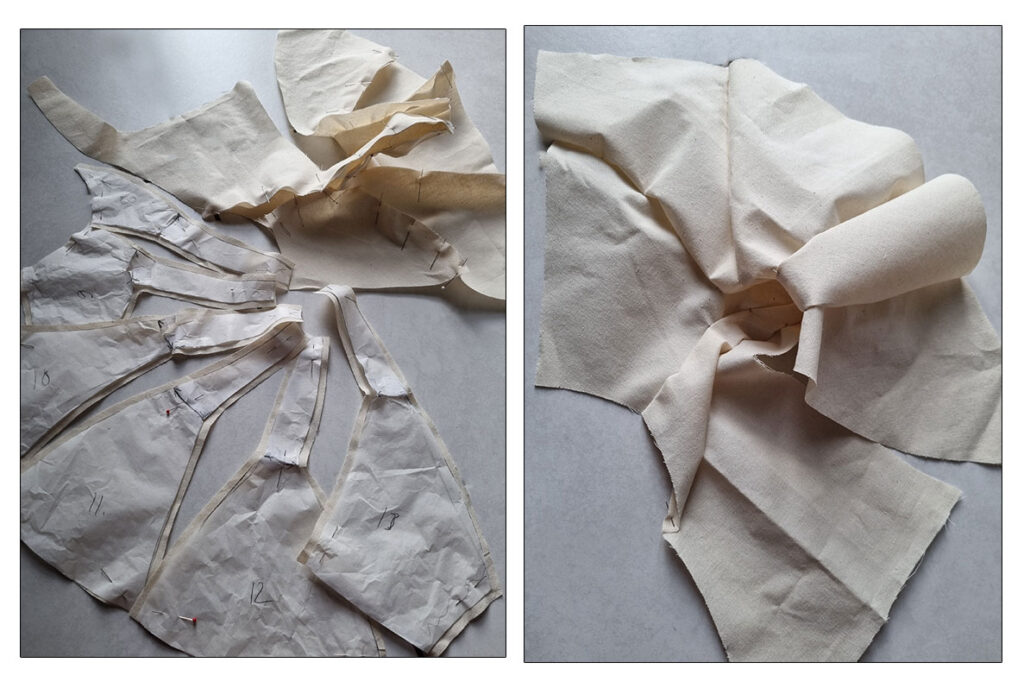
Little by little, the skirt will take shape. Leave one seam open per hole, so it’s easier to press the seams.

Then, close the remaining seams. There will be a zipper at the c-back. You can add a straight waistband.
Here’s the result. The skirt kind of has pockets with holes in them!
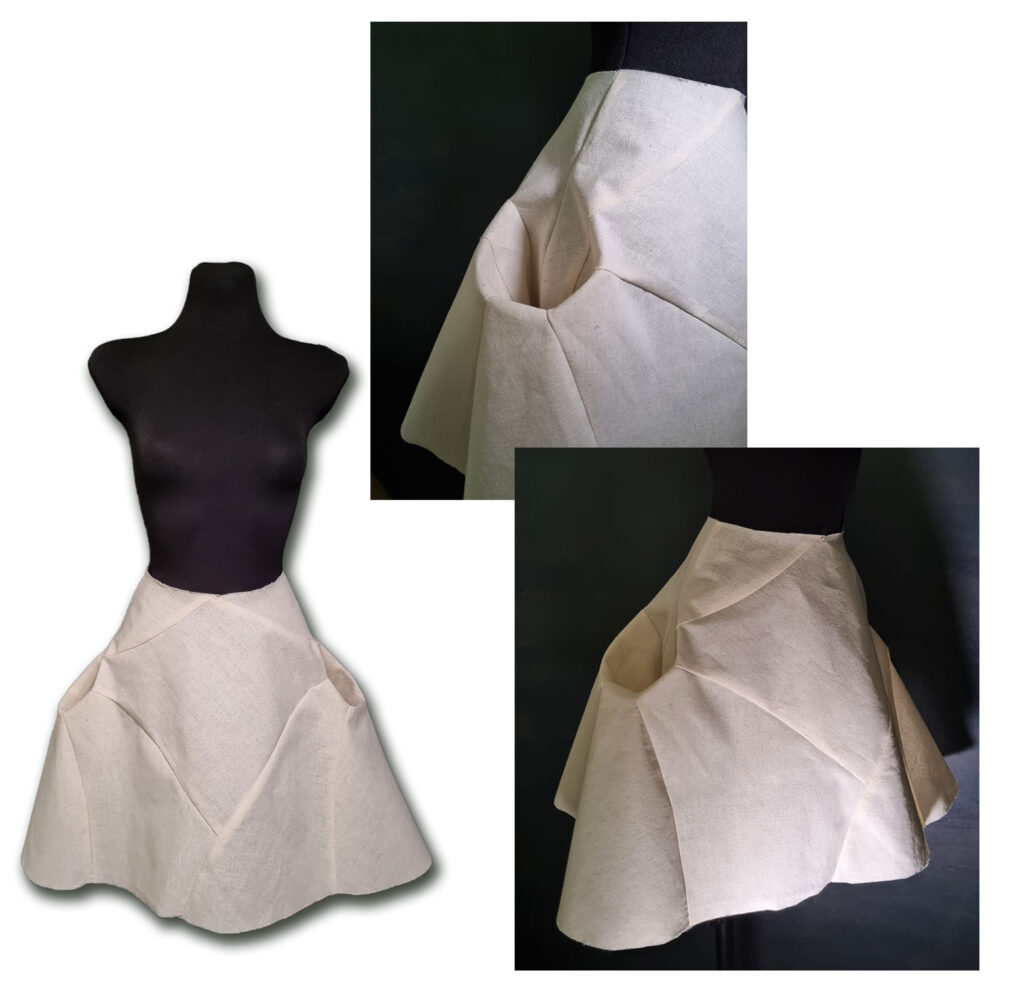
And that concludes my post about the first Pattern Magic book. It was nice to revisit the book after all these years.
If you’re curious about the other techniques, I have this Old post about the knot, and here’s the bamboo bodice, although it’s based on Shingo Sato‘s method.
I will definitely go through the other books as well and write more posts about Pattern Magic soon!






14 Comments
Hi Minna! This is an incredible post and such a generous gift!! Thank you so much for all the effort that went into it!! The patterns, photos of all the stages, and descriptions/instructions are clear and thorough, and the designs are beautiful, creative and fun. I bookmarked it and will definitely revisit! Best regards and thank you again!! 🙂
You’re welcome, Liz. 🙂 I’m glad you enjoyed the article as there will be another one of these for sure. I really loved making the pieces. 😀
Hi there,
Yes, I do have this book and absolutely LOVE it!
So happy you brought it back to my attention, thank you for that!
You’re welcome! 🙂 Yeah, I hadn’t picked them up for quite a while myself. But they always seem to yield new ideas when I do.
Beautiful inspired work. Wishing you much success!
Thanks so much! 🙂
Hola Mina, me encanta tu Blog, es tan detallado y bien explicado, a la vez complejo, aprendo mucho, llegue a ti por un curso en Domestika, sobre las Mangas, ahora ya no puedo dejarte, mil gracias por compartir tus conocimientos. Gracias de nuevo.
Hola Isabel! Thank you so much. 🙂 I’m pleased to hear you enjoyed my Sleeve Course. I hope you’ll learn plenty of new tricks here at my blog, too.
I am very grateful thank you very much
My pleasure. You’re welcome. 🙂
This is honestly God’s work, I believe a few months ago I sent an email to Minna asking for some in depth explanation of the Pattern Magic series and here it is!?!? I thank you all the effort you have put in to making these detail tutorial for us, truly, doing God’s work xxx
Thanks so much! 🙂 It was my pleasure. Thank you for reminding me of the Pattern Magic books. I’ll make one more tutorial. 😉
Hello, Could you post a back pattern piece of Kakurenbo Skirt. I’m wondering , may I use the same shape for back and front?
Yes, you can prepare the back piece in the same way and add the zipper at the side seam. 🙂