Here’s a tutorial for those of you that are interested in learning to draft their own basic skirt pattern. Otherwise, you can find a ready-made multisize basic skirt block on my shop page.
As you might already know, the starting point of drafting patterns is the basic pattern block. You should create the basic pattern for each type of garment using your own measurements: skirt, pants, bodice/dress with darts, bodice/dress without darts, etc. Afterwards, you can modify that pattern to make all sorts of different garments.
I’ll show you how to draft the basic skirt pattern as the skirt is the most easiest piece of clothing to start with. Later I’ll write some posts about how to turn that pattern into different types of skirts. In the meantime, take a look at my panel skirt -tutorial.
Measurements
To draft this pattern, you’ll need these measurements:
- waist
- hip
- distance from waist to hip
- total length of the skirt: waist to knee for basic skirt block
Divide the first two measurements (waist and hip circumference) in half, because the pattern only covers half of the total circumference. Then add 1cm (0.39in.) of ease to the hip measurement.
In my example I’m using the size M measurements, so
–waist: 72cm /2 =36cm (28.34in. /2 =14.17in.)
–hip: 96cm /2 =48cm +1cm of ease= 49cm (37.8in. /2= 18.9in. +0.39in. =19.29in.)
–waist to hip: 20cm (7.87in.)
–total length of the skirt: 58cm (22.8in.)
Drafting the Basic Skirt Pattern
Now that you have all the numbers, you can start by drafting a rectangle where the width is your half hip measurement +ease and the height is the total length of the skirt. Mark the hip level using your waist to hip measurement. Like this:
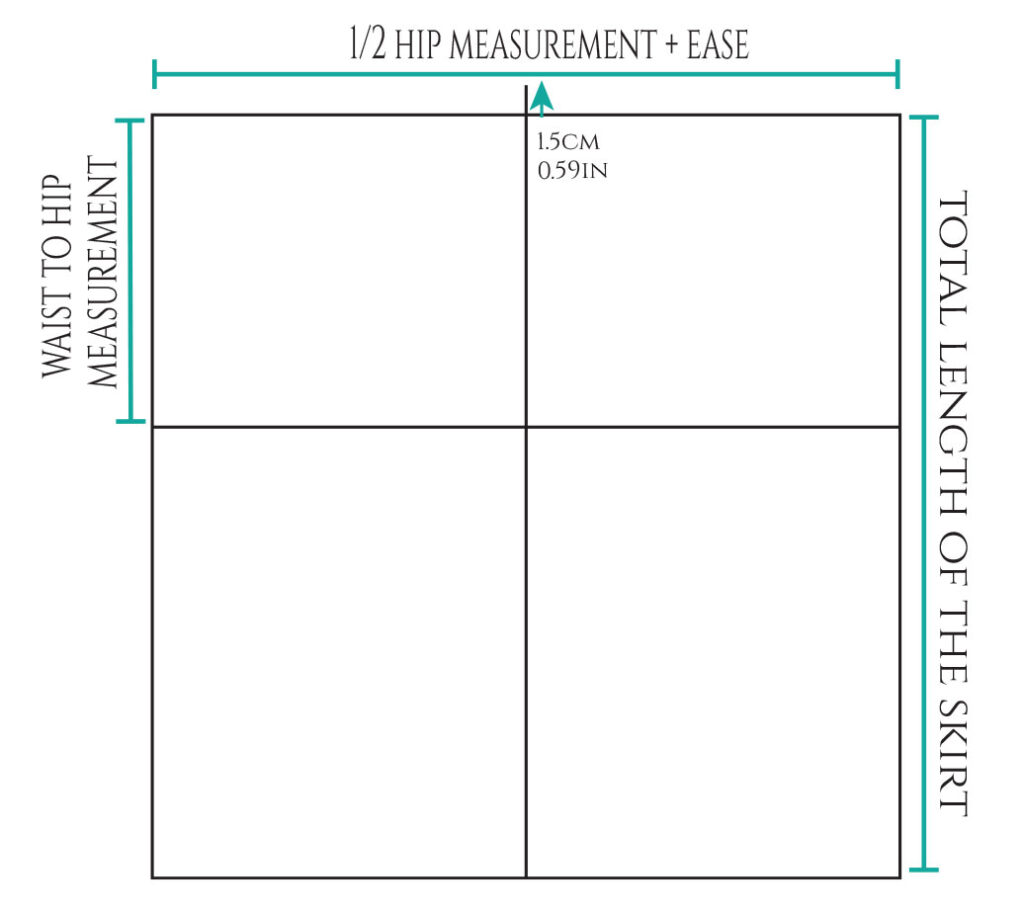
Divide the rectangle vertically in half, right in the middle. This will become the side seam. Extend the line by 1.5cm (0.59in.) above the rectangle.
Then, draw lines from the top of the side seam position to centre front and -back (see the following diagram).
Now it’s time to do some more calculations as we need to get to the waist measurement. First calculation:
1/2 hip measurement+ease minus 1/2 waist measurement
In my example 49cm – 36cm = 13cm (19.29in. – 14.17in. = 5.12in.)
This is the quantity you have to remove to get the correct measurement at the waist. You have some alternatives depending on how large the difference is. Here’s the most basic way:
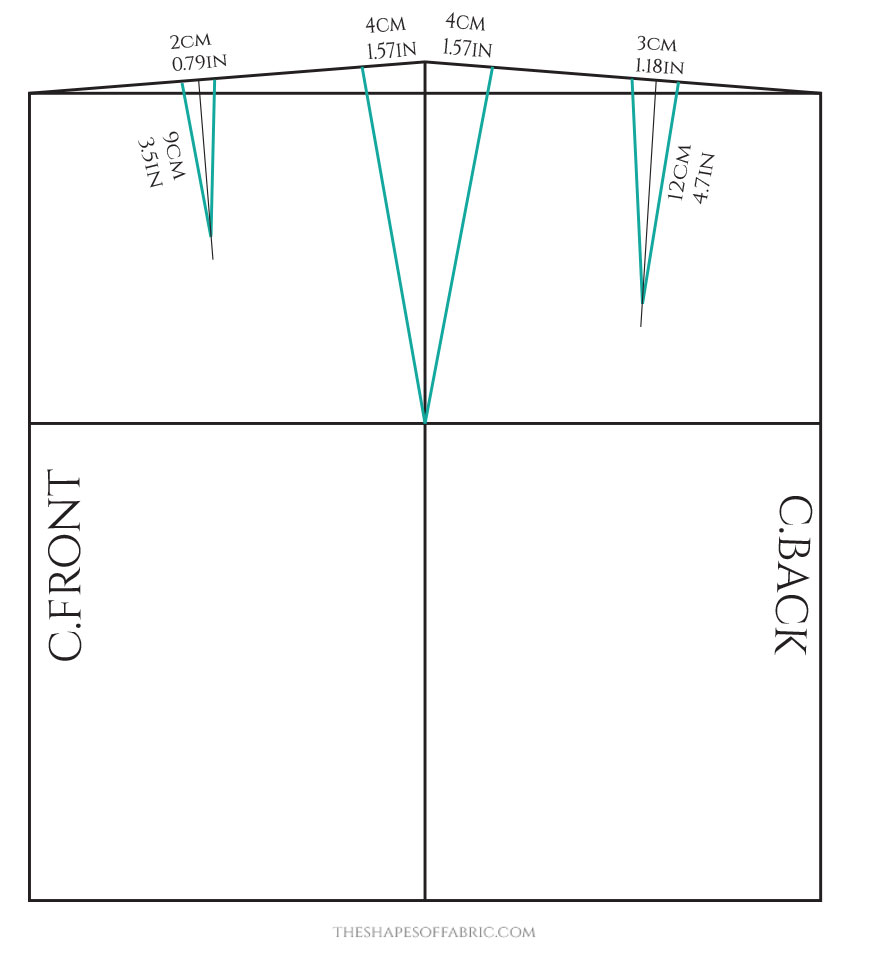
The idea is to take off about 2/3 of the difference at the side seam. In this example, 8cm (3.14in.) divided between the front and back side seam, which makes it 4cm (1.57in.) per side.
The remaining amount will go into the darts, which I placed in the middle of both the front and back waist lines. The back dart will be larger than the front dart because we have a hollow area at the back waist. The wider the dart is, the longer it will be. In the drawing above, you can see how I divided the remaining 5cm/1.97in. between the darts.
If it looks like your darts will become too wide, you can also draw two darts in the back.
Here’s an alternative way to divide the volume. It’s a bit more advanced.
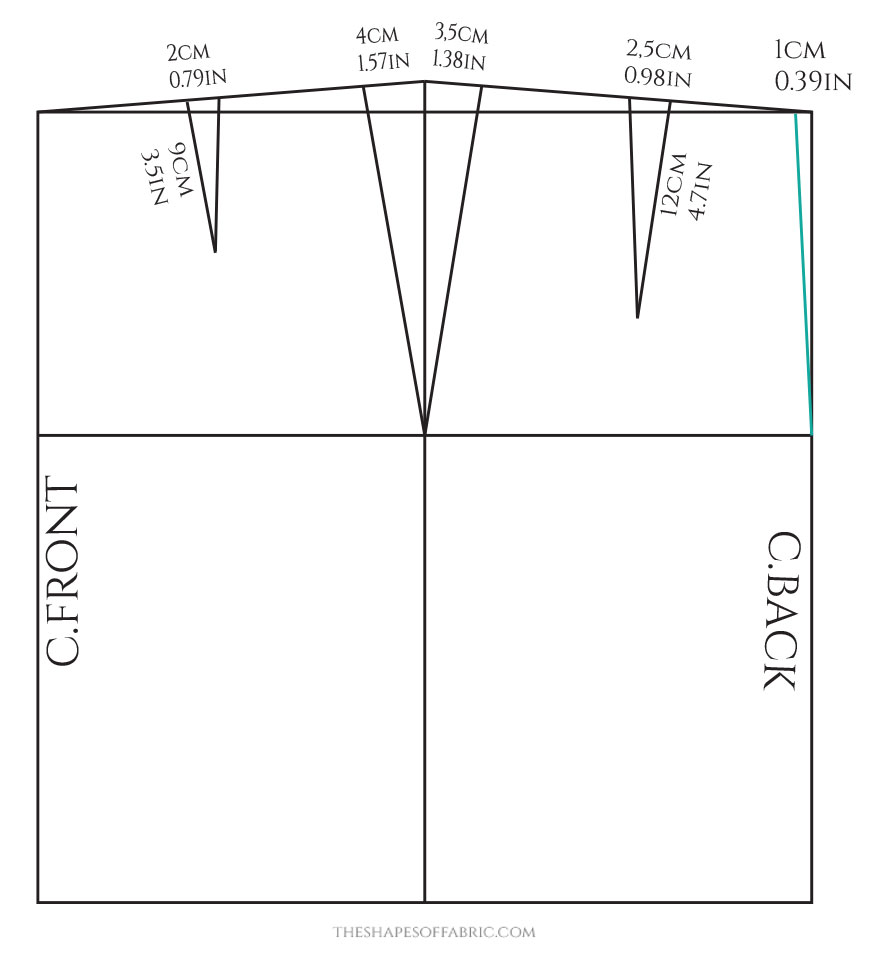
In this version, the back dart is a bit smaller and the side seam of the back piece a bit more straight (which looks better). So I took that 1cm (0.39in.) off at the centre back instead. As mentioned earlier, that’s usually a hollow area, so it’s a good idea to take in some volume there anyways.
Of course, if you don’t want a back seam, you can’t do this. Personally, I prefer the zipper at the back, so there has to be a seam in any case.
However, in the end it depends on your personal measurements. Maybe your darts are already small, so, you can’t remove anything without eliminating them completely. The rule of thumb is to remove more at the back than the front, and to remove the largest amount at the side seam.
Finishing touches
Whichever way you choose, the final step is to add some roundness to the pattern. Meaning, the area of the hips at the side seam and the waistline.
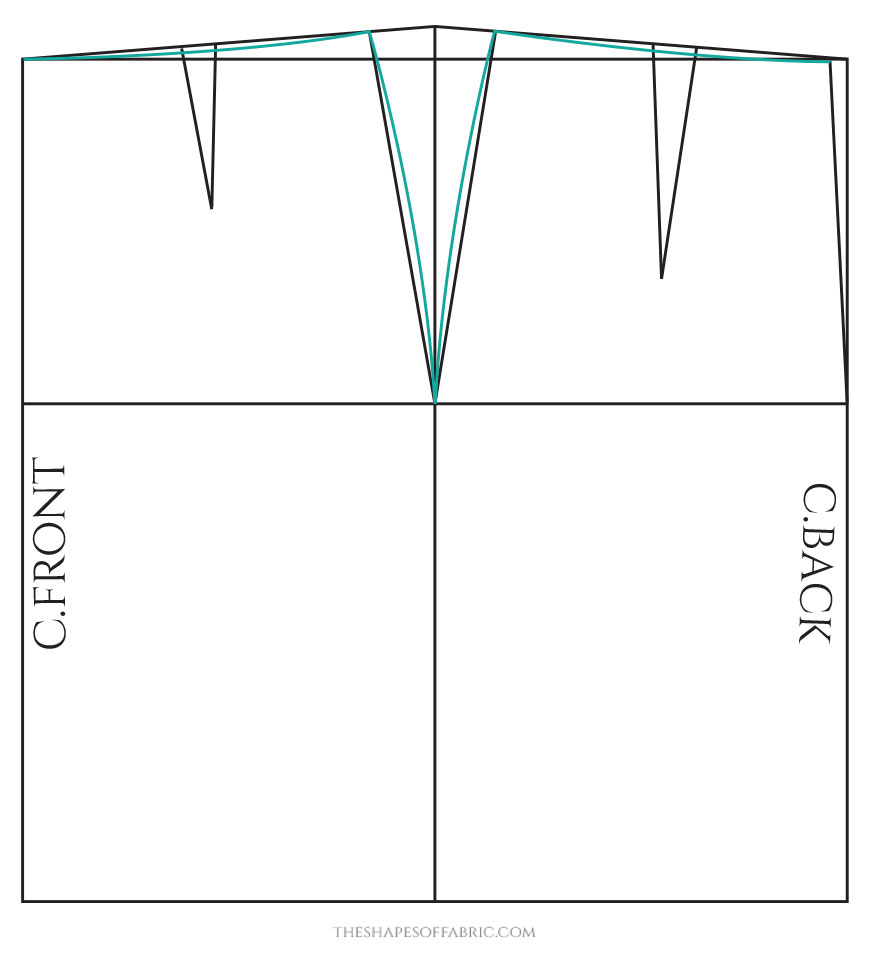
Trace the two pattern pieces. You should cut the waistline with the darts closed to get the correct dart allowance shape.
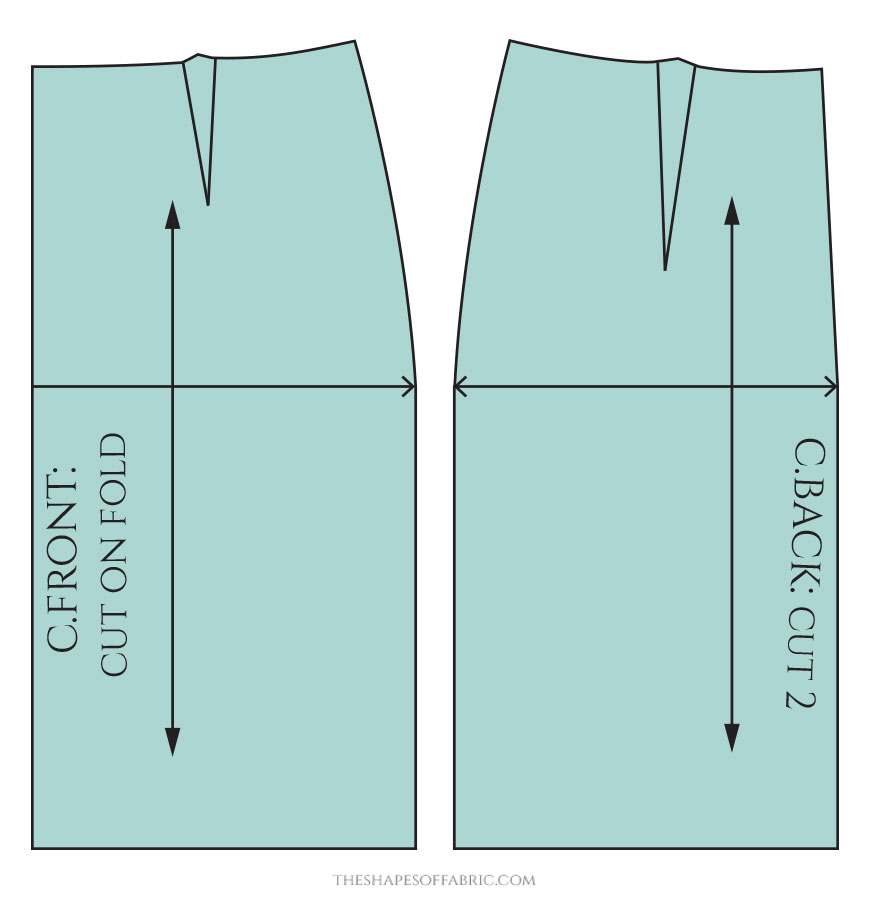
Now your basic skirt pattern block is ready. The front piece is cut on the fold. If you have a shaped c-back seam, cut the back piece twice. Make a toile to check the fit and correct the pattern accordingly. You can add a straight waistband using your waist measurement.
Next steps
So you have your basic skirt block. Now what? On my blog, you can find quite a few articles on skirt pattern alterations. Check out also my shop page for Skirt pattern guides!


41 Comments
Wow great write up here. Weldone madam. But couldn’t really see the figure on the diagram of this basic skirt pattern would really appreciate a clearer pics pls
Thank you. 🙂 Drafting the basic patterns is one of the most difficult parts of patternmaking. More calculations involved. If you let me know which part you find most difficult, I can try to add some additional instructions. 🙂
I just made yet another skirt that gaps all over my waist, so I’m going to spend this weekend drafting a pattern as you laid out here. However, these sentences are confusing.
_____
(1) the final step is to add some roundness to the pattern. Meaning the area of the hips at the side seam and also the waist line. (2) You should cut the waist line with the darts closed.
——–
(1) I don’t see roundness added in your example and I can’t visualize what that means.
(2) What does it mean to cut the waistline with the darts closed? Do you just mean to not cut the V of the dart out?
I hope you’ll get your skirt pattern right. The roundness at the upper hip-area is minimum, that’s why you might not see it. The highest point of the curve should be in the middle, between your waist- and hip lines. However, you can always reduce the curve when you’re doing the fitting of the toile, so don’t worry. The waistline is slightly curved inwards. Cutting the pattern with the darts closed means that you close the dart of your pattern the same way you’ll do in fabric. Then correct the waistline if it’s uneven around the dart, and cut. This way you will have the right amount of fabric for your dart.
Hello! Thank you very much for your article ! I searched to draft a basic skirt and found your blog 😊 I will try it tomorrow and I want to know if I can do that for a high waist ? Also when I tried to sew a skirt that I bought, I always need to do a full tummy adjustment and sway back adjustment.. 😕 can I manage to do that while drafting ? Or I need to do that after !’? Thank you very much for your help
Hey, welcome to my blog. 🙂 If you want, you can already start adjusting the basic pattern before making the toile. Like raising the c. front of the waistline 1cm and lowering the c.back of the waistline about the same amount. Then you might find that folds work better than darts for you. Once you make the toile, you can adjust the rest of the pattern if still needed. The basic skirt pattern has a natural waistline. In the skirt tutorial posted after this, I explain how to make it high waisted.
Oh thank you for your answer !! I will do like that so when you say natural waist, I take on the line of the belly button than I do the adjustment like you said for a high waist skirt
I’d never seen an “all in one” skirt pattern – nifty! I am drafting one out over Easter weekend (right now … 🙂
My question is how you are up the asymmetric side dart since the legs are no longer equal. I’m thinking it will pull the front of the skirt around toward the back (or vice versa) just a little and the line if the dart will be very slightly angled which is what makes it more flattering? But not sure if there’s anything special in sewing it up ….
Thank you for the diagram and tutorial. Found it via your flounces and ruffles pages.
Had a typo in there. Basic question is how to sew up the dart legs when they are not symmetric.
I’m glad you found the tutorial useful. 🙂 This is practically the basic skirt pattern, which you use as a base when drafting all the other skirts (there are quite a few examples on my blog). Before using the pattern, you have to correct the dart legs so that they match in length. You manage to do that if you fold the dart before cutting the waistline of your pattern. I know that darts that are closer to the centre back look more flattering, but for the rest, I couldn’t say. It’s a question of style and personal taste I guess. 😀
Thank you. Always cheering to hear back from the author. 🙂
I was asking because of your alternative / more advanced example (on this page) for the side dart, where the half of the dart that belongs to the front covers 4 cm and the other half, belonging to the back, covers 3.5 cm. I’ve never seen a dart before where it wasn’t mirrored. 🙂
I’m on my 2nd toile and a bit disheartened. I should say that I started with a tutorial very similar to this but not actually what you outline above. I’ve had my first toile apart a couple of times, unpicking and re-sewing the darts … largely, making them longer than the fixed amounts given to start with. Makes me appreciate how your tutorial starts by including the difference from waist to hip line which is what I was figuring out by trial and error. 🙂
I’m glad to help. 🙂 Ah, you’re talking about the one in the middle! That in fact is not a dart, but the side seam. You need to separate the front and back piece. It’s just drafted that way, but then you copy them separately. However, you Could avoid the side seam, too. In that case keep both sides identical. But this being the basic pattern, it’s better to separate. There is no absolute rule on the dart sizes. That depends on how much difference you have between your waist- and hip measurement.
I have a question. I have only 6 cm difference between waist and hip. Should I just forget about darts?
If there’s very little difference to divide between different points, you could either only use it at the side seam, or divide it between the side seam and back. (Because the back usually has a hollow area.) When you do the toile, you can check if that works or if it’s better to divide the number in another way. 🙂
I am plus-size, and regularly run into a problem where most of the patterns I find are improperly shaped for plus-size women — not sized, mind you, but shaped. In this case, there are seven inches of difference between my hip and waist measurement, but they don’t neatly curve together, I have love handles and a bit of belly hangover that stick out farther than my hip measurement before curving into my waist. How would I account for that while making this pattern?
Thank you for your help!
Hey Nicole. 🙂 Well, in this case, you will need more space in the front. So take a measurement at the widest point of your tummy. Measure also the distance from the waistline, as you’ll need this information for your pattern. Then check your pattern at the said level and add the amount you need (1/2 measurement) at the c.front of the skirt, all the way down. Also, lift the c.front 1cm (3/8″) at the waistline, because you’ll need slightly more length. Now, with the extra width, see if you manage to divide the numbers better between the darts and the sides. I’d probably draw the side seam curves higher up to give space to the love handles. But you can fine tune the line when you fit the toile. There’s also the possibility to skip the front darts completely or turn them into folds, if needed. 🙂 I hope this helps.
Thank you so much!
This may sound like a really silly question, so, I add my own seam allowance to what I’ve drafted before I sew my toile right?
Yes, that’s correct. 🙂 The basic patterns generally don’t have seam allowance, so you need to add it when cutting the fabric. If you leave a bit more generous amount of seam allowance, you’ll be able to modify the skirt toile more easily if it doesn’t fit well straight away.
Thank you! Another question, I’m wondering, since a pencil skirt is generally supposed to be fitting, I guess I can draft my pencil skirt pattern straightaway using this method, and make some adjustments according to your other post? But I’m wondering, for non-stretchy fabric, what amount of ease do you recommend I add to the formula above for a pencil skirt? Thank you very much again.
No problem. 🙂 Well, with 1cm of ease you get a rather snug skirt, so I’d say don’t go below that number. If you prefer to have more space, you can add an extra 0.5cm both front and back.
Hi There,
I am a complete novice so this might seem like a stupid question. Once I have made my draft skirt pattern and am ready to use to make a skirt pattern to cut out, do I need to add seam allowance? I am not sure if the ‘ease’ takes care of this?
Thank you
Hello again,
Sorry, I can see that my seam allowance question has already been answered so apologies for that. I do have another question though about the length of the darts. How do you calculate their length?
Also, my waist to hip measurement is much shorter than 20cm (the distance in your example) only 12 or, if I go for a lower waist band, (which I prefer) its only 10cm. Am I measuring it incorrectly?
Many thanks
No problem. 🙂 There isn’t really a definite rule about the length of the darts. As long as they end above the hip level, you should be alright. The wider they are, the longer you should make them. For standard measurements the waist-hip distance is usually at least 18cm, so you might not be measuring the waist at the correct position. It should be located right below the rib cage. Then find the point where your hip is at its widest. However, everyone has their own body shape, so you might have measured correctly, and should start the hip curve from higher above than the example. You can lower the waistline afterwards, when you’re making the actual skirt patterns. But for the basic pattern, use the natural waist level.
Hello! First, thank you so much for this comprehensive tutorial! I’m making patterns for doll clothes and this is the first time that I feel like someone explained darts properly! Especially the bit where the length isn’t important, just the width. I have two questions, though:
1. At the start, you add 1.5 cm to raise the side-seam? Is that a fixed measurement that I’d need to convert to 12.5” (1/6th – Fashion Royalty dolls) scale or does it depend on the measurements?
2. I’ve noticed in this tutorial that your darts don’t have the upper peaks? I don’t know how to call it, but the peaks that ensure that when closed, the the waistline is smooth? Perhaps it was explained somewhere else in the tutorial, but I’ve missed it.
Thank you once again for this amazing tutorial!!!
You’re welcome! 🙂 The side-seam raise is fixed for this skirt style. I’d imagine in doll size you could do something like 1/8 inch. I’ve only done Barbie size and sometimes it’s difficult to decide how to convert so I just wing it. 😀 The upper peaks of the darts will appear when you cut the waistline of your pattern. Fold the darts before cutting to get the correct shape.
I was worried that winging it was gonna be the answer, haha. Thank you, at least now know there isn’t a specific measurement, I’ll see if I can wing it somehow.
Regarding the darts, I’ve read in another tutorial that the user folds the pattern/closes the darts before completing it in order to get that peak between the darts? Though I imagine that may be difficult in this scale. When you say “cut the waistline” do you mean literally cut it from the fabric or?
With cutting the waistline I mean cutting the paper pattern. Because after you’ve drafted the pattern, you trace it on another paper that becomes the actual pattern. I managed to fold really tiny darts using my nails! 😀 Just ensure that the fold ends at the dart point. It’s easier this way, than drafting the peak randomly.
Thank you for the tutorial!
I love high-waisted skirts, and the difference between my waist and hip is about 25cm, so my darts end up really big, is that ok?
Also, I’m not clear on how I do the next steps with the basic block (I want to make a flared skirt). Do I separate it on the side seam to 2 pattern pieces, cutting out the big dart, and move on from there?
The basic skirt block should have a normal waist height. Then you can turn it into a high-waisted skirt after, when making the actual skirt pattern. 🙂
Yes, you’ll separate the front and the back pieces along the side seam, that’s in the middle.
Hey! Awesome tutorial. Most tutorials make their darts parallel to the center front. Why do you make yours perpendicular to the waistline?
I definitely like the fit more when it’s perpendicular.
Thanks for answering !✨✨
Thanks. 🙂 Oh, that’s just how I’ve been taught to draft them, so I never even questioned it. 😀 But now that I think of it, that must be because the dart legs will get the same length when drafted perpendicular.
I want to ask a question, how can I cut the hip of the skirt.
Do you mean the side seam? You first need to copy the front and back pattern pieces separately. That way they are no longer united at the side. 🙂
I am feeling very good in your class and your page. I am already studying in college in my country.but me newly met learning in yours video.i m satisfied your page madam MINNA
Thank you so much! 🙂 I hope you’ll be soon making lots of selfdrafted skirts!
came across your blog and i have just been going through your teaching. but I have a question on the basic skirt pattern. After removing the deference between the hip and waist measurement from the side seam of both back and front. won’t that affect the waist measurement. like won’t the waist measurement become smaller than the actual waist measurement?
Hi Suzy. 🙂 The initial rectangle width is 1/2 hip circumference. It’s wider than the waist initially. Therefore adding the darts and the side seam curve will result in a correct measurement at the waist.
oh ok 😊. Thank you.
I made my first skirt with this ^_^ tysm <3
Awesome! I’m so happy for you. 🙂