This week the skirt patterns are back! As anticipated, I’ll show you some pencil skirt pattern alterations. So if you love fitted skirts, this one’s for you.
You’ll need the usual basic skirt pattern, and in most of the cases the starting point is the normal pencil skirt where you simply remove some volume at the hemline on both sides of the side seam:

I prepared 6 different versions for you. Many of them are easy. Let’s go in order.
Button down skirt
To get this pattern, you’ll need to do just a tiny alteration. Decide the size of buttons you want to use and then add the overlapping section at the centre front. It has to be a bit wider than the buttons.
In my example the buttons are 3cm (1.18in.) wide, so the button placket is 4cm (1.57in.) wide.
The buttons will be exactly at the c.front -line. This means you add only half of the measurement first. Then, add the whole measurement twice. It’s because the button placket will be folded under twice, just like when making a shirt. This gives you more structure for sewing the button holes. Of course, you’ll also need to interface the area.

You can either make this the only opening of the skirt, or leave it as a fake opening and add a zipper in the back.
Here I’ve also added a waistband that has a 2cm extension at the c-front to match with the button placket.

Asymmetrical pencil skirt
If you follow me on Instagram, this skirt will look familiar. But here’s the more simple version of it. I used the basic skirt pattern directly, but you can make the hemline narrower if you want.
What you see here is just an extra, overlapping piece on top of the basic skirt front. It’s decorative only.
First, mirror the front piece and then draw the overlapping piece shape on top, as shown. Trace it on another piece of paper.
To continue with the button theme, this one has buttons, too. So, add the button placket. Same rules as in the previous pattern: it will be folded twice. In this case though, it’s enough to add 4cm twice. You don’t even have to make the button holes, just sew the buttons on top.


Wrap skirt
Here’s a skirt with lots of possibilities, so you can elaborate this pattern further.
The front of the skirt is open with an overlapping area between the darts. To make this area wider, you can move the darts towards the sides a bit. The colored section will be your new front piece that you will cut twice to create the overlap.

Just add a straight waistband. As a closure, you can either add buttons at both ends (as in my example), or continue the waistband and use it as a tie strap.
In the latter case, measure how long the tie strap has to be going around the waist and making a knot. Then make a buttonhole at the overlapping side of the waistband so that the underlaying part of it can pass through. Here’s an example.

I made the skirt in two different fabrics to highlight the construction.
Another variation you could do, is making a rounded corner instead of an angle. Or if you feel like you want a sewing challenge, you could make the whole overlapping piece with a scalloped edge.
And of course, the wrap skirt can also be flared. Make it a long skirt, add some ruffles at the edge, etc. Check out my Pinterest board for other ideas.
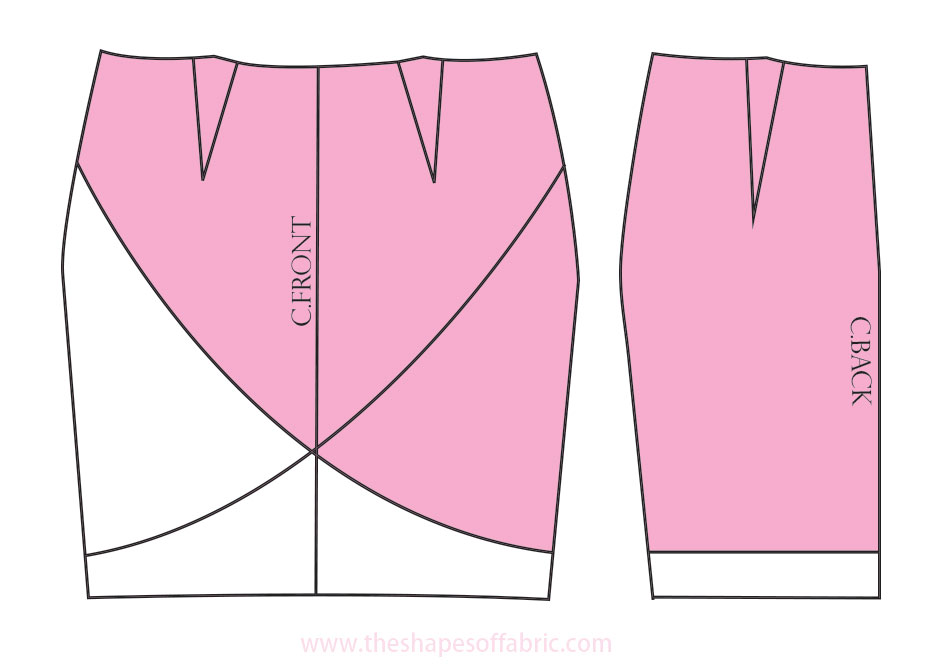
Tulip skirt
From the wrap skirt, it’s just a small step to get to the tulip skirt. The idea is very similar, but this time the overlap is only decorative and the opening is at the back.
I think the pattern is quite easy to understand. I made the skirt a bit shorter just for change. You’ll need the whole front piece for this one as well, because it’s asymmetrical.
I drew both sides just to get a better idea on how the final skirt would look like, but both are identical.

High waist skirt
The high waist skirt is back! But to make it more interesting, I turned the extra height into a waistband which is partially united into the skirt itself around c-front.
You can check out the basic high waisted skirt pattern here.
Just shape the central part a little bit like in the picture; I added some roundness to it. Separate the waistband starting from the front dart edge. Unite the front and back waistband pieces at the side seam and fold the back dart away.
There’s a little facing to cover the c.front part of the waist. It’s such a small pattern piece that I mirrored it so there’s no need to cut it on fold.
The rest of the waistband will be cut 4 times so that it will have a facing, too.


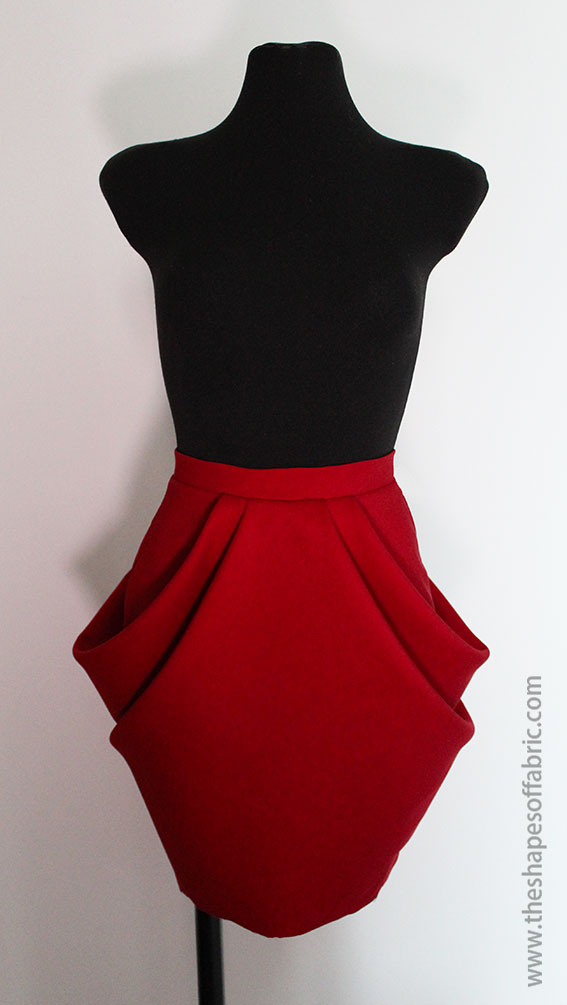
Peg top draped skirt
I’m not sure if this would count as a pencil skirt, but at least the starting point is a pencil skirt pattern. You could even make this pattern by draping on the stand. But I wanted to show you how to get the same effect with flat pattern making.
You can ignore the darts, but measure their width. Decide how many drapes you want (usually 2-3 should do it). This will be the number of cuts you’ll do. Divide the dart widths – front and back – by the number of cuts.
Draw lines to your skirt pattern, both front and back, as in the picture. And then draw a vertical line in the middle of another (large) piece of paper.
It’s probably easiest to work on the front- and back patterns at the same time, as you need to keep the same distance from the central line on both sides. I numbered the sections.

Separate all the pieces. Before taping down anything, just plan how you’re going to place them. The uppermost and lowermost pieces must touch, so plan accordingly. If you don’t add enough volume, the drapes won’t keep shape.
There are going to be folds at the waistline. Keep in mind that you need to add the dart measurements to those folds in the end. In my case I added half of the dart measurement to both folds.
I cut the waistline with the pleats folded as usual to get the correct pleat allowance shapes.
Adjust the hemline to remove the angle. The centre front will be cut on the fold.
These were the pencil skirt pattern alterations that came to my mind.
Let me know if you want me to write about some other skirt patterns I haven’t covered yet.
Speaking of skirts, I polished the panel skirts tutorial a bit, so have a look!


14 Comments
Need over knee hobble skirt.
You should be able to draft the pattern with the basic pencil skirt instructions. Just measure how much space you’ll need around the legs to be able to walk, and remove extra width from the side seams. Use a stretch fabric, or add a slit/kick pleat in the back. In the basic panel skirt tutorial https://www.theshapesoffabric.com/2018/04/22/lets-draft-some-panel-skirts/ you’ll find a panel version. 🙂
Would you be able to create one with wrap-around draping? Like something that creates streamlined draping on the sides and back with most of the draping being gathered at the front? I hope the way I’m describing it makes sense.
Hmm.. I’m imagining something, but if you want to be sure, you can email me a picture as an example. 🙂
Thanks so much For these information Ur post always Help me out Lots of care and Love from my side And Waiting for more post Once again Thanking U
You’re welcome! 🙂 There will sure be more tutorials coming up.
I just started learning how to draft patterns of a pencil skirt and I am having a problem on how to draft the apex point and the dart point… I can draft from the waist line, hip depth, hip line, skirt line, the hem line. How do I draft the mid point and the dart point?
Once you’ve determined how wide the dart will be, you measure the middle point of the front or back waistline and that will be the center of the dart. Draw a straight line down in a 90 degree angle from the slanted waistline. It should have the same length as the dart. Then measure half of the dart width on both sides of this line at the waist, and draw the two dart legs symmetrically around the central line. 🙂 If you want more help, you can email me a picture of your pattern and specify where the problem is.
Tnks so much I really got what I was looking for… It really helped……
Excellent! 🙂
Great work. Learning a lot
Thanks so much. 🙂 Enjoy.
Please what is the length of your skirt and trouser dart. Thanks 👍❤️❤️
The dart length depends on its width, so there’s no universal length really. The wider it is, the longer it should be, but in any case it shouldn’t go over the hipline. Something between 9 and 12cm is usually good. 🙂