I wasn’t sure whether I should add circle skirt patterns to my skirt tutorial series, as there are so many blog posts and videos about this theme already. But then again, the list of skirt styles wouldn’t be complete without them, so here we go! I added some extra variants to make it more interesting.
Now you can forget about the basic skirt pattern. The circle skirt pattern is different and you only really need the waist measurement. Plus of course the total length of the skirt. What you do need instead, is a huge amount of paper, a compass, a tape measure and a calculator. These patterns require some calculations.
The circle radius
About the calculations… I’m not going to bore you much with theory. Just a quick explanation about why you see the 3,14 involved in the calculations.
All the different circle skirt patterns are based on the shape of a circle. But you can’t just draw a circle at random and use it as your pattern. There’s a way to calculate the circle so that you get the exact waist measurement you want. And this is where the 3,14 comes in handy.
It’s the the value of theπ or Pi. The name is derived from the first letter of the Greek word perimetros, meaning circumference (according to Wikipedia).
We use it to calculate the radius of the circle, to get the right waist measurement, and from there the hemline. Don’t worry if you don’t understand the why’s. If you just follow the instructions on how to calculate, you’ll get your pattern in any case.
The basic circle skirts
To get to the variants, we must start from the basics. Here are, in order, all the different versions of the circle skirt: full circle, 3/4 circle, half circle and 1/4 circle.
This time I’m going to be using centimeters for the example measurements:
- 68cm waist circumference
- 45cm skirt length
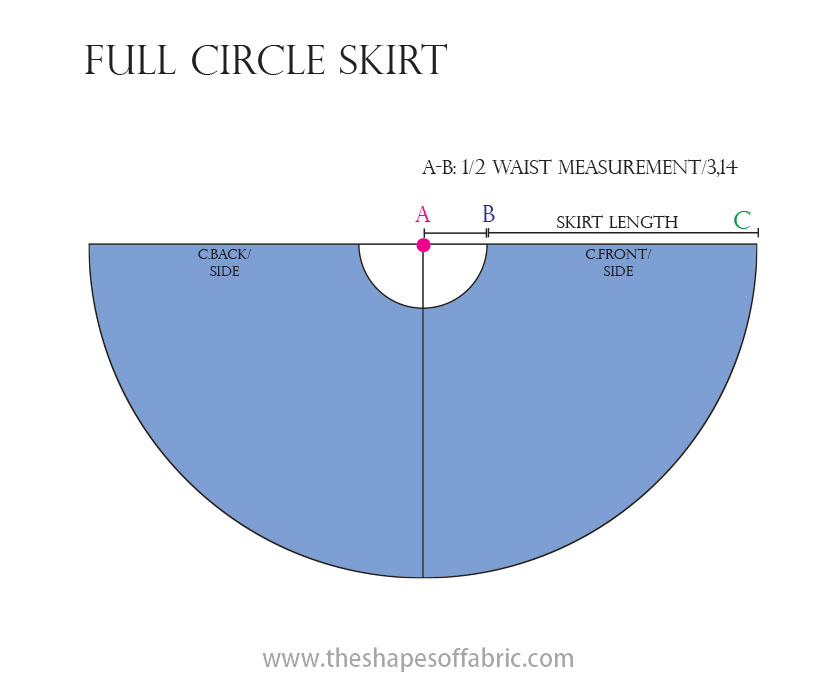
Full circle skirt
All the patterns are drafted for just a half of the skirt as usual so we’ll only need half of the waist measurement, too. 68cm /2= 34cm.
If you’re ok with having side-seams in your full circle skirt, stick with that number. But if you want just one seam in the back, add 1,5cm to get the seam allowance, too.
For the full circle pattern, start by calculating the radius A-B: simply divide your 1/2 waist measurement by 3,14. In this case
34cm /3,14 = ca 10,8cm
Draw a straight line and mark point A in the middle of it. Take your compass and draw a half circle around point A, using the A-B radius you got with the previous calculation.
From point B, continue the straight line adding the skirt length to arrive to point C. Take your tape measure and measure the distance between points A and C. Use this radius to draw the whole hemline half circle around point A.
3/4 circle skirt
This is my personal favorite in the circle skirt family. If the full circle is too much, but the half circle isn’t enough, this skirt is perfect!
The calculation for the radius A-B is a bit more complex. It starts the same as last time, 1/2 waist measurement divided by 3,14. But then you have to add 1/3 of the same calculation. Let’s see:
34cm /3,14 =10,8cm
10,8cm /3 =3,6cm
10,8cm + 3,6cm =14,4cm
You can draw the pattern in the same way as the full skirt. It’s just that once you’ve drawn the half circle for the waistline, measure the line and stop at the point you arrive to the 1/2 waist measurement. It’s 3/4 of the half circle.

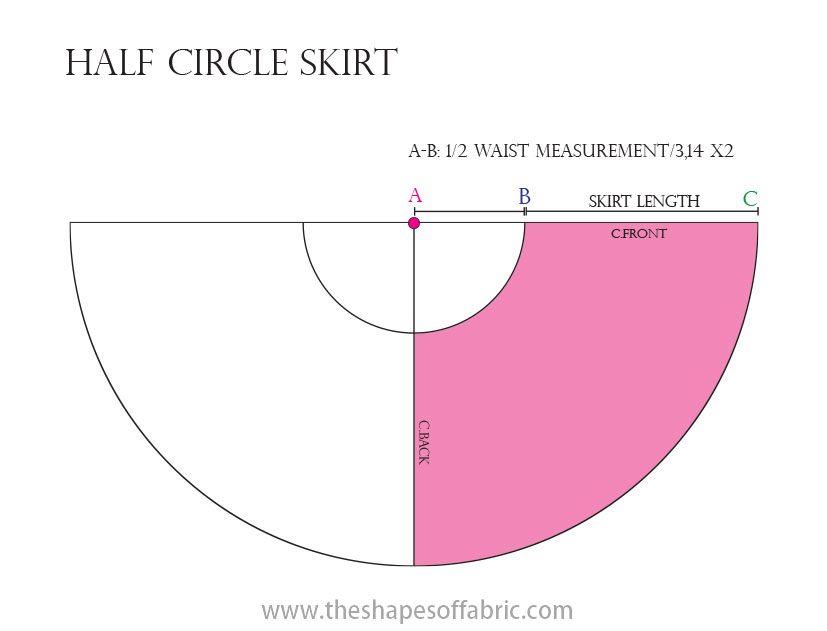
Half circle skirt
This time the pattern covers just a quarter of the circle, so start by drawing two lines at 90° angle to each other. Point A is at the angle.
The A-B radius calculation is 1/2 waist measurement divided by 3,14 times 2.
34cm /3,14 =10,8cm
10,8cm x2 =21,6cm
Now your compass might no longer be enough to draw the circles, so you have to resort to the tape measure or normal ruler. Just try to be accurate. If you’re unsure, you can always measure the arch and see if it’s 1/2 of your waist measurement.
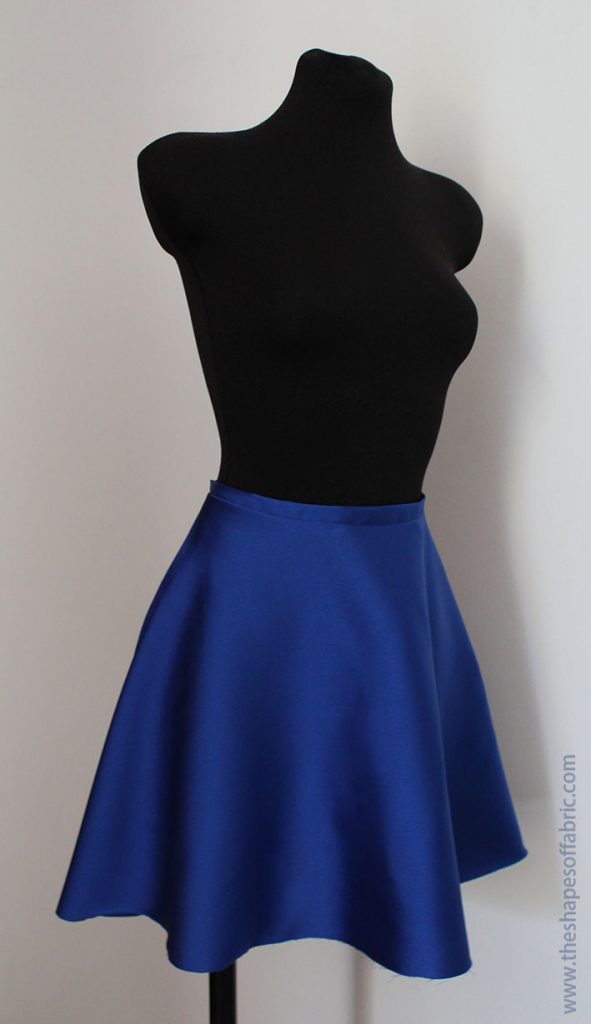
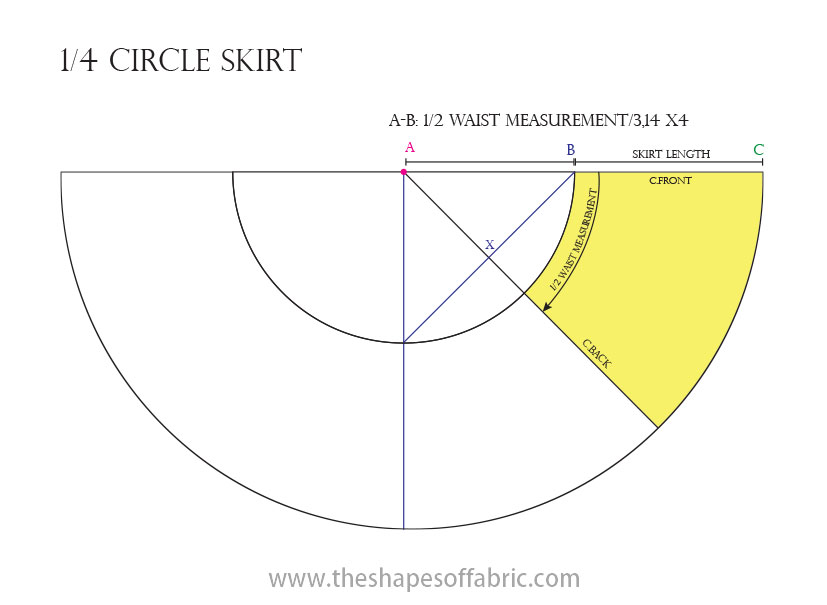
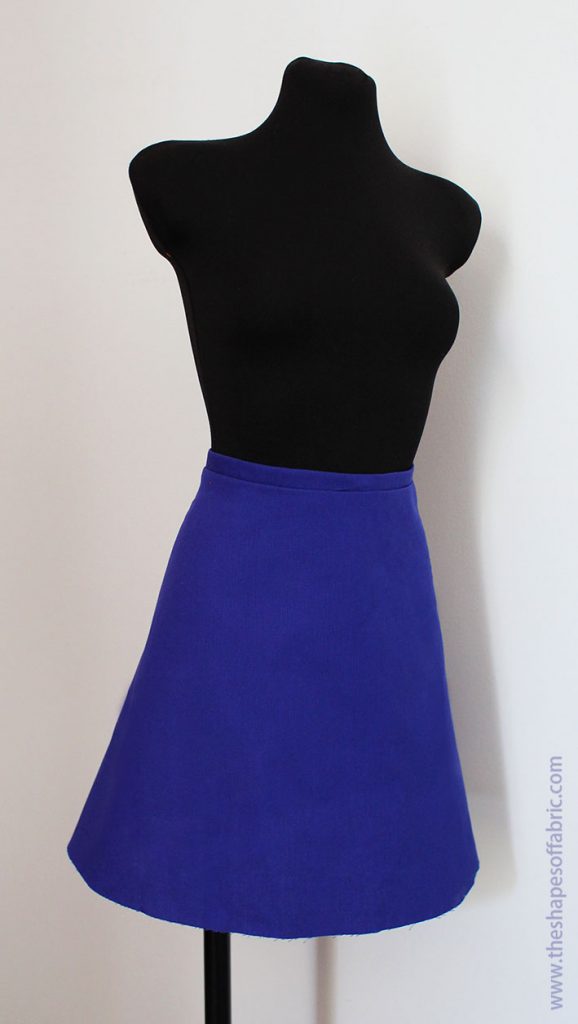
1/4 circle skirt
This is the smallest of the circle skirts. It’s practically an A-line skirt. So it’s up to you to choose which is the easiest way to draft a pattern for this type of skirt. However, the pattern is useful for some transformations, as you’ll see after.
The radius A-B is getting bigger. Now you must calculate 1/2 waist measurement divided by 3,14 times 4.
34cm /3,14 =10,8cm
10,8cm x4 =43,2cm
You can either draw an arch randomly around point A and stop when you arrive at the 1/2 waist measurement. Or you can draw another line down at 90° angle from point A, draw your waistline arch from point B all the way to the new line. Then draw a straight line from there across to point B and find X in the middle of it. That’s 1/4. (Wow, that sounds complicated!)
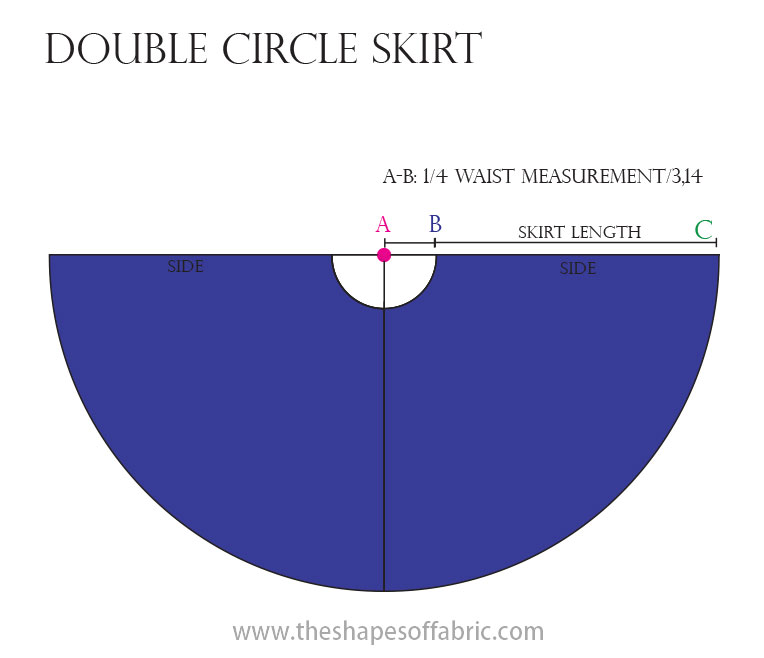
Double circle skirt
What if the normal circle skirt won’t do and you want an even fuller skirt instead? Well, then you can do a double circle skirt!
This version literally consists of 2 full circle skirts. And logically the calculation for the A-B radius is as follows: 1/4 waist measurement divided by 3,14. The example waist measurement is already 1/2 waist, so now we divide it in 2 to get 1/4.
34cm/2 =17cm
17cm /3,14 = 5,4cm
Depending on the length of your skirt and the width of your fabric you will either have 2 or 4 seams.

The variants
Now that we’ve gone through the basics, we can get to the other versions of circle skirts you can make. These are based on the previous patterns.
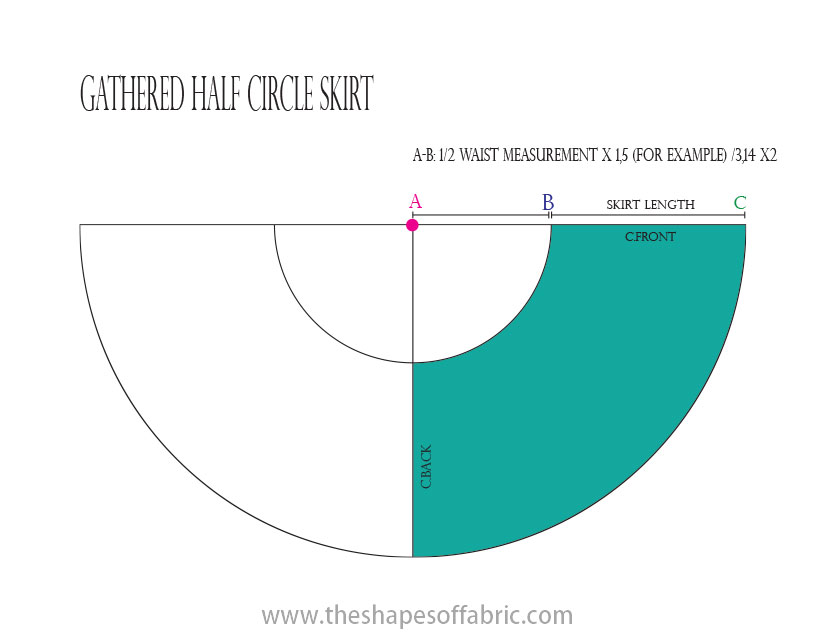
Gathered half circle skirt
Starting from the most obvious one. Why would you want to make a gathered circle skirt? Well, it gives even more volume to the skirt and if you add an elastic to the waist, you won’t need a zipper.
This doesn’t have to be a half circle. You could also make any of the other skirts, too, with the same method.
The calculation of the radius A-B is otherwise the same as for the regular half circle skirt, but you must add extra width to the waist so that you can then gather it.
In my example I added 50% extra, which means I multiplied the normal 1/2 waist measurement by 1,5. If you want double, multiply it by 2, etc. So:
34cm x 1,5 =51cm
51cm /3,14= ca 16,2cm
16,2cm x2= 32,4cm

Paneled half circle skirt
Remember panel skirts? Did you know you can make paneled circle skirts, too? Well, you can! First draft your circle skirt normally, and then divide it into as many panels as you want. It’s easiest to divide at the hemline. You’ll only need one of the panels as your pattern though.
In my example I drafted a half circle and the skirt will have a total of 6 panels.
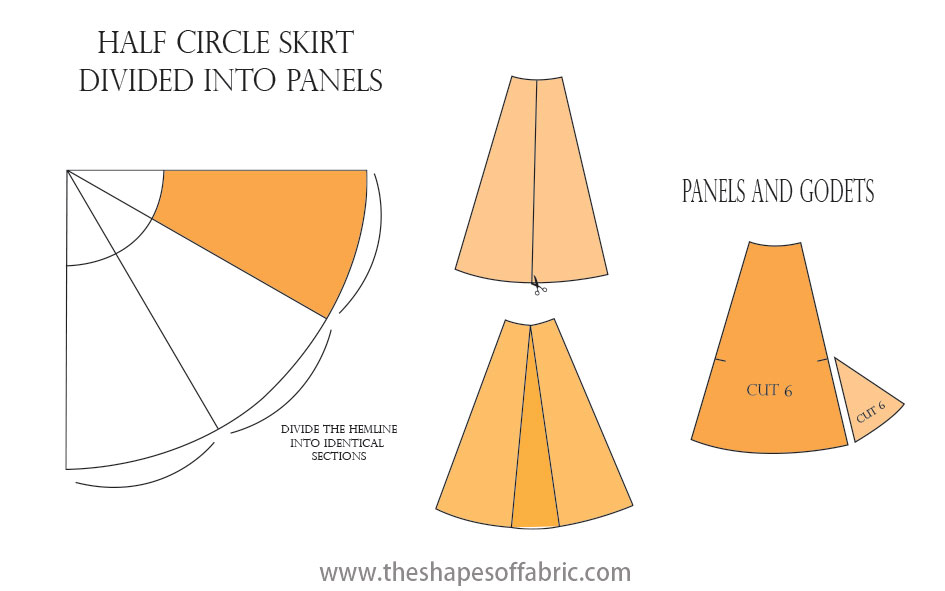
Reason for wanting to divide your circle skirt into panels could be that you’ll make the panels in different fabrics. Or maybe you don’t have big enough piece of fabric to cut the whole skirt in one piece.
But also, like in the examples above, you can then go ahead and alter the panel to get a whole new shape to your skirt. I just simply gave it more volume with the slash and spread method. The resulting skirt will be wider than a normal half-circle skirt.

In the other example I inserted godets in between the panels. That gives more volume only to the hemline.

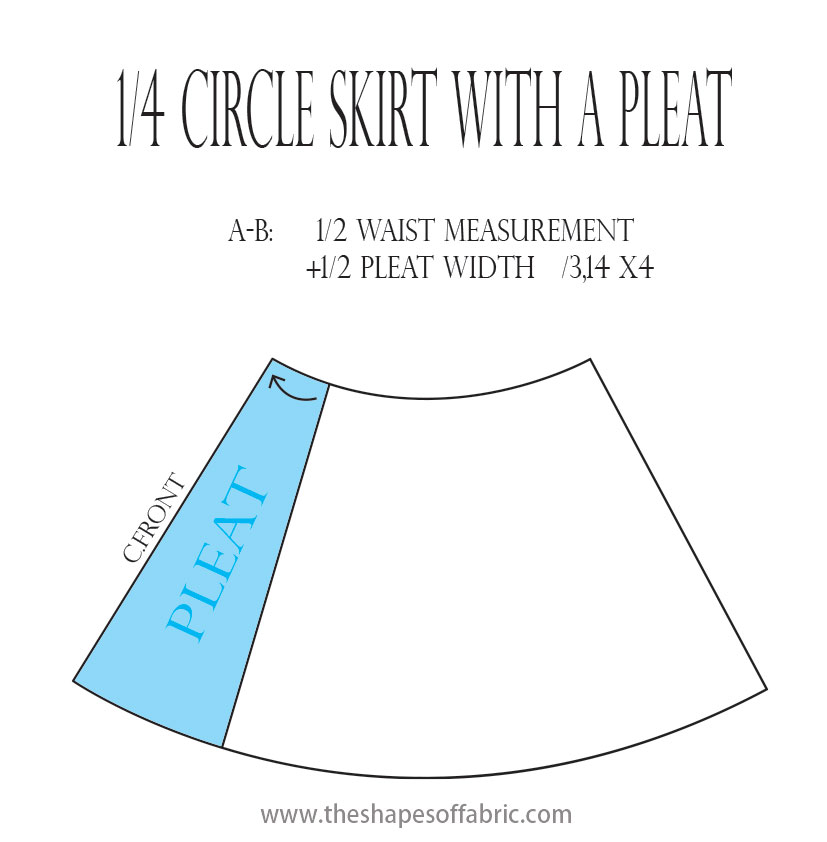
1/4 circle skirt with a front pleat
And then there are the pleated versions. First let’s add just one box pleat in the front.
Again, you can draft the 1/4 circle skirt pattern as usual, but you need to add 1/2 of the pleat width to the 1/2 waist measurement. In my example the front pleat is 10cm wide on both sides. That means the A-B radius calculation goes like this:
34cm + 10cm =44cm
44cm /3,14 = ca 14cm
14cm x4 =56cm
In the picture here you can just see the final pattern.
Pleated 1/4 circle skirt
To have more pleats, the method is the same as above. Decide the number and width of your pleats and add them to the 1/2 waist measurement. Of course, remember to count only half of the total number of pleats. And on the c.front and c.back calculate just half of the pleat width.
My skirt has 2 whole pleats and 2 halves, which makes 3 pleats. Each of them needs 20cm. I know that may seem like a lot, but these are box pleats, so it’s only 5cm folded in two on both sides.
The calculation:
34cm + 60cm (3×20) =94cm
94cm /3,14 = ca 30cm
30cm x4 =120cm
Here’s how the pattern looks like:
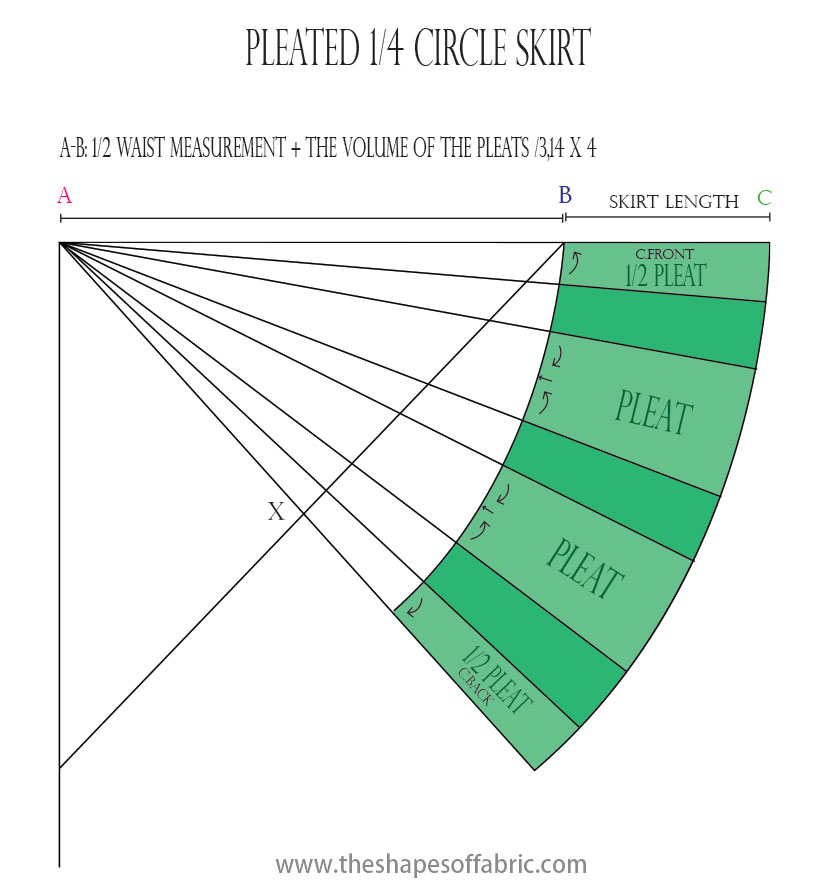
Divide the pleats evenly at the waistline. The skirt becomes much more flared than the 1/4 circle skirt. If you need an even bigger profile, start from the half circle skirt.

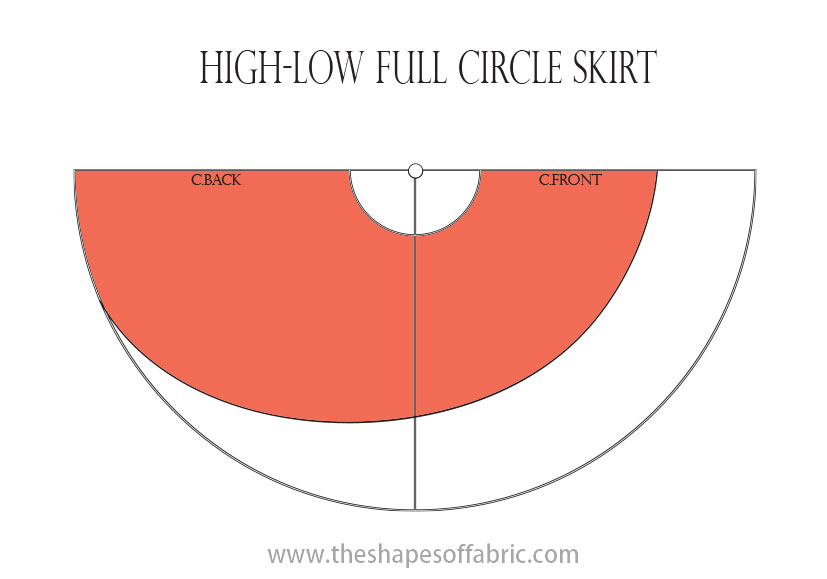
The high-low skirt
Here’s a very simple variation to the full circle skirt. First draft the pattern normally and then re-draw the hemline like this. Just pay attention to the front length so that it won’t remain too short and make the backside as long as you want.
Remember to add the seam allowance to the waist measurement so that you can add a zipper to the back.
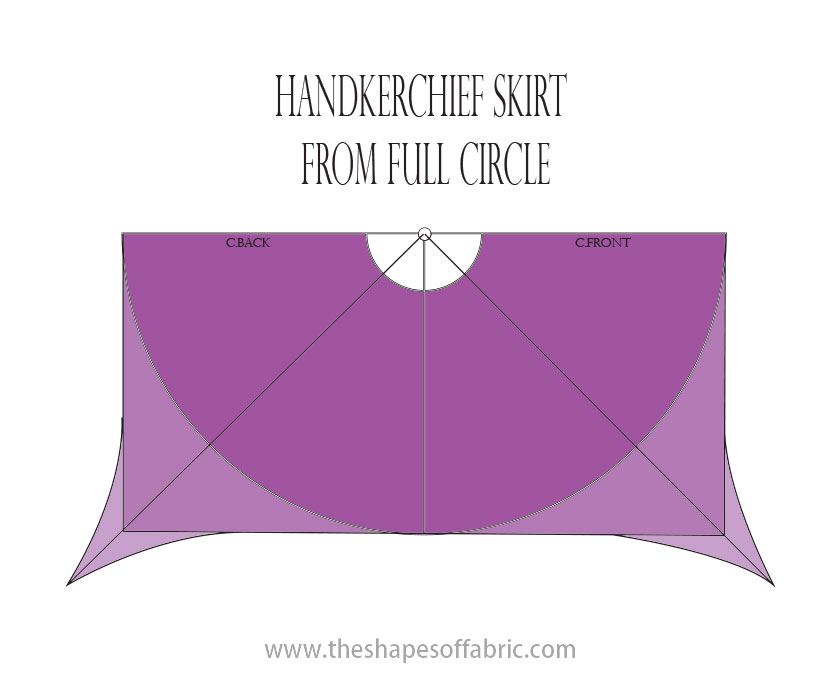
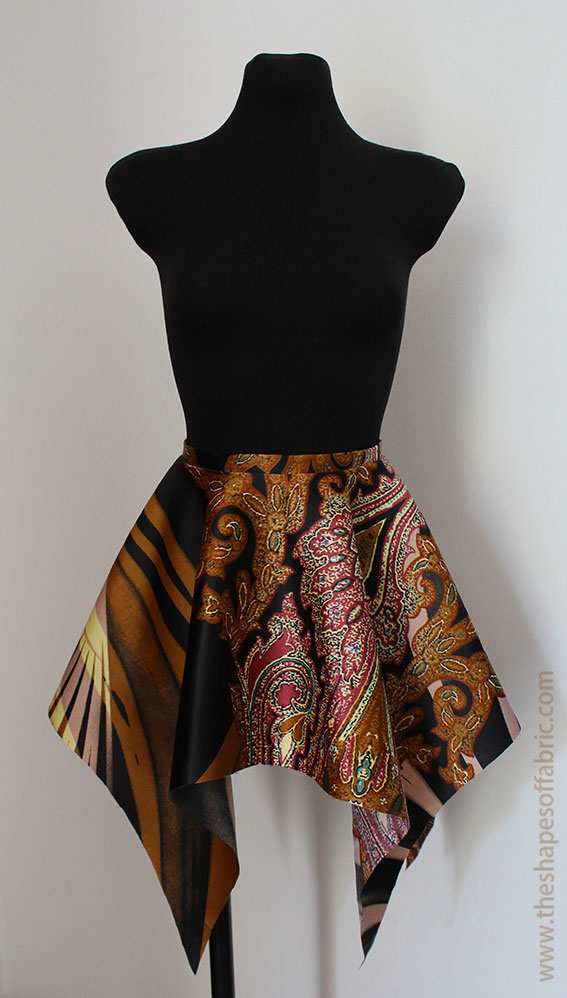
Handkerchief skirt
This one is the second variation you could do with the full circle skirt pattern. Draft it the same as usual, but instead of drawing a round hemline, make it a rectangle.
Choose the minimum length you want to have in the front, back and the sides. I used the same 45cm I had in the original full circle.
Then draw two lines at 45° angle starting from the centre (=point A) that go past the corners of the previous rectangle. Draw 2 symmetrical pointy bits around the lines.
And that was the last one of the circle skirt patterns. Just a final notion: you can use the straight waistband for each of these skirts. There are instructions for the pattern at the end of this blog post, if needed.
I hope you got some ideas for your next skirt project. Be sure to check out the other skirt tutorials, too, if you haven’t done so yet.
Related Posts


This tutorial has been updated 24.2.20: added double circle skirt.
125 Comments
Thank you so much for this post! You explain it so clear and easy to understand! Regards, Camelia
You’re welcome! I’m glad to hear that. 🙂 I was trying to make it as simple as possible.
Would it be possible to have a double circle skirt but to make it Hilo do you think. I was also thinking of a back pleat. ( girls bridesmaid dresses)
Yes, you can do that. 🙂 It’s a bit more difficult to figure out the hemline shape as there are two whole circles involved. As for the back pleat, one of the circles will then have a larger waistline to accommodate the pleat allowance, too. So you need to draft two patterns, one for the front, and one for the back.
Dank u wel voor deze mooie eenvoudige patroontjes, ze zijn heel goed uitgelegd
You’re welcome. 🙂
Thanks so much for the post especially for the pleated and handkerchief hem circle skirts. I really appreciate the work you’re doing. For the full circle skirt the distance A-C is used to draw the hem from the center front to the center back right? I just wanna be sure I understand it well.
You’re welcome. I wanted to add something extra to the usual circle skirts. 🙂 You can think of the two arches of the full circle skirt as the waistline and the hemline. Just remember, that the actual skirt length is calculated from point B to C (if you do for example that 45 cm starting from point A, your skirt will be too short). And yes, the arch goes from center front to -back. When you cut it on a fabric folded in half, you’ll get the other half, too.
Thanks so much. They are all explanatory
You’re welcome. 🙂
Question re: panelled skirts: I’m a beginner at sewing. I’ve just cut out six panels for my gathered half-circle skirt. On inspecting the panels I have noticed that I have the grain line running down one edge of the panel and the bias running down the other edge. How do I go about matching those edges – I’m assuming grain to grain and bias to bias? I feel like matching one grain edge with one bias edge will not work. Will having one edge on grain and one edge on the bias goof up the drap? Thanks for your help!
Usually the panel skirt panels would have grain line in the middle. If you already cut the pieces, you could try matching them like you said, but probably the bias seams will stretch and then you need to adjust the hemline afterwards. Let the skirt hang for a day or two before adjusting.
This is professional drafting , I love it .
Thank you! 🙂
Esse post foi muito importante para mim, pois tirou minhas dúvidas a respeito dos tamanhos das saias.Você usa uma didática especial que nunca havia visto. Deus a ilumine sempre. Muito obrigada.
You’re welcome! It’s my pleasure. 🙂 I’m so happy that my tutorial cleared your doubts.
This is the BEST post on circle skirts I have ever found. Thank you for writing it!!! I especially like the gathered circle and the pleated one!
Wow! Thank you. 🙂 I just wanted to be thorough. 😀
Thank you very much for easy and detail information… I will sew pleated peplum top in the pleated half circle fashion…. Thanks again
You’re welcome! 🙂 I’m sure it’ll look fabulous!
Thank you so much, for this info you’ve helped me soso much. Yiur explanation for the different types are clear,you reminded me of what I’ve forgotten and i even gained some info I’ve been looking. Thank you so much keep up the good work.
You’re welcome! That’s awesome. 🙂 It’s always great to re-discover things you knew before.
I’ll definitely try out these projects and will like to tag you so you can see what I made that’s if you permit me to
Sure, I’d love that! 🙂 I hope you’ll get lots of pretty skirts out of this.
Thank you so much, I’ll definitely be tagging you.
These all is awesome. I am from Surinam. Here we do not have books or other materials to learn all these tips and trucjs. No pattern books at all. So I am so hapy with you and all these omportant infirmation. I now will learn howvto see and make easy skirts and dresses.
I’m happy to have the opportunity to contribute to your learning in that case. 🙂
heel goed uitgelegd
eindelijk dat stukje over de straal en tailleomvang begrepen
Brilliant! Thank you. 🙂
great tutorial! i love the design of the fabric you used for the handkerchief skirt and i am going to make something like that and share with you but i am not sure about the right kind of top to pair with it. maybe you should help? thanks!
Thanks! 🙂 I think with circle skirts in general it’s a good idea to either have a top that ends at the waist-level or a top that gets tucked under the skirt waist.
Am super impressed with your work….Bravo
Thank you so much! 🙂
Great tutorials! I love making circle skirts, and I’ve wanted to make a maxi version but it requires so much fabric. Now I’ve happen to come over nine meters of a narrow lightweight cotton I want to just make a giant skirt out of for fun and thought I’d make a 1.5 circle. My math brain simply died trying to figure that out. But I feel like maybe I can follow your calculations for a 3/4 but half them… maybe? What do you think? Would it make sense to do 1/4 waist (rather than 1/2) divided by 3,14 and then add a third of that calculation?
Thank you! 🙂 I’m glad you find them useful. I think you could use the 3/4 circle skirt calculation, as that would be the closest to 1,5 circle. I have never tried it, but what you say sounds correct: just divide the original (half) waist measurement in 2. That’s how you do when you make a double circle skirt, too. 🙂
Took me a while to get the skirt to the point of being able to try something on, but I’m almost finished now. Just the 10m hem left to do!
Anyway, either I made a calculation error or the waist stretched (like I said, I’m using lightweight cotton, so it shouldn’t be any crazy stretching but some is to be expected since I’m cutting half circles) Because I ended up with a waist that’s about 20% bigger than it should be! which is quite a lot. But, turned out great anyway cause it just meant I could add a few pleats in the back which looks super cute.
Wow, that’s an impressive amount hem! I’m sorry you encountered problems with the measurement, but it’s good that you found a way to make it work anyways, 🙂 Stay stitching the waistline immediately after cutting helps with the stretching problem. Otherwise just check the measurement at the pattern-phase with a tape measure so you get everything right before cutting.
fabulous tutorials and you make the circle skirt calculations easy. I just wonder if they are the same for knit fabric and could pull up over hips without a zip?
Thanks so much. 🙂 Yes, you can use knit fabric, too, but the waist will most likely stretch so add an elastic waistband.
Excellent beyond words I am grateful to you to have this tutorial thanks a million
You’re welcome. 🙂
This is the best article I have seen on the matter, thank you! Just one question, what fabric did you use for the examples? They all look amazing!
What a compliment! Thank you. 🙂 For the examples I used some fabric scraps I had. So it’s a mix of everything: cotton, different kinds of polyester satins, cady, viscose, crêpe, a type of chamois.. sadly I don’t know the names of all, some were scraps already when I bought them.
These examples are amazing. I am just starting testing out my own patterns, and this is super helpful. Thank you!
You’re welcome! 🙂 I’m sure you’ll find drafting your own patterns very rewarding. Enjoy!
Thank you so much, i copied some pf your illustration for i can use it for my teaching for my students in Grade 10. Again thank you so much,
You’re welcome. 🙂 I’m glad to contribute in the education.
Thanks so much for these wonderful posts. Question: when drafting the high low skirt pattern, how did you draw the curve from the front (where the skirt will be shortest) to back (longest)? Did you kind of eyeball it so that it gradually gets longer, or did you have a geometric principle in mind? How much of a difference do you think it would make? I’m trying to draft one myself and kind of got stuck on this step. Thanks for any advice might have!
You’re welcome. I usually just freestyle. 😀 The more difference you leave between the front and back, the more noticeable the high-low effect will be. Start from the front so that you manage to make the skirt long enough. If you want to make the line symmetrical, you can decide how much difference there will be, for example 30cm, and then measure half of that in the middle, making the skirt 15cm longer at the side seam.
hi… thank you so much
You’re welcome. 🙂
This is the best explanation I have seen so thank you. Just one question if I may, For the 3/4 circle skirt, could you draw a line at 90 degrees then another at 45 degrees so essentially half then half again? Would that work?
Thank you so much! I’m pleased that I managed to prepare clear instructions. 🙂 If I understood your question right, what you’re saying is correct. Just measure the waistline anyways -just in case- so it’s the right size.
Yes I will do. Thanks again.
Best info ever! Now I can breeze thru my summer skirts in record time….. thank you!
Thanks! 🙂 Have fun sewing the skirts! Summer is approaching.
Thank you so much, with your wonderful explanations, I will soon become a sewing addict!
You’re welcome! 🙂 I hope that you will. Sewing is a fun hobby! 😀
Wow you’re 3/4 circle skirt looks amazing, can I ask you what fabric you used for that skirt 🙂
Thank you! I think that was polyester satin. I had some remnants in my stash. 🙂
Can you show how to do a double or triple circle skirt? Pretty please
Yeah, I guess I could add them in this article. 😀
Wow. Just stumbled on your site. I must say you re very talented and a born teacher… thank you so so much
So glad to hear that. 🙂 You’re welcome.
Thank you for such a detailed post on circle skirts. It is explained in very easy language. I’m going to sew one for my sister.
You’re welcome! Your sister is so lucky. 🙂 Enjoy!
Thank you for this extremely helpful post regarding circle skirts! If you could please answer one question that I have – when I draft the pattern on paper, and cut it the pattern out how do I then cut the actual fabric?
I’m happy that you found it helpful. 🙂 When it comes to cutting the skirt, it depends on which type of circle skirt and its length. Ideally there’s no seam at the c-front. For example the full circle skirt is easiest to cut with 2 side seams, so you don’t have to worry about the seam allowance in the circle radius -calculation. You need to cut the pattern piece twice to form a full circle. If your skirt is short enough to fit the fabric, let the grainline follow the c.front and back of your skirt. Longer skirts must be cut in the other direction. The half- and 3/4 circles are easier: just fold the fabric in half and place the c-front of the pattern on fold. You’ll only need to sew the back seam. 🙂
Hi,
I wanted to try the half circle with godets. In the dress in the picture, how wide did you make the godets and at what height did you insert them? Thank you, it’s a very helpfull article!
I think they were about 18-20cm wide at the hemline and I inserted them slightly below mid length. 🙂
Could you show pictures of the different circle skirt variations with different fabrics as well? Such as the differences between chiffon, tulle, etc.
That’s an excellent idea! 🙂 I’ll search my stash and add some more examples soon.
very helpful, did like the handkerchief skirt tho was having trouble with box pleats.
thank you.
I’m glad you found it useful. 🙂 Yes, the box pleats skirt is probably the most difficult one of these.
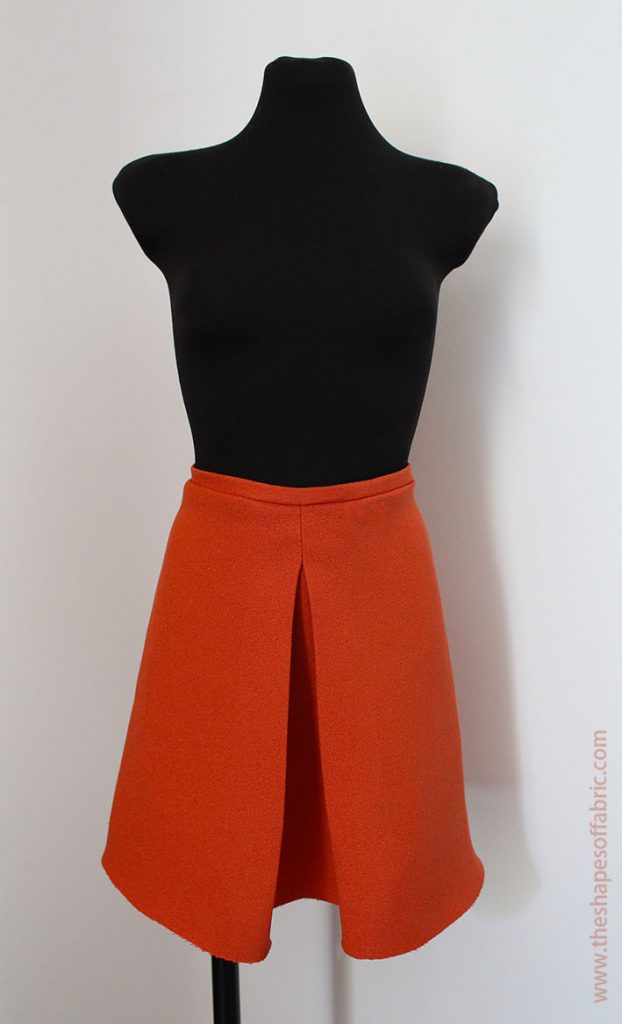
I absolutely love that orange and black skirt!!! Do you have the pattern for it?
Thank you! 🙂 That is the half-circle skirt divided into panels as seen in the pattern-picture above. I slashed and spread the panel to get a wider skirt.
How come you didn’t include the waist band in here? And how am I supposed to find that? You only mentioned it…
Sorry about that. Instructions can be found in an earlier post, I added the link.
Thanks for the different variations of the circle skirt. Please, how do I add structure to the circle panel skirt?
You’re welcome. 🙂 Sometimes you can use a tulle skirt underneath, sometimes a wire structure works better.
Thank very luch for this detailed tutorial. I was wondering, how would you draft a wrap circle skirt ? I suppose the back is just a half circle but for the front, would I just have to cut it in half and add a rectangle for the overlap ?
You’re welcome. 🙂 I think I’d cut the circle skirt in two half circle pieces with the seams at the sides. Back piece once and the front piece twice to get the overlap. If you want a smaller overlap, you could chop off part of the front piece. Last July I published a post on a panel wrap skirt, which might help you with figuring out the closure.
Hi! Thank you so much for all of your helpful tutorials, you are a life-saver! I was wondering if it would be possible to make a handkerchief circle skirt that is also low in the front and long in the back with just a seam in the back. I am struggling to figure out how to draft this pattern and figure out the lengths. Also should I add the 1,5cm seam allowance for the centerback before or after dividing by 3,14 for the radius? When cutting the pattern in fabric do I do it in fold at the CF & cut open the CB to sew? Sorry for all the questions! Thanks in advance!
Hello! You’re welcome. 🙂 Yes, if you want to, you can definitely make the handkerchief skirt in high-low version. It just won’t be as gradual as the round one. Maybe it helps to imagine moving the half circle of the waist towards the front of the pattern.? The skirt side will be longer than the front, but shorter than the back. You could make a little trial version with a fabric scrap to test the shape and see if you like it. Yes, I’ve added the seam allowance to the calculation before dividing (although apparently it’s a no-no), and the skirt turned out great. Usually I prefer having the two side seams instead, though, so this problem doesn’t present itself. You can have the back seam in addition to the side seams if you need it. Also yes, you cut the whole skirt on the fold and then open the c-back seam only. 🙂
Thanks so much for all this great info! Just what I was looking for. Now off to make a gathered circle skirt!
You’re welcome 🙂 Excellent! Happy sewing.
In order not to make a point or toes, I leave the godet skirt hanging for at least 7 days before making the lower hem
That’s a lot! I usually don’t have the patience to wait so long. 😀 But I guess it depends on the type of fabric. Some stretch more than others.
This is the first email I have received since subscribing. Amazing! The explanations and illustrations are so clear. Look forward to trying one of these out. Thank you.
Thank you so much and welcome! 🙂 I hope you’ll find many useful tutorials here.
Hi!
I’m praying your blog is the light at the end of my circle skirt tunnel!
I need to make a long skirt, combined from 3 1/2 circle skirts. It’s for dance so made from chiffon and extra flowy and light!
So am I right in thinking, if I use your 1/2 circle plan, but divide by 3 and not 2, does that work?
76cm / 3 = 25.3 / 3.14 = 8.06 …… do I still need to times by 2? What’s that part of the maths for?
I hope your still active on this 😅🤞🏼
Thank you!
Hello! I must tell you secret: I’ve never actually been good at math! 😀 But I think your idea is correct. Whenever my brain goes into tilt making these calculations, I test it by drafting just the waistline circle bit and then measure it to make sure the final measurement is going to work. So in your case, measure, and multiply by 3. The result should be your waist measurement. 🙂
Hi! I don’t know if you still see and respond to comments on this article, but I’d love to know if you use a zipper for the full skirt or if an elastic waistband could work. If the pattern is meant to be made with a zipper, how could I alter it to accommodate for an elastic waistband?
Hi there. 🙂 You could use the gathered circle skirt pattern to add an elastic to the waist. The idea is that the hole in the center has to be large enough for the hips to pass through. So use your hip circumference instead of waist circumference measurement.
This was the comment I was looking for!! Off to make a big circle skirt for Ren Faire
Sounds great! 😀
Wow…. this is amazing. Thank you so much. Just saw this now and am happy I believe after this your tutorial my sewing skills will not be the same. God bless you. nice one 😍👍
Thank you so much! 🙂 I’m always happy to hear that my tutorials are helpful to people all around the world.
Love this! This is great! Very clear explanations and innovative ideas. Thank you!
You’re welcome! 🙂 And I’m very pleased that I managed to be exhaustive with the explanations.
The free fitting booklet is amazing! Thank you very much. Now I have some ideas on how to adjust purchased patterns.
Awesome! 🙂 I’m happy that it’s proving to be useful for so many. You’re welcome.
Hi,
Is it possible to make a circle skirt with a train at the back using back pieces as full circle (I.e 2 x 1/4 circles) and the front as 1/3 circle? Or mould that look a little strange and be too difficult to work out?
I do love this blog post, it is the most detailed me I’ve seen.
Thank you! 🙂 I don’t see why not, but I haven’t tried personally. I wouldn’t know how to calculate that 1/3 of a circle though. But to make the front and back sides with different amounts of volume in general, which is what I think you’re after, it’s just important to get the waist measurement right and only calculate the patterns for half waist instead of full waist.
I am a plus, plus sized woman with a desire for a full circle skirt. Your instructions for drafting & constructing seem basic & straight forward. ‘Haven’t measured my waist in a long while, but I wear a woman’s size 28/30. The desired finished length is 20″ to 23″. I have a plethora of 45″ to 60″ fabric to play with but am not sure of the most reasonable way to cut the pattern pieces.
Instead of joining 2 half-circle skirts, would 4 quarter-circle skirts be the best way to go? I am about 5’4″ tall and have a waist measurement of 52″.
I’m not sure how to determine the width of the waist band in proportion to my girth &/or skirt length. My thoughts are that a 3″ waist band would be the place to start. Your thoughts, please? Or would a gathered waistband be the way to go?
I hope this makes sense. Other than a circle skirt shouldn’t be seen on someone as big around as I am, I welcome any & all thoughts.
Thank you / y’all in advance.
Hi Lisa. 🙂 Sorry for the late reply. In case you haven’t resolved yet: When the circle skirt pattern piece is too wide to be cut on the fold, you can cut in on one layer of fabric. That way you have a much bigger area to place the pattern. In fact, this method is used with full length circle skirts. As the circle skirt pattern is already a half circle, you will get two side seams. If you prefer to have a zipper at the c-back, you can cut one of the two pieces folding the pattern piece in half and adding an extra seam. As for the waistband height, I don’t usually make a straight waistband higher than 3cm, which is 1.18in. Because higher waistbands would need to be shaped.
Thank you for the reply. I like how straight forward your explanations are – easy to understand. I have a tendency to overthink which translates to over complicate even the simplest of tasks. ROFL! at myself. I can be confident about how to proceed with confidence. I probably should practice hemming a circle before I go forward.
As far as the timing of the reply goes, life happens. 😀
THank you again.
Thank you for taking the time to publish this information very useful.
You’re welcome. 🙂 This tutorial has turned out to be the most popular on my blog, so I’m glad that I decided to create it.
This is an incredible help, thank you!
Do you have any advice on matching the vertical stripes from a bodice to a circle skirt?
You’re welcome. 🙂 The shapes being different, I’d probably just match the central stripes as best as I could.
this is my fourth time using this post as a reference! you are amazing for doing this, and I genuinely feel like I’m getting better at skirt making because of this post specifically. thank you!!
That’s marvellous! 🙂 I’m glad that I decided to put this tutorial together as it’s helping so many people.
Hi,
I was reading through this tutorial – my question is seam allowance? Every time i make a half circle skirt the waist is at least 2 or 3 inches too big, even when i follow the measurements. The initial pattern i followed was ‘your waist in inches/3.14 rounded to the nearest 1/4 inch’ and i had about half an inch of seam allowance when i joined them together..please tell me whats happening i am using bedsheets for practice before i make a skirt i will wear outside and basting immediately after cutting and am running out!! (This is my first clothing project iv had no issues with bags ectetera)
Hmm.. that sounds odd. I have never tried to draw the pattern using inches, but in theory it should work the same way, although centimeters are a bit more accurate. Still, 2-3 inches is a lot. You can check the waist measurement before cutting the fabric with a measuring tape: just measure along the waistline of the pattern. I’m trying to imagine where the problem could be. Sometimes the fabric stretches, but not much. The pattern is without seam allowance, so when you cut fabric, the waist’s seam allowance is added above (or inside) the circular waist line. Is it possible that you add it under? Doing so would cause the waist to grow bigger.
hi I am still confused about the seam allowances. I am making full circle skirt pattern using 2 half circles (as per the instruction). I understand I need to add waist seam allowance above the waist. And add a hem seam allowance. But should I also add seam allowance on the side seams where the skirt halves will be joined? Thx
Yes, you’ll also need the side seam allowances. But it doesn’t influence the formula to calculate the radius. 🙂
Awesome, perfect.
Thanks. 🙂
For variations of pleats, do you add the extra fabric width you need into the calculation or the whole amount of fabric you need for the pleat?
For example if I’m doing a 2.5cm pleat, I need 7.5 cm of fabric for it. But that’s only 5cm extra fabric I need because the finished pleat will be 2.5cm inches of fabric. Do I add to the waist measurement 2.5cm (half of 5cm aka half of extra fabric needed) to my calculation or 3.75cm (half of 7cm which is the total amount of fabric the pleat will use)?
Ie. (1/2 waist) + 2.5cm
Or (1/2 waist) + 3.75cm
Thank you
Each knife pleat will need twice as much fabric as the depth of pleat is because it’s folded twice. So, if the depth of pleat is 2,5cm, you will add 5cm to the waist measurement. The final amount depends on how many pleats your skirt will have. 🙂
So for the gathering section, you multiplied the radius measure by 2. Can you please explain why ?
It’s just to make an easier calculation. 🙂 You can add volume by multiplying by any number. I usually do 1.5. But it depends on the fabric and how full I want the gathers.
Great post! Thanks for explaining the variations so well! Seeing the samples really helps, too.
Thanks! I wanted to make the tutorial more interesting and fun. 🙂