Trench coat is one of my favorite spring season garments. I have never actually made one myself, so the Make Nine -challenge seemed like a perfect excuse to add it on my to-do -list.
I have had a trench I really love for years, but it has started to look quite worn out as you’ll see in the picture below… My idea was to make the new coat very similar to it, changing just the collar. And in a different fabric obviously.
Trench coat details
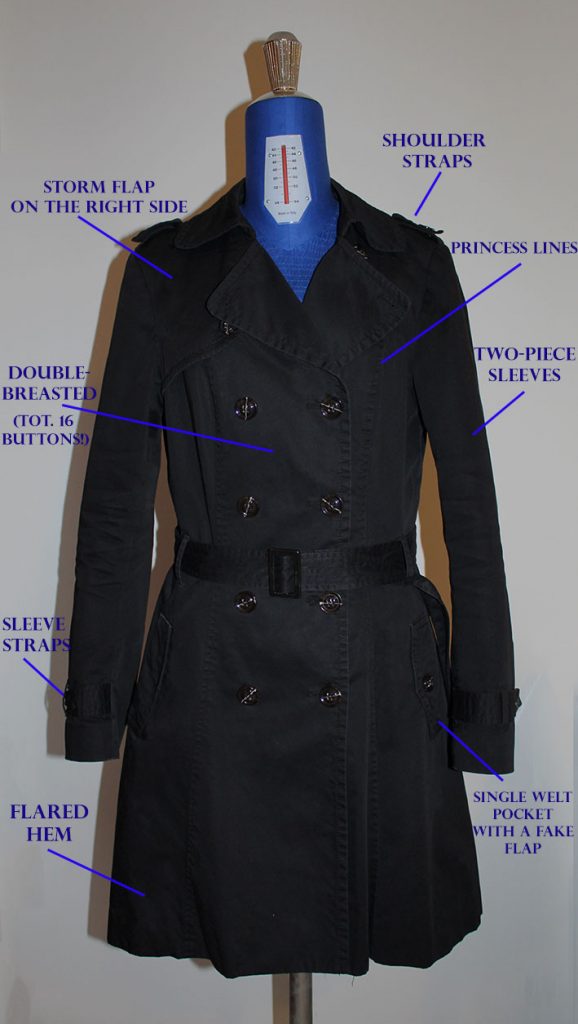
So we have a typical double breasted trench, with princess lines, shoulder- and sleeve straps and the storm flap on the right side.
Trench coats usually have a more straight profile. This one has a flared hem instead. That’s why I decided to make a coat more similar to this, and not a classic trench.
There’s also an interesting pocket construction I wanted to try out. It’s a single welt pocket with a fake flap integrated. (And I’ve lost a button!)
Good thing about having the actual garment, instead of just a picture like last time, is that we get to see the back side as well.

I’m going to need lots of buttons! I counted a total of 17.
The trench is fully lined, the storm- and back flap included.
So there’s going to be a bit of work to construct this one. Let’s start from the pattern.
Trench coat pattern
To draw this pattern, you’ll first need to have the basic tailored jacket pattern with your measurements. Choose the one with darts, because we are going for a more fitted shape and the darts are needed to make the princess seams.
It should be complete with a two piece sleeve.
This is my starting point. It’s a classic tailleur pattern:

Don’t worry if yours is a bit different. If it also has a waist dart in the back, it’s even better.
You don’t have to copy the collar, because it’s going to be different anyways.
Now we will modify the pattern so that it turns into a trench coat pattern. I added all the moves on the following drawing. I hope it’s not too much of a mess!
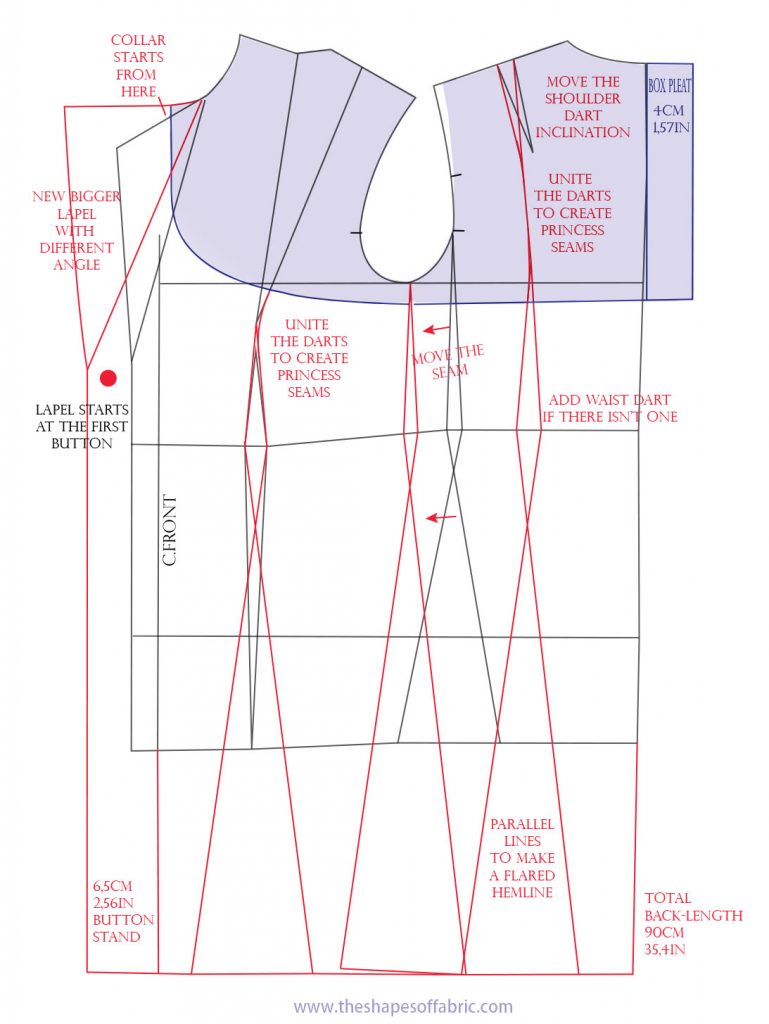
The new lines are in pink, but you can see the original pattern there too.
Check the waistline measurement to see if it’s good as it is. Otherwise change the dart-widths. This being a coat, you don’t want it to be completely fitted.
My trench is 90cm / 35,4in long measured from the c.back.
The moves
Starting from the left:
- I made the button stand wider, because this is a double breasted coat. From the c.front it’s 6,5cm / 2,56in wide.
- As usual, the lapel starts at the first button. I drew a bigger lapel, because I wanted to see how it looks like. The tip is higher than the original but the breakpoint remains the same. The collar will start at the c.front.
- I united the waist-dart to the bust dart to draw the princess seams. The flared hem starts already from the waistline.
- Then I moved the side seam in the middle. The original pattern had the seam more towards the back.
- The original pattern didn’t have a waist dart in the back, so I added it. I moved the inclination of the shoulder dart so that I could draw the princess seam. Theres flare at the hemline. All the seams from the waist down should be parallel to one another.
- Lastly I drew the storm flap and back flap. You see them in blue. There’s a box pleat at the c.back. Remember to close the darts. You can either leave ease at the back shoulder or open the dart volume as flare.
The pattern pieces:
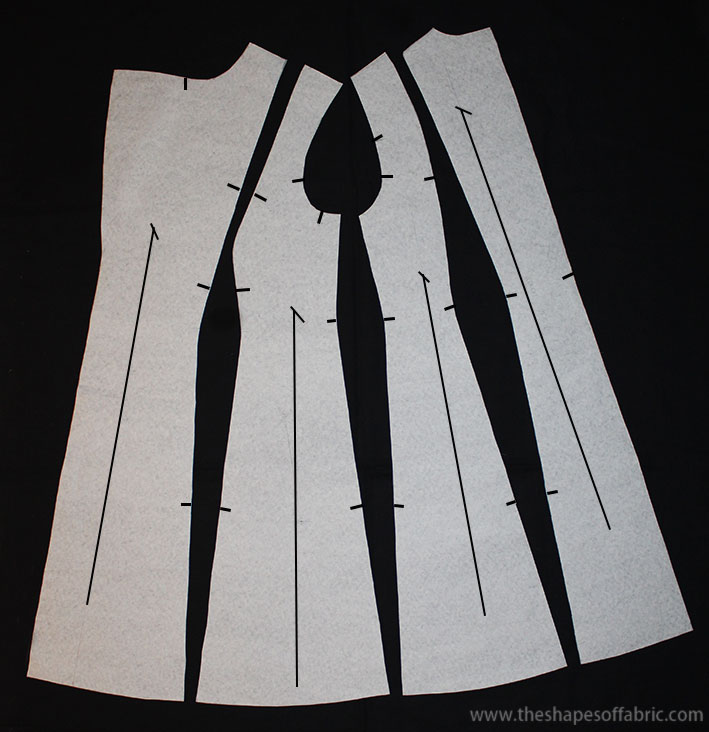
In case you’re wondering where the facing piece is, I just cut the front piece twice for now as I was being lazy…
The sleeves should be good the way they are if you didn’t change the armscye measurement. Just mark where the straps will be sewn.
The collar pattern
The collar I wanted to use here has a separate collar stand, not like the usual coat collars. My old trench also has a separate collar stand, but it’s a different type.
I was trying to search the name for this collar, but couldn’t find it, so if somebody knows it, please write it in the comments!
I prepared a scheme for the construction. It’s a mix of Winifred Aldrich and my own. She calls it the shaped collar.

Reshape the pieces after cutting and opening/overlapping.
Notice how you have to flip the collar stand around. It’s not so logical, but the opposite side of the stand will be sewn to the collar.
Check the measurements with the coat’s neckline. Start measuring at the collar piece and continue to the collar stand piece. Add a notch where the shoulder line of the coat will be. Cut off or add extra to the c.back parallel to the original line.
Then check the collar piece measurement with the collar stand and do the same.
Upper collar has a straight grainline, under collar is on bias.
The pocket pattern
So the pocket I was telling you about.. Here it is!

You know how the single welt is folded in half? Well, in this case it’s not folded in half. Instead, on the other side of the fold, there’s a fake flap.
I was going crazy trying to figure out the pattern just studying the existing pocket. But I think I got it.

Here are the remaining pattern pieces. The straps and belt are basically just straight pieces with pointy ends.

Trench toile
Naturally I sewed a toile, because it’s way too risky to make a coat directly in the final fabric! And yes, I found some things to modify.


Turns out I didn’t like the big lapels after all. And the hemline wasn’t flared enough. Also, I felt like it was a bit too tight from the back and the sleeves. Outer garment needs more space. Never happy with the sleeve length, I decided to make them longer again.. Lastly, I decided to move the pocket a bit backwards.
Here you can see the changes I made to the pattern pieces.

I added 2cm /0,79in of flare to each seam, starting from the waistline and in addition there’s 4cm /1,57in of flare at the c.back, that wasn’t there before.
There’s 1,5cm /0,59in of extra on both sides of the side seam under the arm, which will also cause a wider sleeve. And I added 1cm /0,4in to the back, near the armscye. While I was at it, I widened even the front side a tiny bit.
You can see the lapel modification in the picture, too.
Of course then I had to modify the storm- and back flap as well. I had an idea that it would look nice if the back flap was not completely flat, so I added some flare.

And the sleeves. I only had to widen the under sleeve, as that was the area I modified. I slashed the sleeve open right where the side seam of the body section is and added volume, also some at the hemline.
As before, I made the sleeves longer. This time 2cm /0,79in.
Whenever you make changes to the armscye, re-check that the sleeves still match with it.

The next step would be to add seam- and hem allowances and draft the facing & lining patterns. You’ll see those next time!
14 Comments
Hi, I think I’ll try to make it. It would be helpful to know how many meters it needs to be done.
Do you mean fabric? Well, that depends on the size of your coat and the width of the fabric you’re using, but very approximately I could say twice the full length of the coat. If you want to use two different fabrics like I did, you’ll need at least once the full length of the coat in the other fabric. Measure from the shoulder near neckline all the way down and add some extra cm for hem- and seam allowance. I usually first draft the pattern to calculate how much fabric to buy, so I get the exact amount.
Thank you for the informative post. I really like the back flap on your original trench. I have a beefy upper back so designs with loose or even tenting back flaps don’t appeal to me. I’m curious – did you ever have occasion to unbutton it?
Cheers, Sarah
You’re welcome. 🙂 These back flap buttons seem to be just decorative. In fact, if I unbutton it, the pleat doesn’t open nicely, because of some stitches that keep it flat. The beauty of drafting your own patterns is that you get to shape the details the way you prefer, so you could create the perfect back flap for you. 🙂
I’m having a hard time understanding how the collar goes with the lapels. Been googling like a maniac but I don’t understand at all how it’s sewn.
Did you see the second part of the tutorial where I’m sewing the coat? I hope that will shed some light to the issue. I find it’s helpful to study existing garments, in this case a trench coat, to understand how to put the pieces together. If you don’t have a trench coat at hand, you could go to a shop and see the collars there. 🙂
Thank you so much for this article!
You’re welcome! 🙂 Every autumn and spring I think about making another trench coat with this pattern but end up not having time. Planning on one again. 😀
hi, just wanted to know, is the collar pattern with or without seam allowance? thanks
These are without seam allowance.
Great work you have done here. Compiling all these must have been hectic. Hard work is what you have put in here. Well done!
Please, I need the the body measurements for blazers. Thanks a lot!
Thank you. Yes, it’s quite a lot, but it has been done during Years. 😀 The body measurements for blazers are the same as those for a bodice. You just add more ease to the pattern.
So I found your article and just wanted to let you know it’s been quite helpful for me – though in a less orthodox way than you might expect haha. I have done almost no sewing in my life personally (though I made a basic apron once and remember seeing how patterns worked from my mom).
I’m actually a game developer, but I’ve realized there’s a surprising amount of details that carry over from something like sewing patterns to modeling in 3D (Especially with something called “UVs” — When you’re texturing a 3D model to add the actual skin, color, & details, you have to “unwrap” the model and cut the resulting eyesore into smaller chunks to apply the texture cleanly. Since textures are technically flat images, it’s a VERY similar concept to creating a fabric pattern – just in reverse I suppose. Almost like you’re starting with the finished garment structurally, but you’re having to work backwards to figure out what the individual panels/pieces of fabric would need to be to make that shape, while ALSO making sure the pattern on said fabric lines up nicely haha. It’s fun stuff. And a total pain in the butt.).
Anyway – as a concept artist trying to break down finer details of a trenchcoat without really understanding how they work, this has helped me in trying to understand the structure better, thanks! 🙂 Knowing where the seams would likely run helps in trying to stylize the coat, where to add panels of other fabric, and other little details like that haha.
Wow! That’s so interesting. I didn’t know my tutorials could be useful even for game developers. 😀 Anyways, awesome!