

There are lots of tutorials about different patternmaking techniques here at my blog. And also lots of posts about different sewing projects. So, to combine the two, I want to show you how to use layering technique to make a really cool skirt with scalloped pleats!
This is a design I originally posted on Instagram. The pattern was rather complex, but I managed to simplify it for this tutorial. The skirt is quite a long project, but I think it’s definitely worth it!

Like I’ve mentioned before, you can use the layering technique when you want to make pleats with particular shapes. In this case, I’m making them scalloped. As you can’t fold a scalloped shape to create a pleat, you need to separate the pieces with a seam.
Skirt with Scalloped Pleats: the Pattern
For this project you’ll need the basic skirt block.
Start by deciding the length of your skirt and adjust the pattern accordingly. I made mine knee length, so the basic block was perfect as it was.
To get rid of the dart, we will first turn the basic skirt block into an A-line skirt by rotating the dart towards the hemline. You will also need a straight side seam, so add flare. If you want to lower the waistline, do it now.
Then, mirror the piece so that you have the whole skirt front.
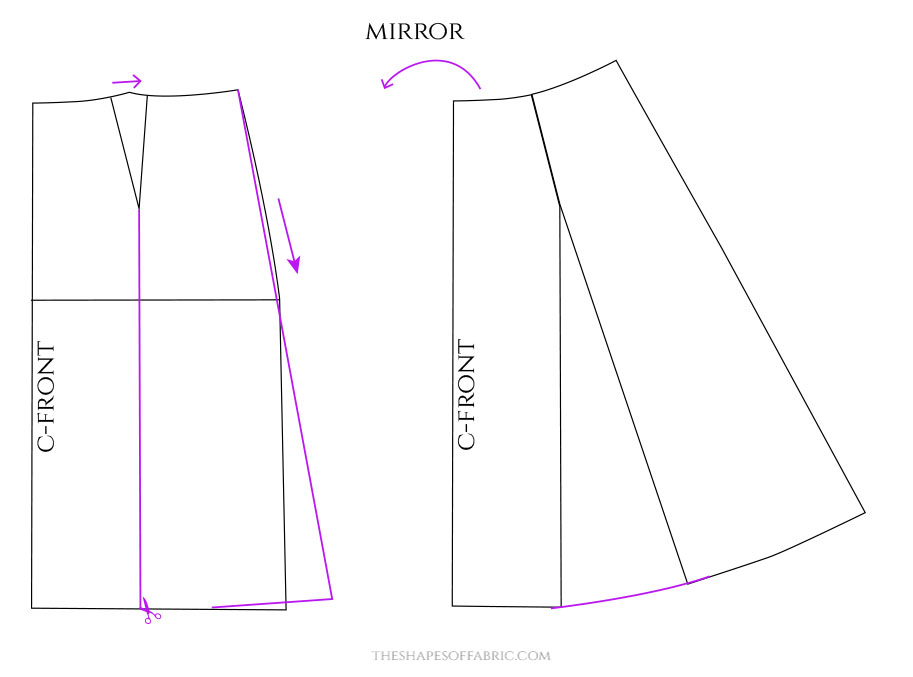
You might wonder, why there’s no back piece? Well, you’ll see that soon…
Next, divide the skirt front into 10 sections like this. Divide the spaces evenly at the waistline and the hemline.

Measure the lines to get an average length. They won’t all have the exact same length and to avoid making several templates, we’ll use an average length.
Divide the measurement evenly by the number of scallops you want. For example, my skirt has 6 scallops per pleat, about 9cm wide each. Then, use this number to create a scallop template for the template you will use to trace and sew the pleat shapes.
Mine was 3cm high. I was already thinking ahead and didn’t want the shape to be too difficult to sew. So, I made the scallops with rather wide curves.
Next, align your scallop template to the lines you drew earlier to draft the layer shapes. If you’re lazy, you can skip this part and only draw approximate shapes just so you know where the layers are. You need to trace the layers anyways, so, you might just as well draw the pretty shapes then.

The layers will also need a facing each: Draw a parallel line 3cm to the left of the guidelines. This will become the depth of pleat.
Now you have everything you need to trace the layer pieces. Here’s how:
Start each layer at the base of the previous layer’s facing (the purple lines). This is why we drew the first line outside of the skirt: piece number 1 will be attached to the base of the previous layer’s facing, which in this case means the last layer of the skirt back.
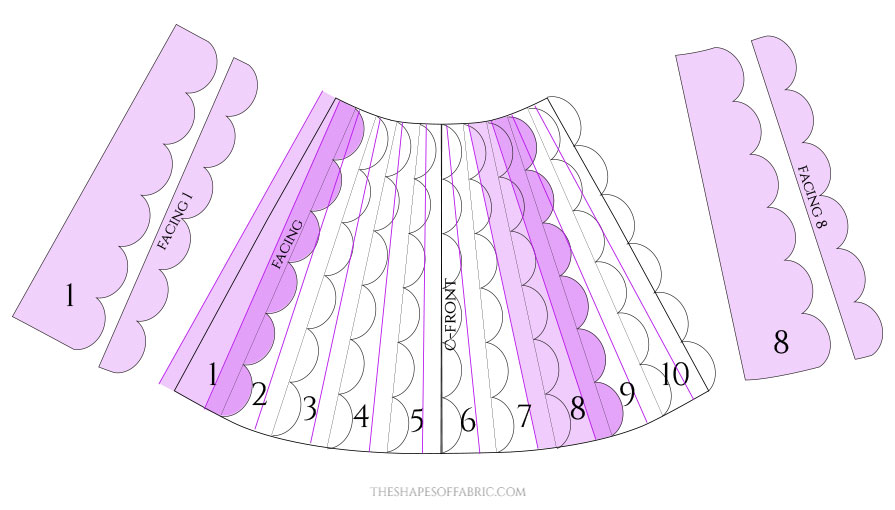
You can use the scallop template to draw the shapes. Adapt it a little to each line.
After you’re done, you will understand why I didn’t have a separate back piece. To save time! 😀
I know it’s cheating, but preparing the front piece already took so much time that I didn’t want to trace 10 more pieces. Adapt the skirt waist so that the front and back pieces will have the same measurement right at the beginning and you’ll be fine.
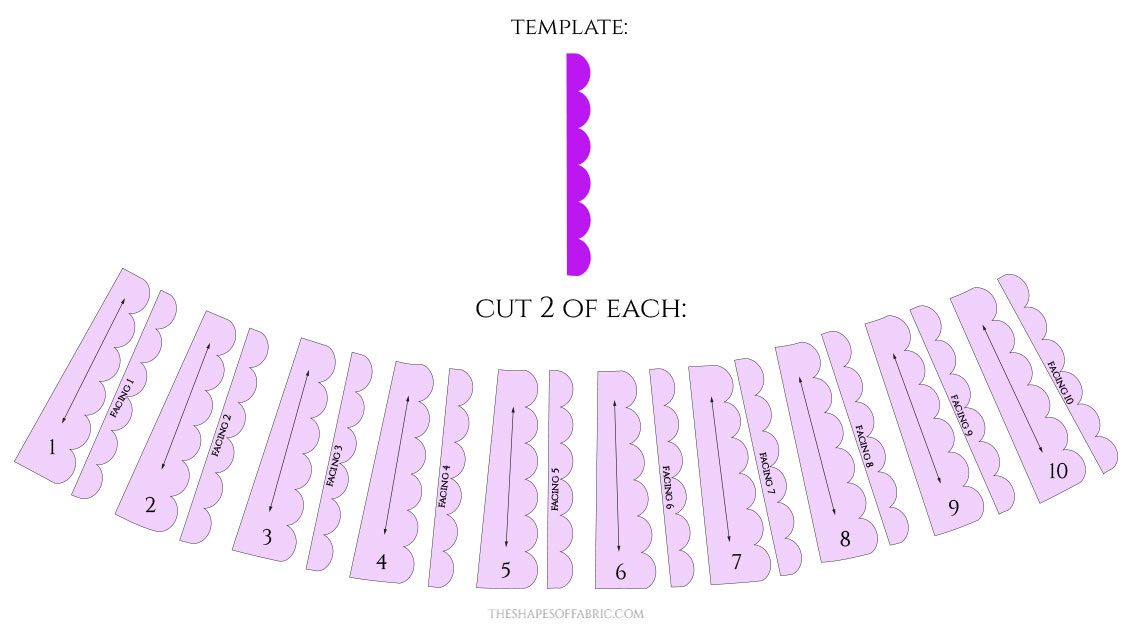
Here are the pattern pieces. I placed the grainline in the center of each layer. Cut each piece twice to get the back of the skirt, too. The zipper will be at the left side seam, but you don’t need to alter the pattern for it.
Trace your template, too. Use a heavier paper as you will sew all the layers with it.
The Waistband
The skirt with scalloped pleats will have a straight waistband.
The pattern is a long rectangle. You’ll need your skirt’s waist measurement. If you lowered the waistline, it’s not the same as your own waist measurement.
The height is twice the final waistband height (no more than 3+3cm), because it will be folded in half.
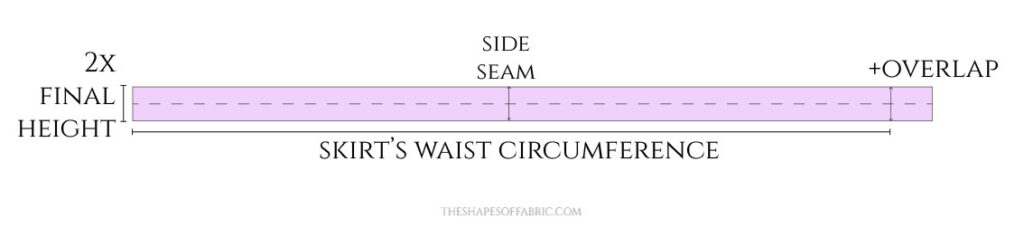
There’s an overlap to add a button closure. Mine was 3cm long.
You can add even the seam allowance to the pattern. Ensure that you have notches for the opposite side seam and the overlap.
Cutting the Pieces
So, you need to cut each skirt piece twice. Normally, one would fold the fabric in half, but in this case all the pieces point in the same direction; there are no mirrored pieces.
It means, that if your fabric has a right and a wrong side, you need to have two layers of fabric facing up.
The layer pieces will be cut with the right side up, while the facing pieces will be placed wrong side up.
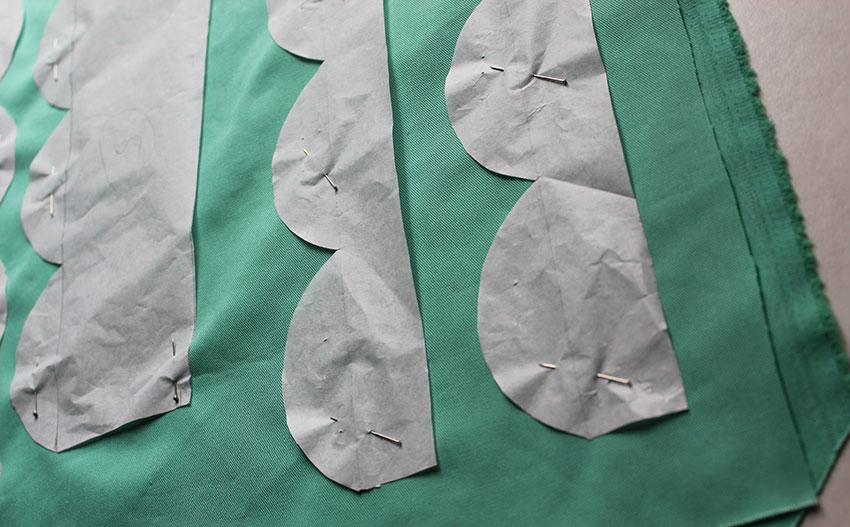
I used up 2m of full width fabric and that was a close call, too! The fabric is a mix of cotton and polyester. It’s because that added polyester prevents the skirt from creasing so easily.
The pieces have a 0.7cm seam allowance at the long edges, 1cm at the waist, and a 2cm hem allowance. As you will use a template to sew the scallops, you don’t need to worry about cutting a precise seam allowance.
Sewing the Layers
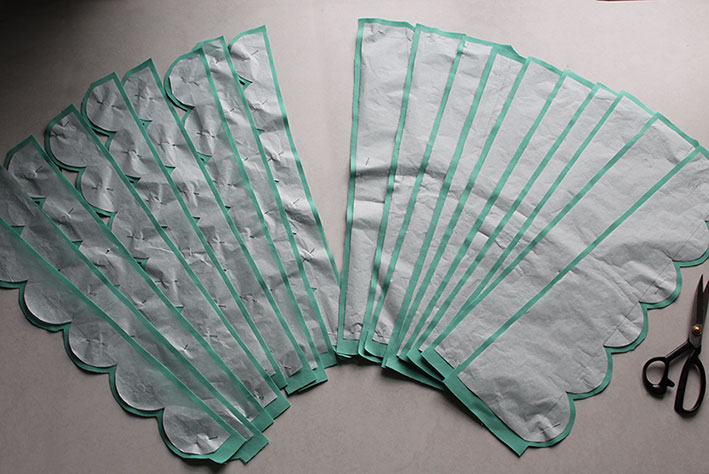
You won’t be able to hem the skirt like you normally would. Instead, you do each layer separately. Therefore, you can start by finishing the hemlines of each piece with a serger or zig-zag stitch.

After that, unite the layers with their facing pieces along the scalloped edge, right sides together. Pin the template onto one layer at a time and sew, following the template shape. Keep track of which layer number you’re working with, so that you don’t mix up the pieces!
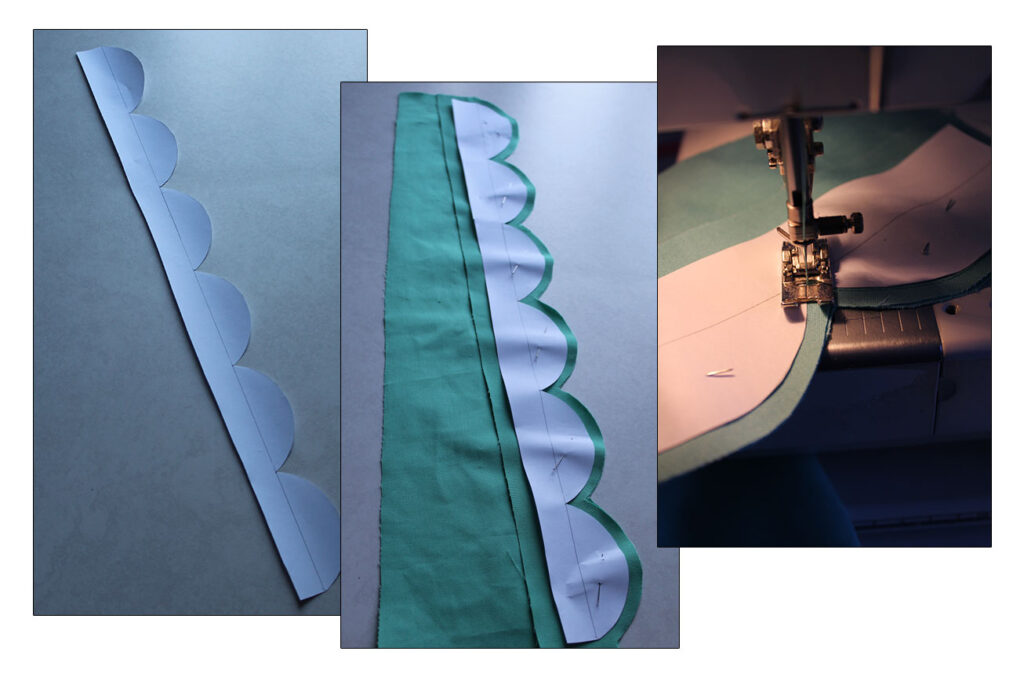
The template should help you sew neat shapes. Then, clip all the corners (see the arrow) and trim the scalloped shapes before turning the right sides out and pressing. Just a side note: it took me ages to press all the layers!
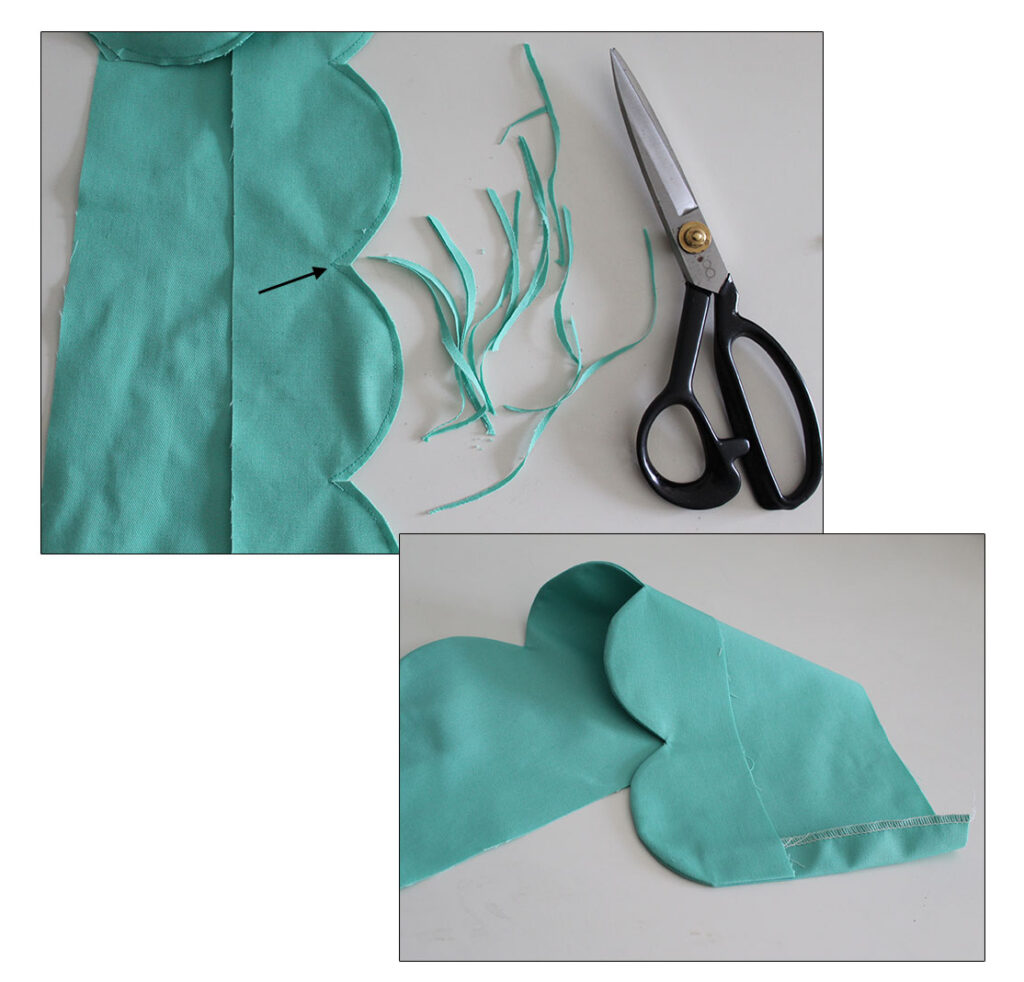
Here above you can see how the hemline will end up. The lower edge is folded but not stitched, to create that pleated look.
Uniting the Layers
Now that all the layers have been prepared individually, you can unite them to create the front and back pieces of the skirt. I kept these two separate at first.
Pin each layer to the base of the previous layer’s facing so that it ends up partially under it. Before sewing, lay everything flat on the floor and measure the waistline to check that it will have the correct measurement. If not, adjust where you pinned.
Notice, that you need to remove 3cm+seam allowance from the left edge when measuring, as that will be overlapped with the previous layer.
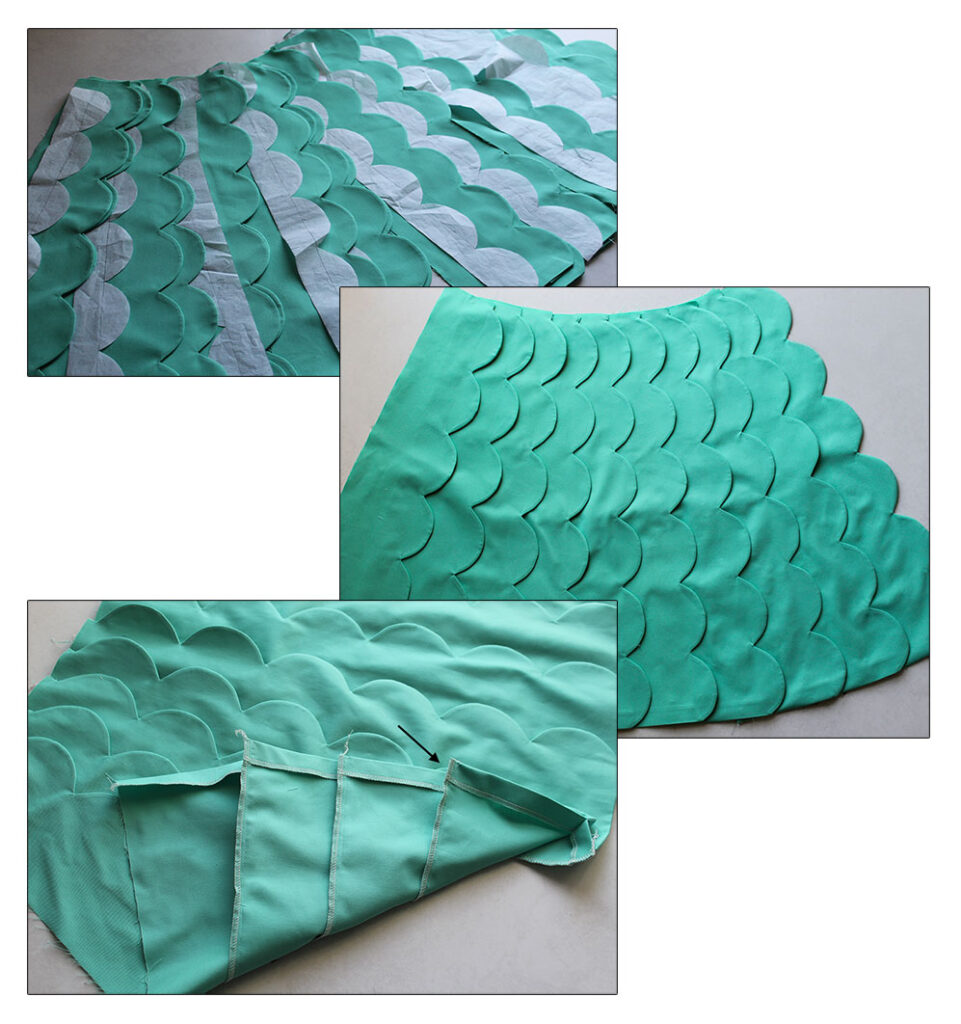
Once you’re happy with the waistline, sew the seams and finish the edges with a serger or zig-zag stitch. Here you can see (the arrow) why you can’t finish the skirt hem in one go and need to do each layer separately.
After having completed the front and back sections, you can unite the two at the right side seam.
Then, pin the layers in place at the waistline and stitch to keep them in place.
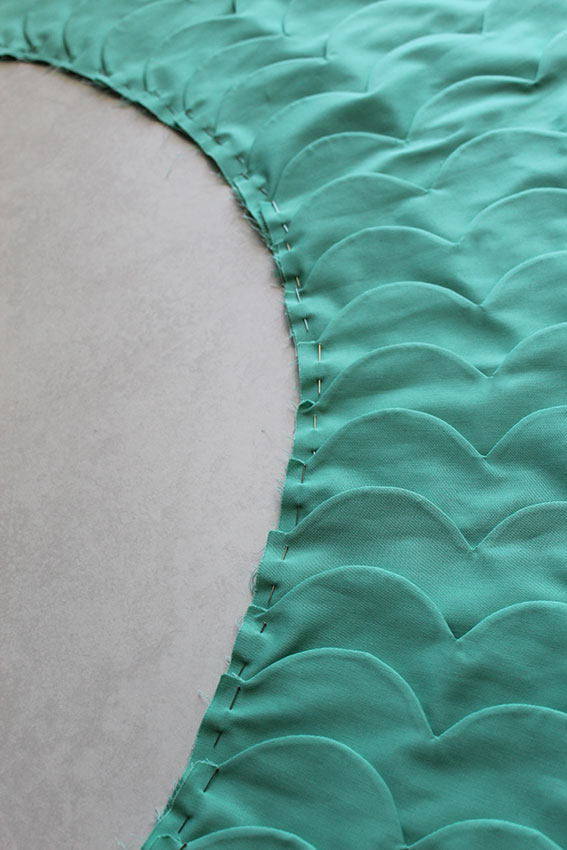
The Zipper
I wasn’t sure how to sew the zipper between the layers, but I proceeded one step at a time and in the end managed to make it work. Here’s how I did.
To give you an idea of what I was trying to accomplish, this is the final look. I wanted the zipper to remain hidden underneath the scallops at the side seam position.
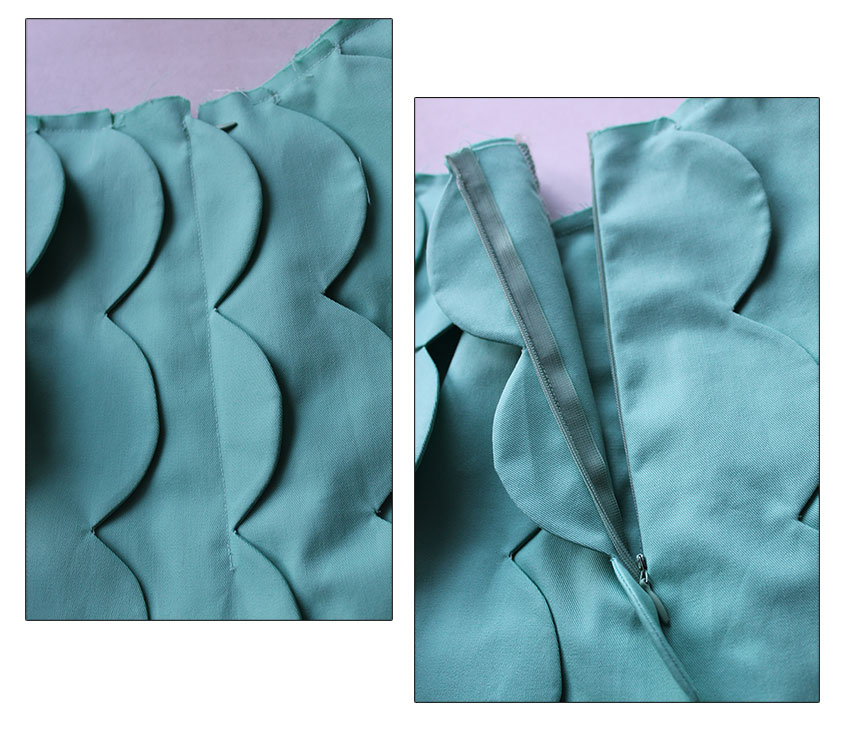
I started by sewing the left side of the invisible zipper with a regular zipper foot onto the scalloped edge as you can see in the left picture above. That was the side seam position.
Then, I closed the zipper to find out where to attach the right edge. It was going to be sewn onto the other layer piece. So, I aligned the layer piece with the base of the facing where the zipper was already attached to find the exact position and pinned the zipper in place.
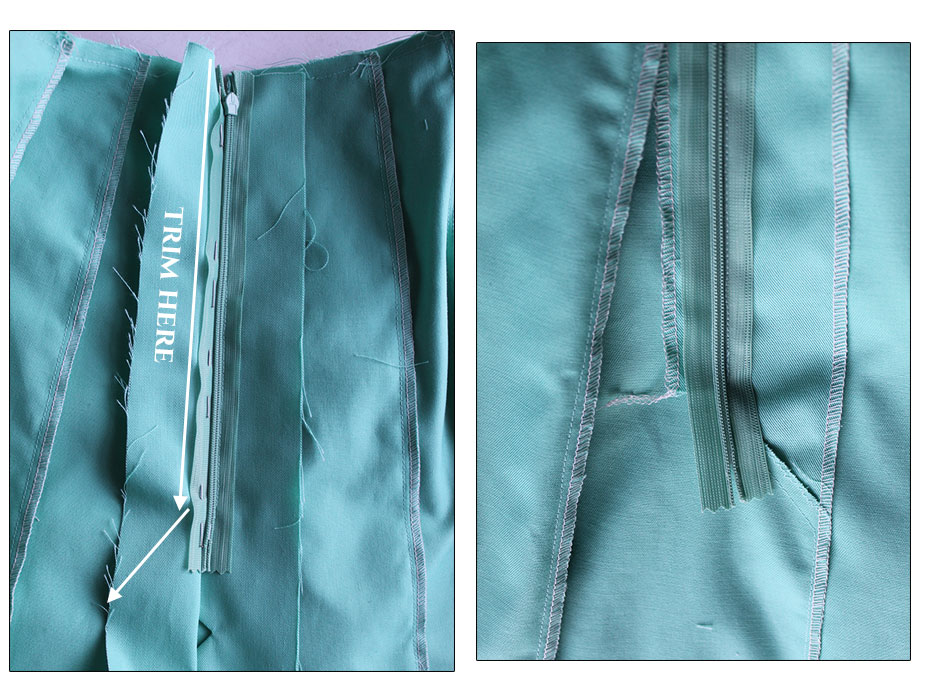
This time I used the invisible zipper foot. Afterwards I trimmed off the excess fabric. You need to make a diagonal cut at the bottom so that you can complete the rest of the side seam normally, attaching the remaining length of the layer to the base of the facing.
The zipper needs to remain completely on the inside, so even the diagonal edge has been stitched down.
I’m not sure if this makes sense, but you will understand better while you’re actually sewing the piece, because in the end it’s quite logical.
Sewing the Waistband
When the zipper is ready, you can attach the waistband. I interfaced only half of its height because the skirt waist was already bulky enough with all the layers.
First, you prepare the overlapped section like this:
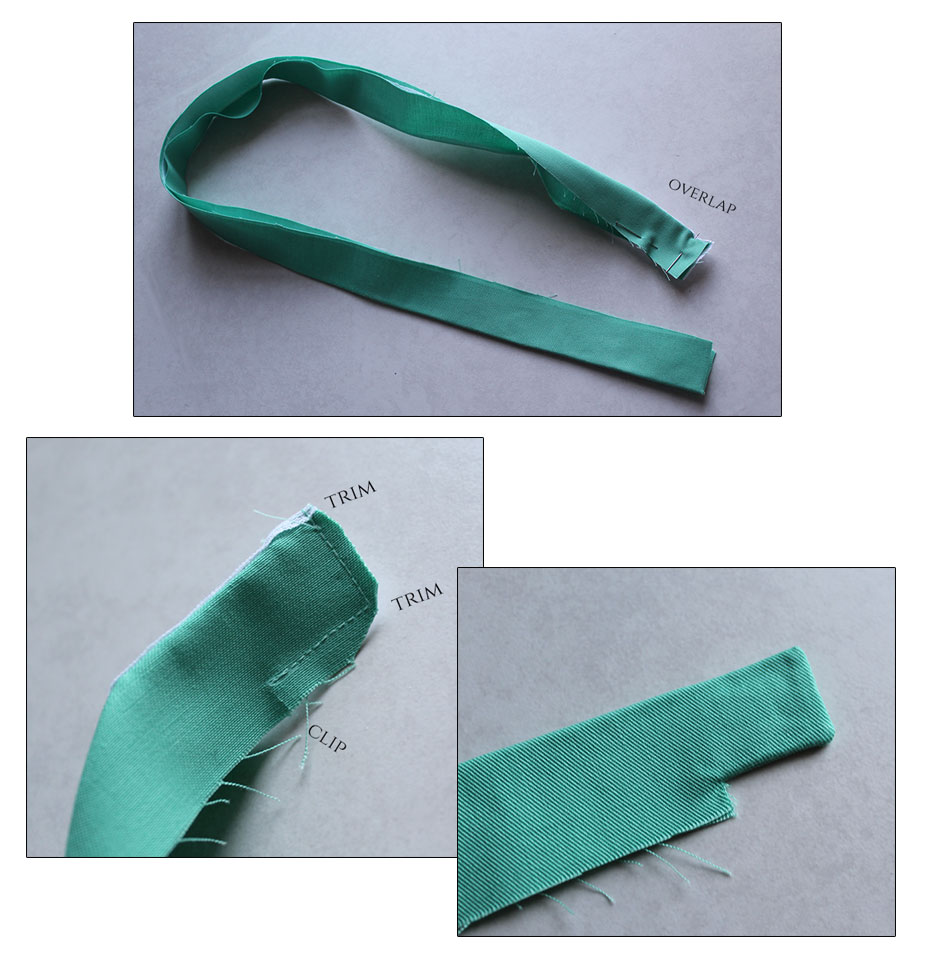
It’s basically where the buttonhole will be stitched. This part extends over the opening above the zipper.
After having pressed the overlap nice and flat, you can pin the rest of the waistband to the skirt waist. The right sides together. I placed a pin where each layer starts (=many pins!) so that I could be sure to sew the waistband in the right position as seen in the picture below. You only sew one edge at this point.
Also, ensure that the waistband ends up at the same level on both sides of the zipper opening.
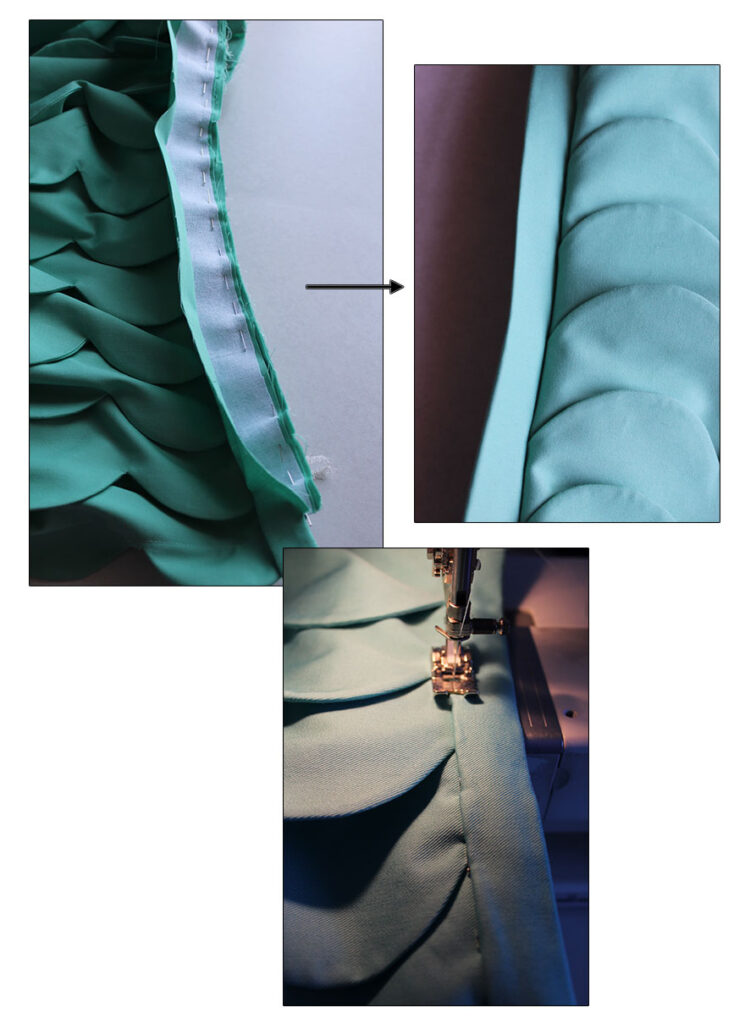
Then, you press all the seam allowance towards the waistband and close the remaining short end.
Finally, pin the inside of the waistband and top stitch it in place. I prefer to stitch with the right side of the skirt up, as it’s the visible side and I want the stitching to look nice. You can also hand stitch.
You’ll also need a buttonhole. I found this cream-colored button in my stash. The buttonhole is 2mm wider. I marked it with a basting thread.

The last step is to hem the skirt. I opted for hemming it by hand.

Tadaa!
Having already done this skirt with scalloped pleats as a half-scale sketch I knew more or less what to expect. But seeing it in color and actually being able to wear it made it even better! I immediately forgot about the amount of work that went into this. So worth it! 😀
Here I’m trying it on with different shirts, but haven’t quite found the right one, yet.
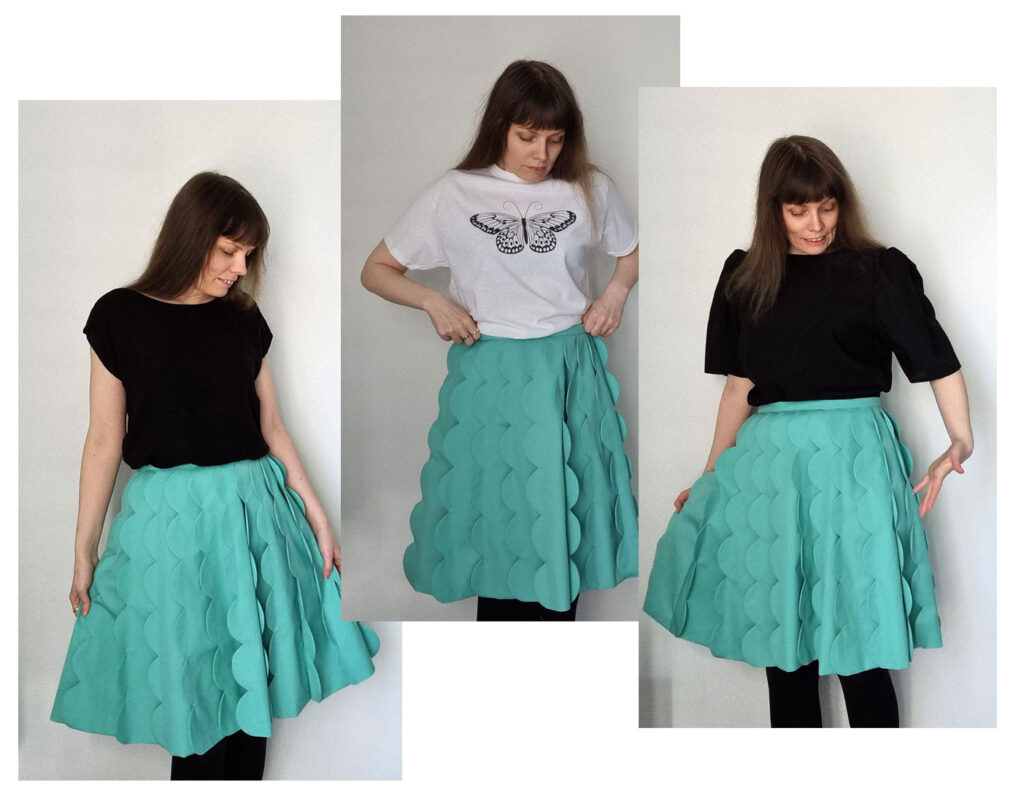
I mean, this is a perfect example of my reasons for making clothes. You get made-to-measure and unique in one go!



8 Comments
This is creative. Artificer
Thanks so much. 🙂
wow that is so couture, yet doable, great instructions!
Thank you! 🙂 That’s great to hear.
Had to practice these scallops from big to super mini tiny maybe 60 years ago. They had to be perfect in shape and size each time, or had to do them all over again, and again. You managed to bring them together into a lovely creation. Thank you so very much for you showing. And for sharing your creativity all together.
Thank you. 🙂 Yes, it can be a bit tricky to get the edges smooth when turning the right sides out. Here I had quite a few to turn! 😀
This was so helpful, thank you so much for making it look like so easy. I’ve searched so many tutorials but didn’t really understood the process so well. But then I found yours and it’s very easy to understand and I also found your YouTube short while searching for a video tutorial. I’m going to try it very soon now.
Glad to hear. 🙂 This is one of my favorite skirts.