A while back I posted the basic bodice pattern -tutorial. That one was with darts. So now this pattern should be easy.
The Dartless Bodice Block is useful when you want to draft loose fitting garments. If you have never drafted a bodice pattern, this is a great way to start. I included instructions on how to draft the sleeve, too.
You’ll see that the instructions are quite similar to the other basic bodice pattern, just more simple.
I’m continuing with the metric system.
The Measurements Needed
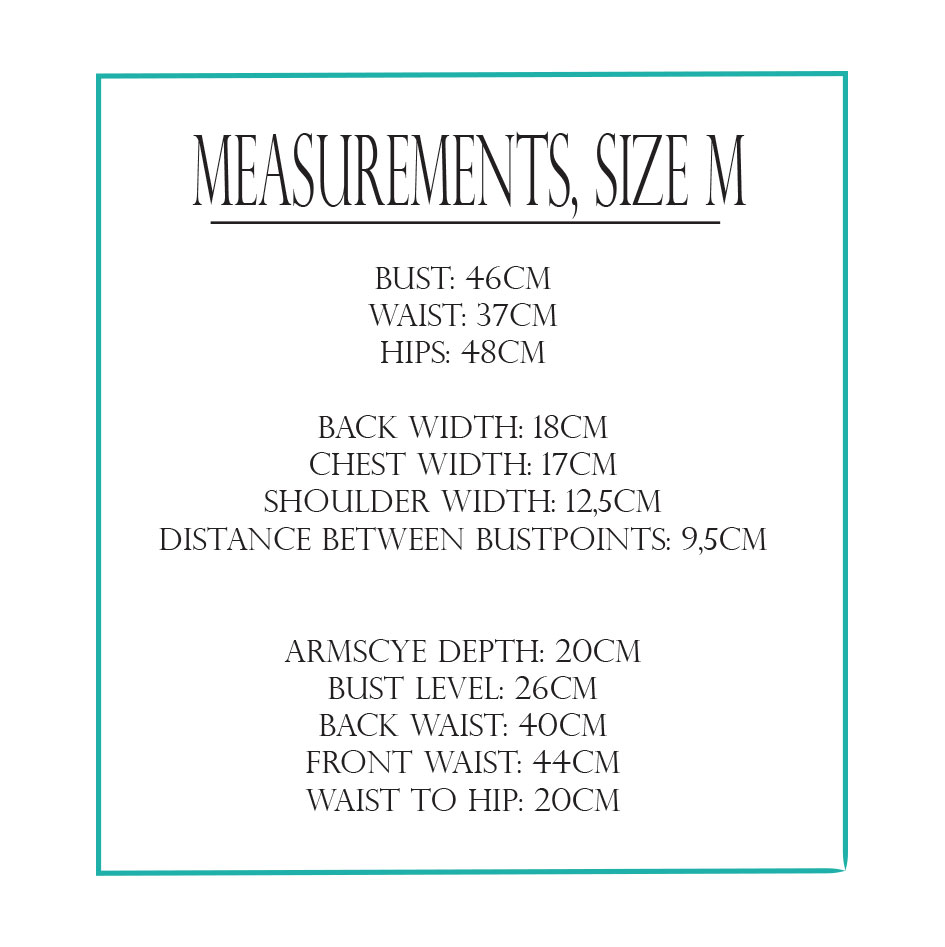
Here are the measurements you will need to draft the dartless bodice pattern. It’s the same picture of the industrial size M -measurements as last time. The horizontal measurements are already divided in half.
You can find instructions for taking the measurements in the Body measurement -chart of mine. Just sign up with the form you find here at my website if you look at the side panel, or at the bottom of the page if you’re on mobile.
Dartless Bodice pattern: starting point
Doesn’t this rectangle look familiar, too? Well, it’s pretty much the same as last time. There’s just more ease in this pattern, because we’re going for a loose fit.

So the height is your back waist/nape to waist length+ 2cm. The width is ½ bust circumfrence + 6cm of ease.
To separate the little back neckline -rectangle at the upper right corner, the height is 2cm. For the width, choose your measurement among these:
- Size XS: 6,5cm
- S: 7cm
- M: 7cm
- L: 7,5cm
- XL: 8cm
Then draw the horizontal line in the middle using your armscye depth -measurement + 2cm of ease. This will be the underarm line.
So using the size M measurements: 20cm+2cm = 22cm.
Mark the side seam position exactly in the middle of the underarm line.
How about the 2 vertical lines on both sides? For the back side calculate ½ back width + 2cm of ease.
Using the example measurements: 18cm +2cm = 20cm.
For the front side it’s ½ chest width + 2cm of ease.
So here it’s 17cm +2cm =19cm.
Dartless Bodice Pattern: Back
Now it’s time for the details, starting from the back piece. There are numbers to make it easier to follow the instructions.

1. Draw the neckline. At least the first 3 cm from the c.back should be a completely straight line and then you can curve it.
2. Measure 4 cm from the top and draw a short parallel line. This will be the guideline for the shoulder slope. Then calculate your shoulder width + 1 cm of ease (because we want the whole bodice to have a similar kind of loose fit) and draw a line starting from the base of neck and ending on the guideline you drew earlier.
3. To draft the armscye, first measure 5cm upwards from the underarm line (=point A). And then mark point B in the middle of the shoulder tip and point A. These are your guide marks for the armscye and at the same time will be useful notches later for a sleeve.
The armscye line should touch the point B, but stay about 0,5cm outside of point A. Don’t curve too much here.
4. At this point we can also add the hipline. So check your measurement chart for the distance between waist and hip.
5. To finish the back piece, we need to draft the side seam. Just measure ½ hip circumference /2 + 2,5cm of ease along the hipline.
For example 48cm / 2= 24cm + 2,5cm = 26,5cm.
Draw a line between this point and the reference point you have in the middle of the underarm line. Then you can just check there’s enough room for the waist, but that shouldn’t be a problem anyways.
Dartless Bodice Pattern: Front
Now that the back piece is ready we can draft the front piece.

1. Starting from the neckline. You can get the A-B distance from the back piece; The front neckline width is the same as back.
Add 1 cm to that to get the missing measurement from point A downwards. Now you can draw the front neckline.
2. Next up, the shoulder slope. The procedure is identical to that of the back piece. So measure 4 cm from the top and draw a short parallel line ( =the guideline for the shoulder slope). And then draw a line starting from the base of neck and ending on the guideline. The measurement should be exactly the same as that of your back shoulder.
3. Although this pattern doesn’t have a bust dart, it will be useful to mark the bust point on the pattern: Measure the bust level from point A downwards. Mark it at the c. front and from there, measure ½ distance between bust points. For the sake of the loose fit, you can even add 0,5cm of ease. Mark the bust point here with an x or a circle.
4. To draw the armscye, let’s first add a guide mark 5 cm upwards from the underarm line. The front armscye line should touch this point. You can curve it more than the back armscye at the underarm region. Make a nice continuous line from front to back.
5. Measure ½ hip circumference + 2,5cm of ease.
For example 48cm /2 = 24cm + 2,5cm = 26,5cm.
And draw the side seam uniting the two reference points at the underarm line and hipline.
Extra:
Sometimes you’ll need to use this pattern only from the waistline up. You might notice that it’s too short in the front. To correct this, you can draw the front waistline a bit lower using your front waist measurement.
Measure the front waist length from point A downwards and draw a second waistline. After the bust point width, you can unite the line to the regular waistline, curving it a bit.
So now your Dartless Bodice Block is ready and we can draft the sleeve.
The Sleeve for Dartless Bodice Block
To draft the sleeve pattern, we will need some measurements from the bodice. Other than those, you should have the total sleeve length and the elbow level measurements handy.
Here’s the bodice we just drafted. I marked the areas we need to measure to draft the sleeve.

The Sleeve Cap

1. Start the pattern by drawing these 3 horizontal lines. The first two are 5 cm apart from each other. To draw the uppermost line, measure the distance between the underarm line and the shoulder tip of your bodice (1) with a straight line. *Detract the following cm (=x) from the measurement :
- Size XS: 3,5 cm
- S: 3,5 cm
- M: 3,5 cm
- L: 4 cm
- XL: 4cm
For example, my bodice size is M, so I’d detract 3,5 cm.
2. Then mark the starting point for the sleeve cap along the future bicep line. Measure the bit 2A from the bodice and add 1 cm. From that point, draw a vertical line straight up to the second horizontal line.
The next measurement is that between the armhole notch and the shoulder point of the bodice front (3), measured in a straight line. Add 1 cm of ease.
Draw a slanted line using this measurement ending on the uppermost guideline.
Then do the same with the bodice back (4). This time the line goes in the other direction and ends on the second guideline.
Draw a vertical line straight down from that point. Then measure the bit 2B from the bodice and mark the end point of the sleeve along the bicep line.
3. Now we have this house-shaped sleeve cap. Mark the middle point along the two slanted lines (=reference points). Then draw your sleeve cap as in the picture.
The front armhole line should start with a more pronounced curve on the bicep line.
Use the reference points to shape the upper part of the sleeve cap; at these points, the curve should be at its maximum, about 1,5-2cm away from the slanted line. The front side is usually more round than the back side.
Notice where I placed the sleeve armhole notches: 5 cm above the bicep line, just like the bodice has its armhole notches 5 cm above the underarm line.
Sleeve Cap -check
Compare the measurements of the sleeve cap and the armscye lines of the bodice, on both sides of the armhole notches. The basic sleeve has about 10% of ease between the cap notch and the armhole notch, both front and back. Meaning the sleeve cap is bigger than the armhole of the bodice.
So measure the armscye line length of the bodice between the armhole notch and the shoulder tip, and add 10% to get the measurement needed for the sleeve cap. For example if the measurement is 13cm, the ease would be 1,3cm and as a result, the sleeve cap should measure 14,3cm.
If you’re not happy with the measurements, try to adjust the sleeve cap shape. You can modify the cap width and -height. And also move the cap notch a bit left or right if you need to distribute the ease.
The remaining part of the sleeve cap, after the armhole notch, should have the same measurement as the bodice. You can adjust the sleeve size if needed.
Rest of the Sleeve
When you’ve controlled and adjusted the sleeve cap, mark the middle of the bicep line and draw a line straight down from that point. This will be the grainline of your sleeve pattern. It doesn’t always coincide with the cap notch btw.
Measure the total length of your sleeve starting from the top of the sleeve cap and choose the hemline width. It could be for example 30 cm this being a loose fit garment, so divide 15 cm on both sides of the centre line. Then draw the underseams and finally the elbow line.
All the Pattern Pieces
Here are all the pattern pieces of the dartless bodice block:

Now, if you followed my other bodice pattern tutorial, you know the drill: copy the pattern. Never cut the original. Check all the lines. They should continue smoothly between the front- and back pieces (armscye, neckline, hemline..) The waistlines should match.
Toile
Make a toile to check the fit so you can make corrections to your original pattern. Besides the general fit all around, you will want to check for example the shoulder seam position and if you managed to get the bust points right.
If you prefer, you can also check the bodice pattern without the sleeves first, before even drafting the sleeve pattern. So that if you have something to correct around the armscye line, or the side seam, you have less things to correct when the sleeve doesn’t exist yet.
Especially when there are no sleeves attached, the dartless bodice will have some extra volume at the front armhole-area. To get rid of it, you can make a little dart towards the bust point. Afterwards you can rotate the dart in another direction or turn it into more flare at the hemline.
Once you’re happy with the result, the dartless bodice block is ready for use. If you’re wondering what kind of garments to make with your new basic block, check out my Patternmaking Guides. There are various alternatives from dresses to hoodies and shirts to choose from.
Here’s a summary on the dartless bodice pattern construction. If you’re already on my mailing list, you’ll find it in the resource library.


33 Comments
Sorry this is my 3rd time bugging you with questions! I’m new to sewing, and I’m wondering, I have seen a few posts both on YouTube and written blogs on how to draft sleeves, and they draft them without any reference to a bodice pattern, just using body measurements. And I DID wonder, how do I know if these sleeves are going to fit the armhole? They talk nothing about armholes too. Just sleeves. Can you explain this to me please?
Hmmm.. I’ve never drafted a sleeve pattern that way. But I suppose it assumes the bodice pattern has been drafted with the same body measurements and that way will result in a correct sleeve pattern. I’d imagine you need to adjust the pattern though to match the measurements with the bodice in the end. Or you just gather the sleeve head until it has a perfect measurement. In any case it sounds strange.
@stephanie, that’s how I learnt as well. However I have come to understand that most people just use a type of pattern without knowing why. The method described by most youtubers does require you to gather the sleeve a bit a technique called easing in sleeve. However, using the method described here and in subsequent posts, you can never go wrong. Good luck in your future projects.
your tutorial is very useful. thanks for serving the women,the oppressed.
Excellent. 🙂 I’m happy to share my tips and tricks.
send me pdf
If you mean the summary, you can fill in your email address in the box where it talks about the summary. It will be sent automatically. 🙂
Hi Minna
please can u advise.
I am drafting the Dartless block.
I have done it twice and I am finding the back shoulder is not extending over the back armhole line as in your diagram.
Also the hip line is not flaring out as much as in your diagram.
I am doing something.
please advise if there are any measurements for curve points at necks and armholes to follow when curving.
Hi Mariam,
If you’re still struggling with this, don’t worry about the pattern looking different. It’s because you’re using different measurements. The ones in the example are industrial measurements (=ideal). Everyone has a different shape and the resulting bodice block reflects that. You can cheat a bit to draw nicer lines, but in the end what matters is that the bodice fits you. 🙂 For the back neckline you can draw at least the first 3cm straight, and then start curving up. For the front, no more than 1cm straight at the c-front.
Can we measure nape to hip instead of nape to waist to make a longer bodice, or will it throw off everything? Thank you for this detailed guide.
You add the waist to hip measurement afterwards and you’ll get the longer bodice. 🙂
I drafted the dartless block.
I having a problem with the sleeve construction at step 2.
My armhole length was 20 – 3.5 = 16.5cm.
at step 2 my measurements are 16.
the house shape is not correct on diagional. please help.
Are you measuring from the second line to the third line while drawing the diagonal line? You might just need to incline your ruler more. The measurements sound correct. Don’t worry if your house shape doesn’t look identical to the example. Everyone’s is slightly different because of the different measurements. 🙂
This is probably a silly question: but when I’m tracing the pattern over do I need to add seam allowance?
The basic pattern blocks are without seam allowance because you use them as a base for the actual patterns. It’s easier that way. If you’re making a toile for the basic block, you can add seam allowance directly when cutting fabric. 🙂
Hey! Could I ask for some help? This is my first time trying to draft anything, so no wonder I ran into problems. Everything was going smoothly until it was time for the shoulder line and the armhole. My shoulder line (10 cm + 1 cm positive ease) does not extend past the vertical line (the one marking half of back width, which for me is 20 cm) like in the pictures, and I don’t know how to draw the armhole.
I’m not sure if i have done something wrong, or just have a weird body type? I have a very full bust (98 cm circumference), bur very narrow shoulders, and clothes never fit me properly because of that! They are either too big in the shoulders, or too small in the bust. So learning to draft patterns for my exact body measurements was supposed to be a solution to this problem. However it seems now that even that is impossible…
No worries. Made-to-measure bodice patterns can easily have very different shapes. The one in the example is based on the industrial measurement chart which basically means ideal measurements. So if you have narrow shoulders, it’s normal that the shoulder line is too short. Your armscye line will therefore look different. To make this line prettier, you can cheat a little by making the shoulder line slightly longer and the back width slightly narrower than your measurements. See how that works. In any case you can correct the pattern when fitting the toile. The most important thing is that it looks and feels correct when you’re wearing the bodice, even if the pattern has a strange shape. 🙂
Hello there, can I do a bit of cutting on the waistline instead of it being loose ?
do I need to put a zipper behind if I minimize the ease allowance ?
thank u 🙂
Hi! You can make the modifications to your actual garment patterns. This is just the basic block, so it should remain loose. 🙂
Hi Minna, is there a way to get the dartless block from regular block or is it better to draft dartless afresh. I am drafting a loose fit quilted jacket and wondering what should be done with the waist dart (all other darts dumped into this one), should I just ignore it and straighten out the side? I don’t want as much fullness, kinda going for rather straight silhouette. Thanks much!
Hi Rohini. For a jacket you’d normally use a specific jacket block. However, if you add enough ease the dartless bodice block will work as well. 🙂 I think it’s better to draft a new block rather than modifying the bodice block with darts, as the latter would probably be too tight for a jacket.
Hello, thank you for this tutorial! Is this also suitable for a t-shirt made of tricot fabric? or should I use a different block?
Yes, you can use knit fabric as well. 🙂 However, if you want the shirt to be fitted, I have bodice block instructions specifically for knits, too.
Hello mina
thank you so much for sharing this but do you have any standard sizes chart?
You can see standard sizes chart if you go see my basic blocks at the shop page. I’ve included pictures of the charts. However, they are only graded sideways, not growing in length. Maybe those are helpful. Just refer to the anatomic measurements.
Hi Minna!
Hello from a fellow Finn 😊
I can’t tell you how happy I was to come across your site today while randomly scrolling to look for skirt ideas.
I started sewing less than two months ago and I’ve made myself 4 tops, a pair of loose fitting trousers, and a couple of circle skirts. With the tops, I was immediately frustrated with them not fitting me properly.
So I was so delighted to find your site, clearly a one-stop shop for all things pattern making. And then I realized you were Finnish, that’s so cool!!
I was so happy when I read your About page, I love that you are able to follow your passion. Aivan mahtavaa!
Anyway, tomorrow I’m printing out the measurements chart, and I’ll proceed to making a dartless bodice block, then a toile (I just today learned what that was lol), and from there, who knows!
Just one question for now, how do I locate my base of neck? Google seems to have conflicting information.
A big huge thank you for such a wonderful resource, I already know I’ll be spending a lot of time on these pages.
BR, Annukka
Moi Annukka. 🙂 Welcome to my blog. It’s nice to have Finnish people here, too. 😀 Yes, self-drafted patterns are the way to go. Not only for the fit, but also for the design that you get to plan yourself. The base of neck at the back? It’s where the little round bone (vertebra) is sticking out slightly. You can feel it with your finger.
Do you need to contour a dartless bodice block if you want to change the neckline ?
Do you mean to eliminate gaping? Even if the dartless block doesn’t have a dart, you can still draw a little dart pointing it to the bust point of the pattern and then rotate it towards the hem where it turns into flare.
Love everything but a bit confused. On the Front Block it says 1/2 chest width. On the Back it says 1/2 back width.
I am assuming Bust= Circumference taken around nipples?
For the calculated armhole depth are you using Bust or Chest circumference?
I am 164 cm in height with Chest=35”, Bust=38” Shoulder-Shoulder=14.5”.
Wondering how to plot the armhole depth, width and armhole curve.
Please, please help!
TY!
Yes, bust is the circumference. The chest measurement is taken between the points where the arms start, above the bust. The back is the same, but on the back side. These are all in the body measurement chart PDF. 🙂 For the armhole depth, you’ll need the armscye depth measurement: tie a twill tape around you, high under the arms. Then keeping it straight across the back, measure the distance from the base of your neck down to the twill tape. (We’ll add ease to this measurement, though.) The rest of the armhole shape comes from the chest and back measurements.
hi! I love your blog! and work!
one question – we are adding 6cm ease to the bust and 2,5to the hips. I have similar circumference for bust and hips so I get inverter A shape… Looking at your M measurements it seams that bust and hips are similar, but you get completely different shape… I am confused
Hi Sanja. Thank you. 🙂 Hmm.. that’s odd. Maybe you have an error somewhere. For the standard (=ideal) size the hip circumference is slightly larger than the bust circumference. That 6cm of ease is divided evenly between front and back, which leaves 3cm of ease per side seam. This is almost the same as what’s being added to the hips, so it should result in a slightly flared side seam. Everyone has a unique body shape however, so if your side seam goes the other direction, you can just straighten it and have a bit more ease at the hips.