There have been some requests for a jumpsuit pattern -tutorial, so here we go then. 🙂
I’ll show you how to draft a fitted jumpsuit, starting from the basic bodice block and the classic pants block. But with the same instructions you could draft a more loose fitting version, too.
You’ll see, it’s probably easier than you thought!
I also prepared a couple of examples on how to then modify the basic jumpsuit pattern.
Basic Jumpsuit Pattern
As with everything else, we’ll first draft the basic pattern, which you can then use for all kinds of different jumpsuit styles.
Like I mentioned above, here are the two basic patterns needed. The basic bodice block and the classic pants block.

You’ll find the process easier, if the two of them have a similar amount of ease. For example here, the bodice has 2cm of ease at the underarm line and the pants have 2cm at the hipline.
The bodice should also have 2 darts, so don’t use one that has both darts united.
Uniting the Pieces
The jumpsuit pattern isn’t actually difficult at all, you just attach these two together at the waistline and blend the seams! However you do need to leave some room in between, or the jumpsuit won’t be very comfortable to wear…
Here’s how, starting from the front-piece:
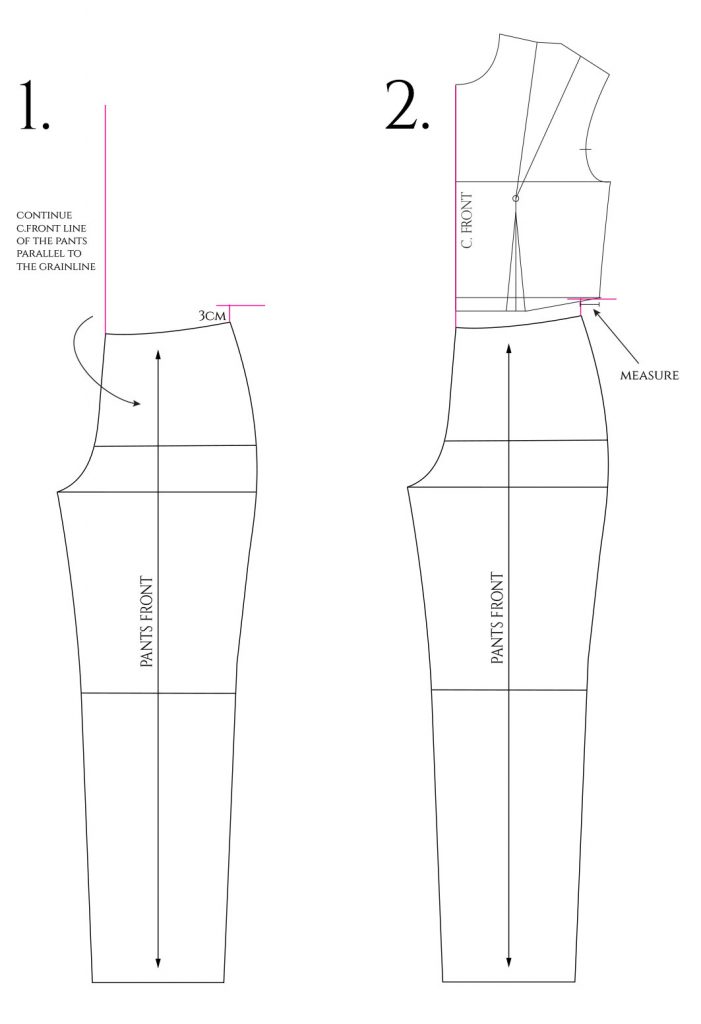
1. Continue the c.front line of the pants straight up, parallel to their grainline. Do the same at the side seam, but only for 3cm /1,2in. Then draw a little guideline at a 90º angle.
2. Place the bodice front piece so that it’s exactly at the c.front line you just drew, and the side seam ends up on the guideline (3cm above the pants’ waistline).
I’ve found 3cm to be enough, but feel free to add more if you want.
Measure how much the bodice side seam extends over the pants side seam.
Now let’s do the back-piece:

1. Continue both c.back and side seam of the pants 3cm /1,2in upwards, parallel to the grainline.
Draw a guideline on top of the one at c.back, whereas to the side seam you’ll add the measurement you got previously from your front piece in a 90º angle like in the picture.
2. Place the bodice back piece so that it matches the point you measured at the side seam, and the c.back is on the guideline.
Blending
Final thing to do, is to blend the seams.

Start by drawing the new waistline in the middle of the empty space between the bodice and pants.
This will be the point where you can add more space in case you feel that your jumpsuit is lengthwise too tight btw.
If your pants don’t have a dart in the front like here, continue the bodice dart downwards. If it does, do like I did with the back piece; find an in-between solution to unite the two darts.
Decide how fitted you want the waist to be, and draw the new side seams.
You might also need to blend the c.front and c.back seams a bit.
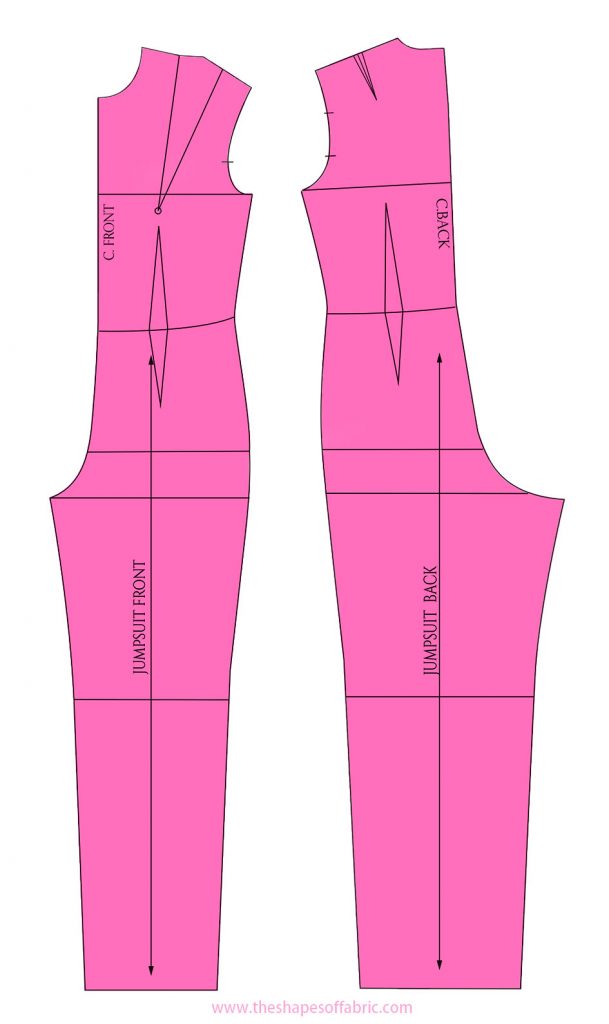
This is the final, basic jumpsuit pattern. In case you’re wondering why the back piece is slanted, it’s because you need more length at the c.back and this is built in the pants block, so you should automatically get a similar result.
Next I’ll show you a few simple examples on how to modify the basic pattern.
Jumpsuit pattern, version 1
This version is united at the waistline, which means there has to be a seam both at the c.front and -back. I chose the opening to be at the front.

There are some limitations to the rotation of the darts because the bodice is united to the pants, so I just rotated the bust dart to the side.
I got rid of the little shoulder dart at the back and made the neckline a bit wider.
The pant legs remain basic.
The result:

Jumpsuit pattern, version 2
This time there is a seam at the waistline. It means you can manipulate the darts normally.

Well, I simply united the 2 darts and cut the bodice front on fold.
And like before, I also got rid of the shoulder dart and enlarged the neckline.
The pant legs are shorter and I made them also wider. I turned the pant darts into folds.
The result:

Jumpsuit pattern, version 3
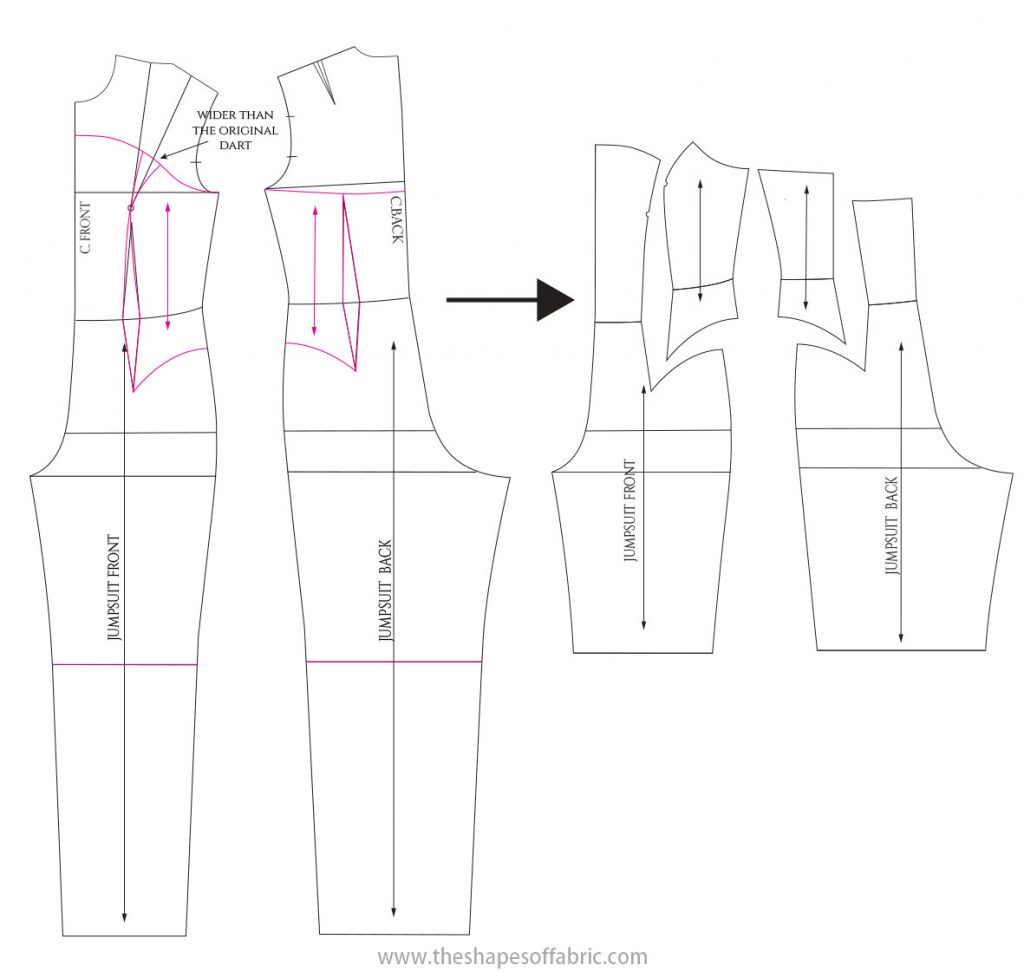
The last version shows how to turn all the darts into princess seam -style lines.
This is a completely strapless jumpsuit, so you’d probably need to add some sort of boning to prevent the top from collapsing. And the waist has to be fitted enough so the upper part won’t need to sustain the weight of the pants, too.
You might have to fiddle with the seamlines around the bust to get a good fit. Making the bust dart slightly larger than it originally was, eliminates gaping.
The princess seam creates little side panels to both front and back. Remember to draft parallel grainlines before separating the pieces from the rest of the pattern (if you inted to cut instead of copying..).
There was no possibility to avoid the c.front seam, because I didn’t separate the pieces at the waistline.
Also this jumpsuit has shorter pant legs, but I kept the original width.
The result:

More Tips and Ideas
You can treat the jumpsuit just like another bodice or pants -pattern. Add pockets, sleeves, collar, button placket, yoke… Do dart– and fabric manipulation. I also have a pattern guide on jumpsuits if you want to learn more.
But as in this example the jumpsuit is really fitted, I’d just like to mention that adding a sleeve would probably not be a good idea unless you use material with stretch or a type of sleeve with a lot of room. To make a jumpsuit with sleeves, start from a pattern with more ease.
And one more tip for fitting a jumpsuit, if you add too much space between the bodice and the pants, you’ll have excess fabric around the waist. Another route to get more lengthwise ease could be to lower the crotch seam.


65 Comments
I love your three jumpsuit choices from the basic jumpsuit pattern.
Thanks! 🙂 I tried to choose easy, but slightly different styles from one another.
Soo helpfull thank u
You’re welcome. 🙂
Thanks so very much. This is very timely and the instructions are easy to follow. Will try it immediately. I used a casual shirt block when I did it first time, added 7cm to the front waist but found that I didn’t have the movement that I wanted, so I was thinking about adding a further 4 cm to the front as I am trying to make a not fitted jumpsuit that will hand a bit by the waist. Thanks so much
You’re welcome. 🙂 Yes, if you start with more ease in general, it will be a good match to leave more ease also lengthwise when uniting the blocks.
That’s nice love your work!
Thanks so much. 🙂
good
Thanks. 🙂
Hey is the jumpsuit patern example you have for your size or a basic 38?
The example measurements are from an industrial measurement chart. I do recommend using your own body measurements. 🙂
Yet another amazing tutorial, thanks so much, you are a huge blessing
You’re welcome! 🙂
Good day Milan!
I was trying to check for an old information on your blog when I stumbled on this tutorial and you cannot even begin to imagine how elated I was to read this. I have long waited for this and I am glad you tutored it effortlessly.
I have a bit of an issue each time I make a jumpsuit, the back is mostly fitted but the center front always have some sort of excess , as if, there is a need to take out some fabric around there.
I know this fitting issue has something to do with either the croth depth, its extension or even the way I curve the front crotch but i do not know how to go about this adjustment to get a perfect fit in that area.
Maybe you can share some ideas about this Milan.
Thanks for your time.
I know jumpsuit patterns can be puzzling, so I’m glad if this tutorial will be helpful. Have you tried making just pants with the same block to see if there’s a similar problem with the crotch? It’s easier to solve first the problems with the pants block. Maybe you could lower the waistline of the pants in the front? Or adjust the front crotch seam. In general it’s not supposed to be very long and the curve is actually quite shallow.
This tutorial is the best I have seen on jumpsuit I really love it. Thanks alot
Happy to hear that. 🙂 You’re welcome.
I commented on this tutorial earlier. It sadly did not appear. Very detailed and nice tutorial. Thanks. Generally pants are drafted for pant waist, in this case, the waist of pant must be drafted really high, such that it meets the bodice waist line. Am I right?
Yes, I haven’t been logged in for a few days, so the comment didn’t appear. (Due to large amount of spam I approve the comments manually.) Anyways, the classic pants pattern usually has a higher waist than one would normally wear and it arrives where the bodice waist ends. 🙂
Thanks Milan, I will try this idea of yours out to see the result it gives.
Thenks is so helpfull for me 🙂
You’re welcome. 🙂
Thank you very much for this amazing and very easy to understand pattern.
You’re welcome! 🙂 It’s good to hear that I managed to explain it well.
This helpfull.how do I draft my own classical pants block?
I haven’t yet created a blog post on that. It’s on my list, but in the meantime you can find instructions in patternmaking books, like for example those by Winifred Aldrich or Helen Joseph Armstrong. 🙂
Thanks so very much, it was useful 👍
You’re welcome. 🙂
Pdf for that please…
You mean like a summary? Yeah, I could create that. 🙂
I accidentally found your blog and am very grateful I did. A jumpsuit has been on my mind for a while. I thought joining up the two pattern pieces and blending would be enough…I would have never thought I needed to add extra length. Your design options are also very nice. many thanks for writing it up.
Thank you! And welcome to my blog. 🙂 Yeah, it’s really a good idea to add extra length, otherwise you won’t be able to sit. I want to see pictures when you finish the jumpsuit! 🙂
I’m new to your blog and I’m new to patternmaking. I thought your bodice block tutorial was excellent! I came across this tutorial for drafting a jumpsuit which I would love to try but I was wondering if you are going to post a tutorial for a basic pant block any time soon?
Welcome! 🙂 I’m happy that you liked that one. I have some article themes in queue now and the pants block is one of them. But I’ll probably get to it sometime in June-July.
Thank you so much for the blog. I have to make a short jumpsuit for my 9 yr old grand. I am wondering about the darts. At this age they have this little poochy abdomen which I hope will be camouflaged with the jumpsuit. Do you think I will be able to do this with pattern top I have? (Girls pattern) I hope this makes sense. I have searched everywhere for a pattern and can’t find one that is fitted. It’s for a pageant. Thank you
You’re welcome. I’m glad that you’ve found my blog useful. 🙂 I’m afraid I’m not familiar with children’s patterns as I’m specialized in adult female only. But I don’t see why it wouldn’t work, if you have girls’ basic patterns to start with. If you make a toile first, you’ll be able to catch any problems and adjust the jumpsuit during the fitting.
Hi would you be able to send me the pattern of the jumpsuit in large or do you sell the patterns.Regards Talua.
Hi Talua. Unfortunately the pictures in this post are just for the purpose of illustration, so they can’t be scaled up to be used as a pattern. I currently don’t have any ready-made jumpsuit blocks for sale, just the bodice.
I have spent the last two hours online looking for this. I wanted to make a jumpsuit but didnt want it to have that waist joining. Thank you for sharing.
I’m happy that you found your way here. 🙂 Happy drafting.
I love you,you gave me zeal to start again
Always happy to inspire. 🙂
Hi please how do I take measurements for basic body draft
If you sign up to my newsletter, you’ll get a link to download a Body measurement chart where I’ve also included instructions on how to take measurements. 🙂
Where could i get this PDF????? 🙂
The instructions summary? It’s in my resource library. 🙂 If you’re on my mailing list, you should find the info in one of the first emails. I also mentioned about it very recently in an email about the fitting guide.
Your tutorials are the best my love
Thanks so much. 🙂
Simple and precise. THANK YOU
Glad to hear that. 🙂
Can I get this pattern in a pdf?
There’s a summary of the construction in the Resource Library, but it’s not the actual pattern.
Sorry, I’ve got a really basic question, but where would the usual openings of the jumpsuit go?
Please smack me if it’s too dumb.
No dumb questions here. 🙂 The opening is usually either at the c-front or the c-back, depending on your preference and design of the jumpsuit.
Thank you so much 😘
You’re welcome! 🙂
Wow, net deze site ontdekt die via Pinterest in m’n mailbox is beland. Ik denk er al lang aan gewoon zelf kleding te maken: 155 cm lengte met weliswaar een zandloperfiguur MAAR alle kleding die ik mooi vind moet ik aanpassen. Zelfs maat 36: darts zijn voor grote vrouwen geplaatst, armopeningen zijn veel te groot en te laag, tailles hangen ergens op mijn heupen. Als vrouw van 60 hoor ik niet kindermaat 13 jaar te dragen, hè.
Gelukkig heb ik reeds 38 jaar een bijzonder degelijke Husqvarna, ondertussen vintage maar wat ik daar al mee heb gemaakt en aangepast….alleen nog geen kleding van begin tot eind, en ze is goed onderhouden. Het kriebelt dus enorm. Ik ga deze site eens goed verkennen.
Yes, it’s definitely useful to be able to make one’s own patterns, made to measure! There’s often something you’d like to modify in RTW clothes, either design or fit, so the perfect solution is to just make your own clothes. 😀
I tried the jumpsuit pattern today and after sewing it was very perfect. I got it so right. Thanks for sharing.
Cool! 🙂 Happy to hear that. Jumpsuits can be tricky.
Wow!!! Thank you for these awesome tutorials.
You’re welcome. 🙂 I’m happy that you’re finding them useful. I have organized the tutorials by topics on the Contents page so that you can find them more easily.
Gorgeous garments. I’m spoiling my girlfriend. I’m glad I found your templates… it aids me in planning ahead 🙂
Thank you! Lucky girlfriend. 😀