I realized I should actually write a post about dart manipulation, as that is an important part in practically every design. Darts are fundamental in a fitted garment unless you’re using knit fabrics. If you look at the pieces I’ve made, you can see that I often get rid of the darts in one way or another. Usually, it’s the first thing I do.
I prepared some examples on dart. These are pretty basic and could be turned into many other versions. Different alterations could slightly change the fit though, so make a toile before cutting the final fabric.
Most of the examples start from the basic bodice-block with two darts, but in a couple of them, I’ve first united the two darts into one because sometimes it’s easier that way.
Dart Manipulation Basics
So let’s see these dart manipulations then!
Dart Manipulation: Moving the darts
You can rotate the darts wherever you want. This doesn’t make them disappear, but you’ll get a different look anyway. Whether you have one or two darts originally, it doesn’t matter.
Draw a new line starting from the bust-point in the direction you like. Cut it open and close the other dart(s). Add paper underneath the opening and draw the new dart ending somewhere around 2-3cm or an inch from the bust-point.
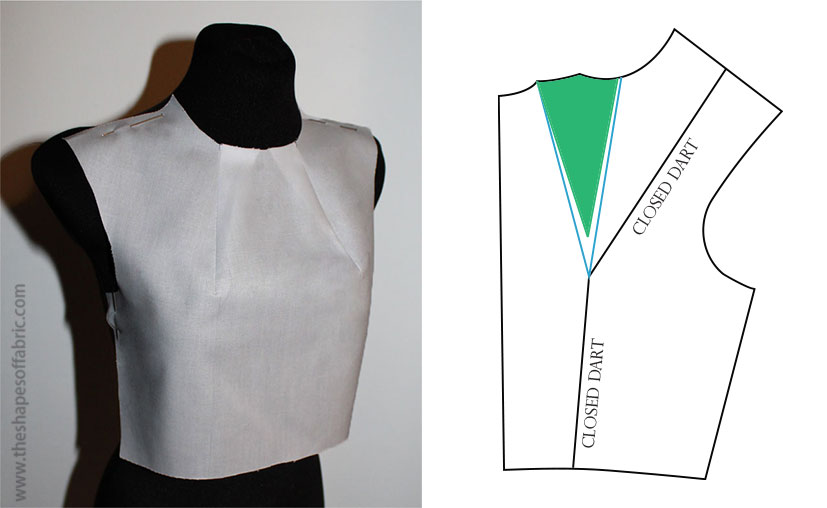
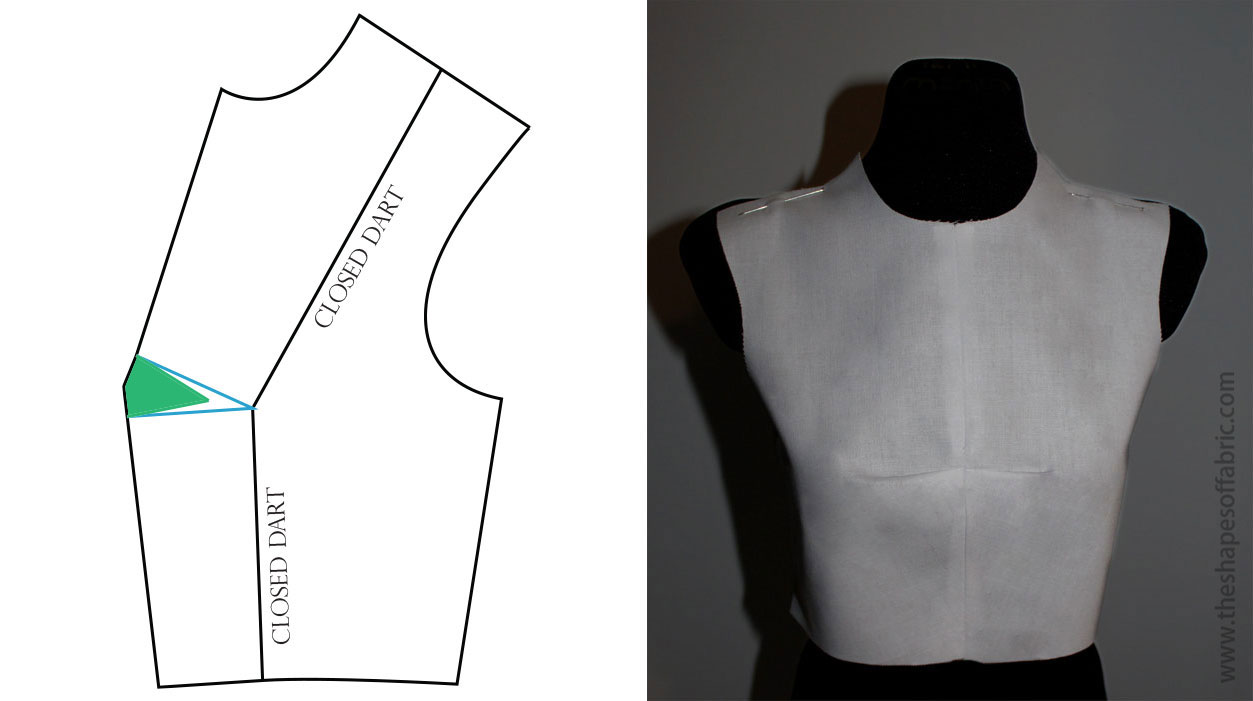
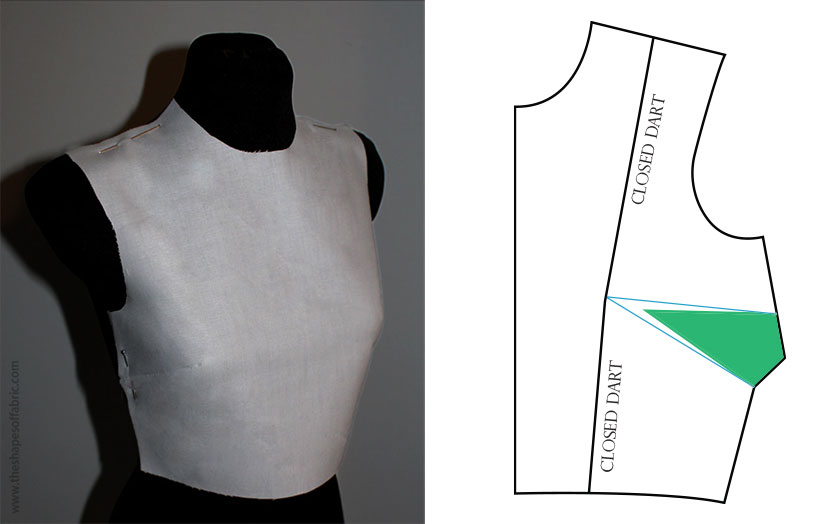
These are a couple of examples I made with the dart going towards the neckline, the centre front and side-seam.
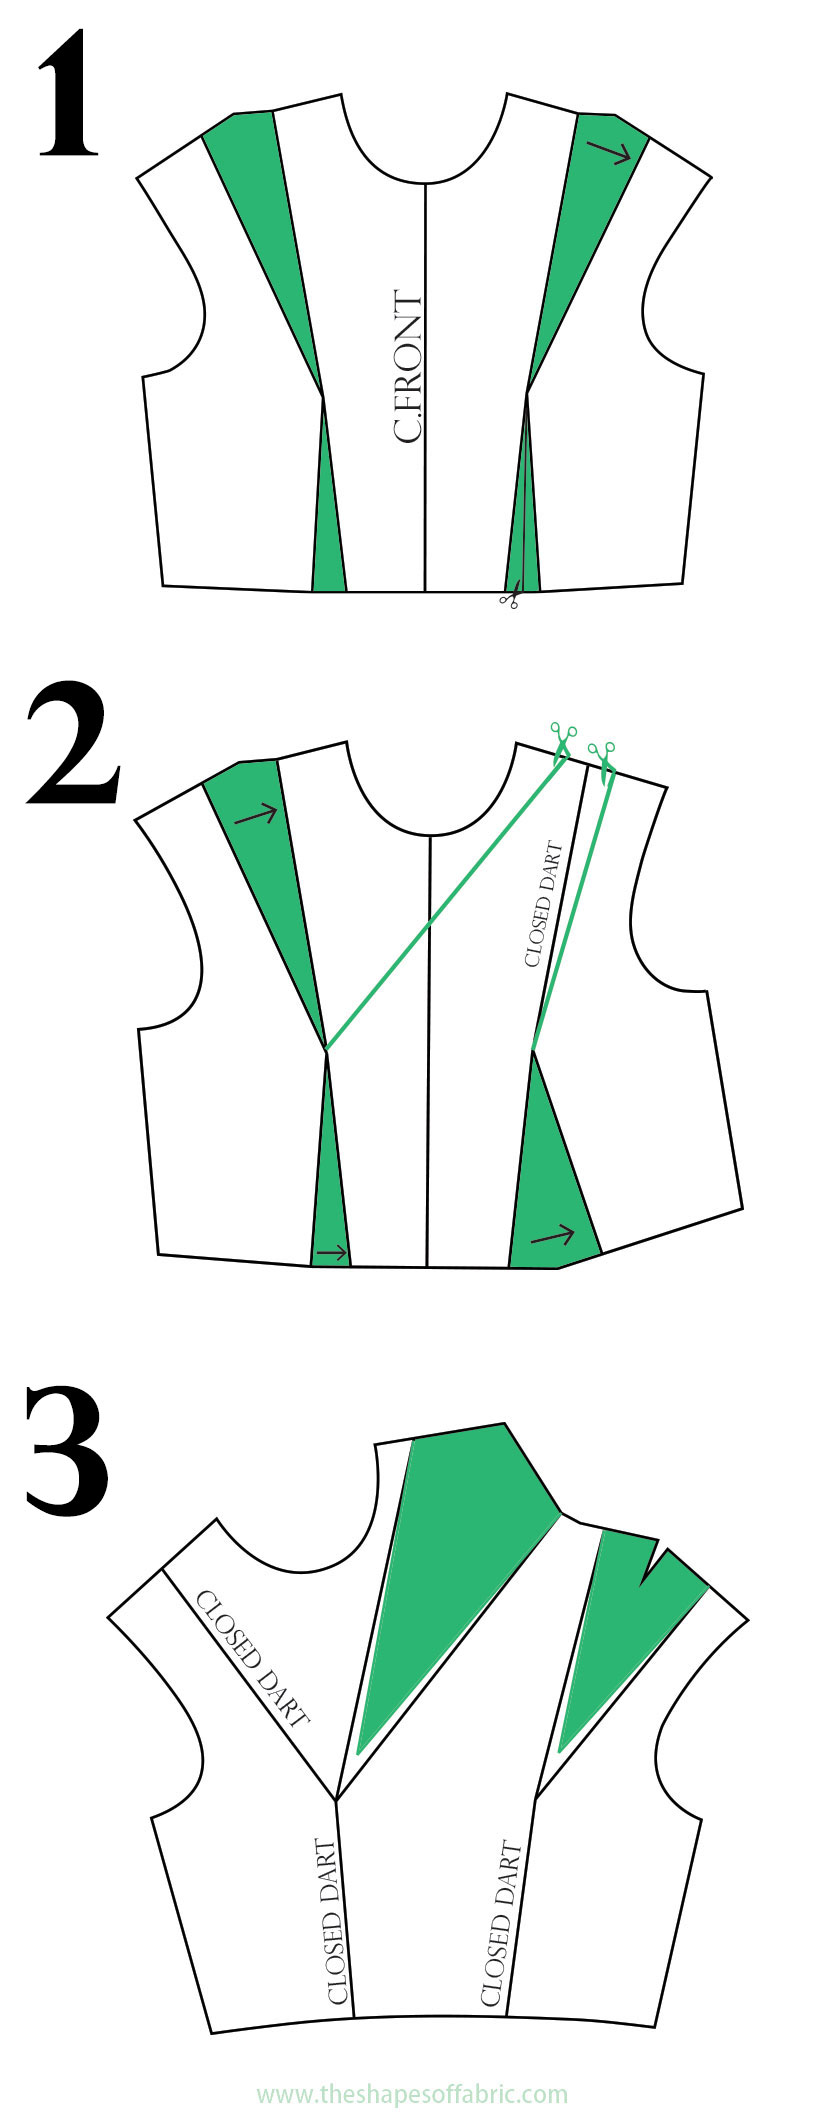
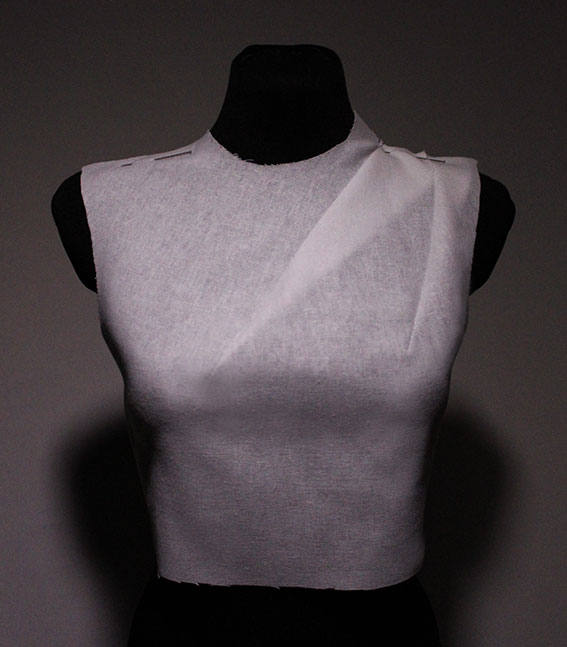
If you’re working on the whole front piece instead of just one half, you’ll have more possibilities with dart manipulation; you can do asymmetrical designs. Just move the original darts around if they are on the way when drawing new darts.
Here’s one with both darts starting on the same shoulder.
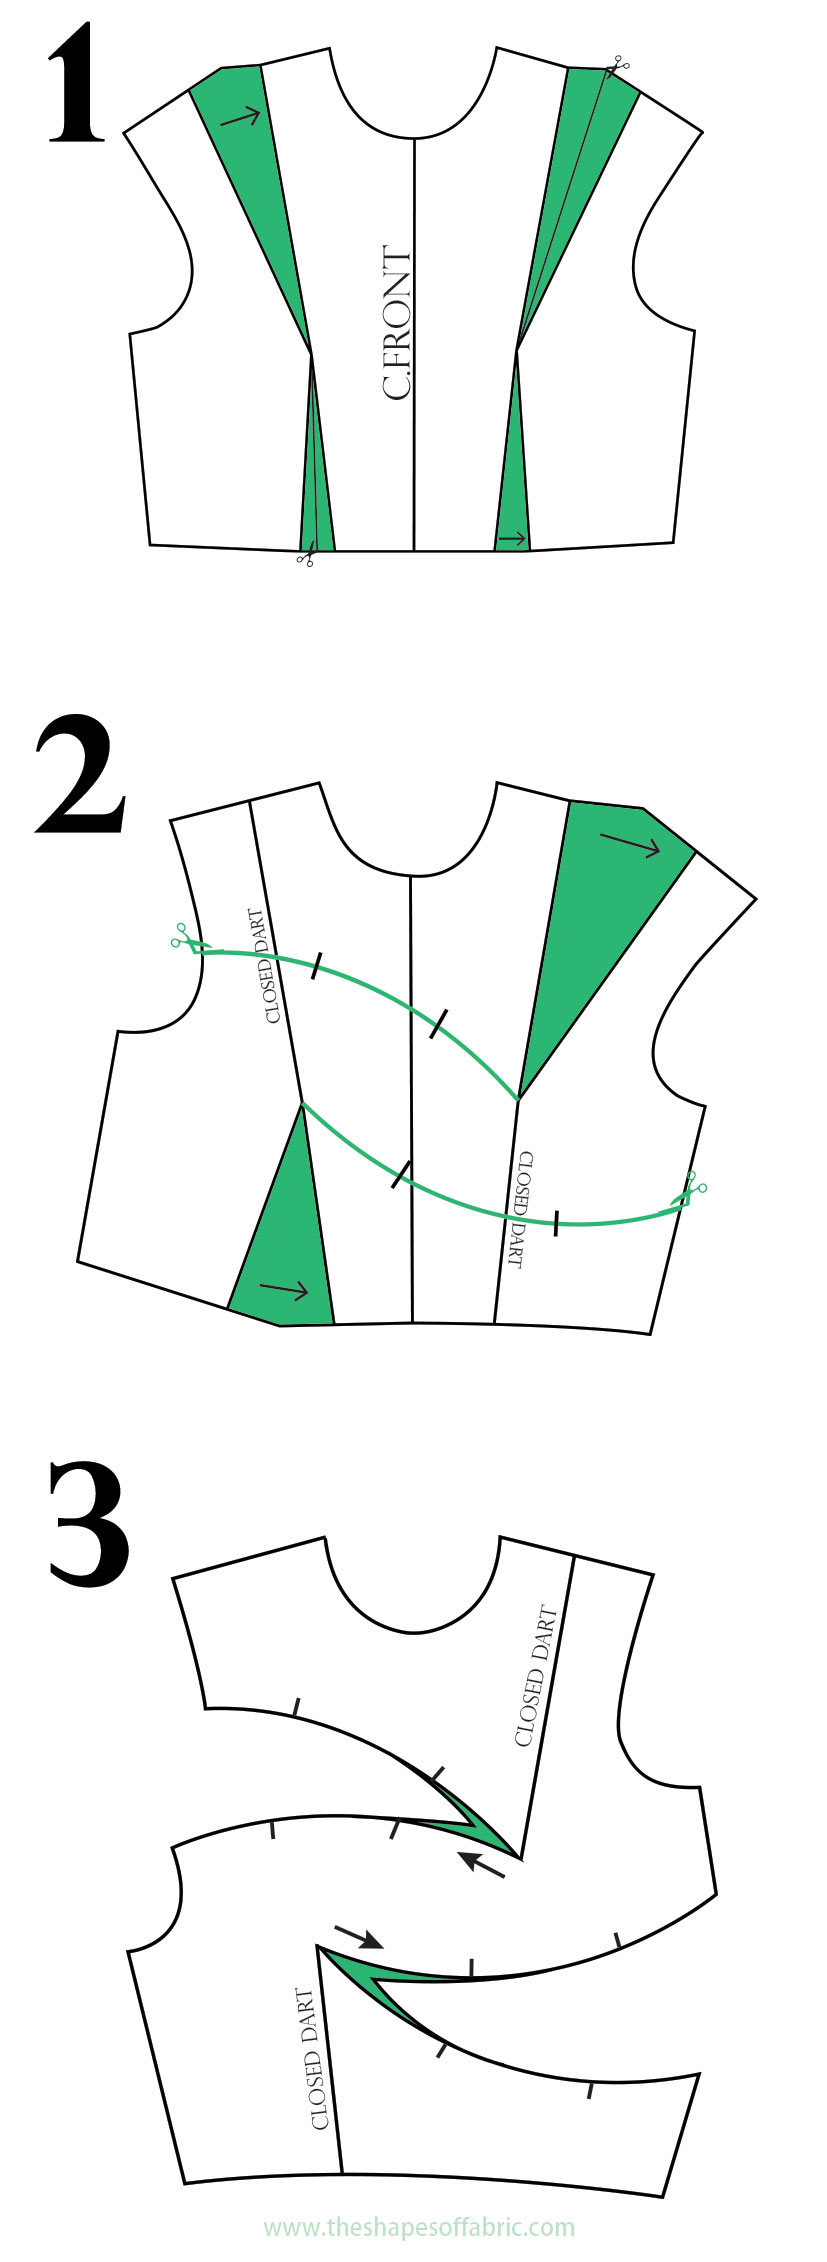
The darts could also be curved. Then you just need to do the so-called cut-away darts. Draw a few tacks along the lines before cutting. Move the starting point 2-3cm or an inch from the bust-point as usual.
Create more darts
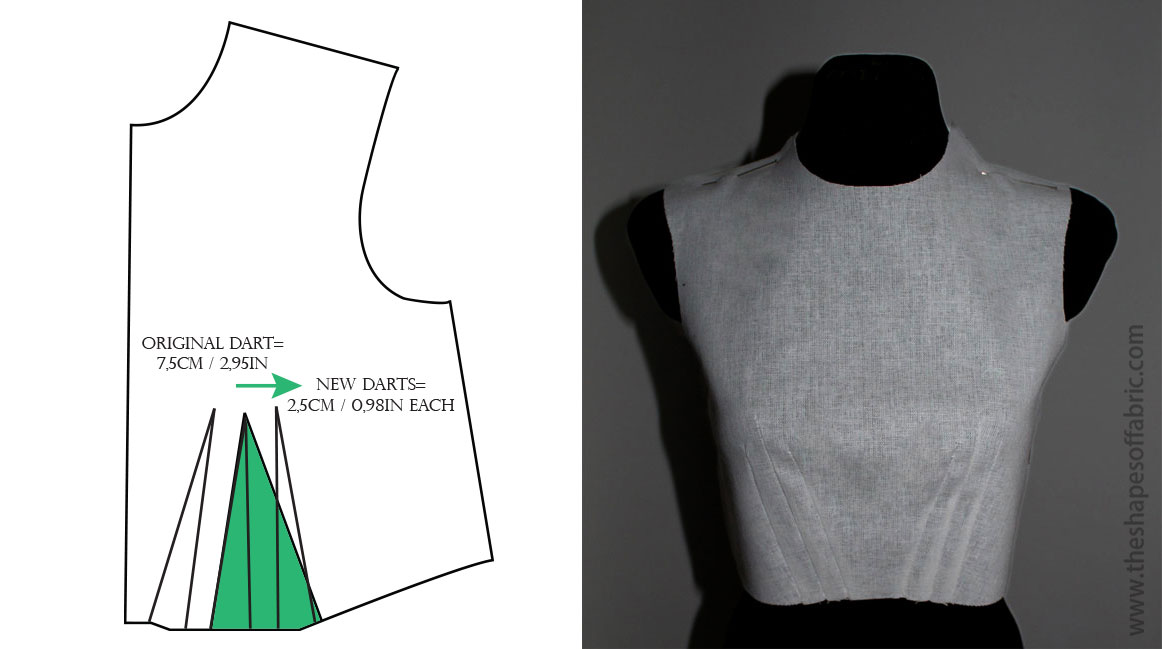
Besides merging two darts into one, it’s also possible to turn them into more darts. Here’s one way you could do that:
First, unite the two darts and measure how many cm/in wide the resulting dart is. Then divide it by the number of darts you want, and draw new darts (in this case at the waistline).
At school, they taught us never to move the bust-dart horizontally more than 2 cm from the bust-point or it wouldn’t be very useful anymore. Hence I kept the darts close to the bust-point.
Stylelines
Using stylelines makes the darts disappear because they get absorbed into the seams. Probably the best-known examples are these two versions of the princess-seams.
In the first one, you just follow the darts to separate the two pieces.
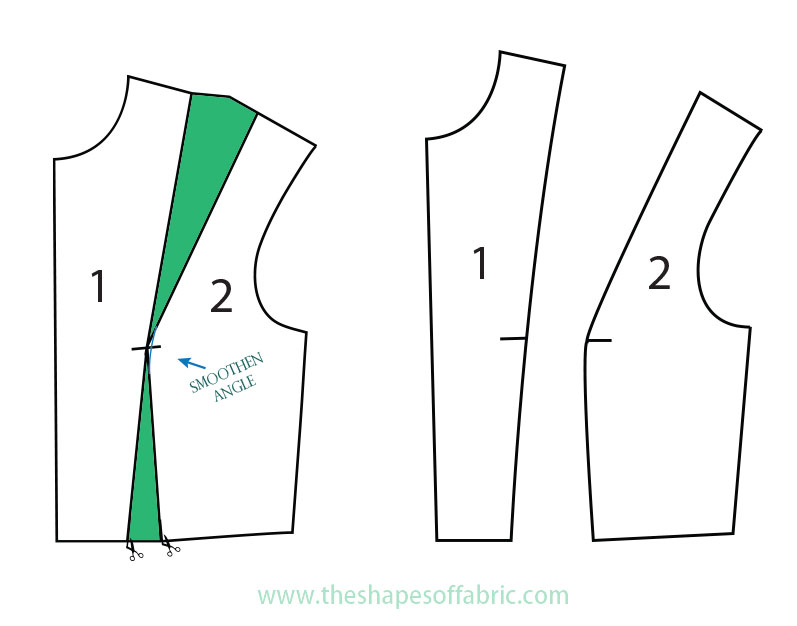

In the second version, you need to draw a curve and close the upper dart.
You’ll find some extra ease in the larger pattern-piece. So you might have to fix that by leaving part of it as ease around the bust point and getting rid of the rest of the difference by blending at the waistline.
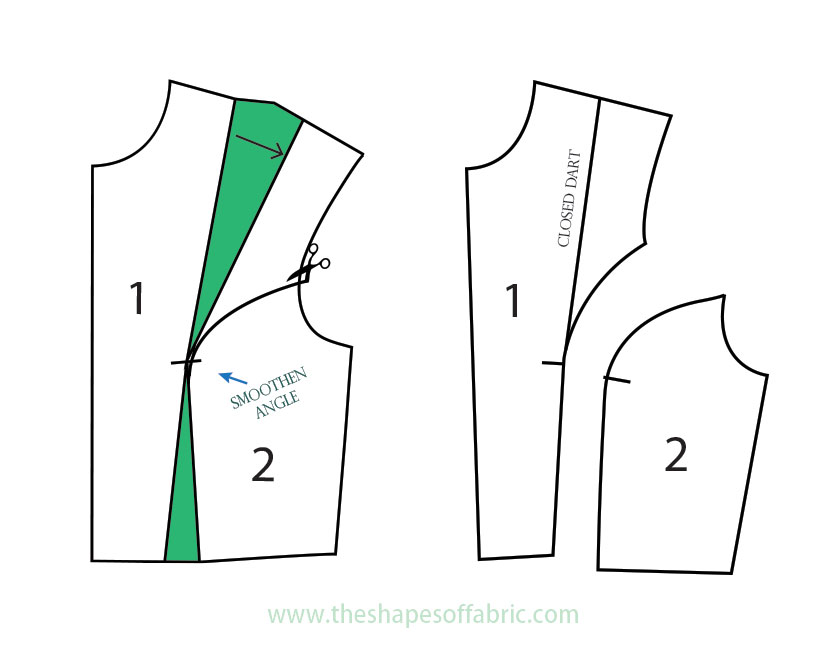

The third example divides the bodice into two pieces horizontally.


Remember to smoothen the angles around the bust point and add notches.
Turn darts into gathers
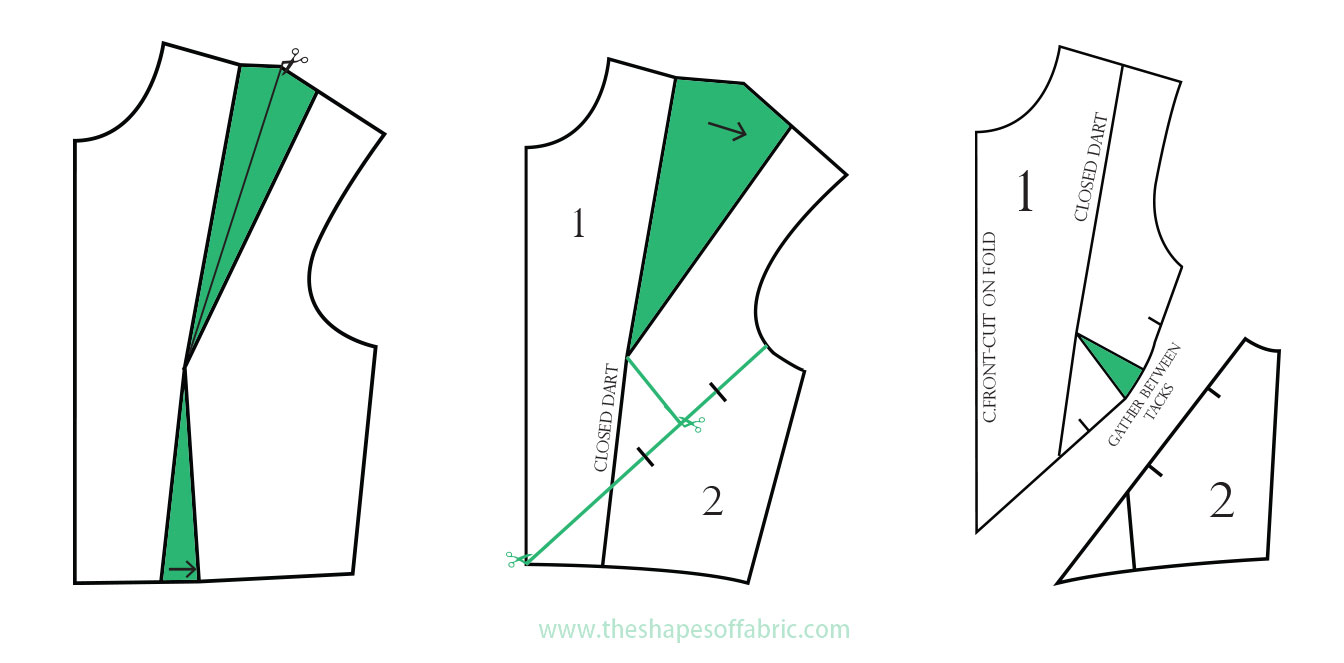
This is a way to turn the volume of the darts into gathers that will add nice details to your designs.
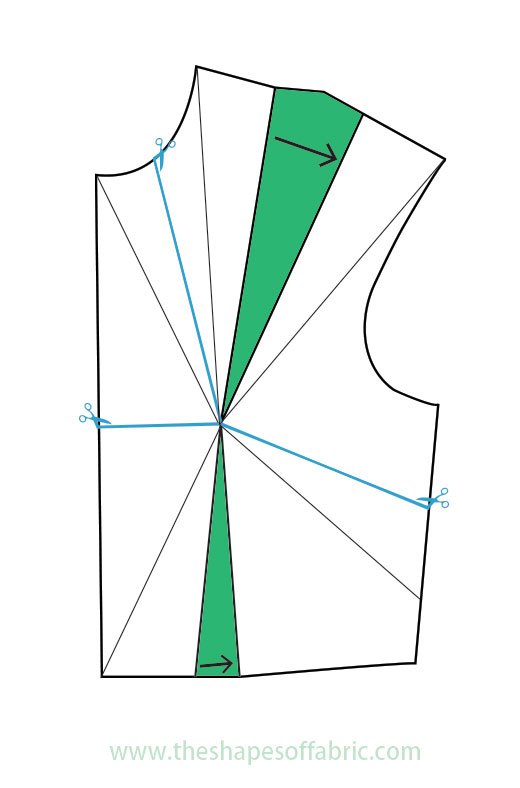
In my example I wanted the gathers at the centre front, so I drew lines in the area the gathers would go, slashed them open and closed the darts.
I’d just like to add that all this will be easier if you slash even the darts open, like in the picture, before doing anything.
Also, measure the area before opening, so you’ll know how much to gather. You’ll also need to add notches on both sides of the gathered bit.
I think you could even do this in a more simple way by just doing one slash instead of several.


How about uniting stylelines and gathering in the same design? You can do that by drawing the styleline a bit further away from the bust-point. Then open a new dart starting from the styleline and you’ll get some volume to turn into gathers. As before, draw notches before rotating the dart.
Turn darts into tucks or pleats
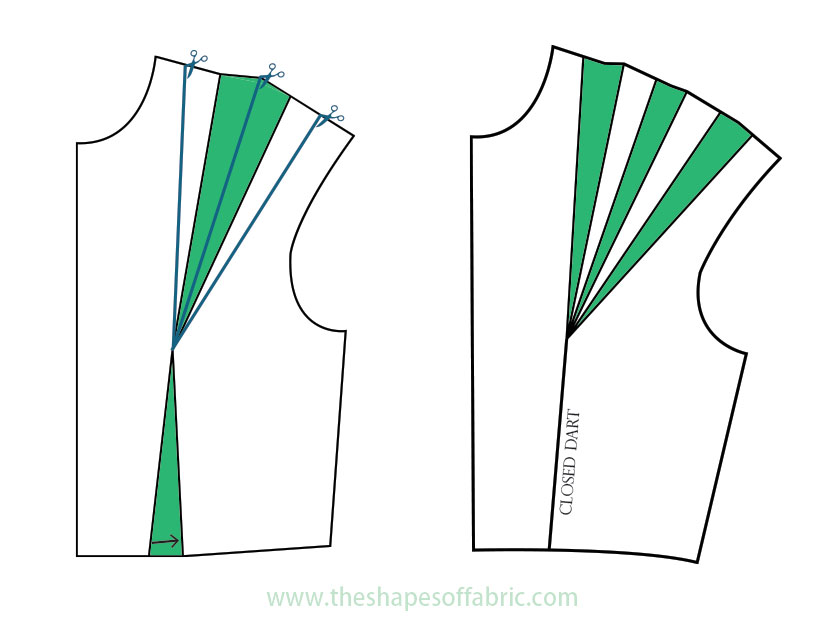
Another way to use the volume of the darts is to fold it into tucks or pleats. This doesn’t result in a very fitted bodice though, especially in the case of tucks.
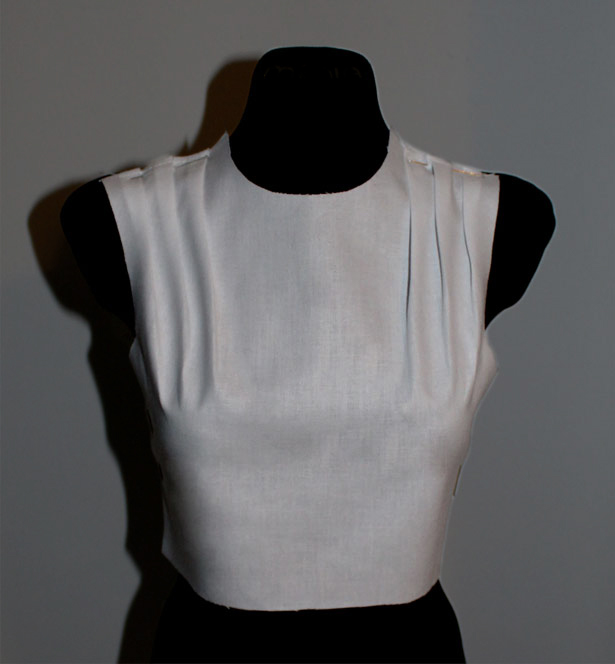
Here I chose to have pleats starting from the shoulder.
I drew two more lines towards the shoulder, slashed them open, closed the lower dart completely and the upper dart partially, dividing the dart-volume between the three openings I now had at the shoulder.
Extra Dart Manipulation: Darts into flat shapes
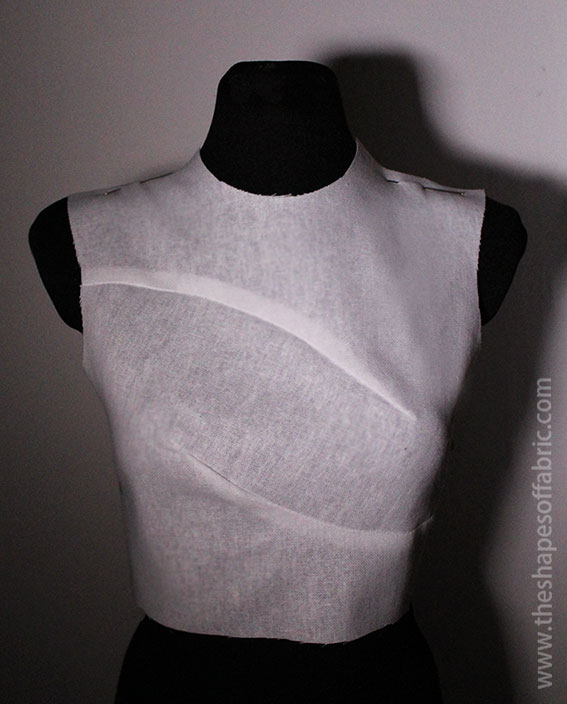
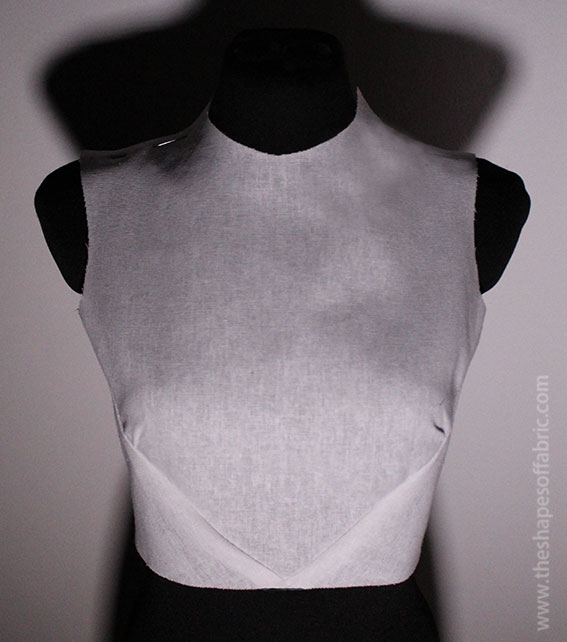
My last example is closely related to the stylelines. You can draw any shape that passes through the dart-points to make the darts disappear. Only thing is that there has to be a line that goes all the way to the edge of your bodice at some point. Otherwise, the pattern won’t lay flat. For example, I left a part of the centre-front open in the first two versions. The last shape instead goes all the way to the waist and neckline so it automatically resolves the problem.
Just remember that you’ll have to sew the shape afterwards! Small curves are surprisingly difficult to handle. Also: Don’t forget notches!


You’ll find lots of resources all over the internet on dart manipulation. I don’t want to be too repetitive, so I finish my tour here. I think these were the most useful versions anyways.
Next time you see a fitted garment that has no visible darts, try to figure out where did the darts go!
This tutorial has been updated on 29.3.19


168 Comments
Very detailed…. Thank you!
You’re welcome. 🙂
Easy to understand thanks for sharing
You’re welcome. 🙂
Love it. Very well and clear explanation. Thank you very much.
Happy to have created a helpful tutorial. 🙂 You’re welcome.
Very, very interesting! Thank you.
Yes, this is a pretty cool theme. 🙂
Thank you for the detailed explanation. Could you show how to manipulate darts for a cheongsam/quipao dress? I’m having trouble figuring that out.
Thank you.
You’re welcome. 🙂 Looking at the pictures it seems that it simply has the normal waist darts and the bust dart has been rotated towards the side seam. I’m not sure if you have a different design in mind though.
thanks so much…easy to understand ..thanks again
You’re welcome. 🙂
Very understandable
Thanks! 🙂
Very good. Thanks for sharing this with me. I will try my best to exercise these darts. Thank you. It will be very helpful.
You’re welcome, and enjoy experimenting with darts. It’s the best way to learn. 🙂
Wow ! !Thank you so much! I have seen some these designs in magazines but never thought creating them for myself. they look pretty easy. I’m excited about learning more from you.
You’re welcome! 🙂 I’m glad my tutorial will help you learn some new skills.
Thank you so much for a detailed explanation. I just found myself a new “addiction”.
I love to read about fashion and implement all I’ve read.
You’re welcome! 😀 That’s a great addiction.
Thanks you, makes it easier
You’re welcome. 🙂 That’s excellent!
Thanks so much for this lovely tutorial, about the last examples (flat shapes), are the shapes hollow on the bodice or did you sew in a black fabric?
You’re welcome. 🙂 The black shapes are in fabric. The same-colored dressform might be confusing!
So detailed, will take a course on this
Thanks so much. 🙂
You are a life saver! I am an upholsterer who has just started out on my own. My latest job is a friends truck seats. Usually truck seats are a wham, bam, thank you come again job, but this friend asked me to change his seat to mimic another type he like. Changing the seat was the easy part. A little foam cut out here a lotta foam added here and done. The new seat is likeva racing seat with wings that sort of hug the drivers side. Anyway, with the easy part over it dawned on me that I was going to need to make my own pattern. In upholstery you use pleats to contour (think wings on a wingchair) But no self respecting car guy wants seatcovers that look like their grandmas sofa lol. I needed to make a smooth pattern to fit the curves and dips and hills of the seat. I have googled and youtubed a thousand videos, articles etc and they never quite help. The princess seam is the right concept but i have a handful of pleats (darts) and no one apex point… more of an apex line. This article has really helped me figure out what i needed. I am not even done with the project but i felt i really needed to thank you! Ill come back and post a pic so you can see exactly what i have been rambling about haha! thanks again!
How cool! 🙂 This is definitely something different and I’m obviously glad that my tutorial was helpful even for an upholstery project. Wow.
This is so amazing and very detailed, I’ll be trying my hands on all of em.Thanks so much
Thanks so much! 🙂 Happy drafting.
Thank you very much, everything explained was in detail and simple understood
You’re welcome. 🙂
Thx so much. I make my own patterns..this is sew helpfull.
You’re welcome. I’m pleased to hear that. 🙂
You are a great teacher, thank you so so much, learnt a great deal.
Thanks! 🙂 I’m happy to hear that my tutorials have been useful.
Thanks so much. You are detailed in your explanation. It makes it easy to follow how it is done.
I’m glad that you enjoyed my tutorial. 🙂
Thank you very much!
You’re welcome. 🙂
Thanks ma
You’re welcome. 🙂
Much more understanding
Thank you very much
You’re welcome. 🙂
This piece was very educative and easy to understand… thank you for sharing
Glad to hear. 🙂 My pleasure.
Thank you so much,u are such a life saver
Thanks a lot for being this impactful, I respect and adore you a lot.
Thank you! 🙂 No problem. I’m glad you appreciate my works.
Whaooo! ???? where have you been???? I have been ? looking for such a detailed and easy,highly educative information like this.
Thank you so very much.
Oh God bless you. ?
Wow! You’re so welcome. 🙂 Yes, this blog is rather new still. I’ve only been on Instagram before. 😀
thanks so much for this, it’s really educative
You’re welcome! 🙂
I have admired fashion for a long while and recently decided to pursue that path, even if it means just sewing for myself and daughter alone.
Your site has helped in a big measure to ease the path.
Thank you for giving selflessly.
You’re welcome! 🙂 I’m glad to help and to share things that I’ve learned. Happy sewing!
In fact I must say you have made tailoring easy to learn. Your tutorials are great. Thank you.
Well, I guess that has been one of my goals here. 🙂 You’re welcome.
Great piece! You made this soon easy for me. Tnx.
You’re welcome! 🙂
Ohh what an information thank you so much I’ve been looking for this detailed info thank you once again very helpful
You’re welcome! 🙂 I’m happy to help.
I am in awe of this site/page. It’s filled with gems!!! Thanks for sharing your knowledge with us… in such a simple manner. Very grateful!!
Thank you so much! 🙂 I’m glad to hear that.
This is really helpful… Thank you very much.
You’re welcome. 🙂 It’s my pleasure.
Thank you ma,your materials are resourceful
You’re welcome. I hope you’ll learn lots of new things here. 🙂
God will bless u just what I was looking for.
Glad you found it helpful. 🙂
Very enlightening
Thank you! 🙂
It is really playing around. Thank you for making it so interesting. But please do you have tutorials on how to draft the basic bodice with the darts?
You’re welcome. 🙂 Yes, I’m planning on a basic bodice tutorial. Hope to be able to prepare it soon.
Thank you so much it’s very helpful…
And it’s very useful for whom who can’t afford such expansive classes….
You’re welcome. Glad to help! 🙂
Wow, you make it look fun and simple. Very clear and easy to follow.
Happy to have managed with that! 😉
Wahooo so comprehensive and interesting thanks so much ?
You’re welcome! 🙂
Thanks a lot. Beautifully illustrated instructions.
You’re welcome! 🙂
I like your piece, detailed and neatly presented. I’ll like to get more pattern drafting information always if it’s possible. Thanks a bunch.
You’re welcome! 🙂 More tutorials are on their way for sure.
Pattern drafting and draping are the most fun things to do. I wish you were around when I was trying to figure out darts. So easily explained! You can never stop learning in sewing no matter how long you’ve been doing it!!
Completely agree with you. 🙂 It’s so cool being able to always continue learning new tricks in this field. I’m glad you find my website useful.
Thank you so much. The explanation and illustration is simple, clear and very easy to follow. Thank you once more.
I am taking a class on this right now! This will be an amazing resource to reference when I inevitably forget everything I am learning.
That’s great! Happy learning. 🙂
Thank you very much. You have inspired me to be more creative.
Mission accomplished then. 🙂 You’re welcome.
It’s an amazing reference for a designing students like me!so inspiring thanks!
You’re welcome. 🙂 Happy to help.
I always run away from pattern making, but you have changed this challenge with your detail explanation. Thank you
That’s so awesome! 🙂 Very grateful to have this opportunity to help people understand a little something about patterns.
Wow! thank you so much, I have learnt a lot here.
You’re welcome! 🙂
You’ve simplified my dart troubles. Thank you
You’re welcome! 😀
Am new in fashion design and I have been looking for comprehensive information like the one you have provided. God richly bless you. Thanks.
You’re welcome! 🙂
Very detailed and explanatory. Thanks for sharing.
My pleasure. 🙂
Thank you, this is a great explanation and it makes sense to my math oriented brain.
You’re welcome. 🙂 I think you might enjoy making geometrical designs. I’m a fan.
Where have you been all my life?
I’m a sewist, I make my own clothes; even with the huge array of dress patterns out there, it gets boring after a while
Now I can play and have fun
Thank you very very much!!!
You’re right! It’s much more fun to draft your own patterns. 😀 Glad to help.
this is quite interesting. its an encouragement for me. Mum introduced me to basic sewing but did not take much interest. Now I feel I have lost opportunities while growing up. It’s a new passion for me now. Thanks for this explanations, finding many ways of using darts to fit dress into shapes is amusing.
It’s never too late to learn! 🙂 An, patternmaking is certainly a very interesting subject.
You are tewww much! Thanks for being of great help through this. It is so detailed.
You’re welcome. 🙂
Thank you so much, this is very helpful. God bless you. I still need more because am just a beginner
You’re welcome. 🙂 Don’t worry, you’ll get there. Just keep practicing and experimenting.
Your tutorial was so clear and easy to understand. thanks for sharing💟
You’re welcome! 🙂
Very interesting article about dart manipulation. Thanks for your clear explanations!
I’m glad you found them helpful. You’re welcome. 🙂
Thanks 😊
You’re welcome. 🙂
A fantastic new approach to try out. Thankyou for sparking my interesting.
You’re welcome. 🙂 I hope you’ll enjoy experimenting with dart manipulation.
Educative and easy to understand. Thanks for sharing.
You’re welcome. 🙂
Thanks a lot for this instructions. Can we see some of this in a gown? Most dart manipulations are done on the bodice stopping at the waist. The reason I ask I that I’d love to make a Chinese gown, but one bust dart seems to be transferred to across the bodice while the other one just vanishes.
Manipulating a long bodice with the lower waist darts is a lot more limited. This is why many times dresses have a seam at the waistline. Basically you can only change the direction of the darts and manipulate the bust dart only, or absorb the darts into style lines. Do you mean the qipao dress? I tried googling pictures but each one had bust darts on both sides. Hmm..I guess you could ease the dart into the diagonal opening as the remaining dart will not be that large (depending on the bust level position though), but I’m not sure how clean it would look.
I love reading your post. It’s very informative and interesting to read. Thank you so much for this
Thank you so much. 🙂 I’m glad to have written a useful tutorial. Dart manipulation is such great fun!
Great information and easy to understand. Thank you. Following
I’m happy that you found it helpful. 🙂
So detailed n self explanatory.
Thank u so much Ma’am.
PS: Am yet to receive the fitting guide.
Thanks
You’re welcome. 🙂 If you’re already on my mailing list, you’ll find the guide at the Resource Library. I send a reminder about it every now and then, but the access info is also in one of the first emails I send. Otherwise, if you requested the guide, you should first confirm your email address by clicking a link you received. Sometimes it ends up in your spam or promotions folder so you might have missed it.
You are a blessing! Thank you!
Your tutorials are AMAZING! Thanks so much!
You’re welcome! 🙂 It’s my pleasure.
Thanks it really helps 😊
You’re welcome! 🙂
Thank you. This is amazing. My mind is blown. I’ve never understood darts and style lines like this. How come high school sewing class never covered this stuff?? I feel so inspired to learn to make a body block and start experimenting.
Great explanations, very clear and well-illustrated! What kind of program did you use to make the illustrations?
You’re welcome! 🙂 Yeah, dart manipulation is like magic. I was fascinated when I first learned about it, too. I drew the pictures with Illustrator.
Great info! How does the principle apply to the back bodice sloper? If the shoulder dart and waist dart don’t point to one point like the bust point..
Thanks! 🙂 In case of the bodice back, you have to work on the two darts separately. But usually the little shoulder dart simply gets eliminated or rotated towards the neckline or armhole. Or turned into flare. Except with princess seams, when you simply unite the two darts with styleline, as shown in the example.
Thanks a lot you’ve made it very easy to read and understand and it has been very helpful.
It was my pleasure! 🙂 Dart manipulation skills will surely turn out to be useful.
Thanks a lot you’ve made it very easy to read and understand and it has been very helpful and I love it.
You’re welcome. 🙂
Thanks a lot!
Your explanations are very clear.
Good job!
Thank you! 🙂 Happy to hear that.
Thanks for sharing
You’re welcome. 🙂
Thanks a lot! So glad I found you, been sewing just bulky items, but they look boring and in the end also so boring to sew. Thanks to your tuts I got the understanding how to make a bodice with your own measurements, how to take them and how to play around with interesting cuts! You are the best!
You’re welcome! 🙂 That’s where the more creative part of making patterns can begin. Have fun!
I’m loving everything you publish. Thank for sharing! Greeting from Brazil. 🙂
It’s my pleasure. 🙂 I’m happy if you learn a trick or two here.
Thanks so much I’ve gained a lot
That’s wonderful! You’re welcome. 🙂
Wow. This is an incredible summary. I’ve never properly understood dart manipulation – the possibilities are mind blowing! A million thank yous
Thank you! 🙂 I tried to cover all the basic ways for dart manipulation here to get you started. 😀
Wow wow wow!!!!!! You have totally opened my eyes! Thanks for a brilliant tutorial. I love origami style folds and tailoring but had no basic understanding of the science of darts. I feel as though you’ve turned the light on for me!
You’re welcome! 🙂 I’m sure you’ll find dart manipulation a useful skill. It’s fun to come up with new designs. Enjoy!
Hey could you maybe explain how to manipulate double pointed darts? Thank you and love your page!!
I have a newer dart manipulation tutorial that has a few double pointed dart manipulations. However, those aren’t too versatile.
Thank you for the information, it’s really helpful
You’re welcome. 🙂
This illustration has really been helpful.Good work
Awesome! Thank you. 🙂
Thank you so much for this detailed illustration
Love from Nigeria ❤️❤️❤️
You’re welcome! 🙂 It’s so cool to have readers all over the globe.
Your tutorials are awesome. Thanks a lot.
You’re welcome! 🙂
Thank you so much ma’m
You’re welcome. 🙂