Last year I had this idea to write about making Barbie® clothes although dolls aren’t exactly the main theme here on my blog. To my surprise, those articles have become rather popular and since then I’ve received several requests to create more tutorials!
How To Sew Barbie Clothes
Well, here it is finally; my How to sew Barbie clothes tutorial. Last time it was more about the patterns and this time I have prepared a tutorial on how to sew tiny clothes. As a bonus I created a whole doll-sized pattern set with different kinds of tops, sleeves, and skirts that you can combine in any way you want. You’ll see some examples in this tutorial. There are two sets actually, one will fit the 80’s/90’s type of doll, and the other one is for the 2000’s version. I added measurements so that you can check.

The package also includes a fun paper doll style planning PDF to test different combinations. Here’s a link to find out more and to purchase the set. I had a lot of fun preparing it and being tiny, everything automatically looks So Cute! 😀 I hope you like it.
Update: there’s a new sleeve set with 9 more sleeve patterns.
Anyways, let’s get to the tutorial.
General Tips for sewing in Miniature Scale
When picking materials to sew Barbie clothes, you should only consider lightweight fabrics because you want to avoid creating bulk. Fabric scraps are great for this project as you don’t need much material.
The best fabric choice is probably lightweight woven cotton.
I made some tests and found that knit materials create more bulk and are challenging to work with at a tiny scale. However, a bit of stretch makes it easier to attach the sleeves, so you might want to consider woven materials with some added stretch for the bodice (and sleeves).
For the closures, you can use either Velcro or tiny snaps (4-5mm). As for the sewing machine, use a Microtex needle (60/8 or 70/10) and about a 2mm stitch length. Use zig-zag stitch to finish the seam allowances if needed. You can also sew by hand.
Sewing at a small scale means that the seam allowance needs to be small, too. In this case I have a 0.16in./0.4cm wide seam allowance. But if you need more than that, you can always trim off excess seam allowance after having sewn the seam.
Remember that you need to sew accurately as at this scale even a small error will show more easily.
If you’ve already sewn tiny clothes, you might have noticed that the sewing machine tends to eat your fabric at the beginning of the seams. To avoid this, don’t start sewing directly at the edge, but rather a few millimeters inward.
To reduce bulk at the seams, you can trim the seam allowance to only 1/16-1/8in. or 2-3mm after having completed the seams and then flatten them by topstitching. This is especially useful in cases where your fabric doesn’t want to stay flat after pressing.
Sew Skirts for Dolls
The main idea here is to not close the skirt into a tubular shape before it’s almost done, because it’s much easier to work with that way. Think about, for example, sewing a miniature pencil skirt hem!
So, begin by closing the darts, if there are any, and sew all the vertical seams, except for the c-back.
Then press and sew the skirt’s hem allowance.
The skirt patterns I created have a small overlapping bit at the upper part of the c-back seam where the skirt will remain open. You may also press and stitch that at this point. It will be folded twice on itself.
Here are a couple of skirt examples at the preparation phase.

Leave the back seam open until you’ve attached the skirt to the bodice, when making a dress.
If you’re making a separate skirt, you can now attach the waistband. Here’s an A-line skirt in the makes!
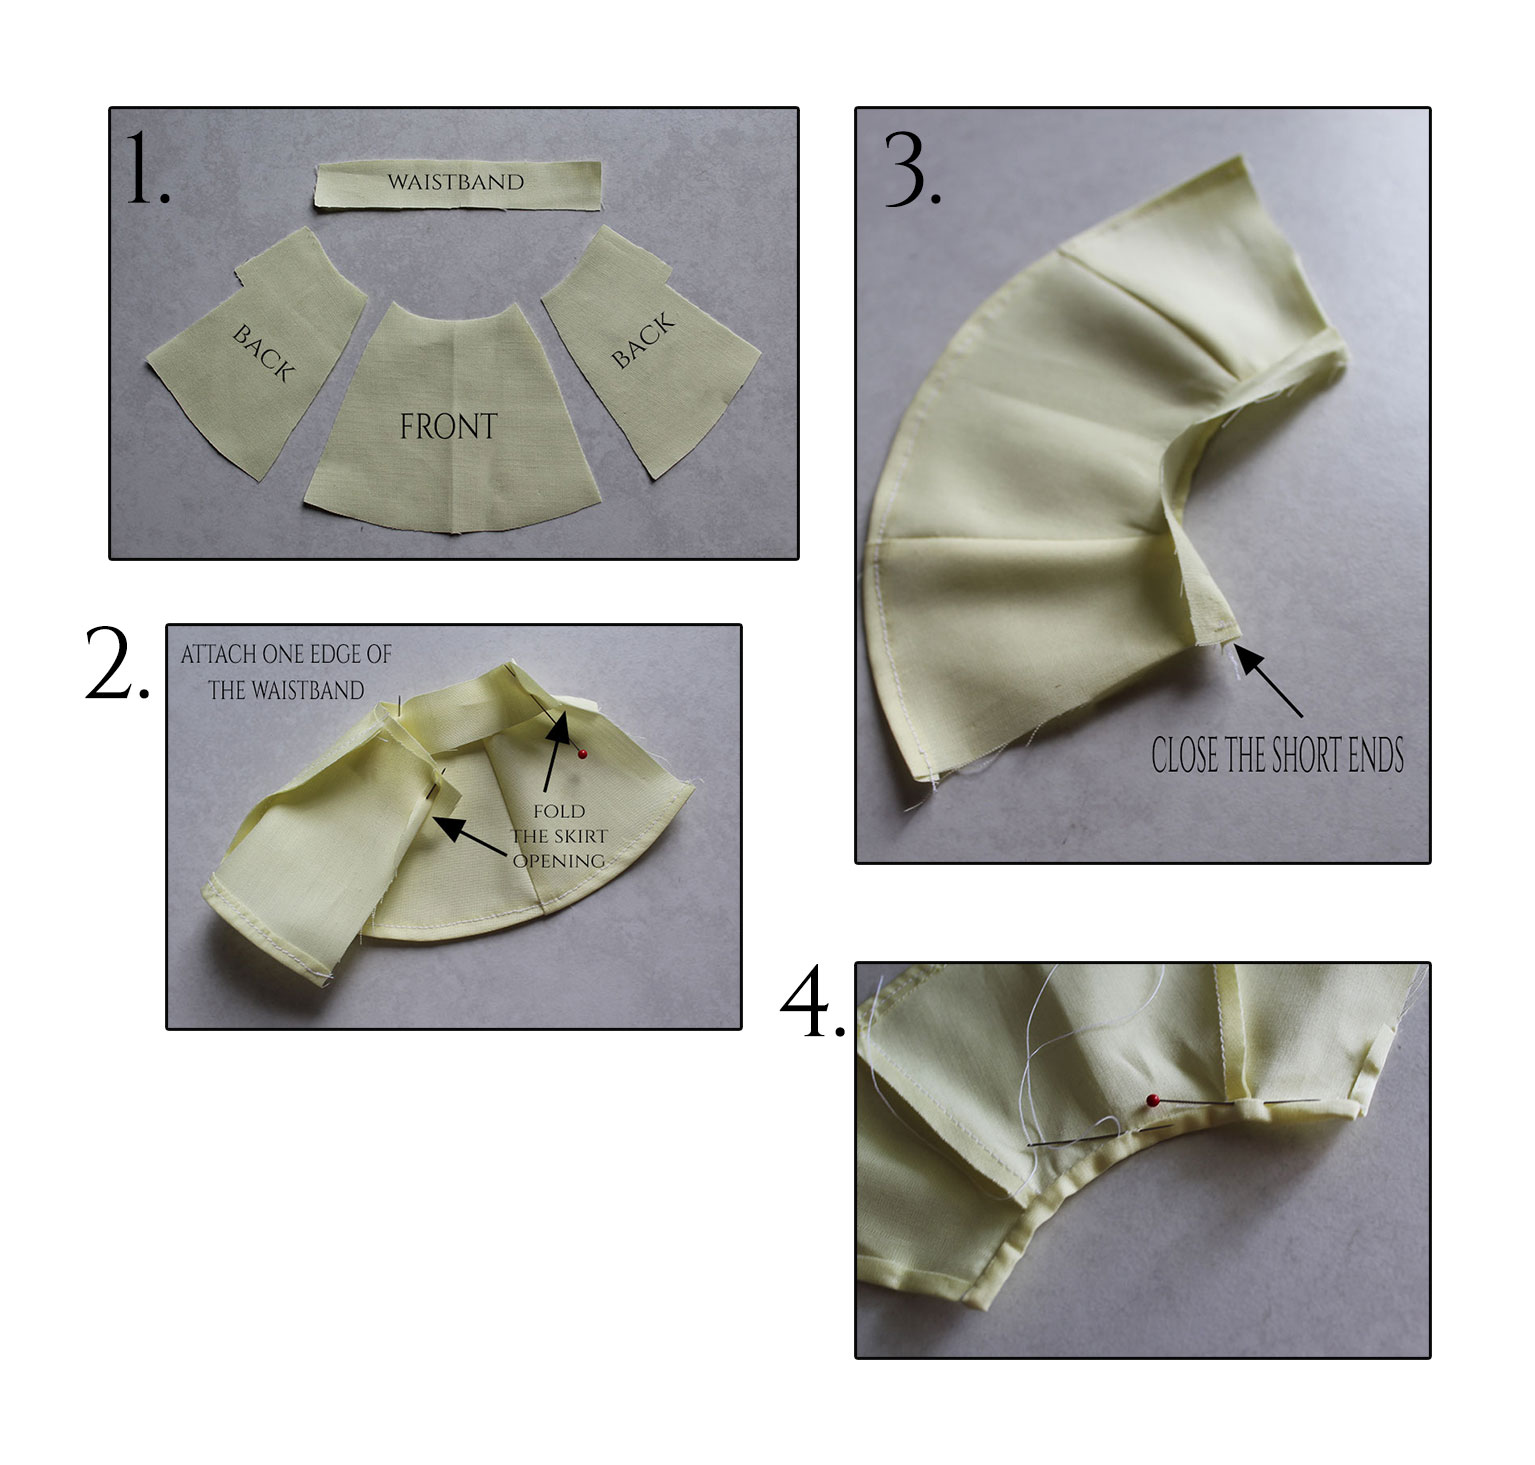
First, sew one edge of the waistband, right sides together, at the waistline of the skirt, matching the c-front with the center of the waistband (2.).
Leave, for example, 0.16in./0.4cm seam allowance at the short ends, which you will close next (3.).
Then trim off extra seam allowance and press the waistband in half, turning the seam allowance of the
remaining edge inside. Hand-stitch (4.). You can either add Velcro to cover the whole back opening, or just one tiny snap at the waist. Then finally close the c-back seam.
Strapless Bodice for Barbie
This is probably the easiest type of top as it has no sleeves, and hence the perfect first example of a lined bodice. The front part consists of three panels.
- Cut the bodice pieces both in main fabric and lining fabric. This way you’ll be able to finish all of the edges neatly.
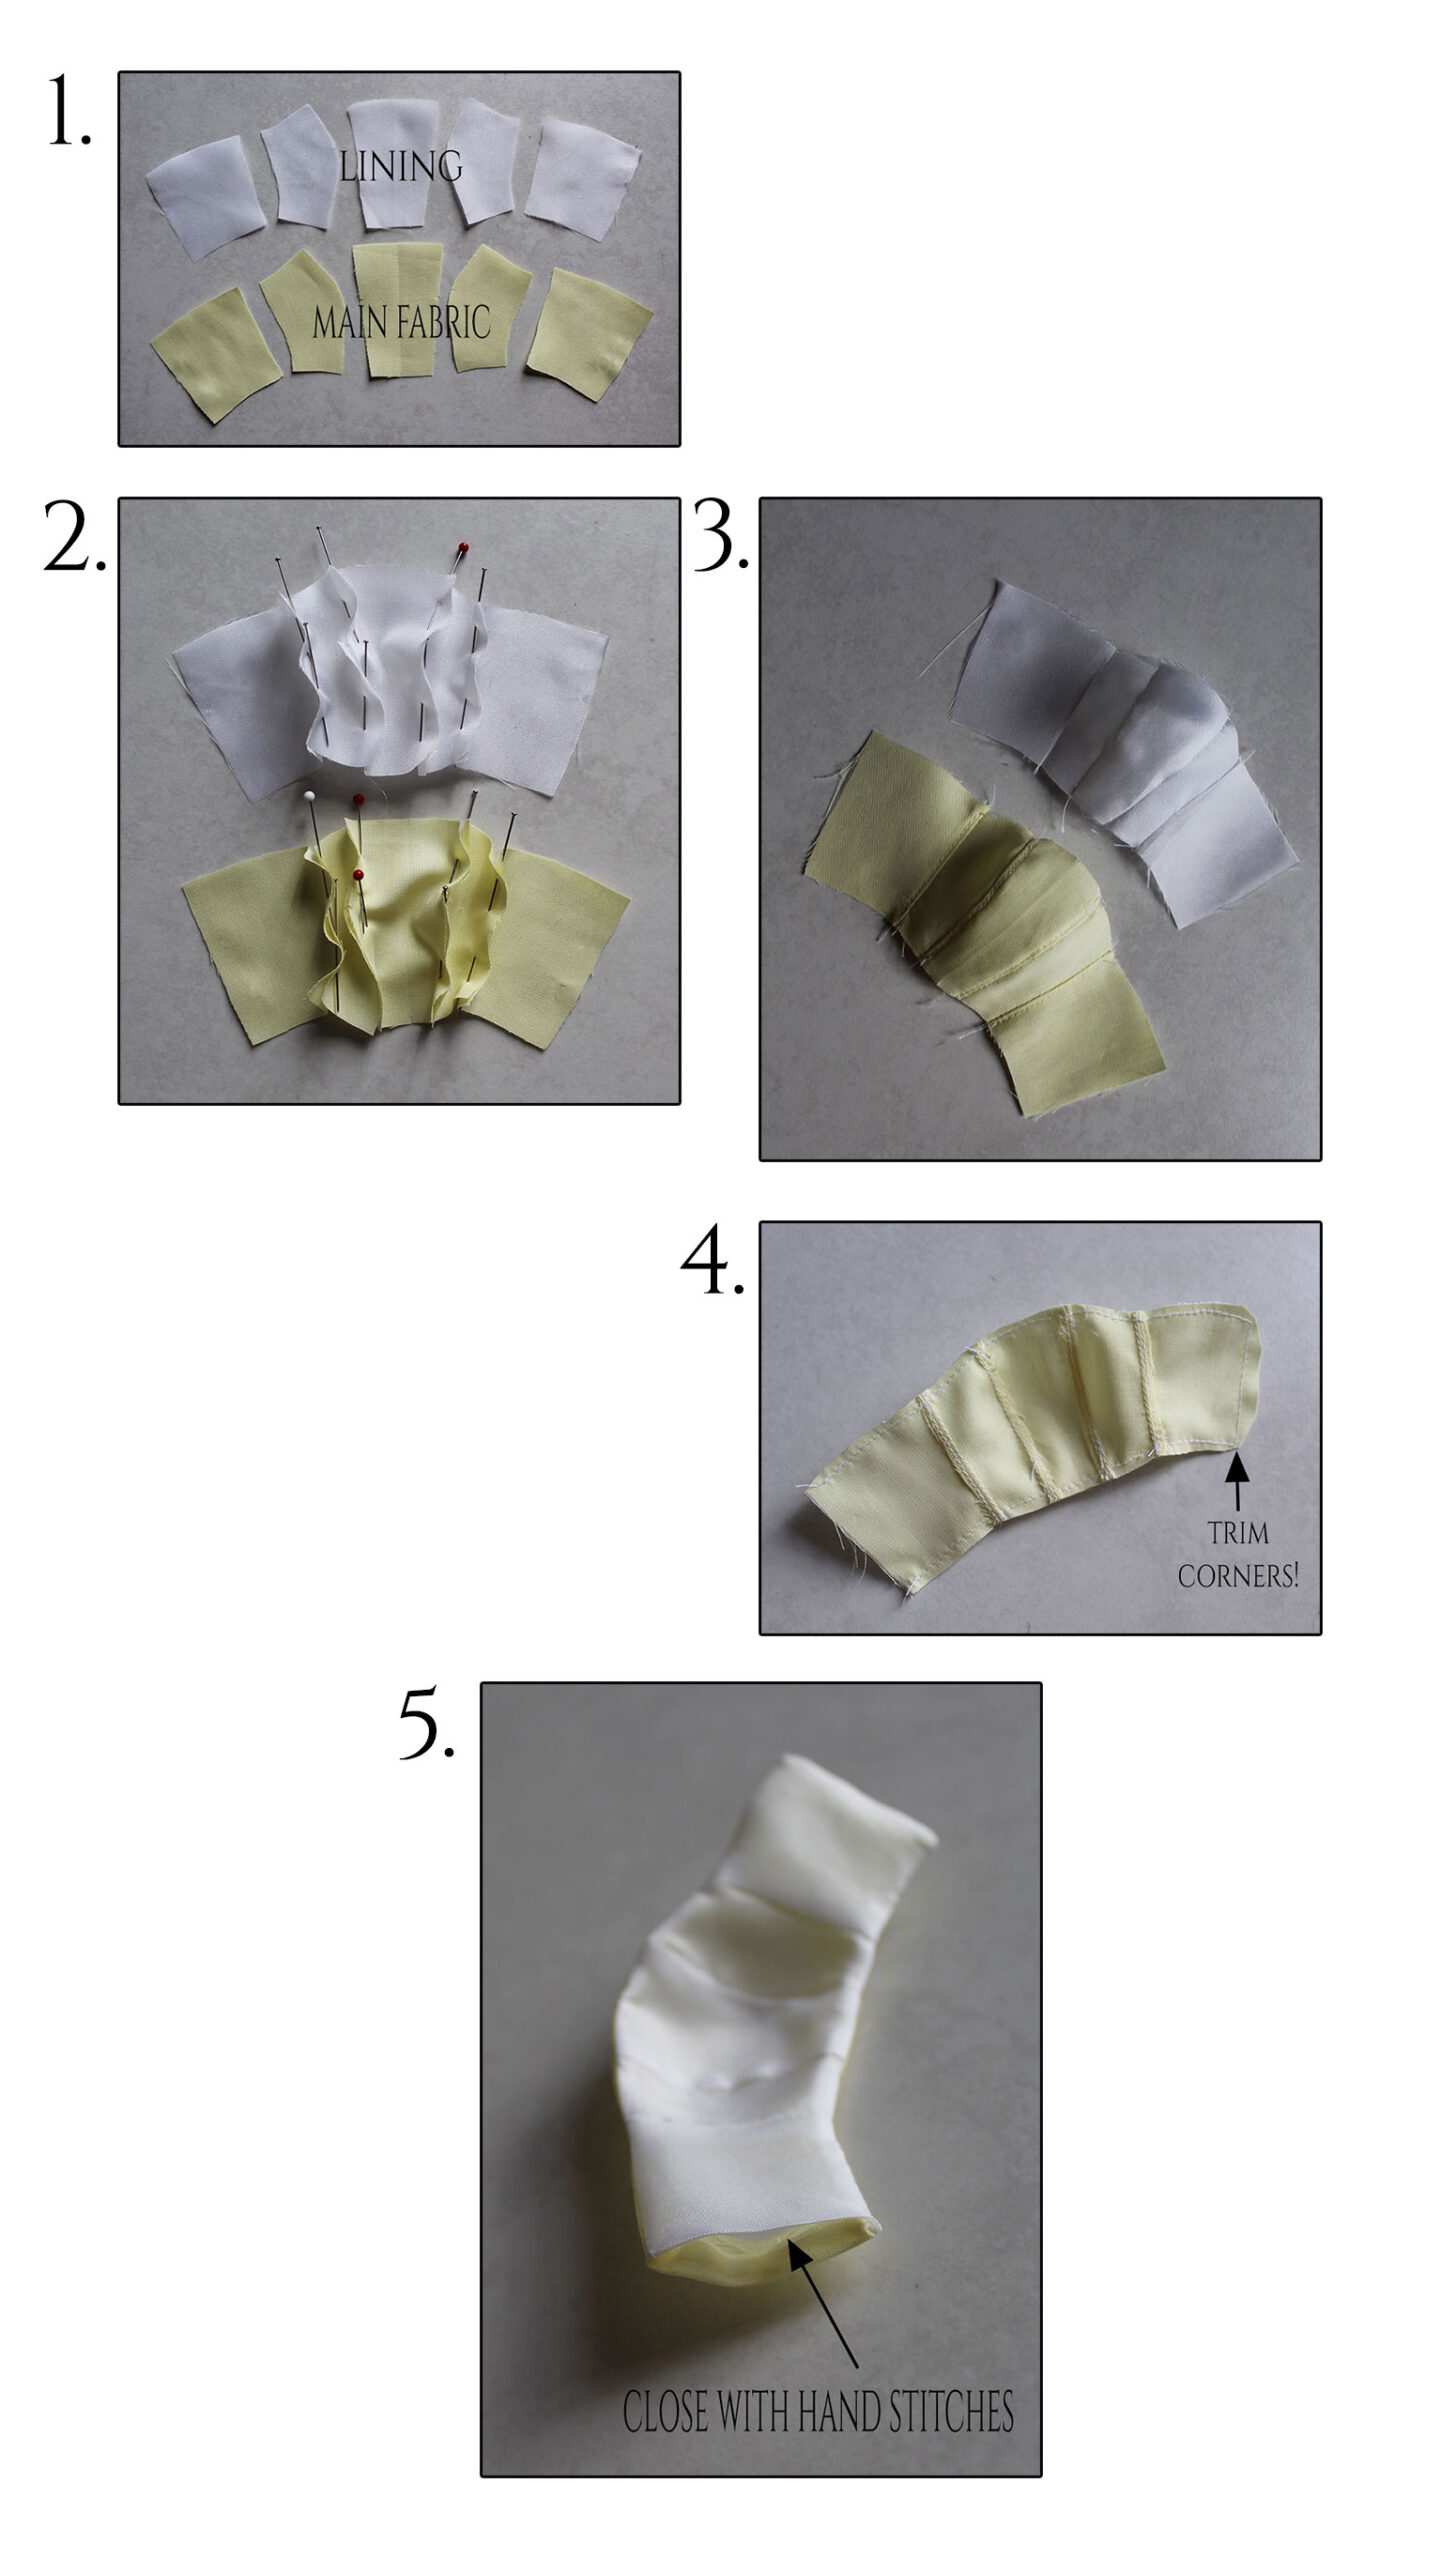
2. First, sew both layers separately. Trim off excess seam allowance and press the pieces. Topstitch if needed, as here (3.)
4. Then pin the two layers right sides together and stitch all around, leaving just one c-back seam
open. Trim and turn the right side out. Press.
5. Turn the seam allowance of the remaining opening inside and hand stitch to close the hole.
Finish by attaching a Velcro closure.
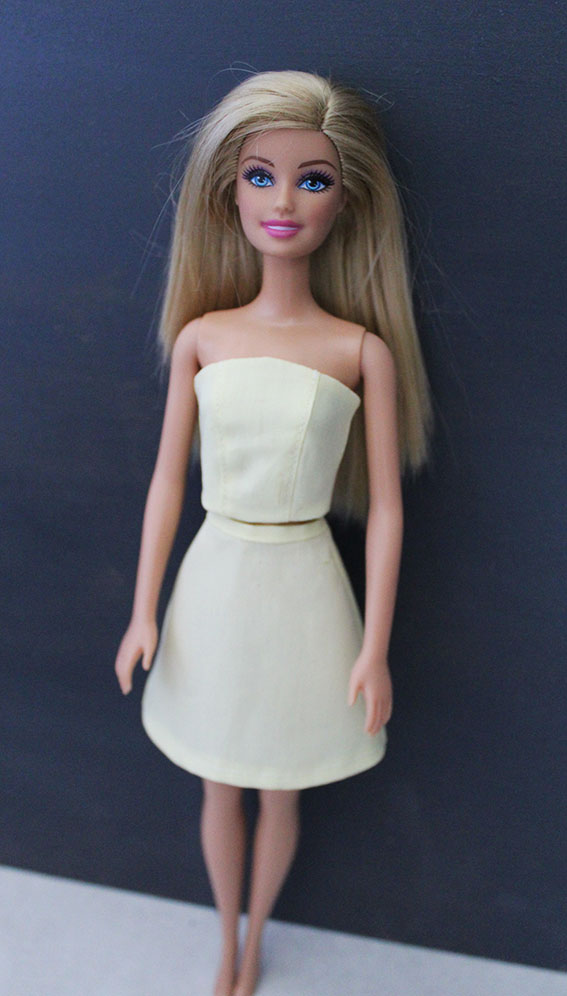
Let’s see the first posing picture! The strapless top and the A-line skirt from the previous section.
Tiny Bodice with Tiny Sleeves
You’ll surely want your Barbie to have tops with sleeves, too! So here’s an example.
You could also use a facing to finish the neckline, but more on that later. The lining will create a neat edge both for the neckline and the c-back, which means it’s actually quite a convenient option.
Here’s a basic top with bust darts. You’ll need to close the darts and shoulder seams of both layers at first. See points 1 and 2.

3. Then pin the two layers together along the c-back seams and the neckline (right sides together of course), and stitch. Depending on the neckline shape, it might take a few trials to get it nice and symmetrical!
4. Trim off excess seam allowance and corners. Make clips that enable you to turn the lining to the wrong side.
5. Press. Here’s how the bodice looks like at this point.
Don’t close the side seams before you have attached the sleeves. It’s much easier to sew the sleeves on while the bodice lays flat like this. Also the sleeve seams should not be closed yet.
If the sleeves don’t have any gathers or hemming to be done, you can just pin them to the armholes, matching the notches and the shoulder seam. Either treating the lining and main layer of the bodice as one, or leaving the lining out. Here’s a flutter sleeve example.
I find it easier to sew with the bodice side on top, which is the opposite of what you would do with human clothes. It took me quite a while until I was able to attach tiny sleeves using the sewing machine! It’s much easier to sew them by hand.

Once the sleeves are attached, trim off excess seam allowance as usual, and then you can close the side seams and sleeve seams. The side seam of the lining is sewn separately in this case so that the seam allowance remains hidden.
Lined Bodice without Sleeves
A sleeveless bodice is always an option if you want to avoid having to attach sleeves. And if you have a lining, you can finish the armholes, too.
After having sewn the neckline, as in the previous example, sew the armholes in the same way. Make some clips at the round sections before turning the right side out.

Now you can just close the side seams to finish the top.
Balloon Sleeves for Dolls
When making doll clothes, balloon, and other puff sleeves will add that extra cuteness to the dresses!
However, this will also add some extra steps to the sewing process. First, you need to prepare the sleeves.
Here (1.) you can see the gathering stitches that have been sewn to the sleeve cap and hemline. There’s a tiny cuff to be attached. You may want to finish the seam allowance with zig-zag stitches after having attached the cuff, as it will fray easily when dressing the doll.
I didn’t even try to make any extra folds to the cuff! Just fold it in half and sew.

In this case you need to gather the sleeve cap to match the armhole between the notches. You can first pin the sleeve at the shoulder line, and then gather one side at a time to match the armhole. Otherwise you’ll lose the central notch of the sleeve between the gathers.
Miniature Bodice and a Facing
As mentioned earlier, you can also opt for a facing, if you’re happy with only finishing the neckline. However, you’ll find that the facing pieces are really tiny!
Let’s also level up by making a bodice with side panels. In this case it’s easiest to attach the facing before the side panels, as this way the bodice will lay flat.
Work initially on the front and back pieces separately. Pin the facing, right sides together, at the neckline and stitch. Trim off about half of the seam allowance and make several clips so that you’ll be able to turn the facing to the wrong side (1.).

Then sew the shoulder seams of both the bodice and the facing in one go and trim (2.–3.).
4. Turn the facing to the wrong side and press.
Finish by folding and stitching the c-back seam so that it covers the short edge of the facing.
Now you can attach the side panels if you have those.
Bodice + Skirt =Dress
Now that you have both a bodice and the skirt prepared, you can finally attach them at the waistline to complete the dress. Match the various seams, c-front, and c-back.

If the skirt has gathers at the waist, gather to match the bodice.
Here’s Barbie in a princess style dress. Notice the balloon sleeves from before! Cute!

The Hook and Loop Closure
I didn’t actually have any tiny snaps. I think you can get them especially for dolls. Hence, I used the hook and loop instead. But in any case, it’s the easier option.
Cut 1/4in. or 0.5cm wide strips of hook and loop tape, that cover at least the entire length of the bodice and attach them to the c-back opening like this:

Finish the dress by closing the c-back seam of the skirt.
And there you have it; everything you could want to know about how to sew Barbie clothes. If you’re going to sew Barbie clothes, these tips will hopefully get you started! Don’t forget to check out that pattern set I mentioned. All the little clothes seen here have been made with the patterns included in the set.
I’ll finish this post by adding a few more doll pics. 80’s/90’s dolls vs. 2000’s, all dressed up in yellow! If you use this tutorial to sew Barbie clothes then I’d love to know how you get on and see what you create.
Which do you prefer?


18 Comments
Can the doll patterns in the set be used to make clothing to sell?
Sure. 🙂 I tried to make the patterns rather general so that they would be easy to adapt. You can mix the features and create your own doll clothes with them. So they kind of become your designs that way.
very helpful
Wonderful! 🙂
I was waiting for this post for so long! Love your blog <3
These tiny clothes look really cute. I supose it needs a lot of patience to sew something like that… but you know what? I gonna try it by myself! – with your tutorial 🙂
Thanks Minna
Have a nice day <3
So pleased! Thank you! 🙂 Yess, you should definitely go for it. It takes some getting used to the small scale, but practice makes perfect, so don’t give up.
Which Barbie model will the patterns fit? They have shrunk her bosom and flattened her feet since I was a kid.
I have included patterns for two sizes. So one fits the model from 80’s and 90’s (and others that have this size), and the other one is drafted for the modern shape. 🙂
Thank you for sharing! Bu how to hide the seams at the shoulders wih sleeves?
You’re welcome. 🙂 If you have a lining, it’ll hide the shoulder seams inside. But the armhole seams will be more difficult to hide. Well, it’s possible to do, but extremely fiddly: you’d have to attach the sleeves only to the outer layer, then fold the seam allowance of the lining layer inside, (covering the seams) and hand stitch in place. I didn’t dare to try. 😀
I’m going to teach my 9 year old great granddaughter how to sew and what better place to begin than with sewing cloths for her Barbies? She’s been making them cloths out of odd socks forever and I must say some of them are cute but most of them look like a sack. She loves her Barbies and wants to dress them all up over and over, so now I can help her make them nice things to ware. I did buy one pack of patterns to give me an idea what I’m getting into. Wish me luck, 9 year olds attention span sometimes leaves something lacking. ☺️
Definitely! That’s how I started sewing, too. 🙂 It’s so nice to design create the clothes yourself. Enjoy!
Hello,
Can you please make patterns for the 28 inch Barbie doll? I would like to see her dressed in clothes for college and working woman. I know you will receive a lot of attention if you add this to your website. Thank you in advance.
Darlene Jones
Hi Darlene. 🙂 I’ll definitely see if I manage to get my hands on one. It would be nice to make clothes in a bit larger scale, too. 😀
So pretty. ♥ ♥ ♥
Regards,
Anita
Thank you! 🙂 Tiny clothes tend to always look so cute.
This is an awesome resource!! I look forward to trying out the patterns. I would love to see curvy and tall versions added in the future so I can make clothes for *all* my Barbies 🙂
Thank you. 🙂 I’m happy to hear. Oh yeah, good idea. I will need to check those Barbies out. I only have the basic editions myself. 😀