This month I wanted to do something different: DIY Barbie clothes! At the time I’m writing this, we’re in the middle of a world wide lock-down and many people find themselves blocked at home. So I decided to propose miniature sewing as a way to pass your time. You can also involve the kids.
Fabric shops being closed, it might be difficult to find material for your human-sized sewing projects. But in the case of Barbie clothes it’s not a problem because those fabric scraps you have at home will do just fine!Your DIY Barbie clothes can be as complicated or as simple as you want. Maybe you want to copy your own existing clothes, or an outfit you saw in a film? You could do clothes inspired by a fashion decade. Or imitate the style of a famous person. Why not try miniature Pattern Magic!
Whatever you choose, I prepared a PDF with the basic pattern -set to get you started. It works both for the old- and new Barbie doll (you know they changed the body shape a bit in the 2000’s). The file is at the Downloads-section in the side-panel – or at the bottom if you’re on mobile.
I drafted the patterns exactly like the human version, taking Barbie’s body measurements. If you’re interested in trying yourself, there’s the Basic Bodice pattern, the Dartless Bodice and the Basic Skirt block tutorial.
To give you some ideas for Barbie clothes, this tutorial will illustrate how to use the basic patterns. Naturally, the same instructions are good for human clothes as well if you change the measurements. 😀
DIY Evening Dresses for Barbie
Let’s kick off the tour of Barbie clothes then! I’ll show you first how to draft 2 different panel dress patterns. By changing the profile of the panel and the length of the dress, you can make more variations with the same idea.
Mermaid Dress
If you’ve seen the mermaid skirt in my Panel Skirt tutorial, this will look familiar.
Begin by copying the whole basic bodice pattern, then
1. Continue the c.front, side seams and c.back line all the way down. Barbie measures 18 cm from waist down, so make the gown a bit longer than that.
Draw also a line from the tip of the waist darts down.
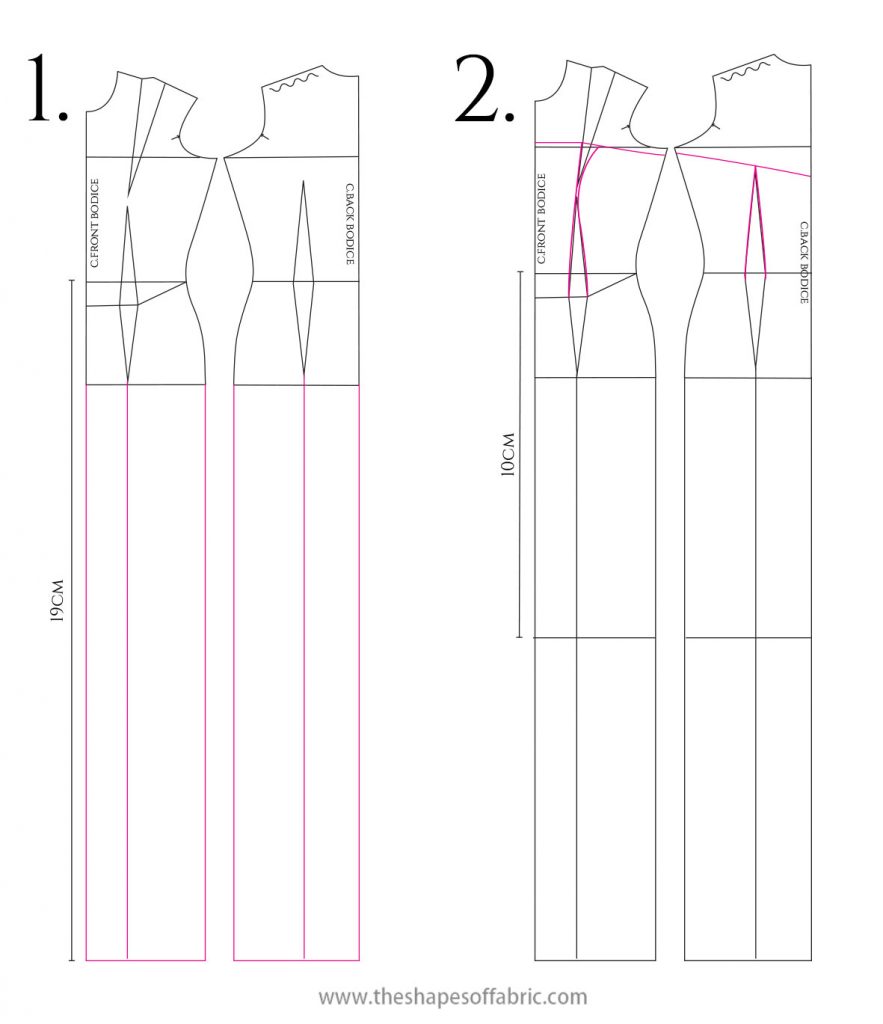
2. Draft the upper part of the dress. This one will be a strapless dress, so separate the shape of the bodice. I made the neckline quite straight, because it’s easier to sew that way. But if want more challenge, try a sweetheart shape.
The back has a shallow V-shape.
To avoid gaping, enlarge the bust dart slightly. Otherwise the panels follow the darts. You can carve some more below the bust area.
3. Then there’s the skirt. Draft the panels so that the dress is a bit more narrow around the knee-level (10 cm from waist down). You can make the back of the skirt longer like I did. The c.front will be cut on fold. I colored the front side panel here to make it easier to see.

Copy the pattern pieces and check that the seams that will be sewn together match in length and that the hemline and neckline run smoothly between the pieces.
The curves should also be identical below the knee, except for the train. So you can start from the front piece and copy the curve to the front side panel and from that to the back side panel.
Here they are:

To finish the neckline you can either make a facing or just line the whole dress. In this picture you can see the pieces I cut. I left 0.5cm seam allowance.

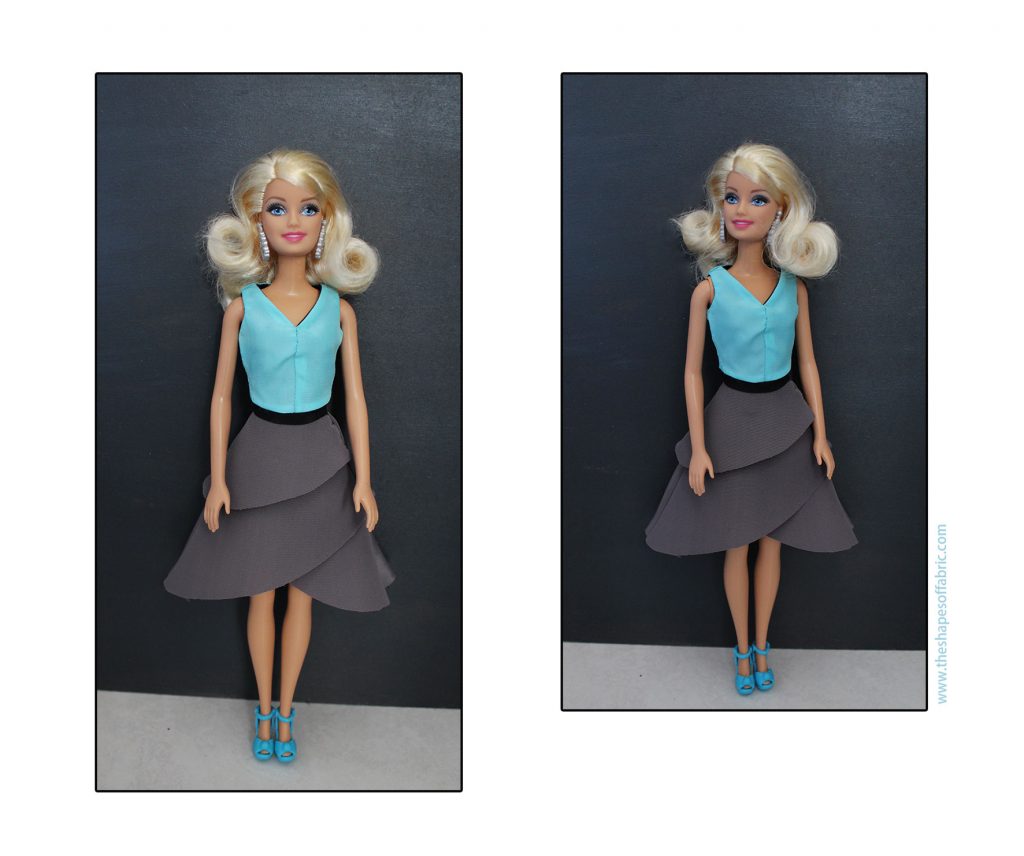
And here she is with her Mermaid Dress.

Flared Panel Dress
Here’s another example of a panel dress. The starting point is exactly the same as for the mermaid dress, so let’s continue from point 3.

3. This time, the shape is easier to draft: straight! You can go as flared as you want. I extended even at the c.front, but to be able to cut on fold, the line continues all the way up.
Copy the panels.
Make the same checks as with the previous dress. Especially the hemline will need some blending. Correct the front piece so that there’s a 90° angle both at the top and bottom, or you’ll find angles when you cut on fold.
The final pattern pieces:

My fabric was a bit too heavy weight for this project, so I found it useful to top stitch all the seams to flatten the seam allowance. This ended up creating nice structure, too.


Here’s Barbie in her shiny new dress.

Balloon Skirt Dress
This dress is quite retro. Had I chosen a taffeta fabric, it would’ve been so 80’s!
There will be a seam at the waistline, so we can use the bodice pattern for the top and skirt pattern for the skirt. You can also make separates if you wish.
Top
1. For the top, you’ll need to do this simple dart rotation to unite the two darts. If you’re interested to learn more about dart manipulation, have a look at this tutorial.
When sewing miniature clothes, it’s best to get rid of all extra darts to make things more simple. While you do need the front dart, the back dart can be eliminated as seen in the picture!

2. Re-draw the front dart so that it starts about 0.5cm under the bust point.
Draw the new neckline: It’s a bit wider than the original. You can also lower the underarm section and eliminate the ease from the back shoulder slope.
Then correct the waistline so that there won’t be an angle around the side seam.
3. These are the final pattern pieces. Control that the neckline, armscye and waistline run smoothly between the front and back pieces.
Just a few tips on sewing the top.
I found that the easiest way to finish the necklines and armscye is to just line the whole thing. I cut the pieces twice and first worked on them separately: closed the shoulder seams and sewed the darts.
Then I sewed the two of them together at the neckline and armscyes.
1. Here you can see a tiny seam allowance, but in reality it was 0.5cm when I started. I trimmed it afterwards.

2. In this picture you can see the same thing, but right side up after ironing.
After this I just closed the sideseams and the top was pretty much ready.
If you leave just 0.5cm of extra at the c.back seam, you can create a tiny overlap to add a snap or velcro closure. Barbie has such a big head that in most cases it seems impossible to Not have an opening somewhere.
Balloon Skirt
Copy the basic skirt pattern. The final skirt will be a bit shorter than it looks on paper so take this into account.
1. Divide both the front and back piece in 3 sections at the hemline and then move the darts so that they match with the line that is closer to the centre.
Tape or glue the front and back piece next to each other on a piece of paper so that there is 1.5cm between them at the hemline, as shown in the picture.
Separate the sections by cutting along the lines you drew.

2. Tape or glue the sections so that there is always 1.5cm distance between them at the hemline and 0.5cm at the waistline (or dart point). Finally add 0.7cm of flare at c.front and c.back.
You can make the balloon skirt either by gathering the fabric both at the top and the bottom, or as done here, gathering at the top and sewing folds at the bottom. If you choose the gathering method, your pattern is ready. But if you want to do folds, continue as shown here:

3. Draw little darts at the hemline. One between each section. Don’t cut yet, because you’ll get the exact shape only by folding the darts before cutting.
4. The hemline should be something like this after you’ve folded and cut. Try to avoid angles between the folds. Mark the side seam at the waistline and the hipline level at c.back so you’ll know where the back opening ends.
When you gather the waistline, just match it with the top.
Here are two pictures to illustrate how the bottom would be sewn. As you can see, I didn’t close the darts completely.

To finish the skirt, I made a pencil skirt as a lining, using the basic skirt pattern as it is, but shortening it by about 2cm. Then I united the hemlines of both skirts. As a result, the lining pulls the balloon skirt upward so that it maintains the shape.
The dress!

Layered Skirt and a V-neck Top
I was trying to find fun and interesting Barbie clothes to show you. As I said earlier, these instructions work also for your own clothes. This next idea is for a separate skirt and top.
Gathered V-Neck Top
1. Unite the darts and rotate towards the c.front. This volume will then be gathered. Place a notch where the gathering starts. Unfortunately in miniature size the volume remains so small, that it doesn’t show much.
Get rid of the back dart as before.

2. Draw the V-neckline ending at the underarm line, and the new, round c.front line. I also changed the armscye line shape.
Correct the waistline.
3. You should end up with something like this. Check the pattern pieces as usual.
Layered Skirt
1. This is an asymmetrical skirt so begin by copying both left and right sides of the basic skirt pattern. To be able to unite the c.back, fill the gap at the waistline and then compensate by increasing the dart volume.

2. Turn the dart volume into flare as shown in the picture.
3. Add even more flare at the side seam. In this example 1.5cm at each side, front and back.
This is the starting point. Now let’s draft the layers.
4. The idea of this skirt is that the layers continue around the skirt, becoming longer each round. You can make as many rounds as you prefer with the same idea. Add some extra flare to the sides so that the top layers are wider than the ones below.
End the final layer in the middle of c.front to get a symmetrical hemline.

5. Here are the pattern pieces. I united the uppermost layer (pink) at the side seam, but especially if you’re making this in human-size, separate the pieces to maintain grainline at c.back, too.
There’s an opening on the left side. Add notches to each piece at hipline.
You can make a little waistband to finish the waistline.
Here is Barbie with the new outfit.
What’s Next?
I hope this little tour inspired you to try sewing some Barbie clothes. Or why not, gave you ideas for your own sewing projects, dresses for You!
If you have a friend, who’s been looking for sewing projects, feel free to share this article. 🙂
Next time I’ll introduce you to a couple of talented people who create Amazing, tiny clothes. They have some tips for you, too. So stay tuned!


36 Comments
Thanks for the inspiration! In fact, my 6 year old daughter is staying with me at home and we are always looking for new creative ideas to do – I just don’t know why I didn’t think of sewing barbie clothes earlier 😅
Stay safe
You’re welcome. 🙂 Always glad to inspire! Enjoy your new sewing project. And you stay safe, too.
This is inspirational! I’ve been sewing over 40 years (non-professional) and this has opened up a whole new horizon. Thank you so much for sharing 💕
Thank you! Always happy to inspire. 🙂
Brilliant. Hope I can do this for my granddaughters dolls. X
Thanks. Enjoy the sewing project. 🙂
Thanks Minna, stay safe
You’re welcome. 🙂 Take care.
What a great article! I will share it on my blog for sure, you did a great job. Thank you for that! 🙂
Stay safe!
Thanks! Next one will be even better! 😉 You too, stay safe.
Omg! Thank you for sharing. I’ve been making doll clothes for a few years now and the mermaid dress and panel flare dress was something I just couldn’t figure out. This was very inspiring.
You’re welcome! I was glad to share. 🙂 It’s fun to make little doll clothes! They all turn out so cute. Enjoy!
Hi
I would like to know if the above info is available in pdf form.
Thank you
Hello. I haven’t made a PDF, but I think there are websites that convert any page into a PDF. Such as Printfriendly. 🙂
Thank you for inspiring ideas and basic pattern. Can’t wait for tiny sewing <3
Stay safe!
You’re welcome! I’ll be curious to see what you’ll make. 🙂 You stay safe, too.
Very nice, thanks for sharing
You’re welcome! Happy sewing. 🙂
Thank you! I just got introduced to the idea, and I think I’ll love sewing doll clothes.
Yes, it’s quite fun. 🙂 Everything is tiny but you’ll get used to it.
I had tried to post back when this first appeared but got an error message. I wanted to thank you for the patterns. I enlarge Barbie patterns for the 28 inch Barbie doll or at least try to.
Sometimes there are temporary glitches. 28 inch Barbie? Woww! Didn’t know they existed. You could also try taking the measurements and drafting the pattern from scratch with my Basic Bodice tutorial. 🙂
Thank you so much! When printing the pdf for the Barbie basics, do I print at 100%?
You’re welcome. 🙂 Yes, it should be printed in the exact size, no scaling.
love these designs! How much fabric did you start with? Half a yard?
Thanks! 🙂 Probably much less than that. I used little fabric scraps that I had left from other sewing projects.
I’m kinda having a hard time on finding the download link for the pdf of the basic pattern. Is it free or do I have to pay for the basic pattern?
The basic pattern set can be found at the Free Downloads section. If you’re on computer, it’s in the side panel, while on mobile it’s located at the end of the page. 🙂 You just click the name and the download should start right away.
This is exactly what I’ve been looking for! I needed a starting point to make Barbie dresses, and this is it! I have to say I wasn’t completely satisfied with the shape of the bodice. I made a couple little tweaks to the pattern to fit the waist more and shrink the armscyes, and I also changed the bust darts out for princess seams. I hope you don’t mind! I’m going to be writing on my blog about the princess dress that I have planned. I am very grateful to you for the resource, as well as the helpful instructions for drafting skirts. I can definitely see a mermaid dress in my Barbie’s future. Thank you!
That’s great! 🙂 Yes, the basic pattern is not completely fitted. It’s made as a miniature version of an actual human basic pattern with some ease included. So you do need to make some adjustments when using the block for the actual patterns if you want to make fitted garments. I’ll have to check out your princess dress! 🙂
I am looking for a Barbie size dress mannequin. One that I can pin into. I have only found hard plastic types in Barbie size. Does anyone know where I can purchase one. Thank you.
I haven’t found one either, just plastic ones. Maybe someone else has been more lucky..?
Thanks for the tutorials. New to sewing but these are very informative. Your creations look amazing.
Welcome to the world of patternmaking. 🙂 It’s a perfect match for your sewing hobby.
cześć czy jest jeszcze możliwe otrzymanie wykrojów dla Barbie?
Yes, you can find the basic pattern set in the Download Free Patterns -section located in the side panel, or at the bottom of the page if you’re on mobile. 🙂