Summer is quickly approaching here in Milan, and that inspired me to write about skirts. Not just any skirts of course, but panel-skirts. I want to include more wearable designs in my blog and this is a perfect opportunity!
There are two ways to draft the pattern. You can either draw directly one panel, which is then repeated, or you can start from the basic skirt pattern and draft the panels on top of it. In my opinion, the first case works best when it comes to flared skirts and the second one is for the more slim-fitting designs.
Single panel -approach to panel-skirts
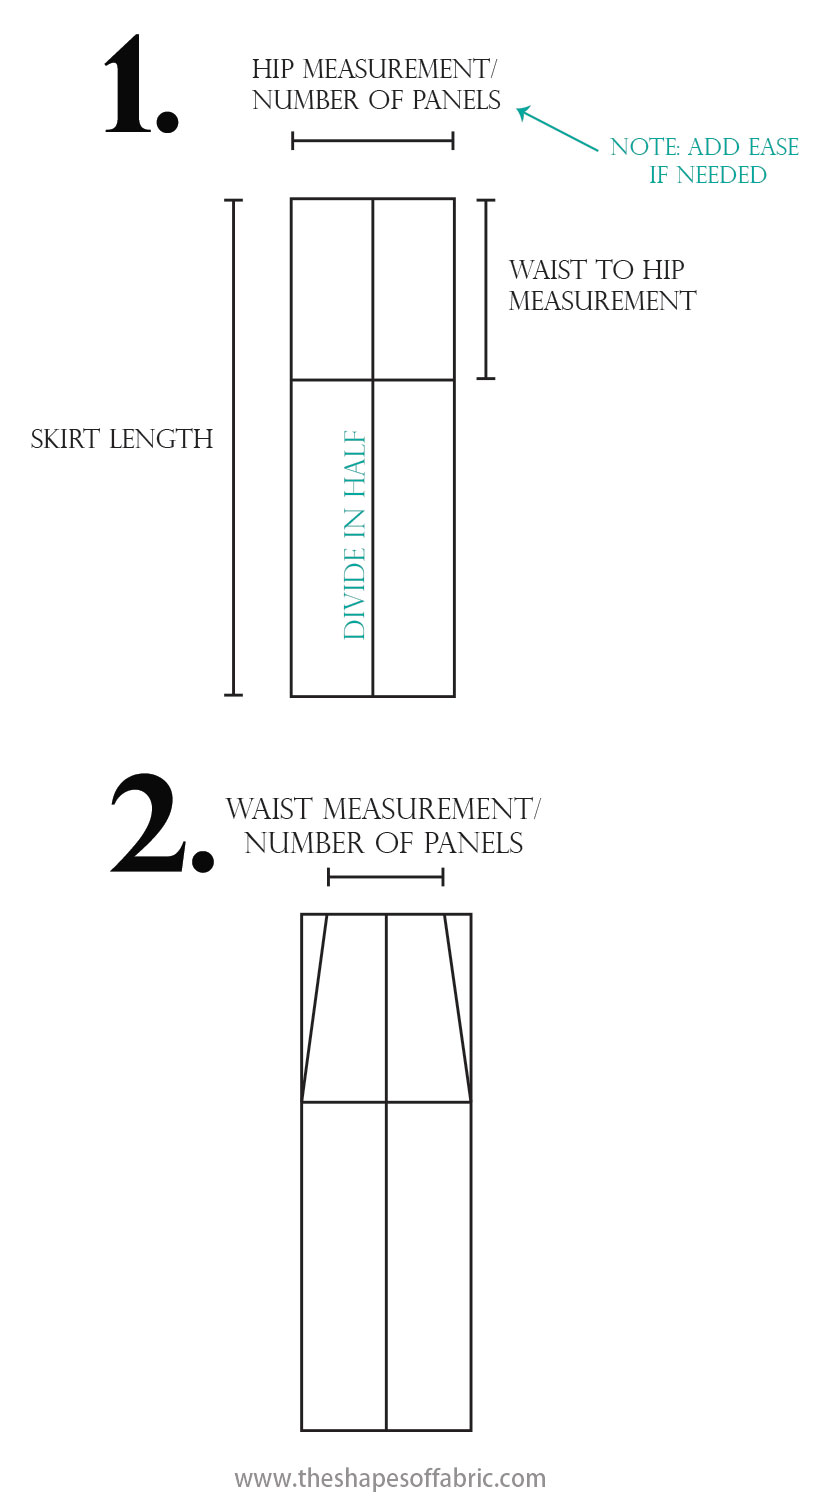
First you need to decide how many panels your skirt should have. Choose as many as you like -and are willing to sew. In my example, there are 6 panels.
The measurements needed are:
- waist
- hip
- the distance between waist and hip
- skirt-length
You might want to add a few cm (almost an inch) of ease to the hip-measurement unless you are using a stretch fabric.
Divide the waist and hip -measurements by the number of panels.
Now you have all the information needed for drafting the pattern.
Start by drawing a rectangle which has the length of your skirt and width of your hip-measurement and divide it lengthwise in two. Add the hip-line.
Mark the waist-measurement and draw lines towards the hip as in the picture. That’s your minimum-width for the upper-part of your panel.
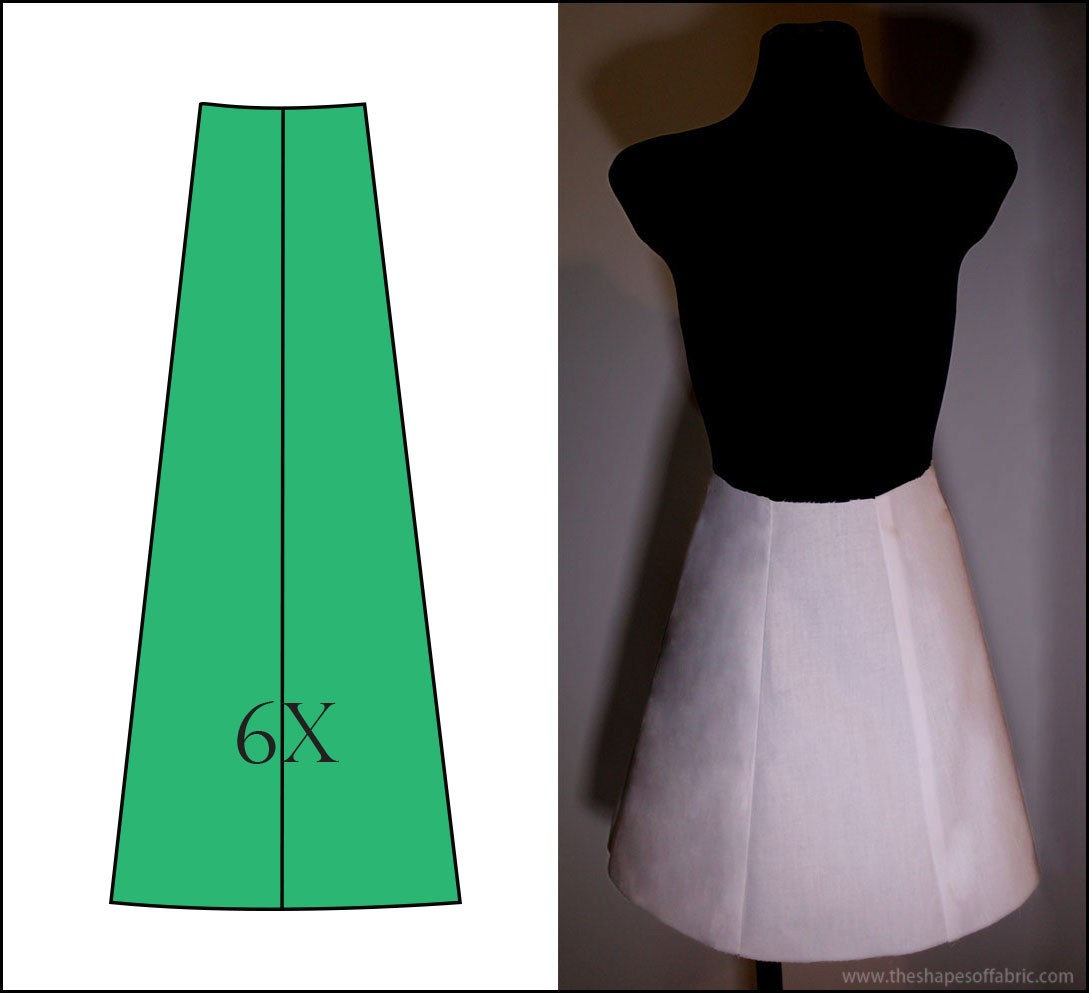
Now you get to choose the profile and width of your skirt. I drew 3 different versions.

Here’s how the above examples look like. As you can see, the first one doesn’t have much sense, unless dividing the skirt is a design-element. What I mean is that you could just as well draft directly an A-line skirt.
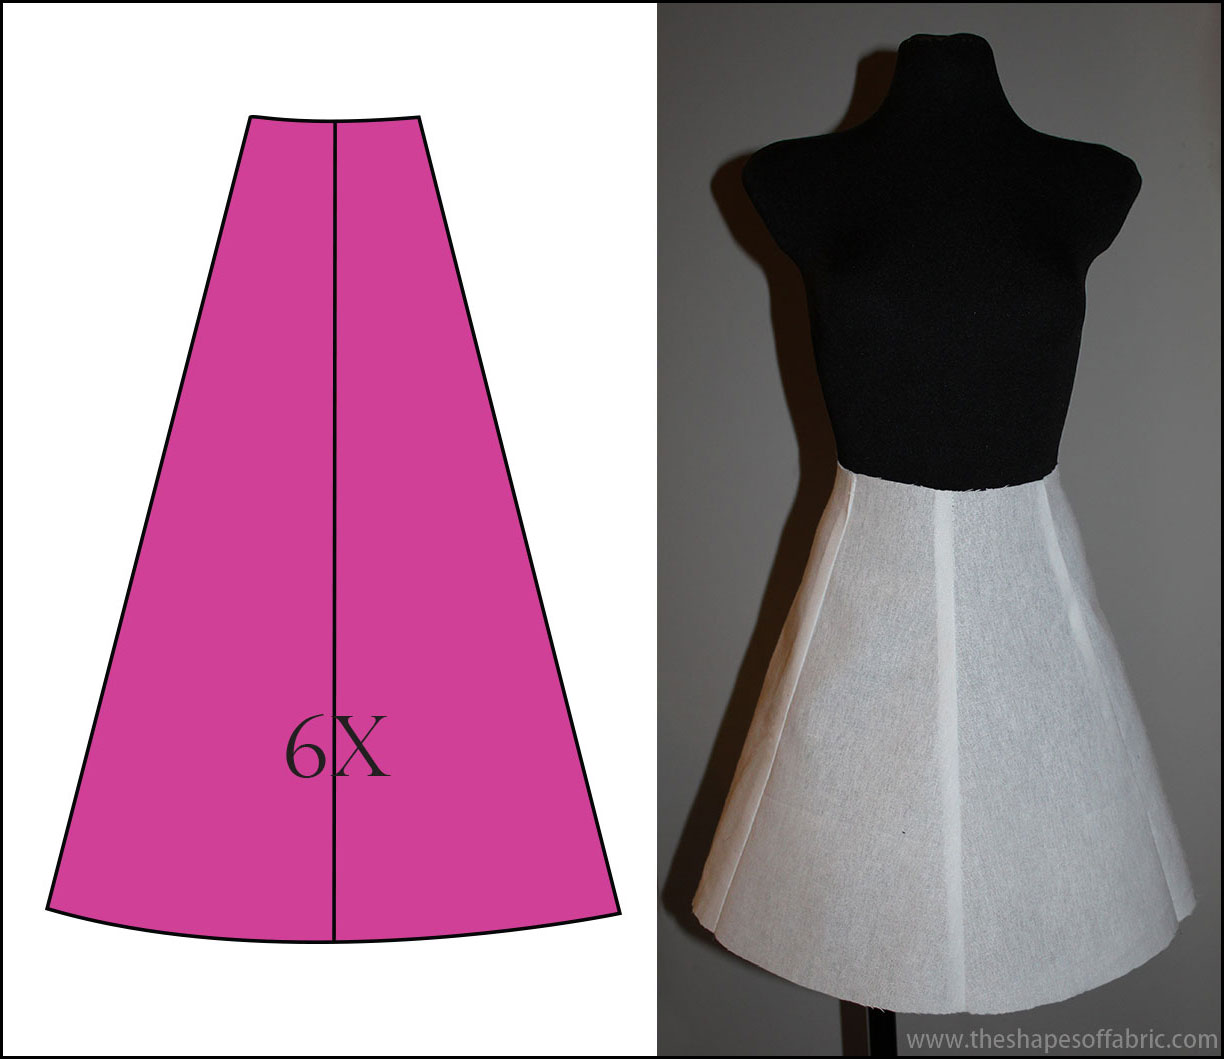
The second one has opening at the centre back, so you get a seam also at the centre front.
And the third one has a different profile thing going on.

This type of construction gives you so many alternatives! I’m going to stick to wearable designs and show you two more ideas for panel-skirts. Both have 8 panels.
These are a bit more tricky to draft. You can draft the distorted panels with the help of the basic panel. Trace two of them one next to the other and then draw the shapes on top like this:

Just remember to maintain the right waist- and hip measurements. And adjust both sides so that they can be sewn together (=they need to have the same length).
Here’s the twisted panel.
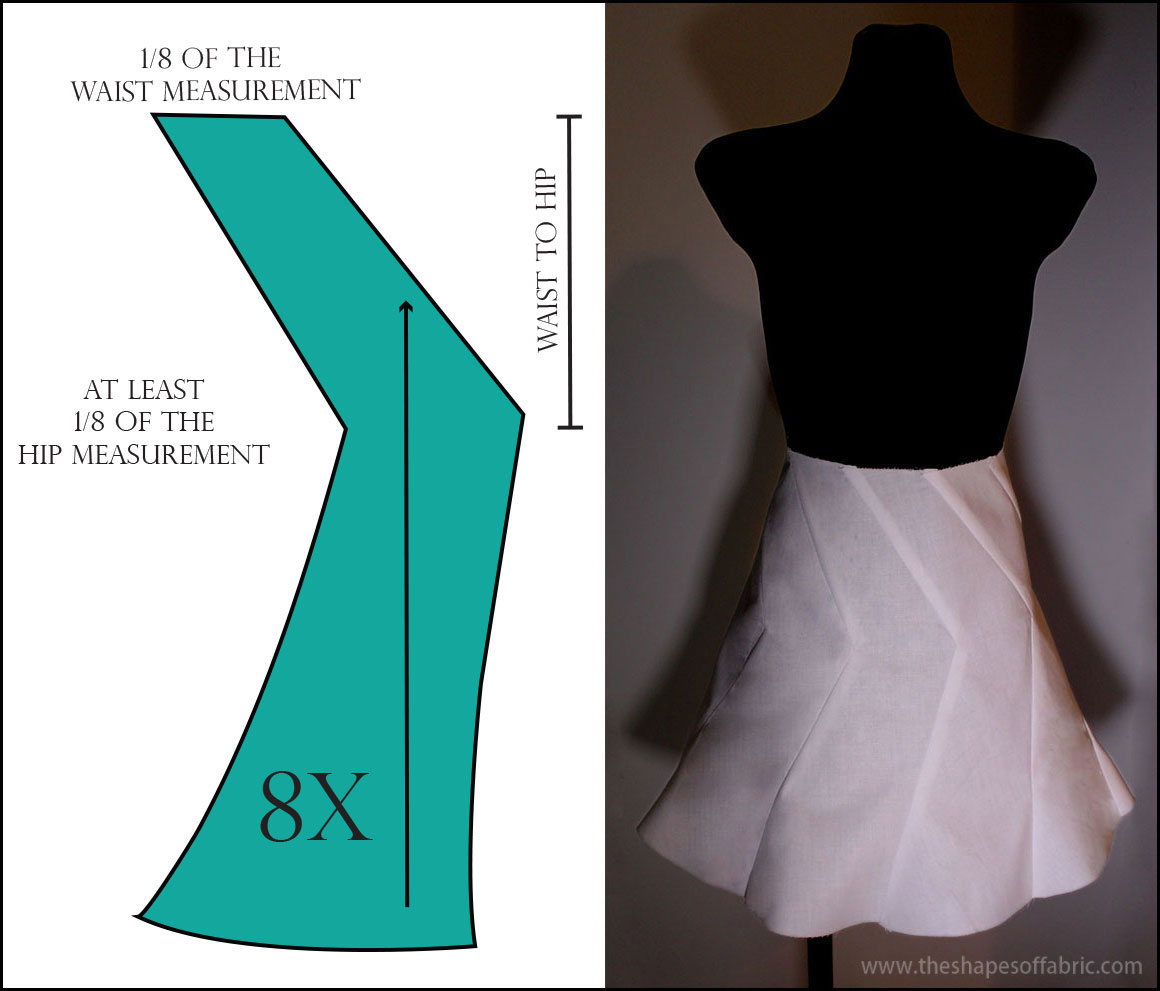
And the diagonal panel.

From basic pattern to panels
In this case the panels are the result of stylelines that separate them from the pattern. It’s a great way to get rid of the waist-darts. But this also gives you the opportunity to use a different fabric or add pleats or gathers to only some of the panels.
Pencil-skirt
You have probably seen pencil-skirts separated into panels. That’s my first example here.
At the base, there’s the basic skirt pattern.
I separated the panels absorbing the darts. You can move the darts if you think the central panel remains too wide or too narrow.
There’s going to be a kick-pleat in the back, so I marked the position.
The panel number 2 in the front will have some gathers.

Then I copied each panel and added a bit of volume with the slash and spread -method to the panel 2. I marked the area so it’ll match the panel number 1.
These are the final pattern-pieces:
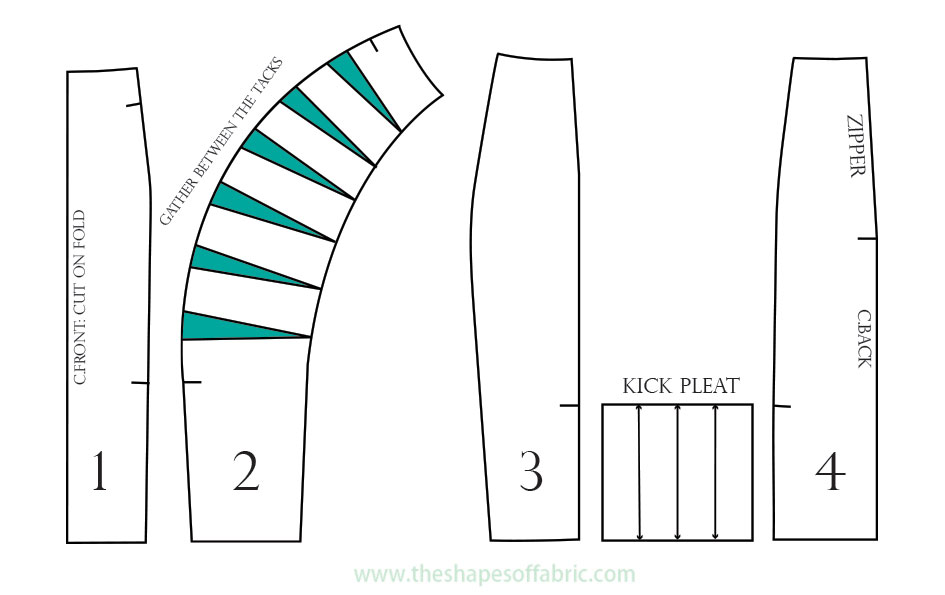
And this is the skirt:


Mermaid-skirt
My second example is also quite a typical design when it comes to panel-construction. It’s the mermaid-skirt (or however it’s called?)
This time there are 8 panels. Having all these seams in the skirt gives you more control over the fit and the shape. If you want to exaggerate you could even add godet’s in between the panels.
This is how I drafted the pattern starting from the basic skirt. I chose to make the backside a bit longer.
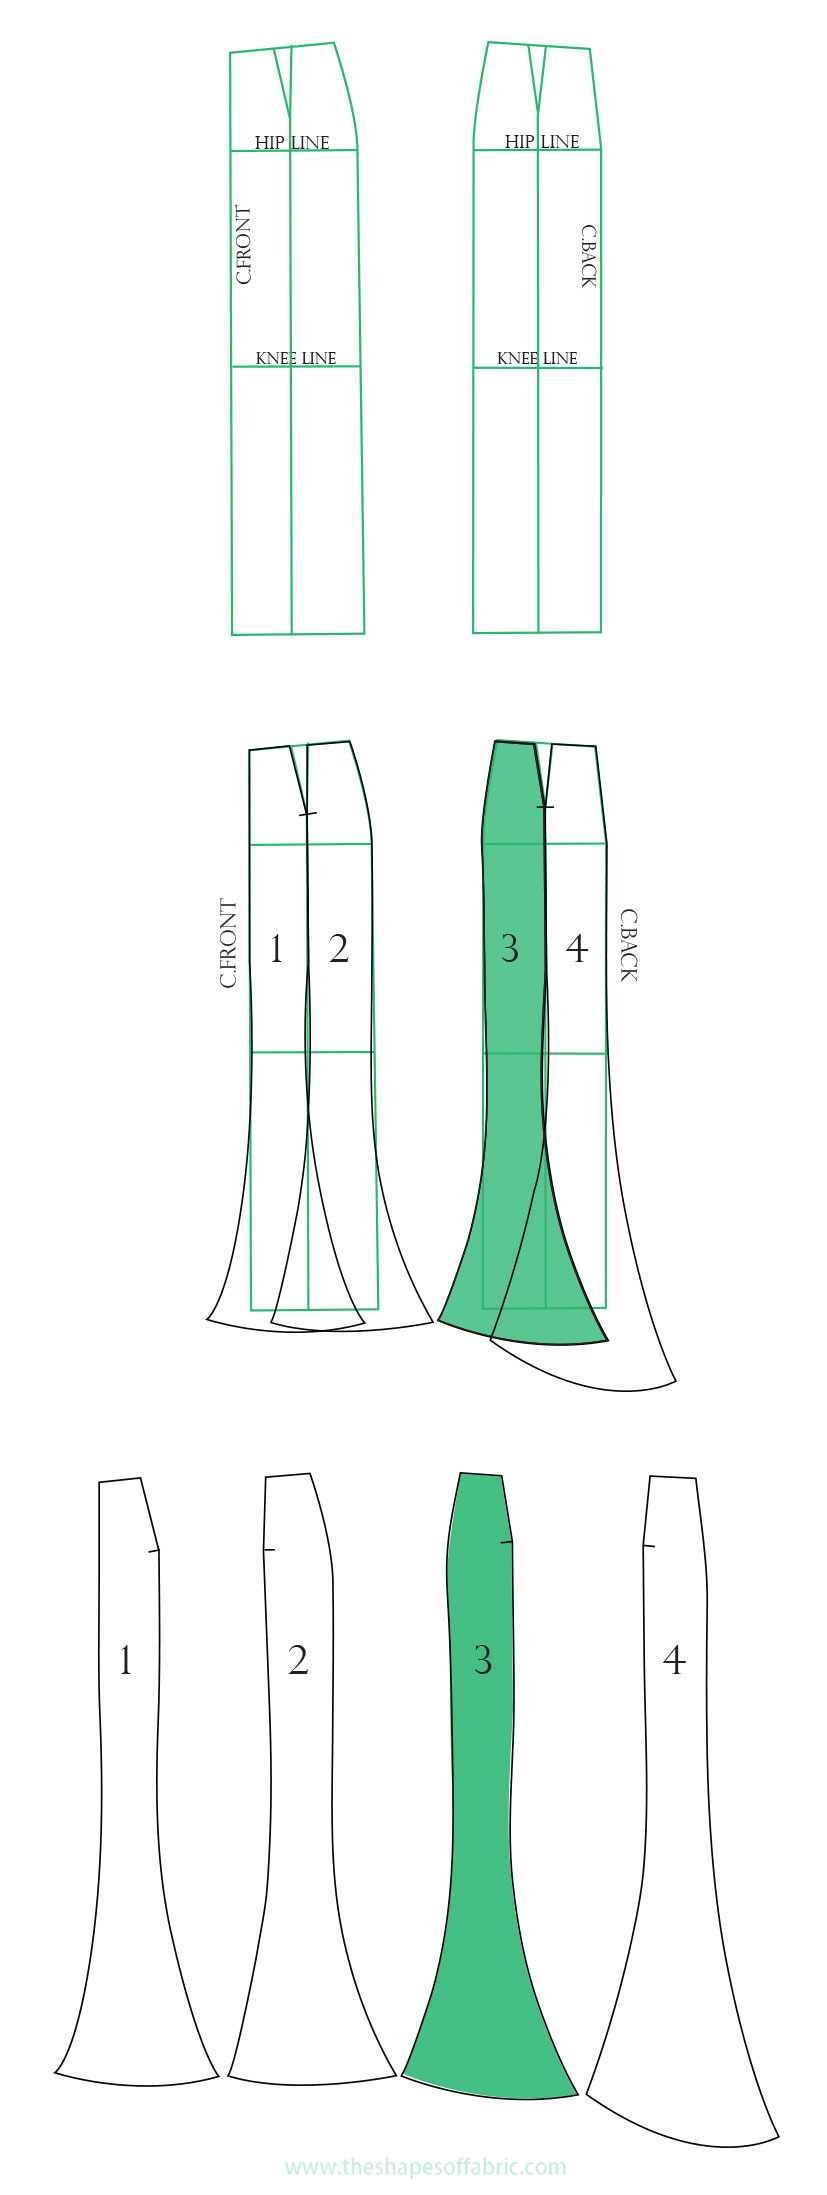
Just remember to measure how much space you need to walk, so that you don’t make the skirt too narrow at its narrowest point, right under the knees. Here too it helps if you have a stretchy fabric.
You can give the final shape to the ”tail” after you’ve copied all the pattern-pieces. To get symmetrical patterns from knees to the ground, you can first adjust one side and then fold the pattern in half and copy the shape to the remaining side.
Here’s the skirt:

This is where my tour on wearable panel-skirts ends, but I’m not done with the theme yet! Next time I’ll introduce some more sculptural designs that I’ve done using this versatile technique.
This tutorial has been updated on 7.6.20.
42 Comments
Mielenkiintoista nähdä, miten hänellä on monta 3D-olomuotoa.
Joo, toi 2-ulotteisesta 3-ulotteiseksi on kaavojen piirtämisessä mun mielestä se kaikkein siistein juttu. että jostain litteistä paloista saa tehtyä vaikka mitä muotoja. 🙂
it’s very good
Thank you! 🙂
Thanks so much. Your just a good teacher, you made it so simple and easy to understand. God bless you. ?
You’re welcome. I try my best. 🙂
Wow… Thanks for the illustrations. Made it very easy for follow and understand. Keep it up.
You’re welcome! 🙂 Happy drafting.
Didn’t understand at first how panel skirts come about but this is just very clear, thank you so much
I’m happy that you found it helpful. 🙂 You’re welcome.
Amazing HardWork of yours..Your Strategy of Teaching is Simple,Clear and Clarity…Thankyou Always
Thank you so much. 🙂 I’m trying to find the most simplest way to explain things so that as many people as possible will be able to draft their own patterns. Glad to help.
Thank you very much for this. You are helping me get better.
You’re welcome. I’m glad to help!
Thank you much.Still learning.It took me 2 hours to master this pattern.You made it simple.
You’re welcome! 🙂 That’s a great start. You’ll soon be making more complex patterns.
Your patterns and illustration are so direct and easy to comprehend, suddenly I can cut and make pieces panel skirt. Good job ??
And I’m glad to have helped you that. 🙂 Thank you!
Thanks for this tutorial. Please how do you cut and attach the lining for panel skirts?
You’re welcome. 🙂 For the lining you can either make the same panels, or if you can, unite some of the panels so that you have fewer pieces for the lining.
Vihdoin paikka mistä löytyy selkeät ohjeet hyvien demo kuvien kanssa miten säätää itselle sopiva hame T.T Kiitos paljon!
Eipä kestä! 🙂 Kiva että näistä ohjeista on apua niin monille. Kaavojen piirtäminen on tosi hyödyllinen taito jos ompelee vaatteita.
The best!!! Thanks so much!!
Thank You! 🙂
This information is really useful …thanks for it !!!!!!!
You’re welcome. 🙂
Hi, I’m a little confused as to why you divide the length by 2? Would this not make the skirt half the length/drop?
Hmm, you don’t divide the length, but the width of the panel in two. Just so that it’s easier to center the shape. 🙂
Thanks for the instructions!that’s very clear. May you explain how can i add zipper on the twisted panel skirt?
You’re welcome. 🙂 The zipper will have to be inserted in one of the seams in the back, although that means that it won’t be centered nor vertical. It’s probably best to choose an invisible zipper so that it doesn’t matter.
Awesome tutorial😀. Can’t wait to make my first panned skirt!
Thank you! 🙂 Happy sewing!
You’re absolutely the best teacher in the world! Congratulations for jour job
How can you do make it so simply?
Congratulations!
Wow! Thanks so much. Really appreciate it. 🙂 I guess I’m just so full of questions myself that it’s easy to imagine what someone would ask and try to provide the answers already in the tutorial.
Thanks for your posts! I have shared your website with friends in Vanuatu. They love it as well.
You’re welcome! 🙂 Vanuatu? How cool! That’s literally on the opposite side of the globe from here.
TY! Have fashion design/drafting degree & quite frankly, you do a better job of teaching basic drafting/manipulation than any of my profs ever did. Your instructions & images are clear, concise, & complete without the extraneous detail that made drafting incomprehensible a lot of the time in uni. I read your blog out of general curiosity at first but return repeatedly to admire the way you teach.
Wow! Thank you so much. 🙂 To be honest, I don’t have any live teaching experience. I’ve just been a very curious student myself, full of questions, so I guess that helps!
Hello and thank you for all the inspiration! I made the diagonal panel skirt for me and it came out really well, I had to make two more for my daughter and for my sister-in-law.
Now I wanted to sew the twisted panel skirt. But I can’t sew the panels together without creating a small pleat at the “twist” where the seam changes direction.Any recommendations how to sew these panels together would be very welcome. Thank you in advance from the Bavarian Forest, Germany.
Hi Nina. 🙂 You’re welcome. I think the issue could be due to the seam lengths being different between the pieces. I made this tutorial several years ago but I seem to remember that happening with this particular design. So, you just need to adapt the lengths at the pattern-phase so that they match.
This is so useful thank you!
You’re welcome. 🙂