As the third season of the Netflix series Bridgerton is about to come out (May 2024), I decided to draft a few Bridgerton-inspired dress patterns and make a tutorial about them.
I’m dedicating this month to 1/4-scale patterns, so all the samples in this tutorial are also in 1/4-scale! I included a basic bodice pattern for you to download in the Free Downloads section by the way, in case you want to try making tiny dresses, too.
Rather than attempting to copy the exact dress designs from the show, I took a slightly different approach: I found the most frequently repeating features and mixed and matched them. This way, you can make all kinds of different Bridgerton-inspired dresses. Just switch up the features and fabrics.
For the purposes of this tutorial, you won’t see any lace or beaded embroideries even though it would make the dresses look more similar to the originals. After all, I’m never going to wear the dresses myself (for obvious reasons). So, I just used inexpensive polyester crepes, chiffons, satins, brocade, and taffeta. I think that the fabric plays an important part, so if you want to make yourself one of these, do pick better fabrics! 😀
Bridgerton season 1 costumes were designed by Ellen Mirojnick, and season 2 costumes were by Sophie Canale. They were inspired by Regency-era fashion, but with a twist. Yet-to-be-seen season 3 costumes are by John Glaser.
The Bodice
Observing the dresses in Bridgerton, the first thing we notice is that most of them have an empire waist. Let’s see how to draft the pattern. Use the basic bodice block.
- Let’s remove the little shoulder dart first by shortening the back shoulder seam by 1cm. Re-draw the armscye line and straighten the shoulder.
2. The empire cut should go just below your bust. Measure from your bust point down to find the correct seam height under the bust. The seam should form a continuous line between the front and back pieces.
Separate the upper section.
3. Rotate the bust dart so that you get one single dart at the waist. Don’t fill the gap yet.
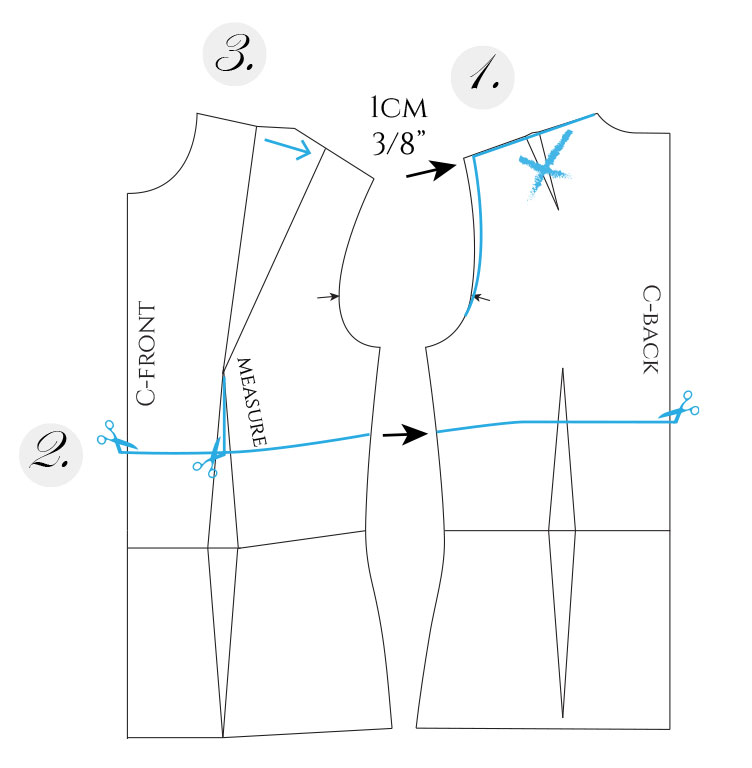
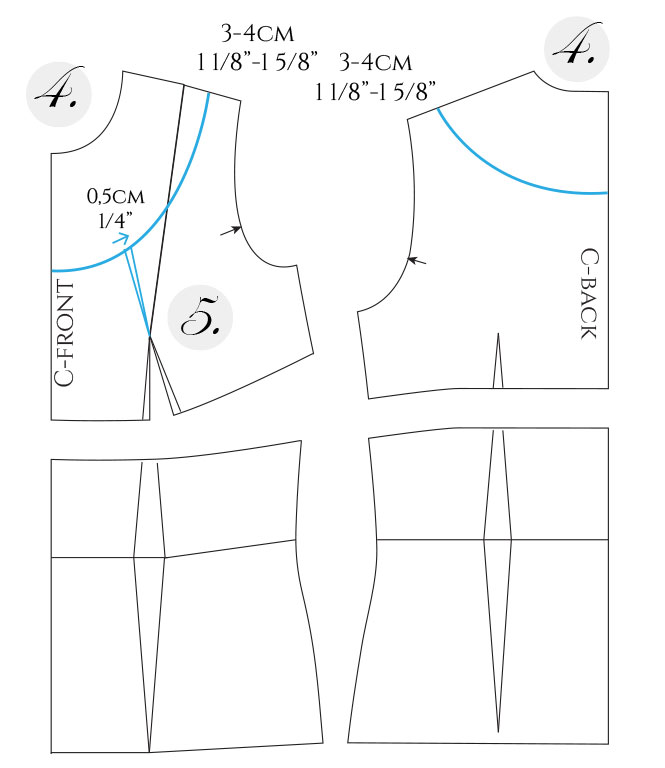
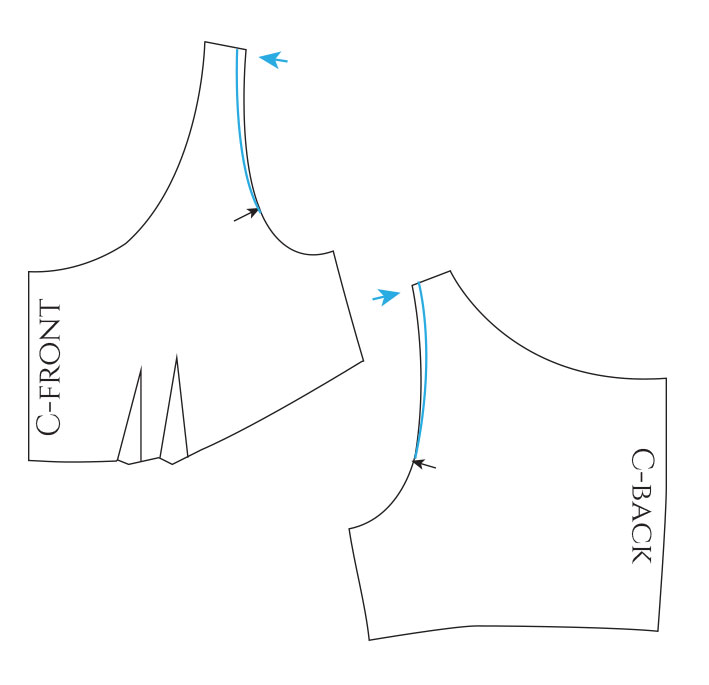
4. Then, there’s the neckline. Most of the Bridgerton dresses have this kind of large, rounded neckline that leaves a very narrow shoulder seam (3-4cm) You can draw it as deep as you want, both front and back.
As the back shoulder is slightly longer than the front, measure from the shoulder tip inward. Ensure that the new neckline forms a continuous line between the two pieces.
5. This kind of neckline often tends to gape, so draw a little dart at the neckline, with its tip at the bust point. Then close the dart and re-draw the neckline, if needed. Now you can fill the gap.
Bodice Design Alternatives
We have the empire cut ready. Next, we can add details. The front bodice rarely has a regular dart. It’s either two or three darts instead.
Luckily, this is an easy pattern alteration: Measure the size of the original dart and then divide the measurement between the new darts. When drawing the darts, the tips should end up about 2cm away from the bust point.
I noticed that many of the darts in the show actually go over the bust, which is technically a no-no. Probably it’s a design feature.
Cut the lower edge of the pattern with the darts folded to get the correct dart allowance shapes. Especially with slanted darts, you need to re-draw the waistline.
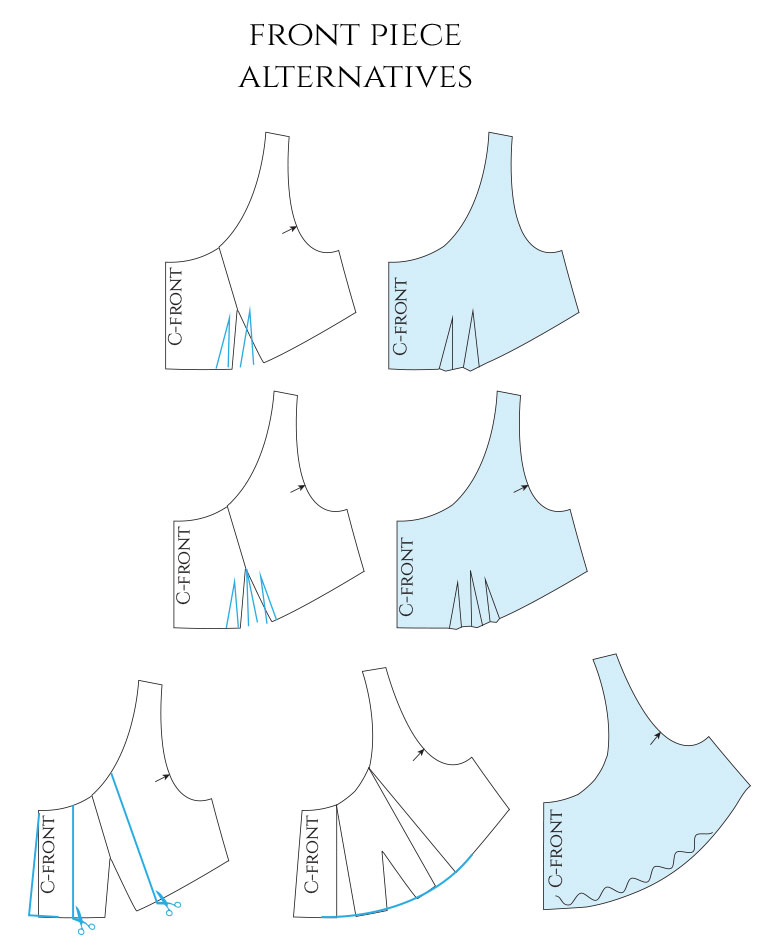
You can also add folds or gathers instead of darts. For example, if there’s a second layer in a transparent fabric on top.
Add more volume with the slash & spread technique, as shown. You can also add some at the c-front. This extra volume can then be arranged into little folds or you can just gather it. In the example below, I did folds.
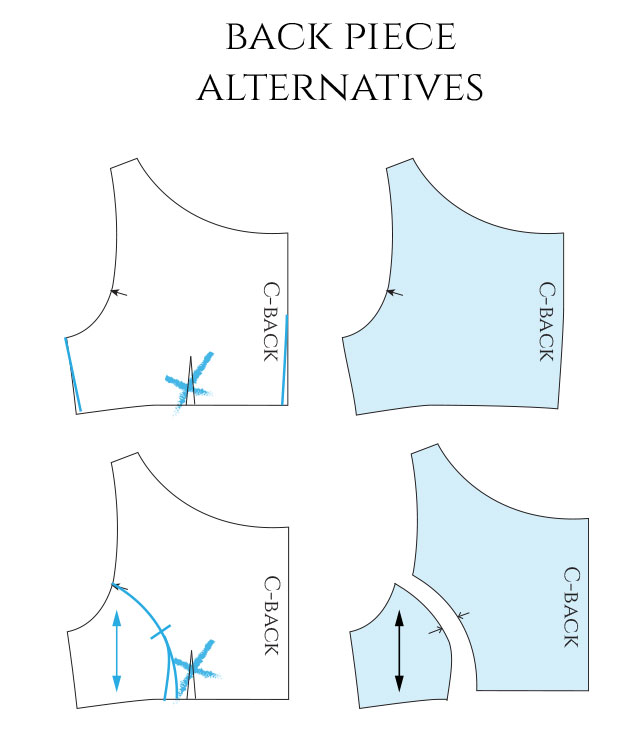
Also for the back side, you have a few design alternatives. The simplest version is to just get rid of the dart completely. It’s so tiny that you can remove half of it at the side seam and the other half at the c-back.
Another option is to absorb the dart into a princess seam. This creates a little side panel. You can move it slightly towards the side seam.
Copy the grainline and add a notch before separating the panel.
The easiest way to finish the neckline is to line the entire bodice. I recommend using the most basic version without extra darts and details.
The Bridgerton Dress Sleeves
Let’s talk about sleeves! These dresses all tend to have very short sleeves. I found the most used sleeve styles for you to pick from.
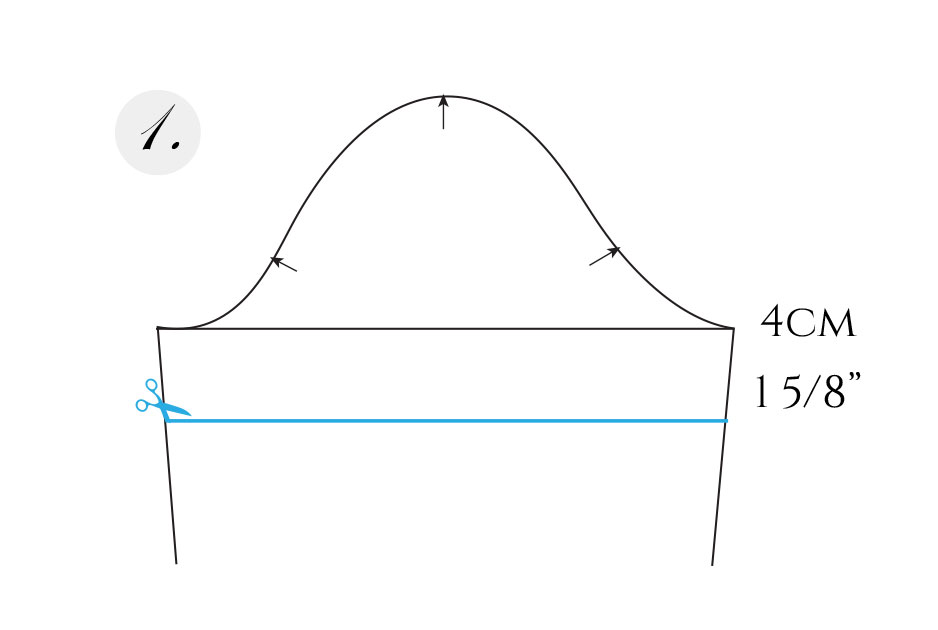
For the first set of sleeve styles, we have this short basic sleeve as a starting point. Use the basic block that goes with your bodice. In the examples here the hemline is 4cm below the bicep line. However, you could make it even shorter.
The Balloon Sleeve
This is probably the most popular: the little balloon sleeve. It’s mostly not very voluminous.
Therefore, I divided the pattern only into four sections and added 3cm between each. Then, re-drawing the sleeve cap, I added another 3cm at the top and 1cm at the hem.

Here’s what this sleeve looks like. You can also see the double-dart.
The Puff Sleeve
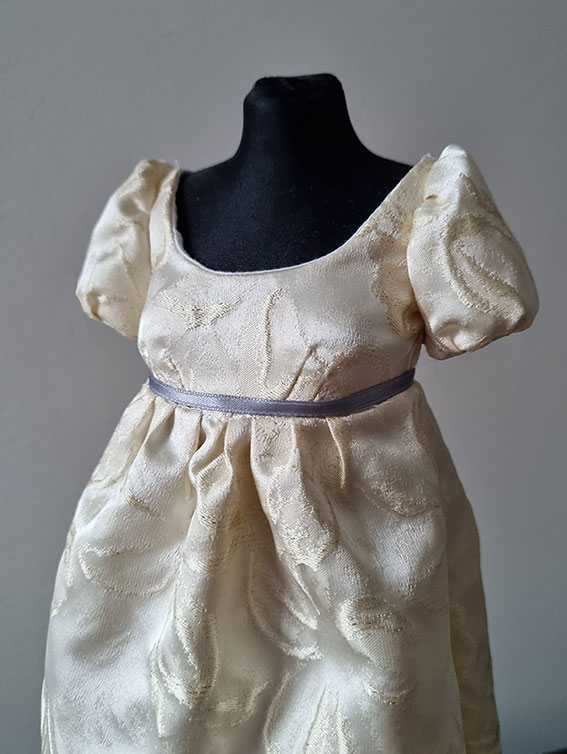
This is a variation of the previous sleeve and it has gathers only at the top.
This means that you slash and spread from the top towards the hem. I only added 3x 2cm. When you redraw the sleeve cap, raise it by 3cm.

Here’s the sleeve. You gather the area between the armhole notches to match the bodice armhole.
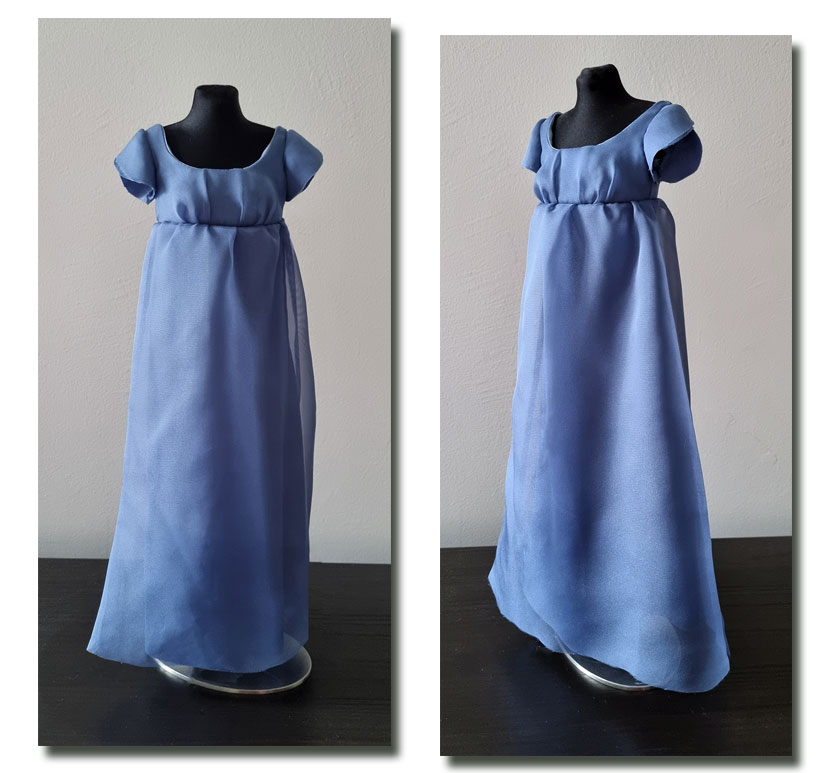
For this dress, I gathered the chiffon layer of the bodice. This is why you don’t see any darts. For later reference, the skirt chiffon has 100% of extra volume that I gathered.
The Bodice Armhole
Whenever you make sleeves with a puffed shape at the top, you might want to shorten the bodice shoulder seam slightly. Here the sleeves don’t have much volume, so shortening by 1cm is enough.
The Flutter Sleeve
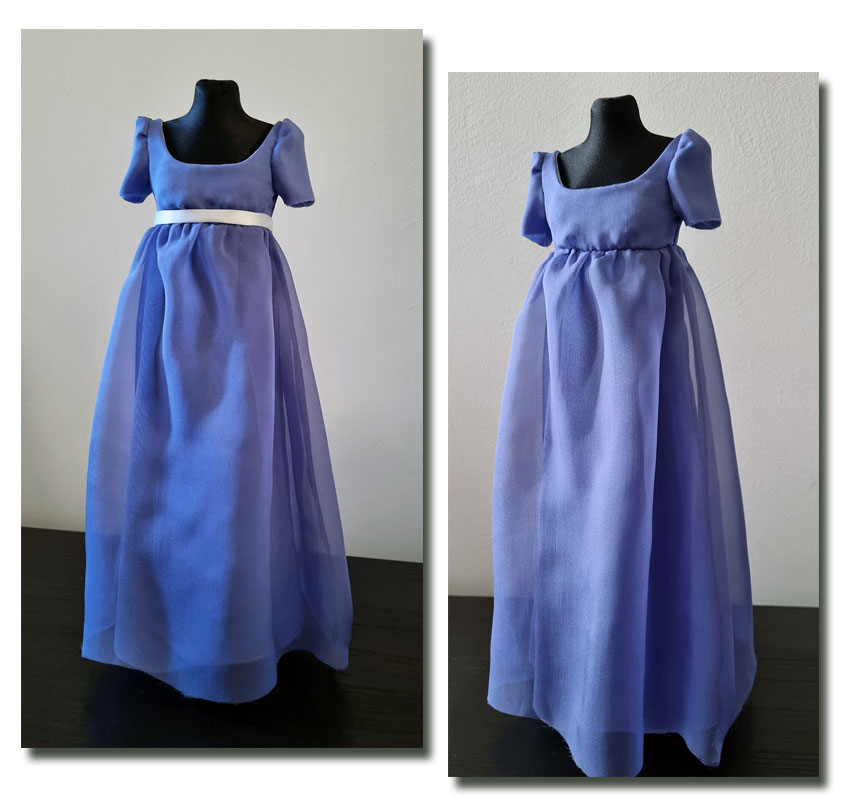
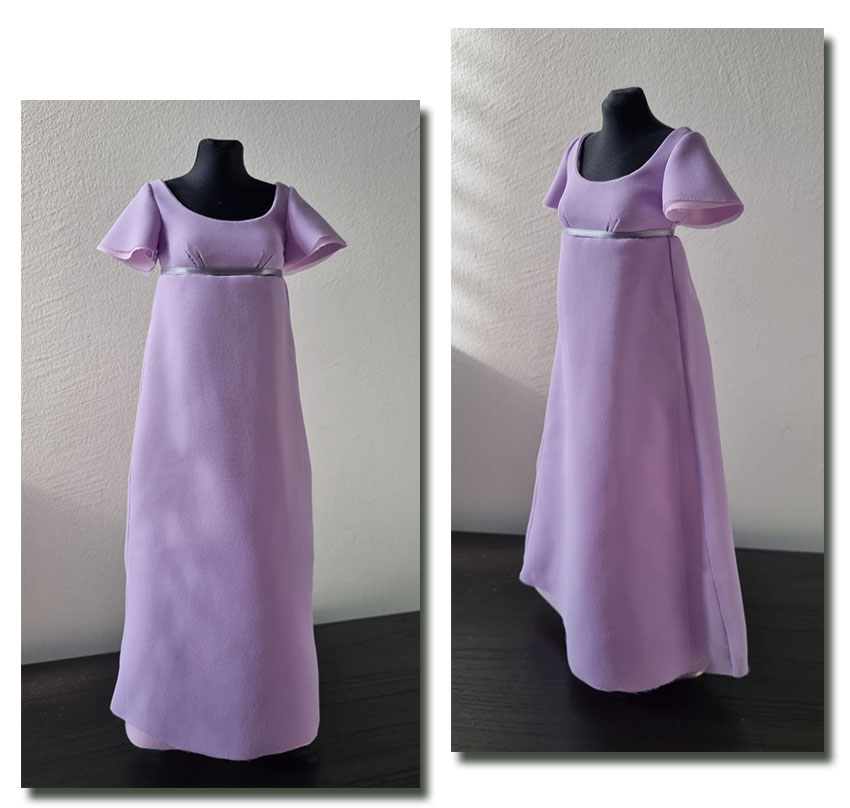
You can also see some flutter sleeves in the show. If you double the layers, making the top layer in lace or chiffon, these look really cute.
This time, I divided the sleeve into more sections between the armhole notches and added volume with the slash and spread method.

In quarter scale, the sleeve does not drape nicely. I made it in two layers: crepe and chiffon.
This is another example of the double dart. The skirt front is plain.
The Tulip Sleeve
The second season of Bridgerton had a lot of tulip sleeves. Here’s one version. It’s longer than the previous sleeves and it’s gathered at the sleeve cap.
Draw the shape directly onto your basic sleeve pattern, as shown. The back piece will remain on top. Trace the two pieces, marking a notch where the other sleeve piece ends. The front piece won’t have extra volume at the top so the pattern is ready.
Add volume to the back piece with the slash and spread method.
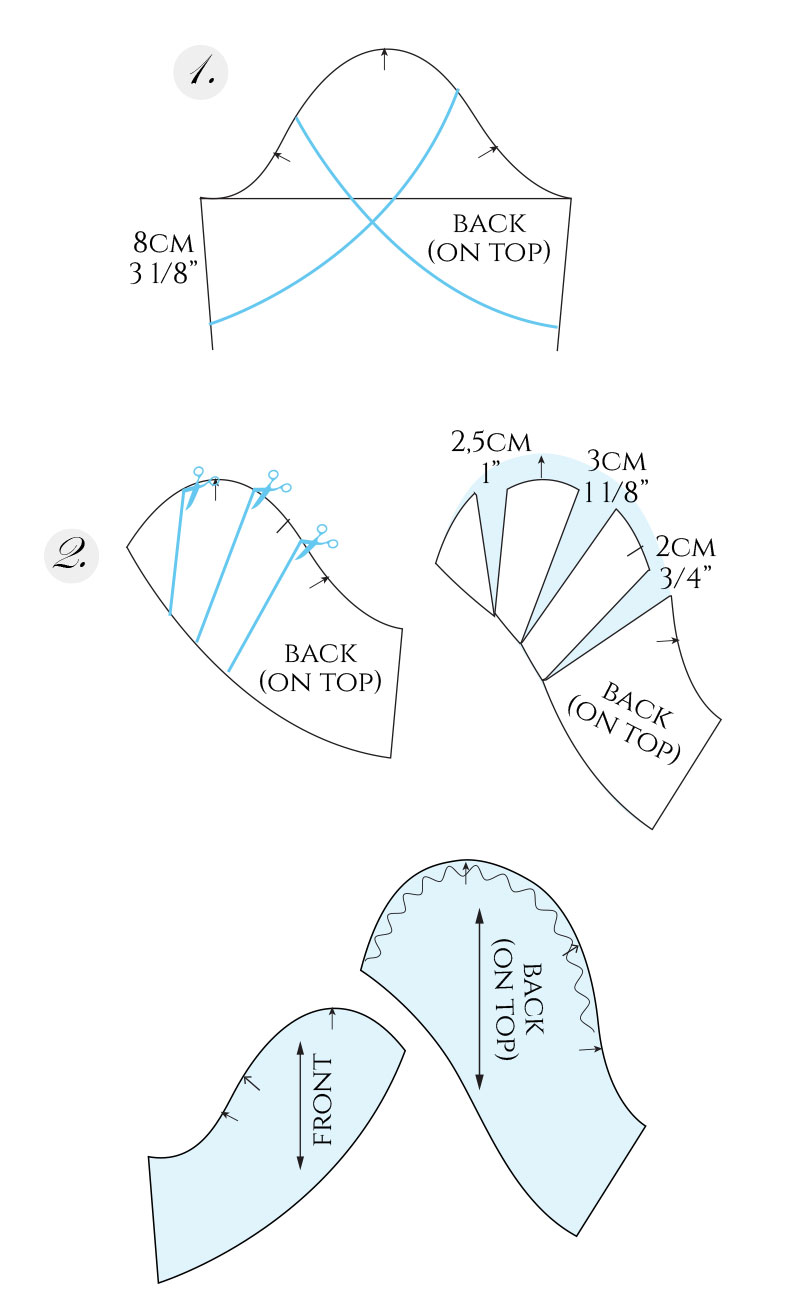
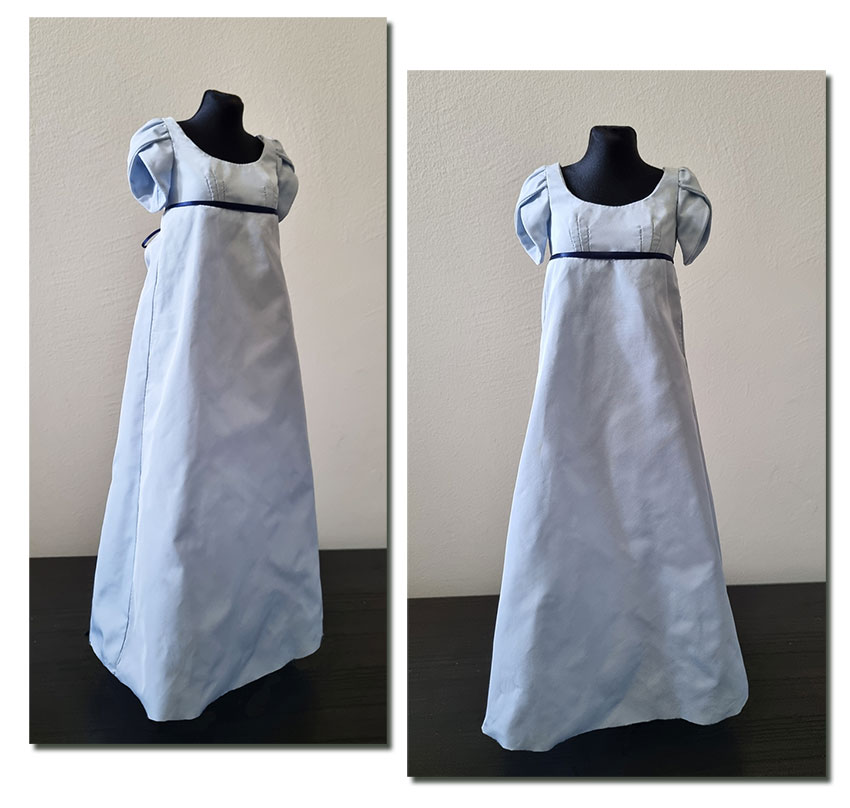
I cut two layers of each, as that way, it was easier to finish the hem. Here’s the sleeve.
I made the dress is taffeta. It has triple darts that I ended up sewing by hand because they very super tiny in 1/4-scale!
The Flared Tulip Sleeve
The second tulip sleeve version is shorter and slightly flared.
In this case, the front side will remain on top. Draw the shapes onto your sleeve pattern and trace the pieces, marking a notch where the other piece ends. We will then add a bit of flare to both hemlines with the slash and spread method. Add slightly more to the front piece.

This one came out very cute! It’s a double layer with satin and chiffon. The flare is quite minimal but just enough for the sleeve hem to open up.
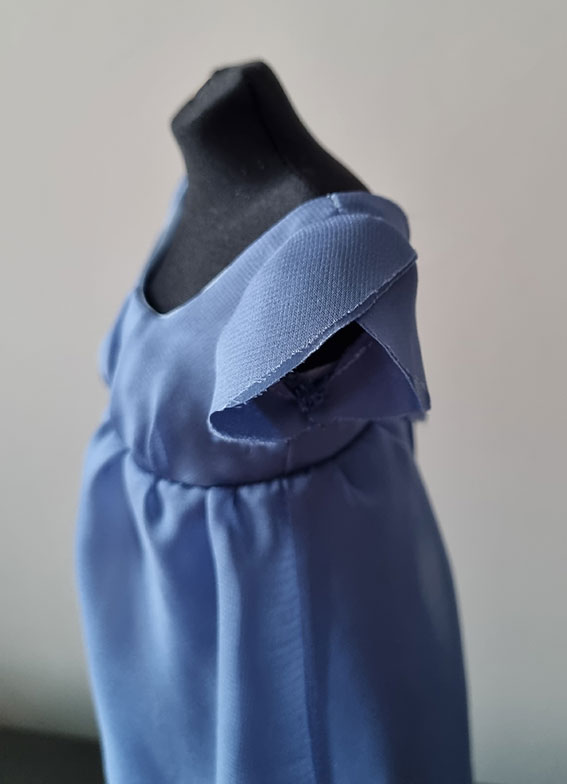
The Cap Sleeve
Finally, I present the cap sleeve. The pattern is very easy: the sleeve covers only the top section of the pattern, starting slightly above the armhole notches. Draw a curved hemline.
Measure how much above the armhole notches the sleeve starts and move the bodice armhole notches accordingly.
Then, add 2,5cm of flare with the slash and spread method in the center of the sleeve and re-draw the hem.

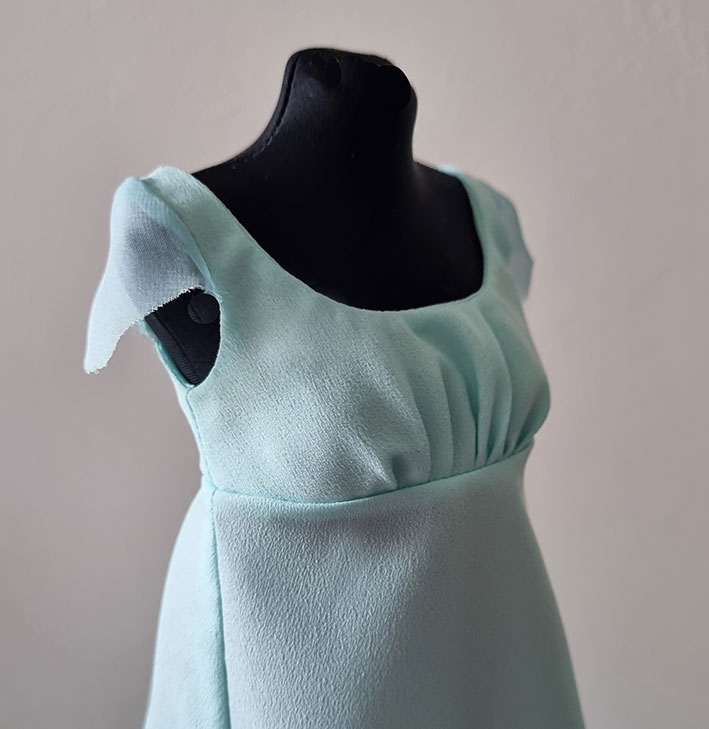
You can see this sleeve in an earlier picture where the bodice has folds. I made the sleeves in chiffon.
The Skirt Patterns
The Bridgerton-inspired dress is still missing the skirt. I have a couple of options for that as well.
First, let’s see how to draft the basic flared skirt to go with the empire cut.
- Take what’s left of the basic bodice and lengthen the pattern pieces until they reach full length. This could be floor length.
- Then, re-draw the side seams completely straight, adding some flare at the hemline.
- Draw a line where the darts are to add more flare using the slash and spread method.
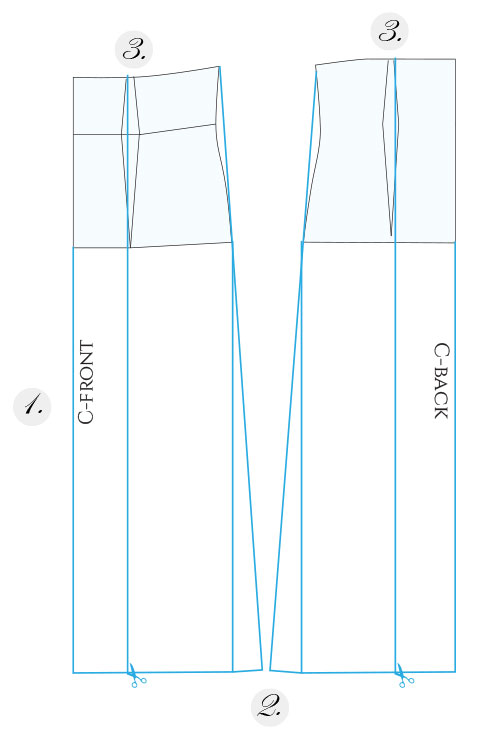
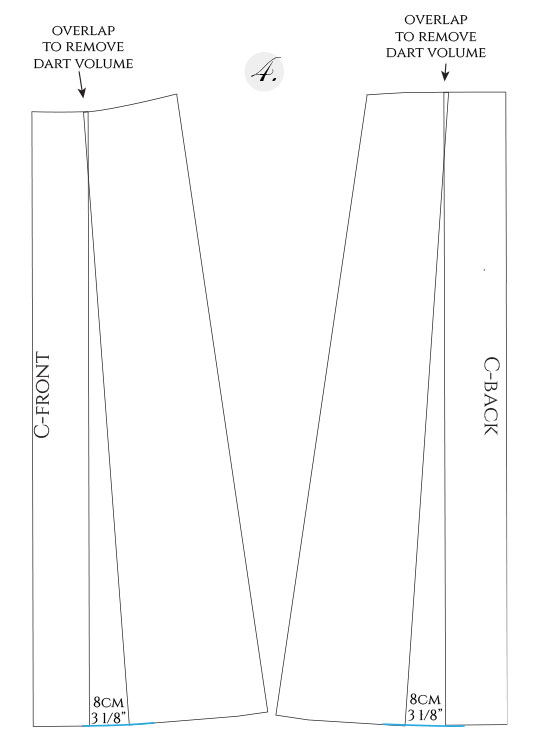
4. You still need to remove the dart volume at the top. To do this while adding volume at the hem, simply overlap the two sections at the top.
The Bridgerton dresses aren’t very flared. So, adding just 8cm of volume will be enough for the basic flared version.
Check the empire seam length to ensure that it will match the bodice pieces.
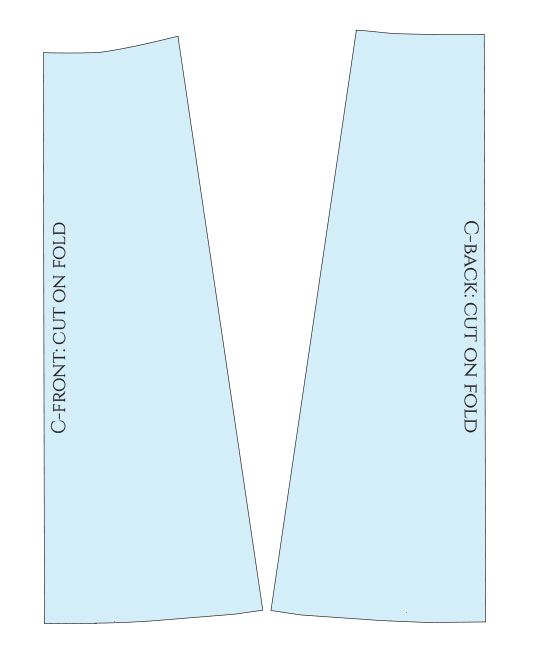
Here’s the final pattern. You can use it on its own, or you can add another layer on top with gathers, like I did. The flutter sleeve dress has this kind of plain front skirt. I think layering it with lace would make a pretty dress!
Adding Gathers
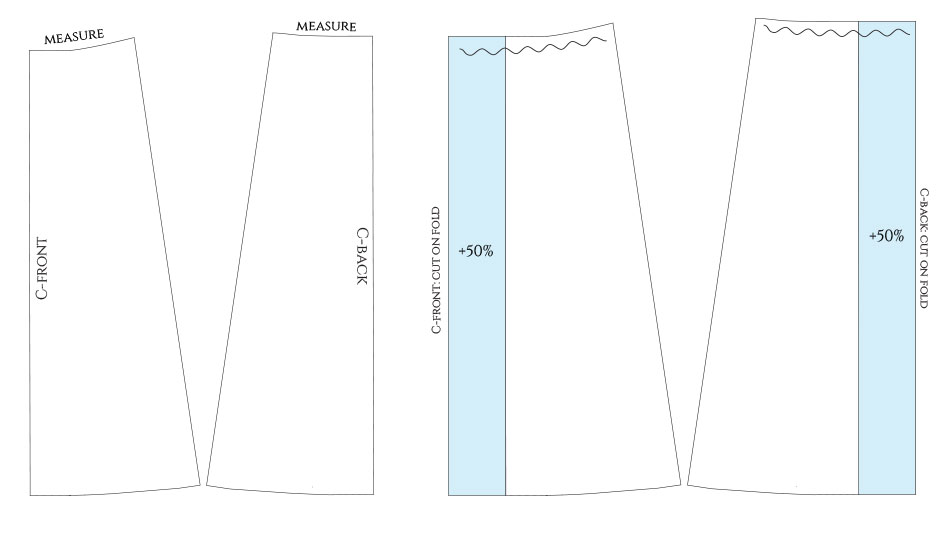
You can add gathers to the skirt like this: Measure the waistline and divide the number by 2.
Let’s say, the front waist measures 22cm and the back waist measures 21cm. 22cm/2 =11cm, 21cm/2 = 10,5cm.
Add the resulting amount of volume at the c-front (11cm) and c-back (10,5cm) of the skirt. This way, you add 50% of extra volume to be gathered.
For this dress, I cut a plain satin skirt and added a gathered layer of chiffon on top.
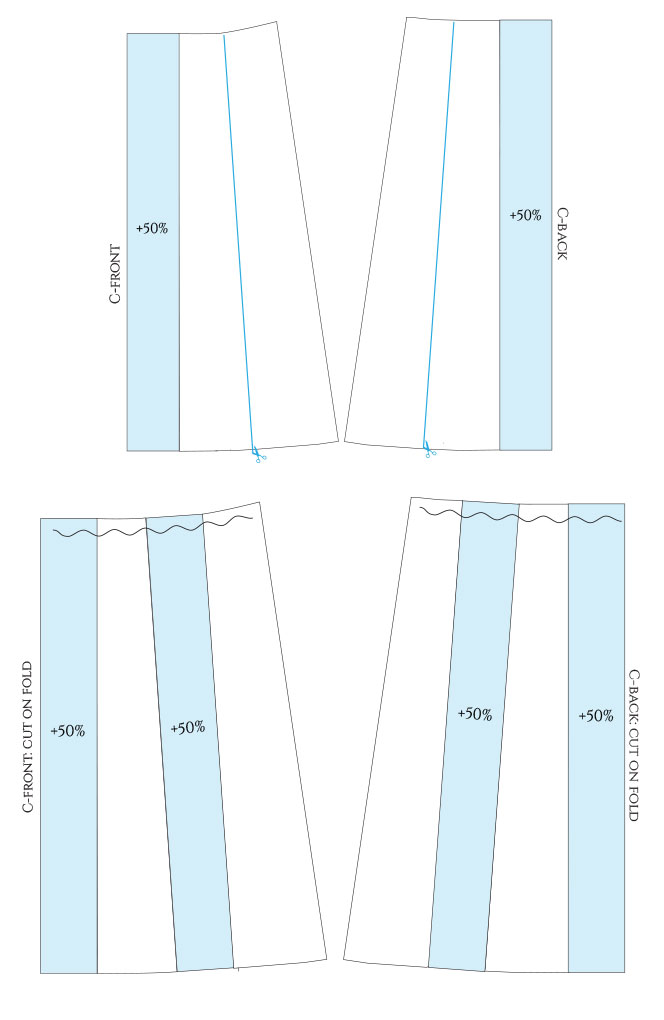
If you want a fuller skirt, you can double the amount of gathers by adding another 50% in the middle.
This was the dress with the puff sleeve example from earlier.
Pleats
Another option is to add pleats, especially to the back of the skirt.
Start by drawing lines where you want the pleats to go. To avoid creating overlap, leave enough space between the lines. For example, if the pleats will be 3cm wide, leave at least 3cm.
Then, add a pleat allowance at each line. It’s double the final pleat width. In this example, 3 + 3 cm =6cm. There will be three knife pleats and a box pleat at the c-back. As the piece will be cut on the fold, you only add half the box pleat at the c-back.
Add notches on both sides of each pleat allowance so that you’ll know where to fold.

Here’s an example with the pleats at the back. You can also see the princess cut of the bodice back.
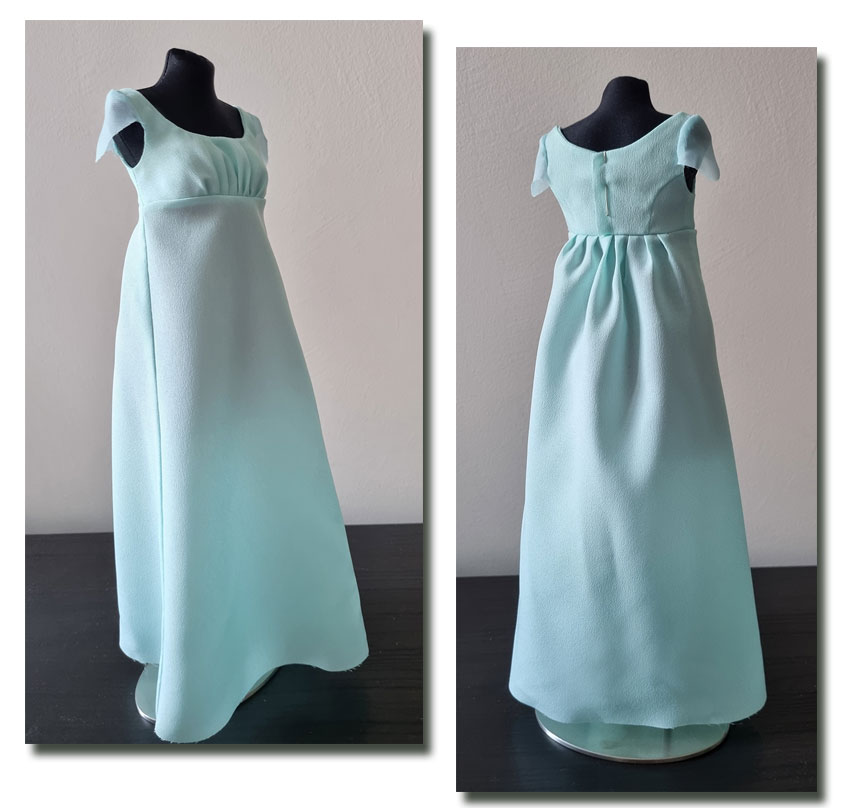
Usually the Bridgerton dresses seem to have extra volume at the back piece only.
Ensure that you have enough room at the empire waist to slip the dress on with just an opening at the c-back of the bodice. Alternatively, you can add an extra zipper at the side seam if you want to avoid having a seam at the skirt’s c-back. For my little mannequin, the dresses were quite snug but I did manage to slip them on.
So that was my collection of the most frequent features observed in the Bridgerton dresses (of seasons 1 and 2). Now you can make your own combinations and sew yourself a beautiful dress. 🙂
I’m curious to see the new dresses of season 3!


4 Comments
This is absolutely hilarious and super cute at the same time. What a fabulous exercise. I agree, not a look I’d wear either – Empire style is rather infantile. But I can see using some of these sleeves elsewhere!
Thank you. 🙂 Yes, the quarter scale seems to have the same effect as Barbie size: everything automatically becomes So Cute. 😀 I’ve heard there are Bridgerton-themed parties where everyone goes dressed up in this kind of clothing.
just stumbled onto your website via YouTube.
I’m loving looking through all these stunning shapes.
This Bridgerton article has got me wondering if you had any thoughts on how to create the sleeve othat wears Violet ( in a grey purple and a light green) in a couple of scenes in season 3, I keep seeing people asking and have been searching but it still baffles me ( I am very new to pattern making !)
I’ve made a Pinterest board with it on- I’ve added it on the ‘website’ section. thanks or reading x
Thanks so much! And welcome. 🙂 I had a look at the pin and I do have an idea. It’s all about adding volume around a hole but I think I won’t be able to explain this in words so that it makes sense. I’ll try to make a mini-tutorial for YouTube or Instagram.