It’s time for a new tutorial! This one is all about ruffles and will hopefully give you some ideas on how to add these beautiful details to your garments.
I was originally going to write one article that contains both ruffles and flounces, but as I started preparing the material, I realized it was too much. And so I had to separate the two.
You know the difference between ruffles and flounces btw? Well, ruffles must be gathered at the seamline, while flounces remain smooth. Usually ruffles consist of a straight rectangular piece and flounces have more like a spiral or round shape.
Some general tips
First of all, hem before you gather.
As for the types of hems, you have a couple of choices: make a normal hem by folding the edge, a rolled hem with serger or bind it with bias strip. But of course you could just leave a raw edge, too.
Here’s an example of the bias binding. It makes the waves of the hemline larger.

If you like a flare such as that but not the bias binding, you could add a fishing line inside the hem.
Just a few words on the gathering process. The easiest way is to stitch one row of long stitches with the sewing machine. But if you think the thread will break, you can always stitch 2 rows instead.
With particularly heavy weight fabrics you can enclose a cord by zigzag stitching over it like this:

Then pull the cord to gather the fabric. Once you’ve attached the ruffle, you can take off the cord.

There’s also such a thing as a gathering foot for the sewing machine.
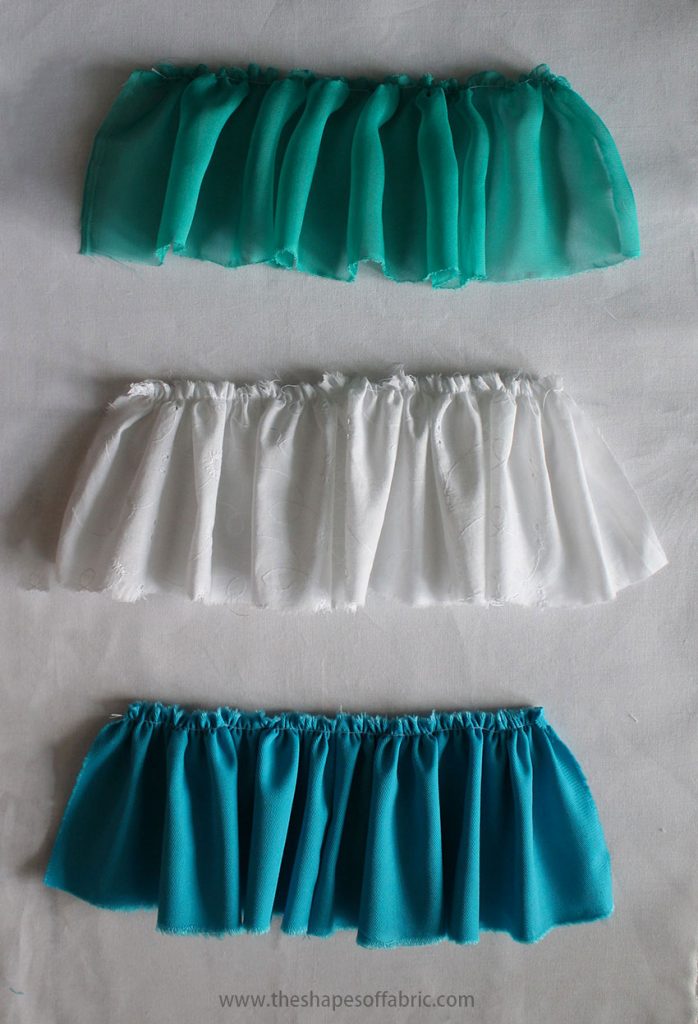
I prepared some ruffle examples and the 3 different fabrics you see are chiffon (greenish), light weight cotton (white) and medium weight cotton-polyester mix (turquoise).
Basic ruffles
Let’s start with the most simple case of ruffle; the one gathered along the upper edge.
Measure the area you want to place the ruffle. This will be the final length. Then decide how full you want your ruffle to be, and make the calculation. You could for example count 1,5 – 2 or 3 times the final length.
Then there’s of course the width of the ruffle. Just add a seam allowance, and a hem allowance if needed.

Remember to take into account your choice of fabric and the width of the ruffle. So, if you’re using a more heavy weight fabric, you might not want to gather it as much as a chiffon, because it would become really bulky. And a narrower ruffle will look more full at the hemline than a wider one even when gathered the same amount.
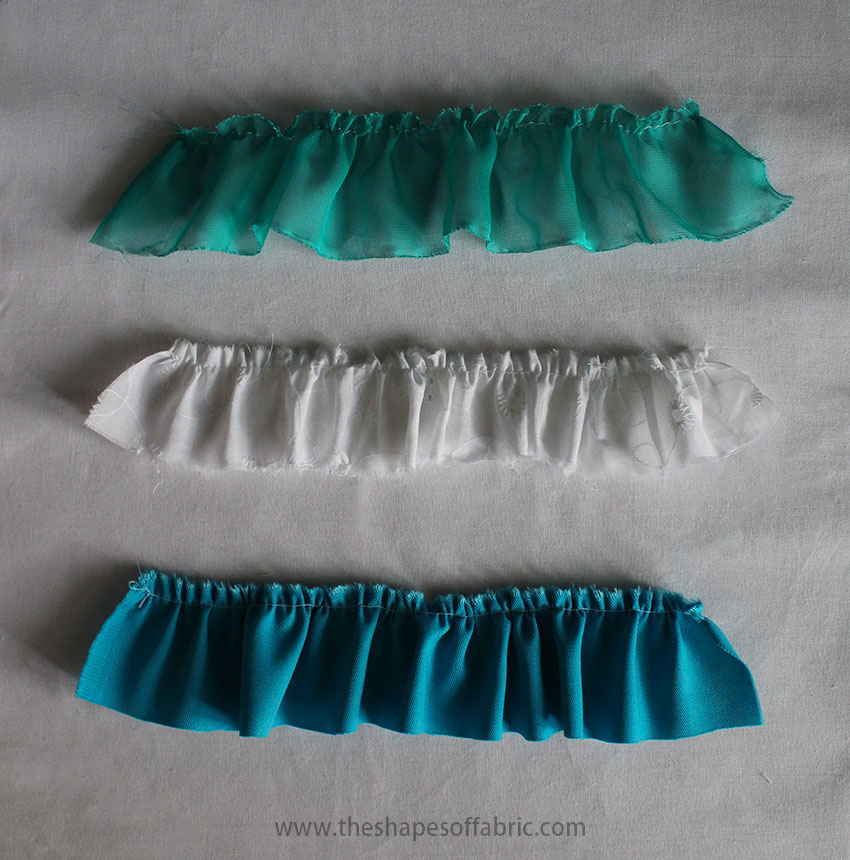
Here are my 3 example fabrics, gathered 1,5 – 2 and 3 times the final length. These ruffles are 10cm / 3,9in wide.


And here are their 5cm / 2in wide counterparts.

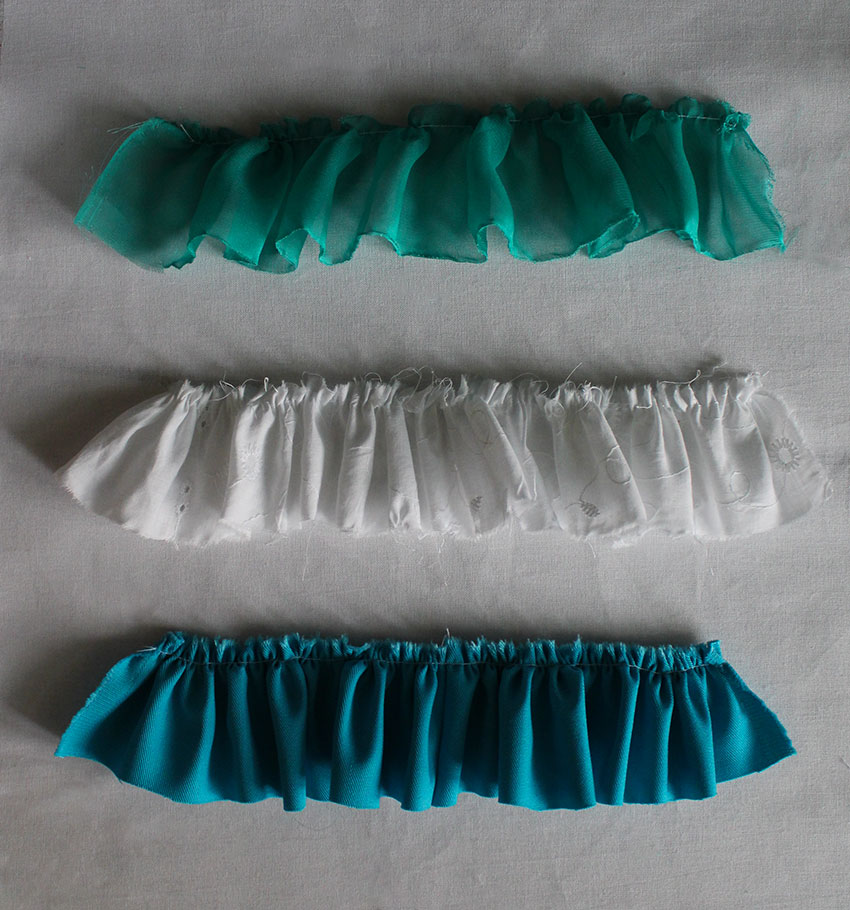
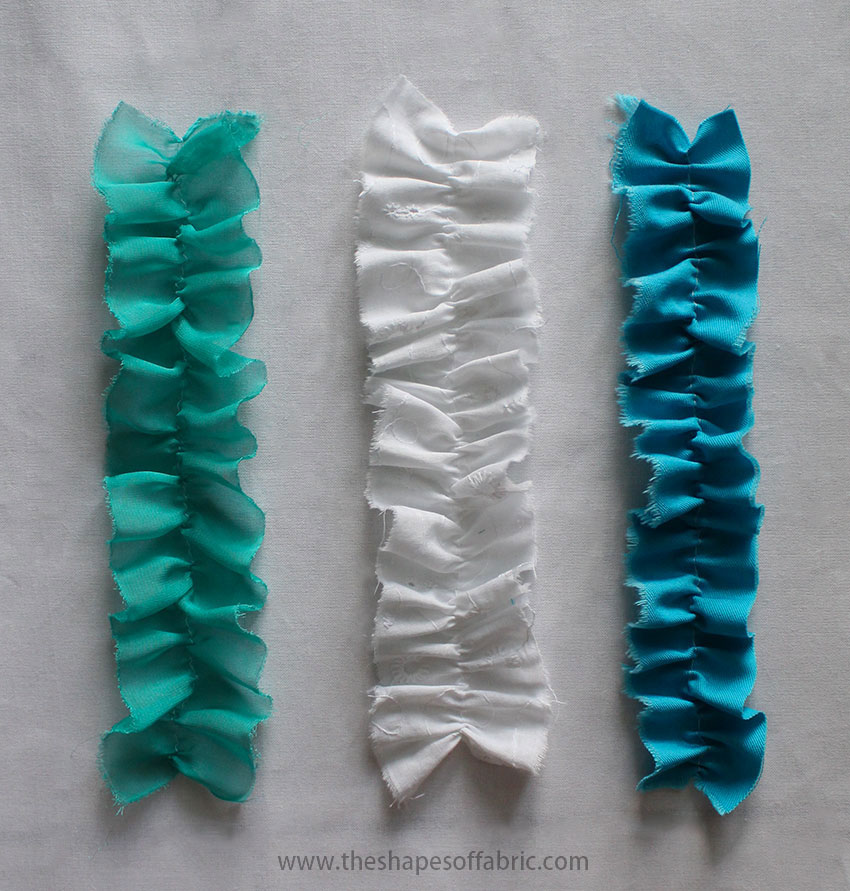
The rest of the examples will be done with 2x the final length -gathering.
Folded ruffle
Here’s a slightly different looking ruffle you can make simply by folding the strip of fabric in half. No need to hem it either!


Double edged ruffles
To make this one, the calculation procedure is the same as with the basic ruffles. Now you have two hemlines, but no seam allowance needed. This ruffle will be stitched and gathered at the centre.
After you’ve attached the ruffle, you can remove the gathering thread so you’ll only have one row of stitches in the centre.
Here are the examples in the 3 different weights.
Besides attaching these ruffles in single or multiple rows to decorate garments, you could also do spiral-shapes.

Double edged ruffle with a tuck
To make the previous ruffle more interesting, you could add a tuck to the centre.
You just need to add twice its width to the calculation. For example 4mm x 2 = 8mm.

When stitching, fold the strip of fabric in half and stitch at 4mm from the edge:

The result:

Pattern stitched ruffles
What if instead of stitching a straight line you do zigzag or other shapes?
Well, you’ll get a more interesting ruffle! Check out these ones and then try your own versions, too.


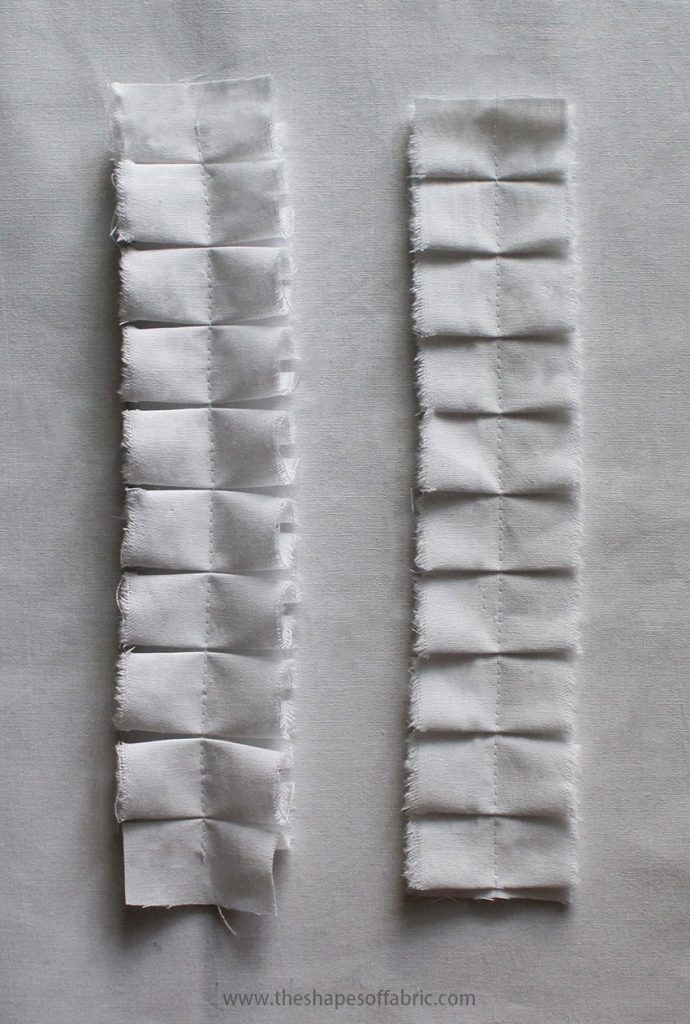
Double edged pleated ruffles
A rather different effect can be achieved by pleating the strip of fabric instead of gathering.
You have quite a few choices here. There’s the knife pleat and the box pleat, but you can also alternate between them or make knife pleats randomly.
I prepared 2 patterns for you, one for knife pleats and one for box pleats. I noticed they require 3x the final length of fabric.

For double edged ruffles the pleats will be stitched in place at the centre. But you could also make single edge ruffles and stitch on one side.
This is what the previous knife- and box pleats look like.
Here I folded the edges of the knife pleats to create chevrons. And next to it you can see randomly folded knife pleats.

Ruffles in practise
So far, the ruffles in this article have been just samples. I thought it would be nice to give you two examples on how to use the ruffles in practice. Here are 2 simple skirt projects you can try. They are based on the skirt patterns I’ve posted previously.
Flared skirt with a ruffle
Starting with the more simple example. This skirt will have a ruffle attached to the hemline.
You can take any skirt you have, measure the hemline and then prepare the ruffle. But that would be even Too easy. That’s why I decided to instead first eliminate the amount of ruffle-width from the skirt hem and replace it with the ruffle.
As a base, I’m using the flared skirt pattern you can find here.
So I want to have a 16cm / 6,3in wide ruffle at the hemline of this skirt, but maintain the same length it originally had. Here’s how to do that:
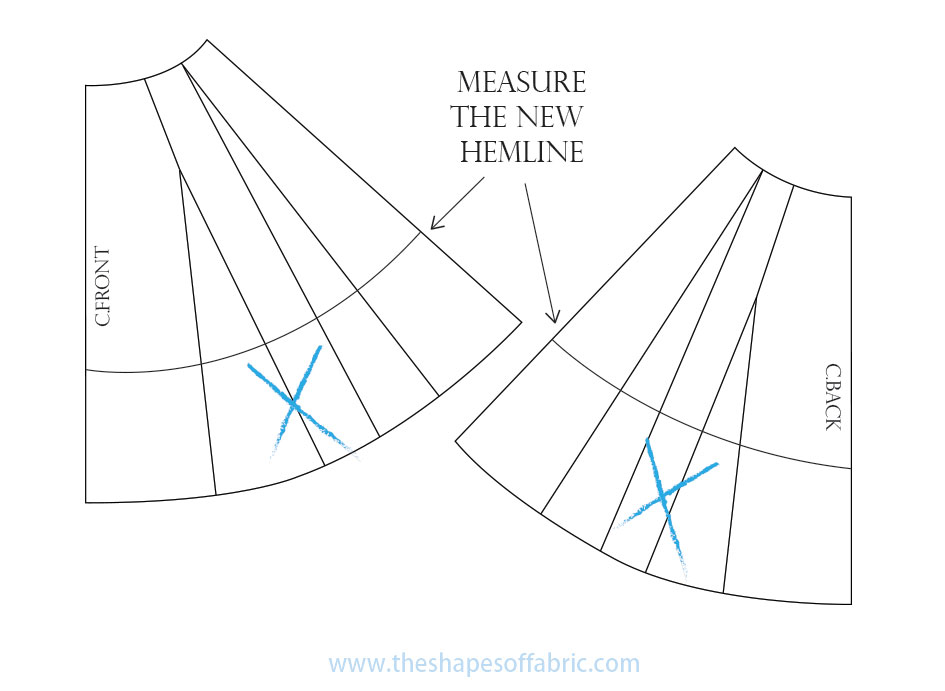
Once I’ve redrawn the new hemline, eliminating 16cm / 6,3in from the skirt length, I measured it, to know the final length of the ruffle.
The (whole) skirt front: 82cm x2 = 164cm
The (whole) skirt back: 76cm x2= 152cm
Then remains to be seen how the strips fit on the fabric. You might have to divide them into more pieces.
As for the width, I’d add 1cm / 0,39in of seam allowance and 1,5cm / 0,59in of hem allowance, making the ruffle strip 18,5cm / 7.28in wide.
Btw, if you find you have too much bulk at the seam line after having attached the ruffle, you can always top stitch it.
Here’s my resulting skirt.

Pencil skirt with a ruffle
This example will also show you how to use the slash and spread -method for creating ruffles. It’s how you need to proceed when dealing with irregular shapes. But also, when you want to have more fullness at the outer edge without having to gather so much (and create bulk).
To be honest, I’m not sure if this would technically be a ruffle or a flounce, but I’m going to count it as a ruffle…
You can start from the basic skirt block.
Copy left and right side of both front and -back pieces and place them next to each other like this:

Separate with a curved line the area you want the ruffle to be in. Add a few tacks so it’ll be easier to sew the pieces together and to arrange the gathers evenly.
Divide the lower piece into slices and separate each of them completely, but don’t mix the order. Add numbers if you prefer.
Then tape/glue them on another piece of paper leaving more space between the pieces at the lower edge. Re-draw both edges.
If you want more flare or gather, feel free to leave even more space between the pieces.
This is how the skirt looks like:

Check out also the gypsy skirt here. It’s a perfect example of a ruffle skirt.
For more ideas on ruffles, here’s my new Pinterest board.
Next time it’s going to be flounces then!


39 Comments
Thank you for this beautiful tutorial.
Thank you!
You’re welcome! 🙂 Glad you liked it.
Thank You Minna, love your Blog and your greatness in sharing your work always 🥰
Wow! Thank you so much. 🙂 I’m happy to share.
Thank you for share your knowledge…your such a wonderful person!
You’re welcome. 🙂 Happy to share!
Gracias excelentes explicaciones en cuanto a volantes los pondré en práctica son muy prácticos y decorativos
De nada. Me complació compartir algunos consejos sobre volantes. 🙂
Wow thanks for sharing, the tips are amazing
You’re welcome. 🙂
Love, love these posts! So much inspiration! Thank you!
Glad to hear that. 🙂 Already working on the next one!
I began seeing at a young age but haven’t sewed much since my girls left home. I’ve been watching to see if there have been different and new ways of sewing to incorporate into my sewing. This article along with your dart manipulation article were some of the best I have seen. Thank you an I hope to read more of you articles in the near future.
Oh thank you so much! That’s good to hear. You’ll surely be seeing more articles. I have quite a few lined up to be prepared. 🙂
Good work….so lovely…..
Thanks. 🙂 Yes, ruffles are lovely!
Thank you for this piece
You’re welcome. 🙂
Pingback: Princess Dress for Barbie - Part 1: Planning - Creativity, Patience, and Hope
This was very insightful, thanks so much. Is there a way one can differentiate between a flared ruffles and a straight ruffles?
You’re welcome. 🙂 I’d say flared ruffles have less gathers, so they have less bulk at the seam.
Thank you so much for the detailed explanation and for the time you took to put all this together.
You’re welcome. I tend to be quite thorough although it means less frequent posts here. 😀
Please help me with lanter sleeves and bishop sleeves
Sure. 🙂 What seems to be the issue? Have you seen the stop motion videos I posted on my Instagram @behind_shapesoffabric? Maybe they’ll be useful? There are several sleeves in the videos, you just need to scroll the feed back a bit.
I’ve always been a huge fan of your work, but now I am doing a course in pattern drafting I appreciate it even more! Thank you for sharing your methods, it’s very inspiring.
Thank you so much! 🙂 I’m very pleased that my tutorials are useful and that you’ve decided to take a course in pattern drafting. That’s awesome!
Thank you so much for your post. It has been extremely helpful! Your structure and presentation are concise and practical. Amazing 🙂
You’re welcome! 🙂 I’m happy that I managed to present the instructions in an easy-to-understand way. That’s what I thrive for.
Thankyou so so much!!
I’m 42 and have just decided I want to fulfill my desire to TRY make myself some dresses, always loved watching project runway and making the cut and wished I knew how to sew. So I’m going to try to learn myself and while browsing questions on Google I found this site and glad I did!!
I’m complete beginner so knowing where to start is overwhelming as I don’t know the tools, nor anything about fabrics or terminology for any of it lol.
I will save this in my favourites
Thankyou again, your amazing xx
Hi Anouska and welcome to my world of patternmaking. 🙂 I’m glad that you’ve decided to learn how to design and make dresses yourself! It’s certainly such a rewarding thing to do. I have tutorials also for beginners. Usually it’s a good idea to start from skirts. Panel skirts and circle skirts don’t require drafting a pattern block, so you should definitely try those. Enjoy!
Hello, what a great website. It is really interesting to read. Can I ask you something? Can you explain the difference between ruffles and frills perhaps w/ pictures? It is really not easy to find in the www.
Best regards, Siegy
Hi Siegy. Thank you! 🙂 To be honest, I call them all ruffles. It might be because English is not my native language. It seems that a frill refers to a narrow strip of gathered fabric used to decorate a garment, whereas ruffle is a more general term. Then there are flounces that aren’t gathered. I have another tutorial on those.
If someone is more expert, please feel free to comment here.
Ahhh, this is exactly what I was looking for–thank you! I already follow you on Insta, and love your work, and just googling how much extra fabric I need for ruffles brought me here.
Aww, thank you! 🙂 Ruffles as pretty. I hope your sewing project was a success.
This tutorial was absolutely brilliant! I appreciated how you showed images of different weights and gathering rates based on the length of fabric used. Thank you so much for making such a comprehensive and useful guide.
Thanks so much! 🙂 My tutorials often tend to grow quite large as I find so many things I want to include. 😀
I just read through so many tutorials and this is the one that made the most sense. Thank you so much!
Very happy! 🙂 Thank you.