So last tutorial was all about ruffles. Now it’s time to talk about flounces!
While ruffles have to be gathered, flounces remain smooth at the seam line.
There are various ways to construct the flounce pattern and you’ll discover the how-to of each by going through this tutorial. I also added a few projects so you can see how to add the flounces in a garment pattern.
Circular flounce
Let’s see the circular flounce pattern first. You can make a full circle or a half circle, depending on the amount of flare you’re looking for. The pattern is pretty much exactly like that of the circle skirt.
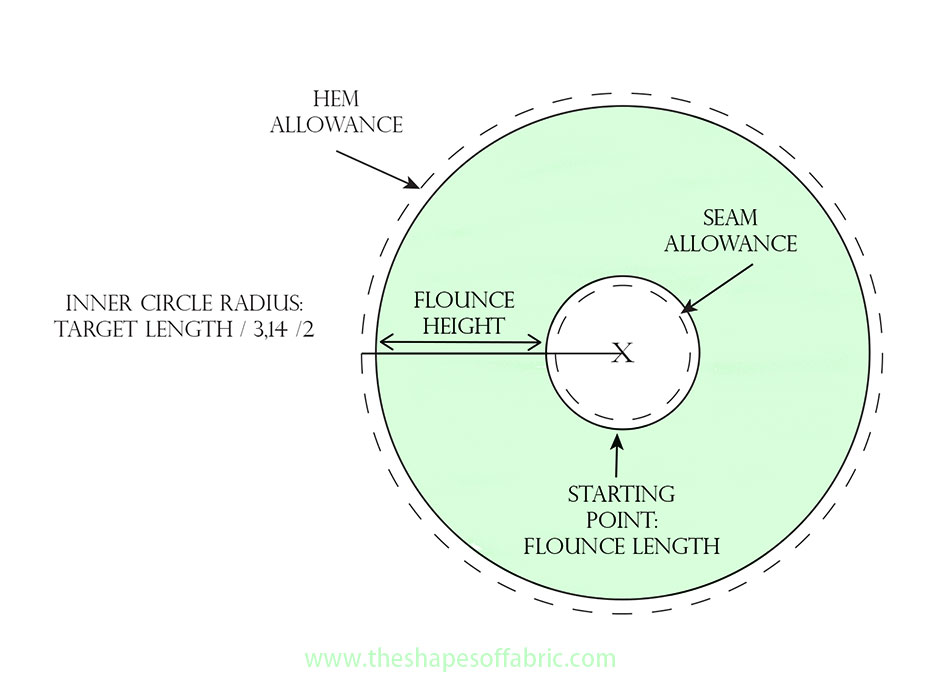
In the most simple case, the inner circle of the pattern is the flounce length.
The calculation
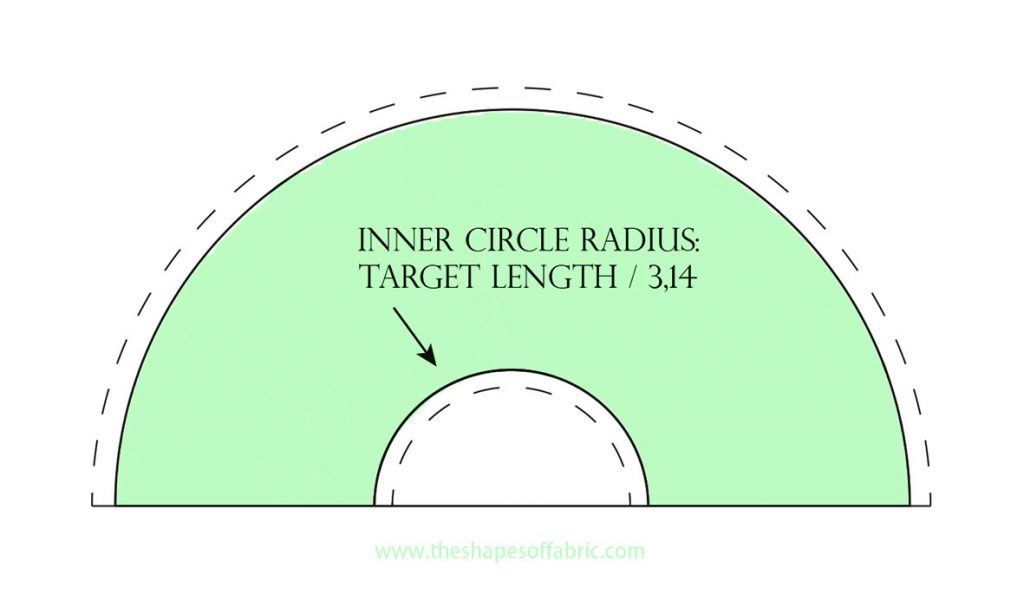
So measure the target length for the flounce and divide it by 3,14. This gives you the radius needed for a half circle. But for a full circle you have to divide the result by 2.
For example, if I my target length was 15cm, here’s how I would calculate the radius for a full circle:
15/3,14 = 4,8/2 = 2,4cm
Use that radius to draw the first circle (=the inner one) with a compass. Then measure the flounce height and draw the outer circle. Finally, add both seam- and hem allowance by drawing two more circles around.
Slash the circle open at one point. The opening will also be the direction of the grainline.
Here’s the half circle pattern.
Choosing your circle
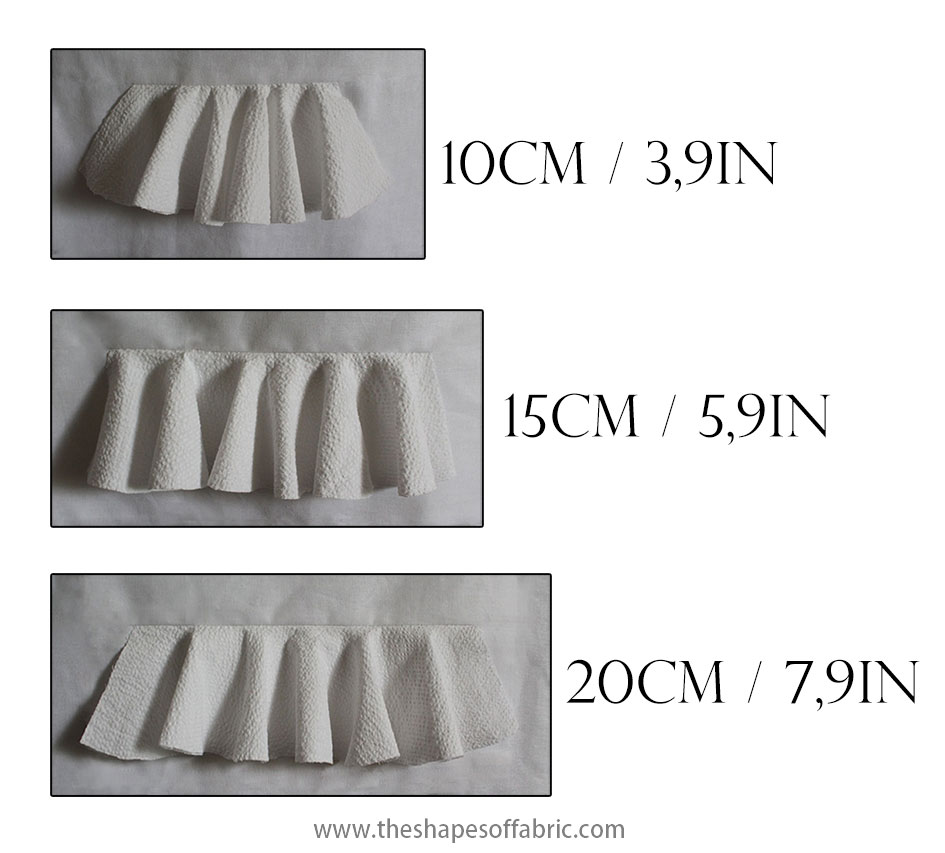
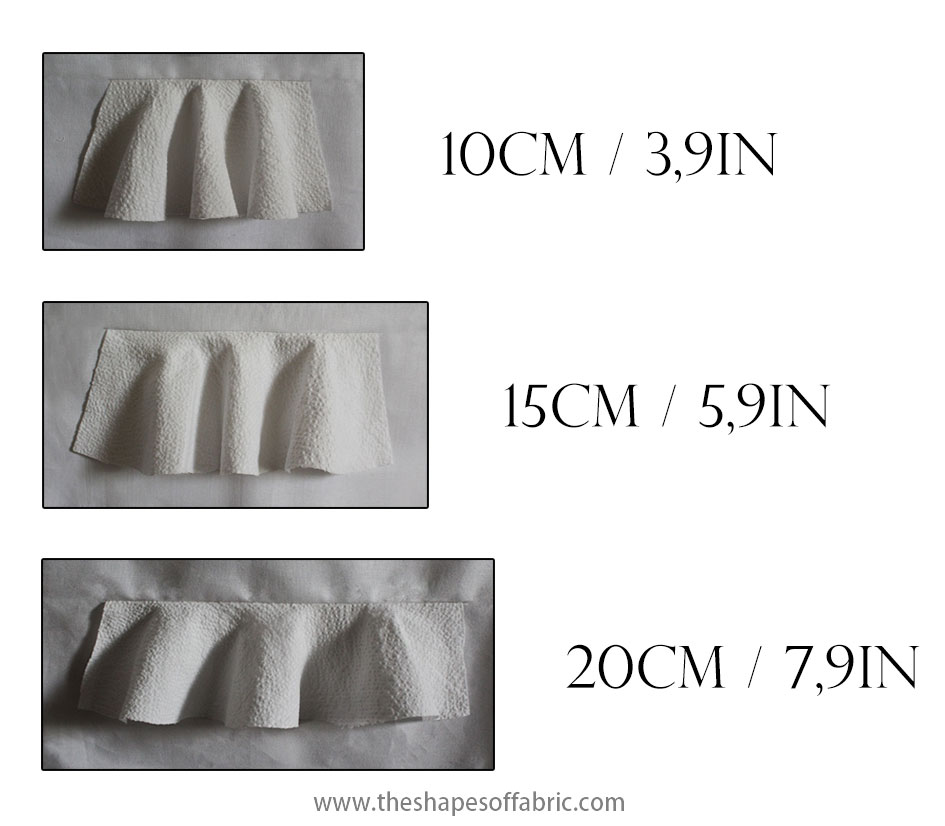
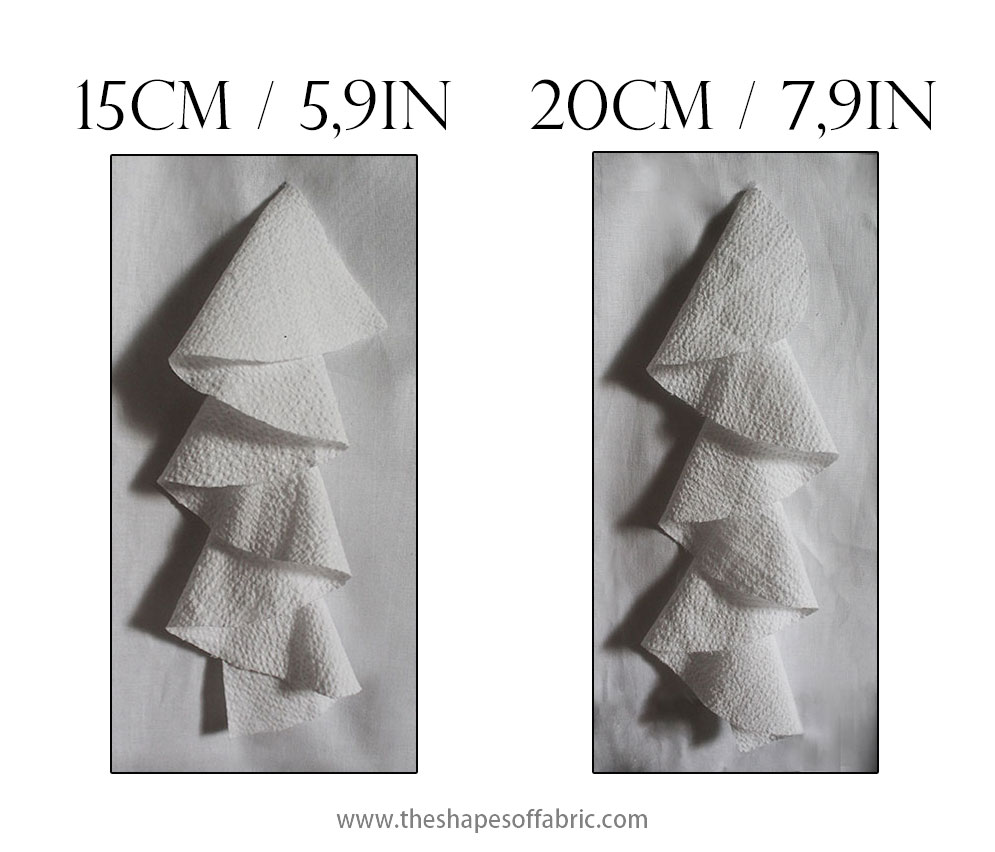
But like I anticipated, there’s more to drafting a circular flounce pattern. The amount of flare of the flounce is affected by the size of the inner circle. The smaller the radius, the more flare you get.
I made some examples with 3 different flounce target lengths, each with both full- and half circle pattern. The flounce height remains the same.
The inner circle radius, and the choice between full- and half circle however are not the only things affecting the amount of flare. There’s also the height of the flounce: the bigger the difference between the inner- and outer edge of the circle, the more pronounced the flare is. Then there’s of course the choice of fabric and the edge finish. Not to mention the shape of the seam line the flounce will be attached to.
So as you can see, there are quite a few things to think about. You just have to make samples if you want to be sure.
If you’re looking for a lot of flare but the flounce has to be quite long, then you just need to cut as many circles as you need and sew them together (French seam and flat-fell seam work the best).
For the vertical flounces placed at the neckline for example, you’ll probably be all set by cutting just one circle.
But here, too, the result is slightly different for shorter and longer seams. BTW, here you can also see the two options for the corner: either leave it or curve it.
I prepared a couple of variations on the normal circle flounce.
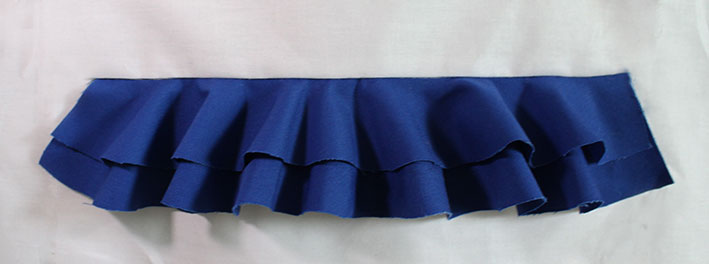
Double layer flounce
If you draft two flounces with different heights and attach them one on top of the other, you get a richer result. Maybe even use two different fabrics.
High-low circle
Just like with the circle skirt, you can make a high-low version of the flouce, too. This results in a flounce that starts wide and becomes narrower towards the end.

Square flounce
Instead of making a circle, you can make a square to get a pointy flounce. I’ve seen skirts with rows of these sewn vertically to fill the whole skirt.

Spiral flounce
The spiral is another way of making a flounce. These give you the possibility to create longer flounces. But the thing is, the amount of flare diminishes the longer the flounce gets. But that could be exactly what you’re looking for.
There are a few different ways you can draft the spiral.
Regular spiral flounce
This is the kind of spiral that results in a flounce that has the same height from start to finish.
You’ll need a ruler and a compass to draft the pattern. I hope I’ll be able to explain the procedure. It’s quite easy once you get the hang of it and then you could just go on infinitely around the spiral!
Here’s a video of the procedure.
First, decide the height of the flounce, seam- and hem allowance included. Then draw a line and divide it by your chosen flounce height measurement.
Somewhere in the middle, sign point B, and then point A at half flounce height distance from it. These are the only two points you’re going to be alternating as the centre points of the circles you’ll draw next.

For the first circle, press the pointer of your compass at point A and use the distance between A and B as the radius. Actually, you’re only going to need to draw a half circle (see in the picture below).
The next circle centre will be point B and the radius is that between B and 1. Draw a half circle continuing the previous line.
Then we’re back to point A and the radius is A-2. Draw a half circle.
Go on like this, alternating between points A and B, drawing half circles that continue the spiral as long as you need to complete the flounce length.

Here’s the resulting flounce. As you can see, it starts with more flare and then becomes rather flat.

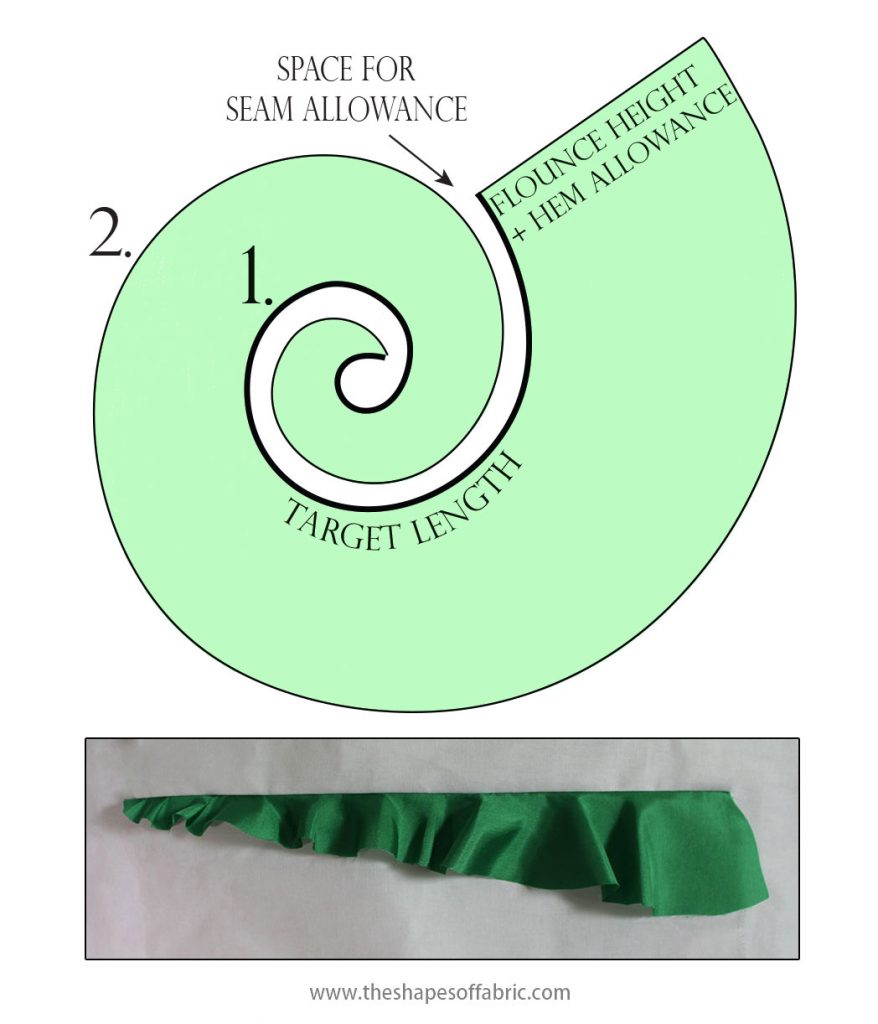
Irregular spiral flounce
This is another way of drafting the spiral. This time you do it freehand. The good news is, you get to regulate the height of the flounce and the amount of flare, too.
That is, the more curved your line is, the more flare you’ll get.
Start by measuring the target length for your flounce and then draw a spiral (1.) that will be the inner edge that has to match the target length. Leave space for the flounce heigth of course. Then draft the flounce itself (2.)
I made two examples. This one starts wide and ends narrow, the amount of flare diminishes towards the end.

And in this case, the flounce starts narrow and gets wider, while the amount of flare remains quite similar throughout the flounce.
How to hem flounces
How to finish the hemline then? We all know it’s not easy to hem a curved line and flounces certainly aren’t easy. That’s why I’d say the best ways are using a serger directly or lining the flounce.
Especially in the case of vertical flounces, where you can see the backside as well, these are good choices.
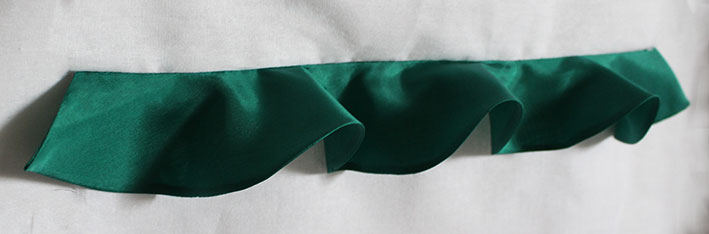
Here you can see a self-lined flounce.
And in this case I used a different fabric for the backside as an accent for the vertical flounce.

Projects
Just like with the ruffles, I prepared a few projects so that you can see how to add flounces in a pattern.
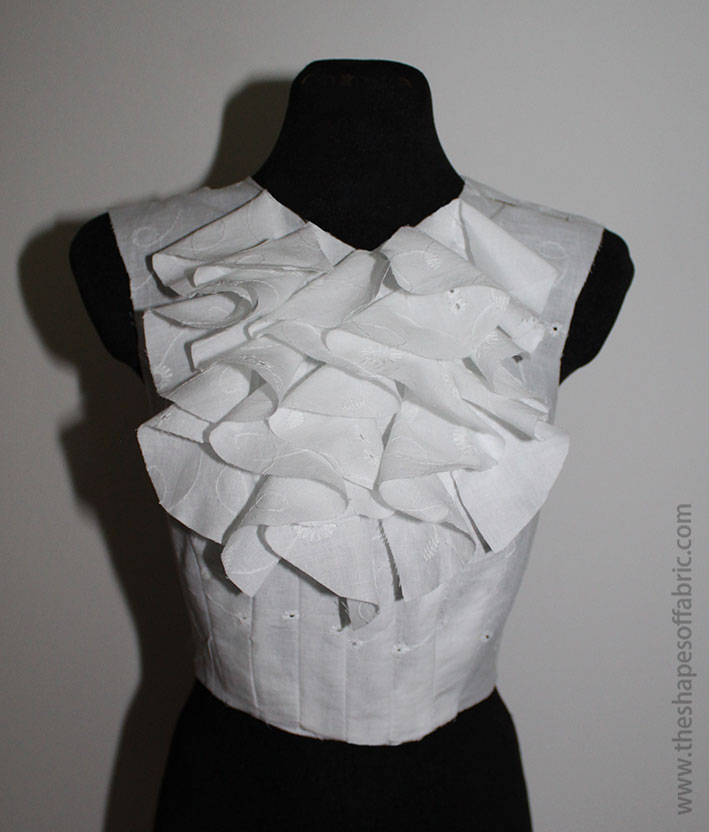
Top with full circle flounces
Starting with this top. I chose full circle flounces to get a very rich neckline. The flounces are added between seams, so to achieve this look, you simply need to divide the bodice front into slices and decide the area that will be covered in flounces.
There will be 5 rows of vertical flounces. I measured 16cm / 6,3in from the neckline and added tacks where the flounces end. Notice, that I made a little V-shape at the neckline, too.

As this was not a long distance, I went for full circle flounces. With only one circle I could cover the whole 16cm and get a nice amount of flare.
The calculation for the inner circle radius: 16 / 3,14 = 5,1 /2= ca 2,5cm.
As a flounce height I chose 8cm / 3,1in.
To attach the flounces, clip the seamline evenly.
Here’s the top:
Peplum skirt
Another great example of the use of flounces is a peplum skirt. I used the pencil skirt pattern as a base and measured the waistline to discover the target length for the flounce, which was 26cm /10,2in. This time I chose the half circle, because I wanted only a moderate amount of flare.
The calculation: 26cm/3,14 = 8,3cm radius.
The height of the flounce: 16cm / 6,3in.
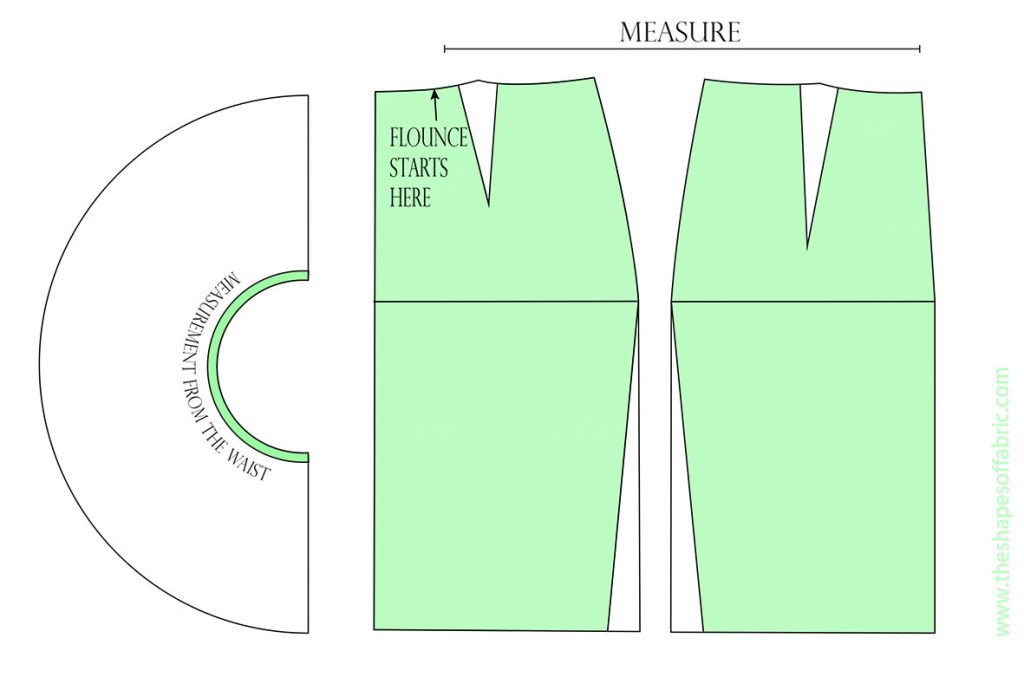
It’s also true that my dressform is quite skinny, so the difference between the inner and outer edge of the circle will be bigger than in the case of a more normal body shape. So you have to test, whether the half circle is enough. You could add more volume to the half circle pattern with the slash- and spread method.
Here’s the result. You’ll probably want to draft a waistband, too.

One-shoulder top
Here’s the last example. You’ll be using the slash and spread -method for creating two layers of flounces at the neckline. That’s the only method you can use if you have particular shapes, as in the case of ruffles.
First you must create the one shoulder top. This being an asymmetrical design, you need to copy both front and back as whole pieces. Don’t worry if your basic pattern looks slightly different.
Draft the neckline and the future flounces.
It’s a good idea to tighten the neckline a bit so that it won’t gape. I added two mini-darts of 0,5cm / 0,2in each at both front and back. They are united to the existing darts so that you can rotate the volume there. If you manage to get rid of the other dart from the back, too, it’s great. Adjust the neckline after this.

Then copy the two layers of flounces and add volume using the slash and spread -method. You don’t need much volume at the underarm area. You’ll be limited by the fact that the pattern will become overlapped if you add too much volume, so look out for that.
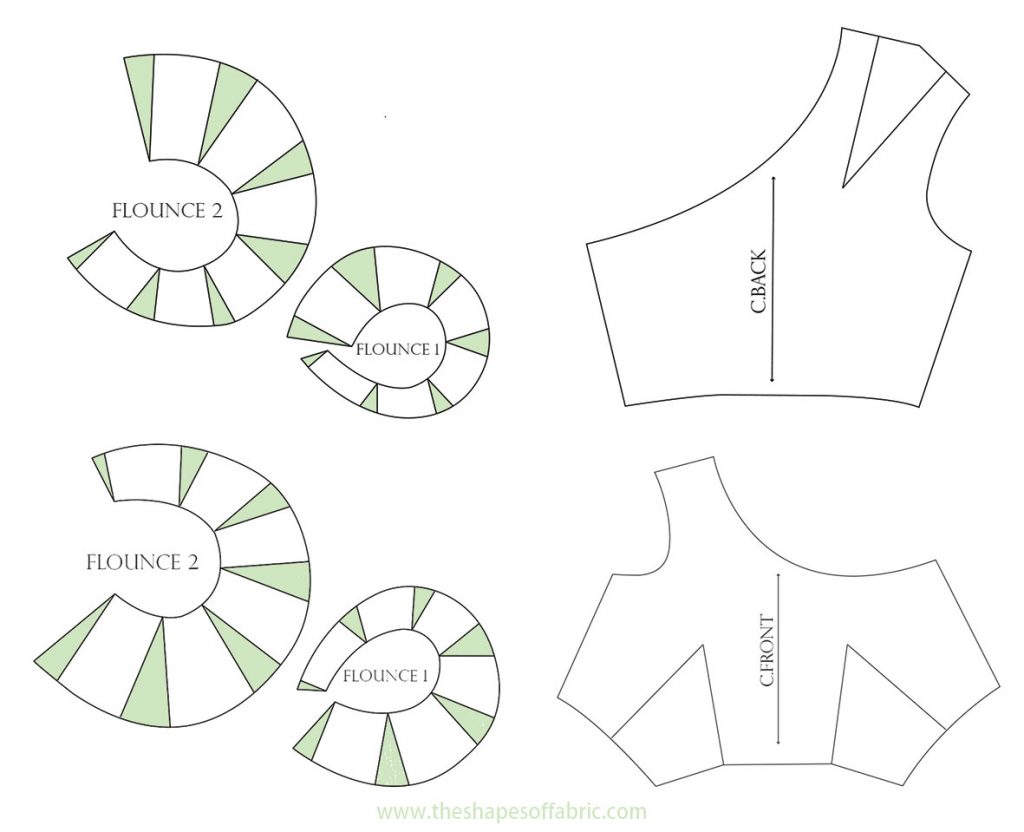
If you managed to get rid of the left back dart earlier, now you can hide the right one under the flounces by rotating it to the shoulder. This depends on the construction of your basic bodice pattern and how long the original waist-darts are. Don’t worry if you need to leave them where they are.
Here’s the one-shoulder top with flounces at the neckline:

More on ruffles and flounces
Check out the Fabric Manipulation books I recommended here. And don’t forget my Pinterest board. I’ve added even more pictures there for your inspiration.
So which ones do you prefer? Ruffles or flounces?
P.s. If you want to learn more about ruffles and flounces, I have a massive e-guide here.


50 Comments
Thanks so much for this tutorial its very helpful. You mentioned adding 2 minidarts of 0.5cm to avoid gaping on the neckline, how do you know the exact amount to add that will prevent the gaping? Do you have any guidelines for contouring?
You’re welcome. 🙂 The 0,5cm is just a starting point. It might be enough, but you can adjust it when you fit the toile. The same goes for contouring. You can start by shaping a little bit your flat pattern, following the curves of the body, but ultimately you must make a toile and adjust the shape directly on the person wearing the garment. Everybody has a different shape, so it’s difficult to guess and manage to draft a perfect flat pattern without the need for corrections. No stress! 🙂
Thank you so much dearest for this step by step tutorial, it’s well explained and clear to understand by an intermediate level tailor, well illustrated with accurate calculations, I personally the only part that I might have a hard time to grab with will be the spiral but it’s all good, I’ll play my part, otherwise thank you so much and still looking out for more great stuff, kind regards!
It’s good to hear. 🙂 Thank you! Yes, the spiral is the most difficult one to understand, but once you start drawing the circles, you’ll notice it’s quite logical. 🙂
Maravilloso
Gracias! 🙂
This is awesome. You are a genius
Thank you so much! Glad you found the tutorial helpful. 🙂
This is pure gold!
I’ve been trying to draft decent flounces for ages and now this pure gem appears out of nowhere. Thank you, thank you, thank you!
Giorgia
Wow! Thank you for your kind words! 🙂 And you’re welcome! Glad to help.
Just great!
Thank you!
You’re welcome. 🙂
Nicely done, thanks
You’re welcome! 🙂
Thank you so much. I tried to replicate the top, but got stuck with hemming the flounces. Any advice?
Yeah, hemming is quite tricky, especially with small flounces. The easiest way is to make them double layer and sew the hemlines together. Otherwise, you could look for tutorials on how to sew curved hems. I have sometimes sewn an extra row of stitches to the edge to gather it a bit. That way it’s easier to fold.
This was so helpful, I wanted to ask if its possible to draft a spiral flounce on paper first before placing it on fabric to cut, seems like it will be very difficult
Yes, make the paper pattern first. 🙂
Hei
How do you you sew the top of the flounces on to a skirt, in a way that it has a good finish. I can not see the thread in your examples. Have you folded the flounce top? Thanks
Hi! 🙂 For the skirt it’s easy to add a waistband, facing or a lining so that the upper edge remains hidden inside. If there’s no possibility to sandwich the flounce edge with anything, you can sew a strip of fabric on top, folding the raw edges under (on the wrong side), so it’ll look finished. When it comes to hemming the flounce, it’s easiest to either cut a double layer or sew a narrow rolled hem with a serger.
Thanks so much
You’re welcome. 🙂
A few years ago, I went to a string quartet concert and the first violinist wore a simple, purple sheath gown with a yellow-gold 2″-3″ high flounce that ran from the top left shoulder, down and across the front, and faded out way down at the hem on the right. It was so interesting! I’d never seen anything like it. I spent the whole concert trying to imagine how to do that and the next few days trying to google the dress. No success. I’d forgotten all about it until I saw this page. I now know it was a spiral flounce! I’m still not sure I could DO it, but knowing what it is the first step, right? Thank you!
What a lovely story! 🙂 I’m glad I was able to contribute. Yes, for a long flounce it’s quite probable that it was a spiral. Enjoy making the dress if you end up going for it! 🙂
Thanks alot fór the illustration ,i find it very helpful ..
You’re welcome! 🙂 Have fun making flounces.
Hi, I’m desperately trying to find or create a flounce collar for a V neckline that sits over the shoulders like short sleeves. Any advice on how I’d do this?
I think you could just measure the V-neckline and use the measurement to draft a circular flounce, making it wide enough to cover the shoulders. 🙂
Wow! you are a genius. Presently I am not sewing I only adjust my children’s. However I am thinking of going full time somedays. So I found this useful, educative, inspiring in fact I ‘am short of words. All I can say is thank you. Keep the good work going. God bless your ministry.
So glad to hear that. I’m flattered. 🙂 You’re welcome.
This is so incredibly helpful!! I was looking for this for a while, thank you so much for the information.
So glad to hear that. 🙂 I try to include as much as possible in my tutorials.
Thank you for posting such detailed descriptions. I thought I was going to make an asymmetrical skirt with a ruffle, but the flounces drape so beautifully.
You’re welcome. 🙂 Yeah, flounces are pretty. The only negative thing about them is that it’s more difficult to hem a flounce unless you make it double layered.
Waooo I enjoy reading ur tutorials. Wish I could hv them all through my Gmail address. Thanks!
If you subscribe to my newsletter, you’ll get notified whenever I publish a new tutorial. 🙂
Thank you for this tutorial! I’ve recently made myself a couple of blouses from patterns with flounces at the ends of 3/4 sleeves, and I’ve decided I love flowing, flirty, flounces😉, so I’ve been thinking I’d like to add flounces around necklines and at hemlines, too! This tutorial is exactly what I needed to feed my need!😙
I see it was a perfect tutorial for you then. 🙂 You’re welcome.
Thanks! That was a nice one
Yes, flounces are so pretty! 🙂
wow i have always looked at doing this and thought it looked complicated but looking at your tutorial you make it so easy to do thank you so much give me the confidence to do this
That’s great! 🙂 Flounces create pretty details in garments, so it’s a useful skill to be able to make them.
Thank you so much for providing me with such clear and complete explanations about flounces ! I want to try the spiral one on a sleeveless top. If I understand well, I need to cut 2 pieces and stitch them together for one sleeve…Isn’t there a way to make it in one piece ?
You’re welcome. 🙂 Yes, you can make it in one piece. Cutting 2 pieces is just for not having to hem the flounce as you can sew the two layers together at the hem.
Thank You, I am a fan from Estonia!
I have a question concerning grainlines of flounces when cutting? I have been working a lot on flounces lately, but I notice that sometimes my flounces hold nicely but sometimes they tend to sag down? It is frustrating, I cut 2 pieces of flounces the same way and then one holds nicely and the other one is sagging. And I have tested different grainlines. Is there a rule when it comes to grainlines? Lets take Your one shoulder top example here in this post, what is the grainline there?
Thank You in advance!
With best wishes,
Margit
Hi Margit! 🙂 Well, the grainline with flounces is a bit complicated, as the flounce is curved so it’s bound to have various different grainlines in any case, no matter where you place it originally. So you just need to choose one. For example, in this case I’d probably place it in the direction of the shoulder seam, making it easier to sew. But for a symmetrical neckline where you cut the flounce on the fold at c-front, I’d put the grainline along the c-front line.
I don’t know if you’ve noticed how sometimes the hemline of very flared skirts stretches unevenly, although it has been cut on the fold and both sides should be the same.? I think the bias might stretch in different amounts, depending if the piece points to the left or right. So this might explain why your flounces act inconsistently.
Just what i was looking for. Thank you for explaining so well!!!
Excellent! 🙂 Thank you.
Thanks I love it please for flare skirt from above kneel like how many yards of organza and can I use crinoline to make it stand
Awesome. 🙂 It depends on your measurements, but usually it’s a good idea to get twice the skirt’s length when there’s flare. Sure, you can add crinoline.