Here comes another basic block tutorial. It’s the basic bodice block for knit fabrics!
In the past I’ve published two for woven fabrics: the basic bodice block with darts and the dartless bodice block. If you’ve already drafted those, this one should be easy.
The basic bodice block for knit fabrics is form-fitting, so you’d use it for drafting figure hugging tops, shirts, dresses – and with a few modifications – even leotards and swimsuits.
But in case you’re wondering, making clothes with knit fabrics doesn’t mean that you automatically need to have this pattern block as a starting point. Just think about loose-fitting t-shirts and sweaters, for example: Although made in a knit fabric, you can use the dartless bodice block as a starting point for the patterns.
So, use this block only when the resulting garment needs to be form-fitting.
The Negative Ease
The bodice pattern for knits differs from the bodice pattern for wovens in that it doesn’t have any darts or ease. The knit fabric stretches to fit the body shape and the stretch makes it comfortable to wear without having to add ease. On the contrary, you often need to make the pattern smaller than your body measurements. This is called negative ease.
The knit fabrics can be either two-way or four-way stretch, meaning, they either stretch horizontally only, or both horizontally and vertically.
Before drafting, you need to take into consideration the amount of stretch in the knit so that the resulting garment will end up figure hugging and not sagging.
Here’s how to test the stretchiness:
Fold your fabric in half on the crossgrain and place pins 10cm apart from each other. This way you’ll have two layers of fabric to stretch. Then stretch the fabric as far as it will go and measure.

In this example, I was able to stretch the fabric by 5cm, which means the stretch percentage is 50%. This is a basic, rather lightweight jersey. I had another fabric, a ponte roma jersey, that only stretched 2.5cm, so its stretch percentage was 25%. Some knits stretch even 75% or 100%.
What do we do with this information? Well, it affects the amount of negative ease to calculate for the pattern block. If the fabric only stretches 25%, you can use your exact body measurements to draft the pattern. For 50% stretch you can calculate -2cm of ease, or even -3cm at the underarm line (half circumference).
If the amount of stretch is 75%, make it -4cm, and for 100% -6cm.
For this tutorial, I’ve included examples of 0 and -2cm ease.
If you’re wondering about the vertical stretch, you don’t need to worry about it for the basic bodice. That’s more an issue when making swimsuits and leotards. Making the basic bodice pattern shorter would only result in a short top in the lack of vertical tension.
The Measurements
Here are the measurements you will need to draft the bodice block for knit fabrics. It’s the usual picture of the industrial size M -measurements seen in my other bodice tutorials. The horizontal measurements are already divided in half, because the bodice block only covers half of the body.

Basic Bodice Block for Knit Fabrics: starting point
Start by drawing a rectangle, where the width is your 1/2 bust circumference (-2cm of ease, if you’re drafting for 50% stretch knits), and the height is your back waist length+ 2cm.
In this example the rectangle is 46cm (-2cm =44cm) wide and 40cm+2cm =42cm high.

To separate the little rectangle at the upper right corner (= the back neckline), make the height 2cm and for the width, choose your measurement among these:
- Size XS: 6,5cm
- S: 7cm
- M: 7cm
- L: 7,5cm
- XL: 8cm
Then, draw the horizontal line in the middle using your armscye depth -measurement. This will be the underarm line. Personally, I don’t like having the armhole this close, so even with knits I like to add an extra 1cm. The choice is yours.
So, using the size M measurements: 20cm, possibly 21cm.
Mark the side seam position exactly in the middle of the underarm line.
The two vertical lines on both sides are for the chest and back. For the back side measure ½ back width (-0.5cm of ease).
Using the example measurements: 18cm (-0.5cm =17.5cm).
For the front side it’s ½ chest width (-0.5cm of ease).
So here it’s 17cm (-0.5cm =16.5cm).
Bodice Pattern for Knits: Back
Then we can add the details, starting from the back piece.

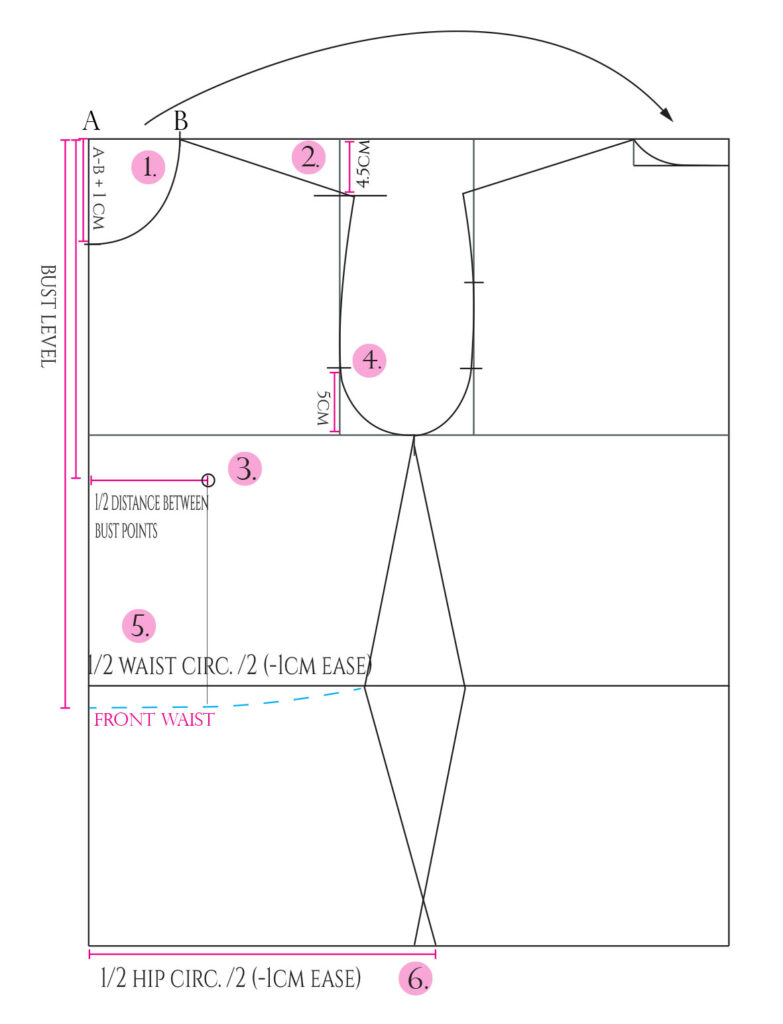
1. Draw the neckline. At least the first 3cm from the c-back should be a completely straight line and then you can curve it.
2. Measure 4.5cm from the top and draw a short parallel line. This will be the guideline for the shoulder slope. Then you can draw the shoulder line starting from the base of neck and ending on the guideline. The length is your exact shoulder width measurement. Pivot your ruler until the shoulder line has the correct length.
3. To draft the armscye, first measure 5cm upwards from the underarm line (=point A). And then mark point B halfway between the shoulder tip and point A. These are your guide marks for the armscye. Point A will also become the back armhole notch.
The armscye line should touch the point B, but stay slightly outside of point A. Don’t curve too much here.
4. At this point we can also add the hipline. So check your measurement chart for the distance between waist and hip.
5. To draft the side seam, first add two guide marks: one for the waist, measuring ½ waist circumference /2 (-1cm of ease) at the waistline, and one for the hip, ½ hip circumference /2 (-1cm of ease) at the hipline.
Here, these are 37cm /2 =18.5cm (-1cm = 17.5cm) for the waist and 48cm /2 =24cm (-1cm=23cm) for the hip.
You can just draw straight lines between these guide marks and the reference point you have in the middle of the underarm line for now. We’ll adjust the side seam later.
Basic Bodice Block for Knit Fabrics: Front
Now that the back piece is ready we can draft the front piece.
1. Starting from the neckline. You can get the A-B distance from the back piece; The front neckline width is the same as the back.
Add 1cm to that to get the missing measurement from point A downwards. Now you can draw the front neckline.
2. For the front shoulder slope, the procedure is identical to that of the back piece. So, measure 4.5cm from the top along the chest line, and draw a short parallel guideline. Then, draw the shoulder line starting from the base of neck and ending on the guideline.
3. Although this pattern doesn’t have a bust dart, it will be useful to mark the bust point on the pattern in case you need it later.
Measure the bust level from point A downwards. Mark it at the c-front and from there, measure ½ distance between bust points. Mark the bust point here with an x or a circle.
4. To draw the armscye, let’s first add a guide mark 5cm upwards from the underarm line. This will become the front armhole notch. The front armscye line should touch this point. You can curve it slightly more than the back armscye at the underarm region. (However, the knit block’s back and front armhole don’t differ from each other as much as those of basic blocks for wovens.) Make a nice continuous line from front to back.
5. Measure ½ waist circumference (-1cm of ease) and add a guide mark at the waistline.
Here, 37cm /2 =18.5cm (-1cm = 17.5cm).
Draw the front waistline: measure the front waist length from point A downwards. After the bust point width, you can unite the line to the regular waistline, curving it gently, as shown.
6. Measure ½ hip circumference (-1cm of ease) and add a guide mark at the hipline.
For example 48cm /2 = 24cm (-1cm=23cm).
Finally, draw the side seam uniting the three reference points at the underarm line, waistline, and hipline with straight lines.
Adjusting the Seams
The side seams still need to be adjusted. First, if you have a larger bust, lets say C cup or larger, you might want to move the side seam towards the back like this:

This is because you need more space in the bodice front than the back around the bust region. The side seam then goes back to its normal position at the hipline. In any case, you can verify the need for this adjustment also when fitting the bodice.
Then, give a rounded shape to the side seams. Think about the body contours: the rib cage, the waist, and the hips.
If you don’t mind having a c-back seam, it’s a good idea to shape that, too, because there’s a hollow area around the back waist.
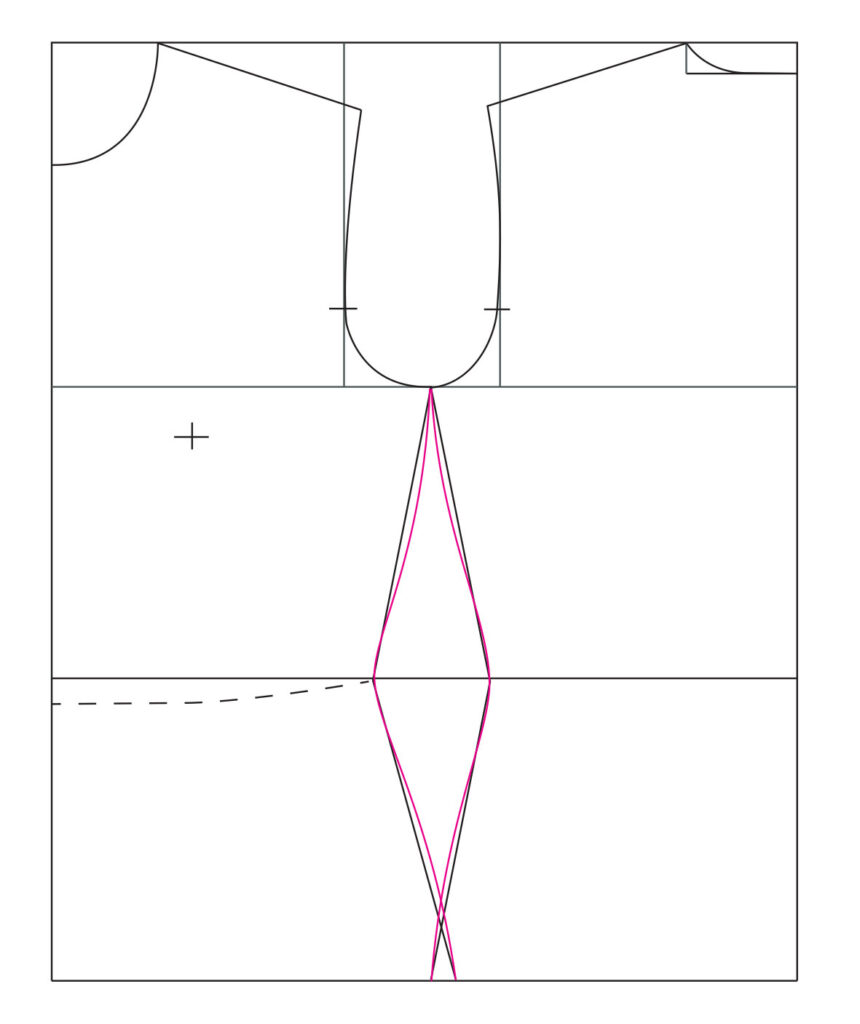
In this example I’ve first drafted the back waist without any negative ease, and then “removed the ease” from the c-back at the waistline. This makes the back side seam less curved.

The Sleeve Pattern
The procedure for drafting the sleeve pattern is pretty much the same as with the other bodice blocks.
First, we will need some measurements from the bodice. Other than those, you should have the total sleeve length and the elbow level measurements ready.
Here’s the bodice we just drafted. I marked the areas we need to measure to draft the sleeve.

The Sleeve Cap

1. Start the pattern by drawing these 3 horizontal lines. The first two are 5cm apart from each other. To draw the uppermost line, measure the distance between the underarm line and the shoulder tip of your bodice (1) with a straight line. *Detract the following cm (=x) from the measurement:
- Size XS: 3,5cm
- S: 3,5cm
- M: 3,5cm
- L: 4cm
- XL: 4cm
For example, my bodice size is M, so I’d detract 3,5 cm.
2. Then mark the starting point for the sleeve cap on the left side along the lowermost line. Measure the part 2A from the bodice and add 0.5cm. From this point, draw a vertical line straight up to the second horizontal line.
The next measurement is that between the armhole notch and the shoulder point of the bodice front (3), measured in a straight line. This time we won’t add any ease.
Draw a slanted line using this measurement that ends on the uppermost guideline.
Then do the same with the bodice back (4). This time the line goes in the other direction and ends on the second guideline.
Draw a vertical line straight down from that point. Then measure the part 2B from the bodice, add 0.5cm, and mark the end point of the sleeve along the lowermost line.
3. Now we have this house-shaped sleeve cap. Mark the middle point along the two slanted lines (=reference points). Then draw your sleeve cap as in the picture below.
The front armhole line should start with a slightly more pronounced curve on the bicep line.
Use the reference points to shape the upper part of the sleeve cap; at these points, the curve should be at its maximum, about 1,5-2cm away from the slanted line.
Mark the armhole notches and the central notch.
Notice where I placed the sleeve armhole notches: 5cm above the bicep line, just like the bodice has its armhole notches 5cm above the underarm line.

Sleeve Cap -check
Compare the measurements of the sleeve cap and the armscye lines of the bodice, on both sides of the armhole notches. The “walking” method is the most accurate way to do this.
This time the sleeve cap has no ease, because it’s not needed when working with knit fabrics. So, the sleeve cap and the bodice armscye measurements should match.
However, don’t worry if the sleeve cap is slightly larger, you’ll manage to ease it in the armhole anyways.
If you’re not happy with the measurements, try to adjust the sleeve cap shape. You can modify the cap width and -height. And also move the cap notch a bit to the left or right. The bicep line can be shortened or lengthened on both sides, too, if needed.
Rest of the Sleeve
When you’ve checked and adjusted the sleeve cap, mark the center point of the bicep line and draw a line straight down from there. This will be the grainline of your sleeve pattern. It doesn’t always coincide with the cap notch.

Measure the total length of your sleeve starting from the top of the sleeve cap and choose the hemline width. It could be for example 20cm this being a fitted garment, so divide 10cm on both sides of the centre line. Then draw the underseams and finally the elbow line.
All the Pattern Pieces
Here are all the pattern pieces of the bodice block for knits:

To check the pattern pieces, copy them first. Never cut the original.
Check that the seams that will be sewn together match in length. Use the “walking” method for the side seams as they are curved. The lines should continue smoothly between the front- and back pieces (armscye, neckline, hemline) The waistlines should match.
Toile
Then make a toile to check the fit so you can make corrections to your original pattern. Use a knit fabric that has the correct stretch percentage. This way you can ensure that the amount of negative ease works. You might notice that the bodice needs to be even smaller.
Besides the general fit all around, you will want to check for example the shoulder seam position and if you managed to mark the bust points right. If you will be making garments with sleeves, fit the bodice with both sleeves attached.
Here’s a common problem you might encounter: As this bodice is very fitted, it’s likely you’ll have excess fabric sagging right below the back waist. The more your back curves, the more this might be a problem.
Having a c-back seam will enable you to fix this by rotating the lower section of the back bodice as shown here:

You can make it more than 2cm if needed. This modification changes the back seam shape so that it follows your body shape, giving extra space for the buttocks. Obviously if the bodice only arrives to the waist level, this won’t be a problem.
After having made the necessary corrections, your basic bodice block for knit fabrics is ready for use!
If you’re interested in learning more about patterns for knits, check out this book review I wrote.
16 Comments
Hi Minna, thanks very much for this new block!
Kind regards, Hanneke
You’re welcome Hanneke! 🙂
I felt so useful from ur blog 🙂😃
Thank you! 🙂
Hi, thank you so much for this. Just one question – the last part about the C seam. Is this to fix the “swayback” issue? The last knit I made had wrinkling on my back waist because it is curved. The problem appears in the middle section of my back with 4 cm extra fabric usually.
Would I be able to use your technique to correct it or should I start the correction from higher up on the back waist. Many thanks if you see this.
Yes, I did the correction to allow the bodice to follow the back waist curve and remove wrinkling. So, I think it might be useful for you, too. 🙂 Maybe you could do a test garment.
Hey! Thank you very much for this explanation. I did a toile and it actually almost sits as I wanted 🙂 For the negative ease, I always thought that you would take away a specific percentage of the whole circumference. Did you tell specific amounts of centimeters instead, because it is easier? Or is there another reason?
Perfect! 🙂 I think it’s easier to divide the fabrics into categories according to the amount of stretch and just apply a fixed amount of negative ease.
thank you
dear mina ❤️😍💐
You’re welcome. 🙂
Hello! I know I’m late to reply on this post – but I’m wondering how to attach a fabric with 50% stretch to one with 25% stretch? Do I stretch the 50% one while sewing to the 25%, because of negative ease?
Hi there. 🙂 If it’s a fitted garment, yes. Because making the less-stretchy fabric smaller will cause it not fit the person. It’s kind of like attaching wrist cuffs to a sweater: stretch the “stretchier” material to match the less stretchy. 😀
Thank you for the great tutorial, especially the part about the sway back correction. I was also wondering, if I wanted to extend the bottom and turn it into a dress, would I have to do full hip adjustment, or would my own measurements compensate for that? With appreciation, Gabri
You’re welcome. 🙂 The stretch fabric is quite forgiving and if you drafted the bodice using your measurements, there shouldn’t be any problems. But, in any case, you can always add a bit more room at the side seam if needed. I do have a post on using the knit block where I turn it into a dress.
Amazing tutorial, love the effort you put on the visuals, just one question about side seam. It says to move the side seam towards the back pattern if you have larger than C cup, is there any indication how much it is good to move it by depending on the bust size?
Hi Anna. Thank you so much. 🙂 I think the best way is to make a toile and draw the new side seam position while wearing it. Then, make the changes to your pattern block.