This time I’m bringing you a Wrap Skirt Sewalong, that was published elsewhere last summer. I wanted to make it available for everyone. So in case you feel like you’ve already seen this before, you’re not imagining!
We’ll be making a 6 panel wrap skirt from scratch. Which means, starting from the pattern. This way you’re going to get a skirt that is made especially for you, with your own measurements. Don’t worry, you don’t need any previous pattern making experience or pattern blocks.
Here‘s my basic panel skirt tutorial if you’re curious about panel skirts in general.
The tools you’ll need are just a pen, scissors, a tape measure and a ruler. An L-square- or a clear grid ruler is also good to have, because that makes it easier to draw perpendicular lines. You might need a calculator, too.
I can’t tell you how much fabric you will need, as this is completely made to measure. You decide everything: how long and how wide you want your skirt to be. Once you have the pattern, you will be able to calculate how much fabric is needed.
You can either use different colors like in this example, or you can make the whole skirt in one fabric. Choose for example linen, cotton or light weight wool.
The Wrap Skirt Pattern
Let’s start from the measurements. You will need:
- Your waist circumference
- Your hip circumference
- The distance between waist and hip -levels
- The total length of your future skirt
When you have written these measurements down, divide the waist- and hip circumference by 6, which in this case is the number of the panels. Obviously we are not calculating the overlap here.
In the next picture you can see my example measurements and the calculations. I wanted my skirt to be midi length, but you can make it as long or as short as you want.
How to Draft a Panel
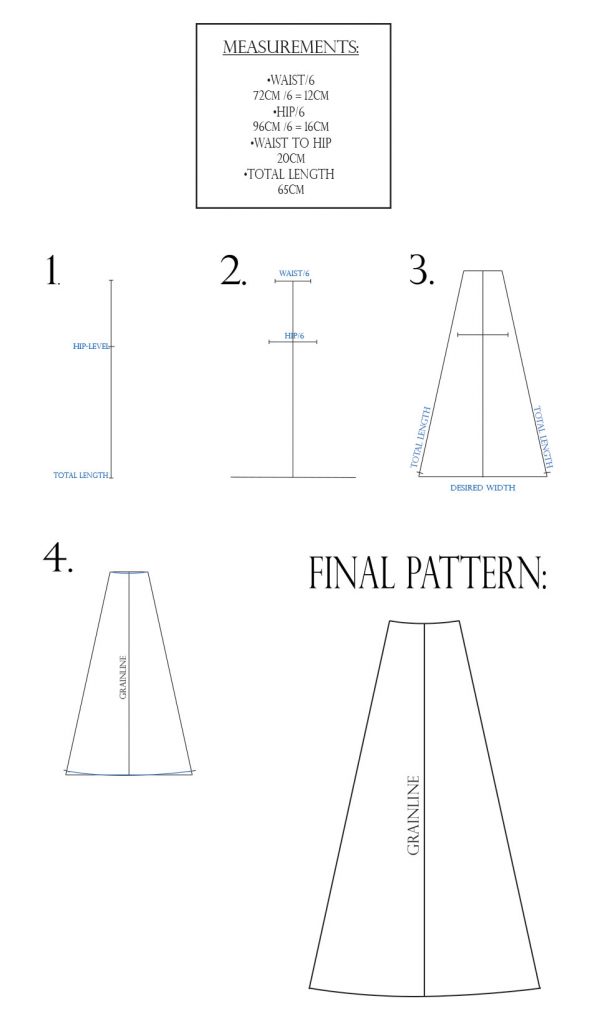
- Start by drawing a line that has the same length your skirt will have. This is the center of the panel. Mark the hip level (=waist to hip).
- Draw the waist- and hip line, using the measurements you got from the previous calculations. At the hemline you can just draw a random line. Each one of these must be at a 90° angle to the center line.
- Decide how wide you want the hemline to be. In my version I did a total of 40cm or 15.75in (=20cm on both sides). Complete drawing the panel by uniting the hemline to the waistline on both sides. Depending on your hip and hemline measurements, you might have a bump at the hip level. Then measure the correct skirt length on both sides and mark the points. You will see, that it will be a bit higher up on the sides.
- Let’s make the waistline and hemline a bit arched. You will get the hemline shape automatically by following the marks you just did.
Now your panel pattern is ready. You only need one of them, because all the panels are identical. If you want, you can add the seam allowance and hem allowance already to the pattern. Here’s my example. Feel free to add a wider seam allowance.
Note: The two outermost panels will need to be hemmed even at the long edge, so add extra seam allowance to those.

The Waistband Pattern
The waistband will also be the tie strap of your wrap skirt. So you’ll need your full waist measurement, the width of the overlapping area, which can be either one or two panels depending on how much cover you want. And the length of the tie straps, which I’d say must be at least 50cm or 19.7in.

So basically you’ll have two waistband patterns, A and B. You can see the measurements and the example calculation in the picture above. It’s enough to draft half of the pattern as you can then just cut it on the fold.
The final width of the waistband could be 2,5-3cm or an inch, so the pattern has to be double that width; the waistband will be folded. Again, add the seam allowance if you want.
And the final little pattern piece is the belt loop. Just make it twice the desired final width (+ seam allowance). The length should be about 2cm or 0.79in longer than the waistband width. This includes the 0.5cm or 0.2in seam allowance already.
Cutting the Fabric
Now that the pattern is ready, you will be able to calculate how much fabric you need for the wrap skirt. You will be cutting 7-8 of those panels, depending on how much overlap you want. I’d say 1 panel overlap is good for a beach skirt. But for a city skirt you might prefer 2 panels. Choose 1 or 2 different fabrics.
It’s good if you have the kind of fabric that doesn’t have a direction, so that you can cut the panels in either direction. I made two examples of how you could cut them. Either horizontally or vertically. Of course, to be correct, you should follow the grainline and place the pattern pieces in the direction of the selvage.

I cut 4 panels in one color and 3 panels and the waistband in the other. I was lucky to have a fabric that has two different colored sides, so I actually only used one fabric! The material is light weight wool. My wrap skirt will have just 1 panel overlap. If you want it to be wider, cut 1 extra panel, as mentioned before.

At this point I recommend that you interface the area of the waistband that is actually going to be around your waist. So exclude the tie straps.
Sewing the Panels
Let’s start sewing the skirt then! First thing to do, is to pin the panels together. If you’re using different fabrics or -colors, just remember to respect the order you had planned.

Then you can go ahead and sew all the seams and finish the edges with zig-zag, or serger if you have one, keeping the two layers of seam allowance united

Next passage is to press the seams. First press them flat the way they are. Try to avoid moving your iron lengthwise, because this part of the panel is on bias and you could end up stretching the seam.
After this you can go ahead and press the seams on one side, following the same direction with all the seams.
While you’re at it, press the hem and the two remaining long edges as well. In this example, the hem allowance is 2cm. The easiest way to do this, is to first press the whole hem allowance inwards and then fold half of it under & pin, like this:

The same goes for the 2 panel edges.

After this you can stitch. Either with the machine, or by hand if you prefer.

And so the panels are ready and your skirt starts to look like a skirt!
Sewing the Waistband
Now we will prepare a loop hole into your waistband so you’ll be able to slip the tie strap through it. It will be located exactly between the waistbands A and B, at the beginning of the overlap.

- Take the two waistband pieces and pin the interfaced ends, right sides together. Sew just 0.5cm or 0.2in bit, right in the middle like this. Or even less, if you manage.
- Then fold the seam allowance inwards on both sides..
- ..and sew on top to fix the folds in place.
- Now you should have something like this when you fold the waistband in half.
So your waistband is now ready to be attached to the skirt. Start by pinning it at the waistline of your skirt. Match the loop hole you just prepared to the seam line at the beginning of the overlap.

Sew this bit first and then it’s time to sew the tie straps. Fold them right sides together and sew. Trim off the angles before turning them around. This can take a while, but you’ll make it!
And finally, press all the seams you just sewed, flattening the tie straps and the waistband. Press the seam allowance towards the waistband and fold the waistband in half. Press the remaining seam allowance inwards and pin.
Sew near the edge to finish attaching the waistband. This is probably the most difficult part of the whole skirt. You can either sew from the wrong side, if you are able to make it look nice on the right side without seeing what your doing. Or you can sew from the right side hoping to catch the edge of the waistband. OR you can sew this part by hand. 😀
Adding the Belt Loops
The very last thing missing are the belt loops. If you chose to do just one panel overlap, you’ll need 2 of them. One on both sides. In case of two panel overlap you could get away with only one belt loop.
But try on your skirt and see how many loops you’ll need to keep your tie straps in place.
Like I said earlier, the loops should be about 1cm (0.39in) longer at both ends than the final width of your waistband. In my example the waistband is 3cm (1.18in) wide, so the belt loops are 5cm (1.97in) long.
Have you ever sewn button loops? This is kind of the same thing, except that you don’t cut these on bias.
So you’ll need a strategy to turn the little tube around after you’ve sewn it. Some people use a crocheting needle, but you can also use the same thread you use to sew it.

So basically, before starting to sew, you need to pull the threads and leave them looped inside the tube (it even rhymes!)
After it’s done, trim off some extra seam allowance and turn the tube around with the help of the threads. This might take some wiggling, but you’ll get the hang of it!
Zig-zag or treat the edges with Fray check/Clear nail polish so they won’t fray.
Now these will be attached to the side seam position of your waistband, folding 0.5cm (0.2in) under at both ends. The belt loop should remain a tiny bit wider than your waistband so it’s easier to pass the tie strap.

Attach the belt loops by hand stitching or with sewing machine. In the end it should look something like this.

And so your 6 panel wrap skirt is ready and I’m waiting for pictures! 🙂
In the meantime, here are mine. I really love the fabric. It has a smooth surface and a slight shimmer.


21 Comments
Thanks so much for these tutorial.
You’re welcome. 🙂
Thanks so much for this, very helpful.
You’re welcome. I’m glad you found it useful. 🙂
Please notify me
Beautiful…thanks for the tutorial!
You’re welcome. 🙂
God bless ur hand work
Thank you so much. 🙂
Thank you so much for the tutorials
You’re welcome. 🙂
Your pattern was easy to understand and follow, thank you so much for the tutorial.
Happy to hear! Enjoy making the wrap skirt. 🙂
I’m working on this skirt right now and I can’t quite understand the directions for attaching the waistband.
I have the waistband pinned to the skirt. The directions say to sew that bit first (I assume that means the interfaced part of the waistband) and then sew the tie straps right sides together, trim the angles, then turn them around.
It seems impossible to turn the straps around without getting it all twisted, though. And it looks in picture 2 that I’d have exposed seams?
Ordinarily I just trust the process when I’m sewing, but I’ve been working on this skirt for 6 months now because of lack of time and I don’t want to have to rip everything out. I’d very much appreciate it if you could explain a little clearer what you mean here.
Hi Rachel. Yes, unfortunately the picture is quite small. The first step is to sew one edge of the waistband to the skirt leaving the straps free. After this you should be able to sew the strap-sections right sides together by folding them lengthwise in half, right sides together as the waistband is only attached at one edge. Start sewing where the skirt ends. Turn the right sides of the straps out, press flat, and then the last step is to fold and sew the remaining edge of the waistband to the skirt so that it becomes a continuation of the straps. I hope this was a better explanation. 😀
Oh! Yes! I think I visualized it better this time. Thank you so much! I’ll check back in after a few weeks and let you know how it went.
Excellent! 🙂
I finally finished it!
The strap situation work out perfectly, thank you for clarifying that process. The waistband is a little weird but I think I can fix it next time around. I’m really happy with it!
This is a great pattern, thank you for sharing it!
Awesome! So glad to hear. 🙂 You’re welcome. Enjoy your new skirt.
How easy would it be to add pockets? I’m assuming that if the seems fall at the hips, it should be relatively easy?
Thanks
Exactly. 🙂 The side seam pockets would probably be the best option.