The whole point in making one’s own clothes is to be able to wear clothes that fit you perfectly, right? Many of us got interested in dressmaking for this exact reason. Besides of course wanting to design your own clothes, which is also fun. And to decide all the details, materials, colors, etc.
Fitting is a crucial part of garment sewing, whether you are using commercial patterns or drafting your own patterns from scratch. So I thought I should address this subject and write a two-part mini series on fitting. This is the first part and it’s all about skirts and pants.
In the example pictures I used the basic pattern blocks, but you can use the same techniques for fitting commercial patterns as well. Although they might look quite different after the various pattern alterations they’ve gone through.
About Fitting in General
When you’re drafting your own patterns, you first take the measurements and then draft the pattern accordingly. You can get very close to a perfect fit, but I always consider the first draft as a pattern sketch that needs to be checked and corrected by making a toile. I never use it without testing it first.
A white muslin is the best material for making toiles (unless you’ll be using stretch fabric). It’s because you can see the markings well.
Skirt pattern is much easier to get right than pants. Don’t be hard on yourself if the first draft doesn’t fit perfectly. It takes practice, trial and error, to become good at fitting. Once your basic pattern block is fitted, the patterns you’ll create with it should also fit well.
If you’re using commercial patterns, you can check the measurement charts that come with the pattern to choose the size closest to your own measurements. Often you can’t expect to find all your measurements in the same column of a measurement chart: the commercial patterns are based on ideal proportions and when grading the sizes, the different parts become larger in even amounts, often both in width and length. But in the real world each person has their individual body shape.
For pants and skirts you should choose a size according to your hip circumference measurement.
Once you’ve picked a size, you measure different parts of the pattern pieces to see if there’s something you could correct already before making a trial garment. After having fitted the toile you can correct the rest.
The idea is that you only need to make small modifications to refine the garment after you’ve cut it in the fashion fabric.
Rule of Thumb
I remember when I was at school our teacher told us to “follow the direction of the wrinkles” to correct the patterns. This means that the wrinkles will give you an idea of what the fitting issue might be. This doesn’t mean the kind of wrinkles the garment has when you sit down, but the wrinkles that form when standing straight.
Tight horizontal wrinkles are a telltale sign that there isn’t enough fabric to go around the body and the garment needs more room to the vertical seams.
Tight vertical wrinkles mean that the garment is too short and you need to add more length. For example when the pants crotch level is too high up.
To make things more confusing, the rule works in the opposite direction with loose wrinkles! Which basically means sagging.
Loose horizontal wrinkles mean that the garment is too long.
Loose vertical wrinkles tell you that the garment is too wide and needs to be taken in at the side seams.
I’ve prepared a series of examples on how to correct different fitting issues in skirt and pants patterns.
Skirt/Pants too Long or Short
Let’s start from the easiest one. This is pretty obvious.
For straight skirts, such as the skirt block, you just lengthen or shorten the hemline until it has the right length. If you are fitting a flared skirt you can consider using the same method as with the pants if you want to maintain the same hemline width.

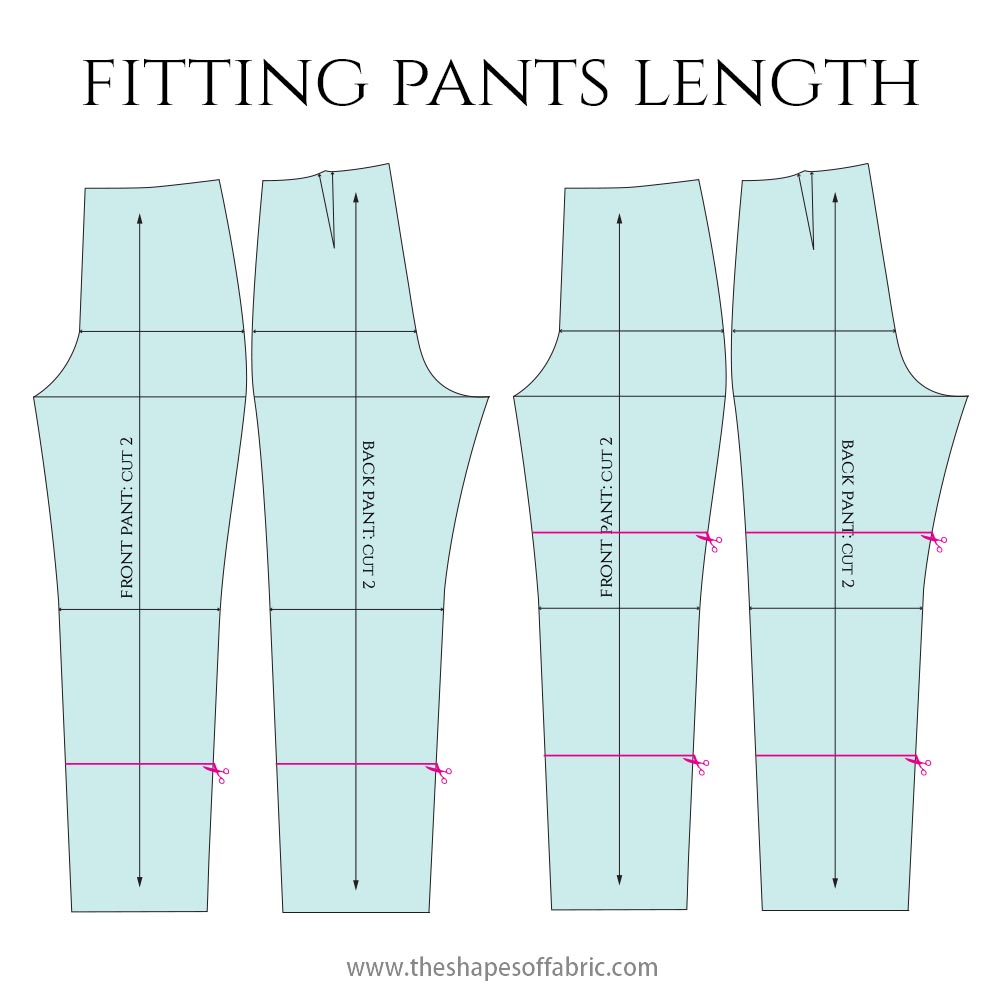
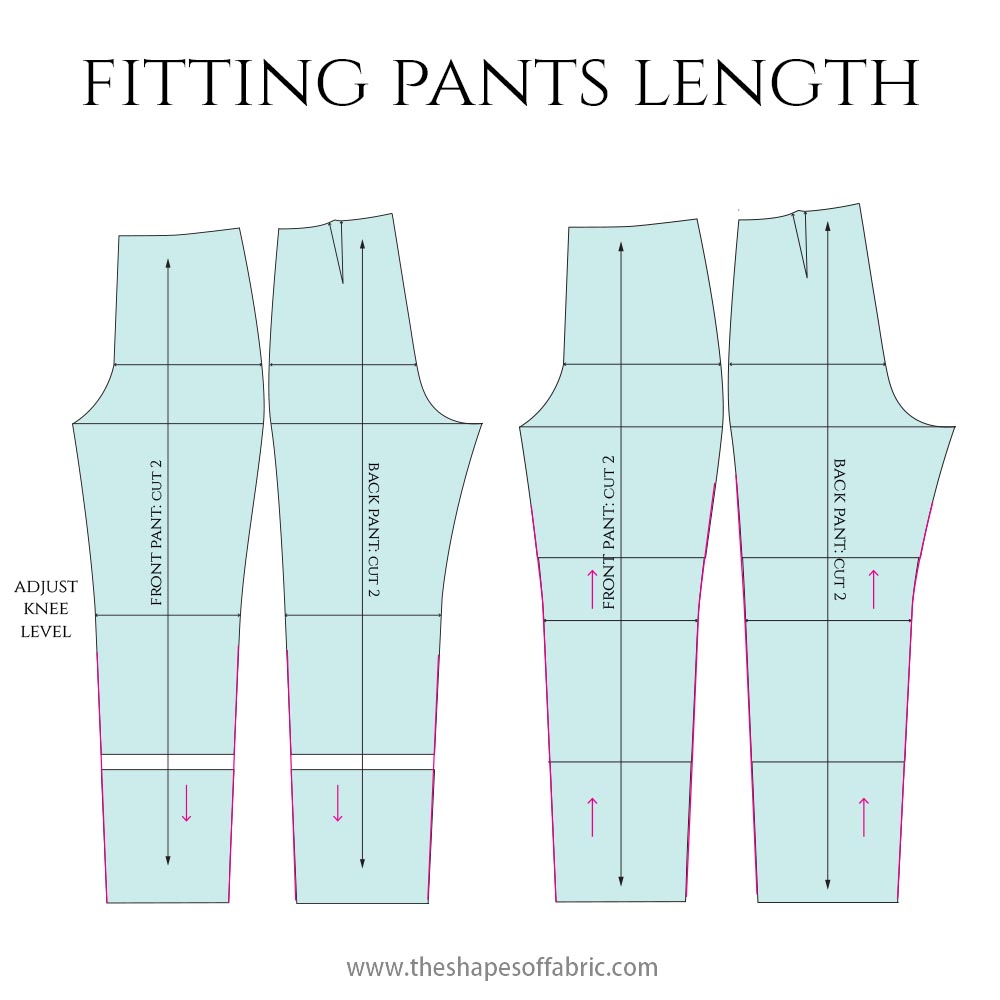
Here are the pants. There are two options, depending on how much you need to modify the length. If it’s only a bit, you can modify at the lower part only. Otherwise divide the amount on both sides of the knee line. In any case, check the knee level measurement afterwards.
On the left the pants become longer, on the right they become shorter. To shorten the pants you overlap the sections. Finally, adjust the lines.
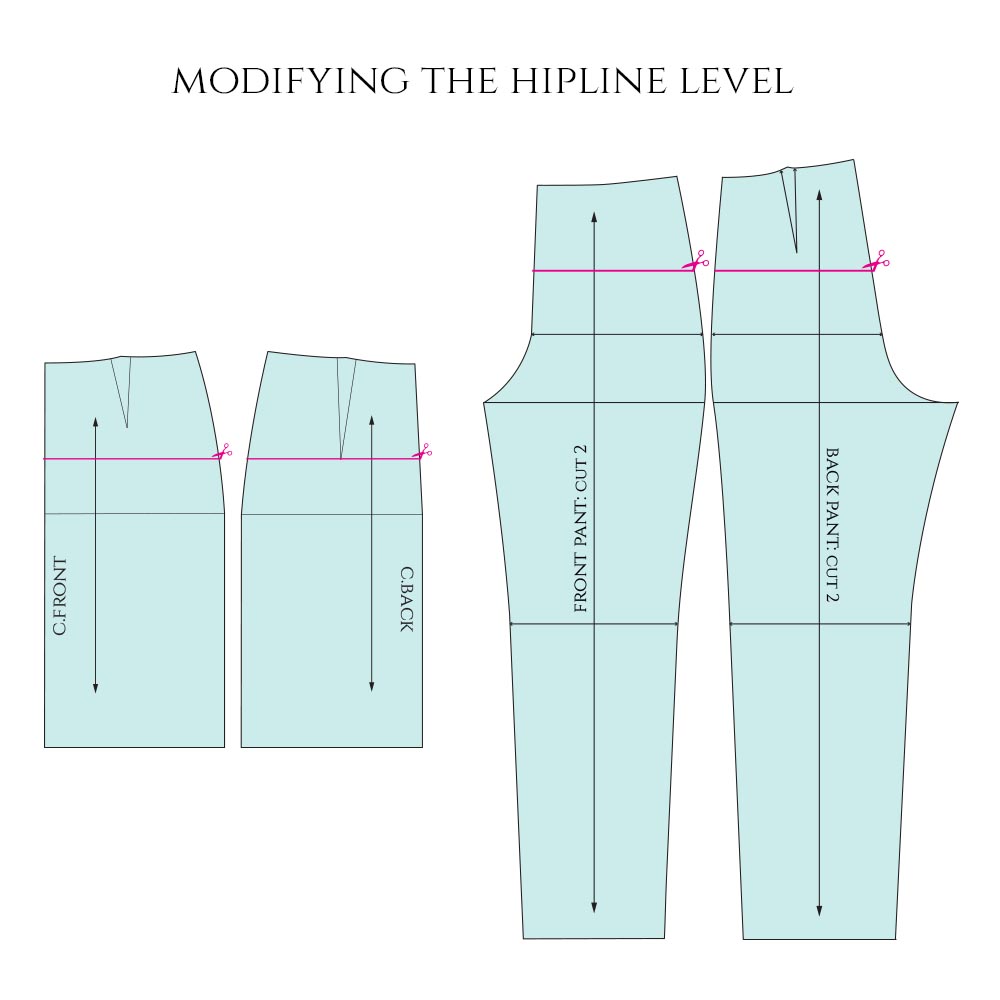
Higher/Lower Hipline
Similarly to the previous example you can also alter the hipline height.
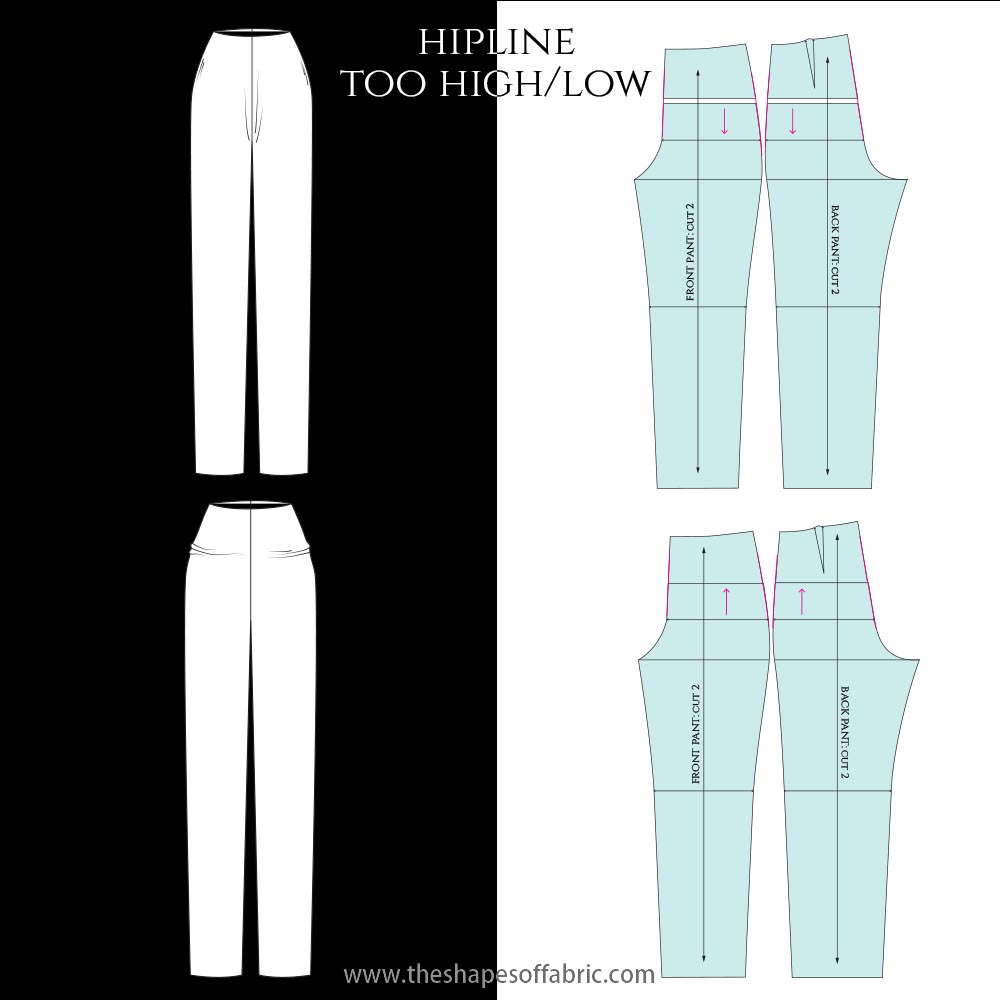
If it’s too high, the hip curves of your skirt/pants remain empty on the sides because the widest part of your hips is lower. The pants might also have the crotch seam too high up which causes it to pull. In the case of a pencil skirt then your hips might not fit as the skirt becomes narrower below the hipline.
If the hipline is too low, your hips won’t fit as the widest part of the skirt/pants is lower than your hips. Therefore you’ll see some tight horizontal wrinkles form where your hips are. The skirt might hike up, too.
The solutions:

Hipline too Wide/Narrow
Speaking of hipline. This is easy to notice when fitting. The hipline will feel either tight or loose. And there are wrinkles:
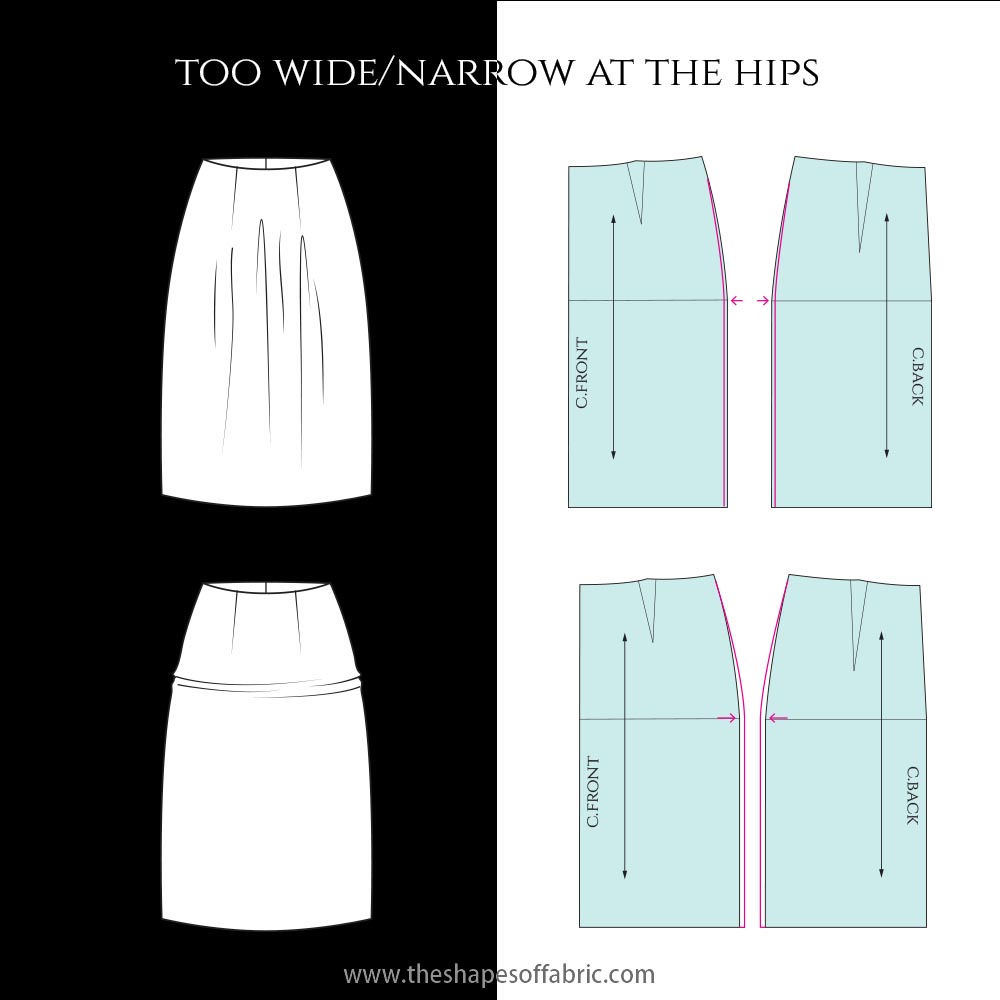

When adding width to the hipline, just ensure that the difference between the waist and hip doesn’t become too pronounced at the side seam. If this happens, you can widen the waistline, too, and make the darts bigger to compensate.
Waistline too Small/Large
This is another easy issue to notice. Here are the solutions.
You have the darts, side seams and the c-back seam to modify (+c-front for pants). Divide the measurement between different points. If one dart becomes too large, you can add a second dart and divide the dart width between the two. Take in at c-back if your skirt or pants gape there.


High Hip Curve
This refers to the hip curves that start almost right below the waistline. The way patterns are normally constructed the hipline curve is placed much lower, so the high hip curve needs some space added higher up.
When fitting the skirt toile you should see tight wrinkles form at the upper part of the skirt as the fabric is pulling. The pants have diagonal wrinkles going towards the crotch seam.
Keep the original waistline measurement, but change the hip curve shape adding space where needed.

Larger Thighs at Sides
Here’s another hip curve correction. You might have wider thighs at the sides, which makes the circumference below the hips wider than your hip circumference is.
So you simply need to move the widest part of the hip curve lower to accommodate the thighs.


Sway Back
If you have a sway back, the skirt/pants will have too much length at the back which causes sagging under the waistline. The pants crotch might also be pulling towards the back.
So you need to shorten the c-back length slightly and maybe add some length to the back crotch line.

Prominent Belly
This is a bit more complex modification. The garment is pulling at the front and needs more width and length in that area.
For the skirt, the whole c-front line becomes wider all the way down to the hemline. But the pants have the crotch seam, so the c-front line becomes slightly rounded to allow space for the belly. Both skirt and pants c-front becomes longer. The waistline measurement remains the same as it was, because of the darts.
If the darts become too large, add another dart.

Full/Flat Buttocks
The full buttocks is similar to the previous correction. You need more space at c-back, both in length and width. For pants, you also need some more length at the crotch seam.
If you happen to have flat buttocks, you can work in the opposite direction to eliminate sagging.


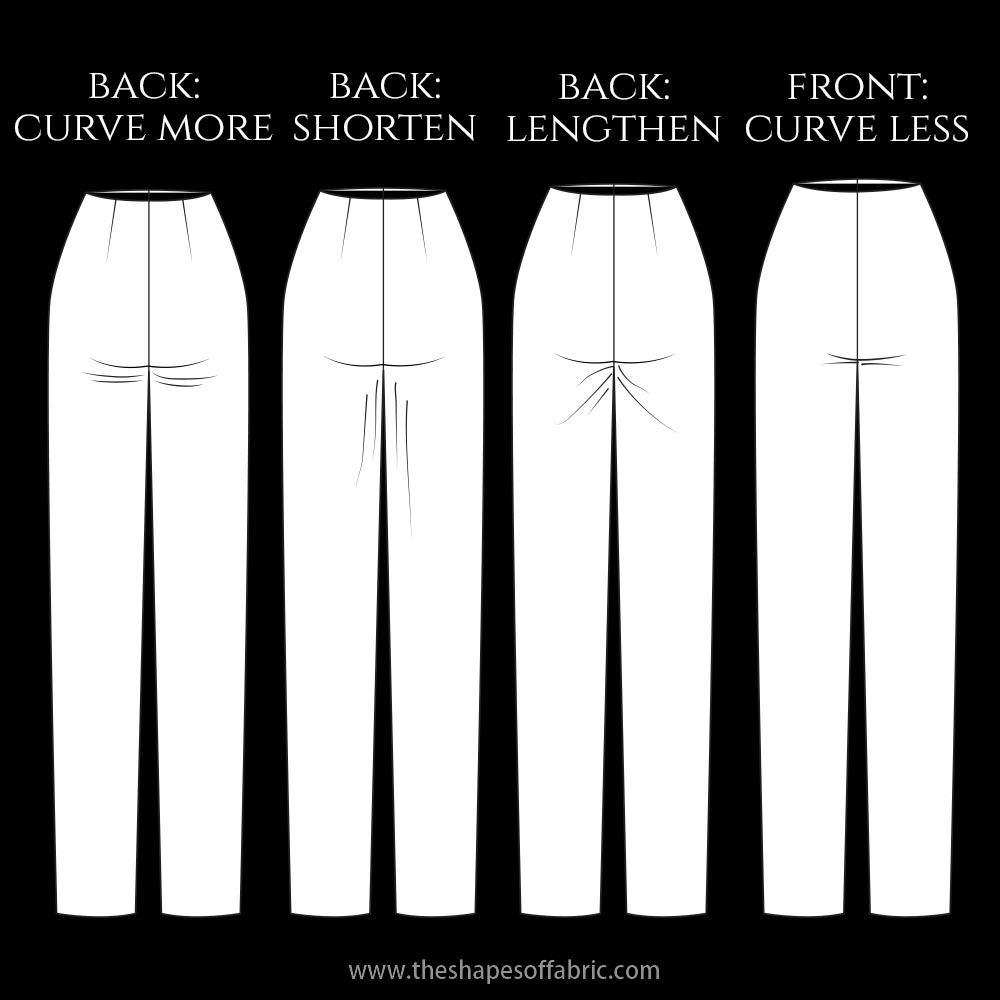
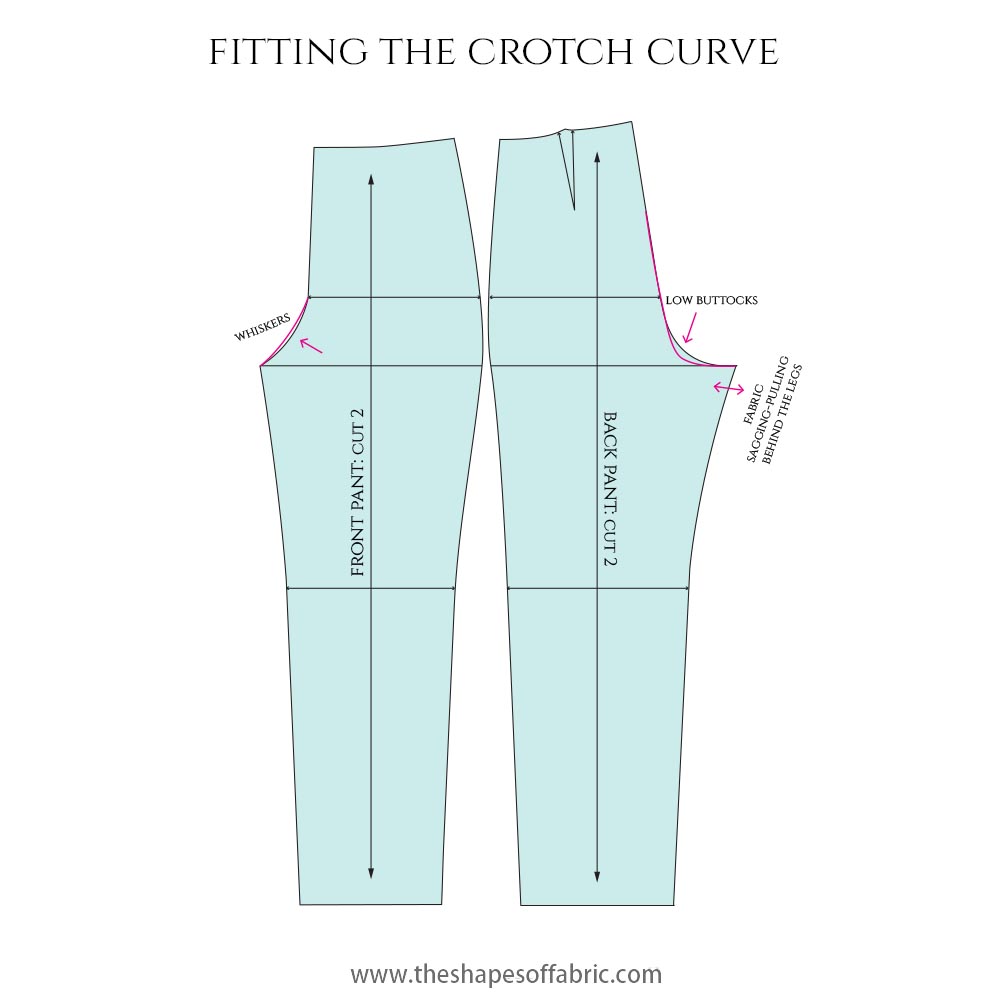
Fitting the Crotch Curve
Let’s finish this round with a few crotch curve shape modifications. The curve length and shape affect the fit of the pants in many ways.
I believe these instructions will help you fix quite a few skirt and pants fitting issues. Next time I’ll bring you some bodice fitting solutions.


29 Comments
Thank you SO much! I have not been able to figure out why i have vertical wrinkles in the crotch but it must be the hip line was too high. I also thought maybe i had curved my waist band too much… i will try adjusting hip line and cross my fingers. Thank you again for such a detailed post!
You’re welcome. 🙂 Pants can be quite difficult to fit. If the vertical wrinkles go upward to form like a smiley shape, it could also be a too curved front crotch line.
Thanks for this great article.
Even if I knew a few things on the topic, your diagrams are a great help. The comparison between the drawing of the the complete garment and the modifications needed on the pattern are very bright and clear.
I might consider printing posters and redecorate the sewing room…
You’re welcome. Wow! 🙂 I’m flattered you consider printing posters! 😀 I’ll probably put all of them in a file that can be downloaded once I finish the second part of the tutorial.
I mean it 🙂 Downloadable files would be much appreciated !
We all have our ways of comprehending things, and despite the litterature on this subject I have already came accross, I think your explanations are the most comfortable (and comforting) for me. The site is very sobre so you don’t get disturbed by anything, there is just the needed text, and I love your really great, well balanced graphics. It is not only self explanatory and easy to understand, it is very logic and synthetic to me, thus I feel I can make this “mine”, and reproduce and explain too. Everything falls into place very nicely, which was exactly the point.
If you ever think about translating some articles in french, I’d be glad to.
Wow! 🙂 That’s awesome. I’ve had a mission to learn how to draw better graphics, so I’m very pleased to read your message. I hope to get these ready in PDF format before end of January (wanted to make it a nice little booklet for my subscribers). I’ll keep you in mind for any French translations. Thanks. 🙂
Thanks a lot ! very helpful article.
You’re welcome. 🙂 Glad you found it useful.
Thank you so so much for this.. I’ll amend my favorite trousers after the season celebration.. I also had an issue. The side seam of my right pant leg was coming forward.. the second was normal.. please what’s the problem or cause
You’re welcome. 🙂 Well, if it’s only one leg, it sounds like it could be more of a grainline issue. Check out “pant leg twist” on Google.
Your generosity is greatly appreciated. Extremely helpful article.
You’re welcome! 🙂 Happy fitting.
Pingback: Schnittmusteranpassung für Jersey? Unbedingt! - Nähen statt kaufen
Good morning just discovered your site looking for Barbie patterns which I have downloaded, can’t wait to try. The above article is very interesting and comprehensive. As above would love a PDF as it’s much easier to read when trying to sort problems. Look forward to when it comes out.
Audrey
Hi Audrey! 🙂 Thanks. I should get to that PDF soon and will for sure finish before the end of January. Enjoy creating Barbie clothes! 🙂
I think this is the most thorough and well explained guide on pants fitting that I’ve found to date. It’s fantastic! Thank you very much for writing it!
Thank you! 🙂 I’m glad to have managed to produce this tutorial. Fitting is an important part of dressmaking.
Best comprehensive pattern fitting issues I’ve seen.
Do have any more resources on fitting the crotch area I would love to get more details on that. Thanks
Did you get the Fitting Guide pdf already? I added a few extra issues there.
Well detailed tutorial…thats so nice of you😘😘
Thanks so much! 🙂
Hi I dont understand the pant fitting at all, when u say cut on the hip line I see u cut away from the hip line
Are you referring to rising or lowering the hipline level? Yes, you can cut exactly at the hipline, and then depending on if you need to add or remove length, you either add paper underneath to cover the gap, or overlap the upper and lower part of the pattern after having cut, and tape/glue the pieces together. You can also separate the pieces higher up if you prefer.
Hi Audrey. I’m about to give up! I’ve done simple pant tailoring before on ready to wear pants only. I never altered patterns.
I lost weight after my illness; of course nothing fits like it did.
The problem area are the famous under the bum and back thigh wrinkles.
So, l need to alter my 12 pairs of ready to wear pants.
I appreciate your way of explaining how to do the pattern adjustments. Is it possible to post some on how to alter ‘ready to wear pants’?
Hope u can help me out,
Mary-ann
Hello Mary-Ann. 🙂 It sounds like there’s too much fabric at the back leg. I think you could unstitch the inner leg seams and shorten the back crotch seam to make it better.
Oh my goodness! Finally a place with all the ressources I need! I’ve been struggling with multiple toiles of a vintage knickers pattern. I think the one thing I’m still unsure of is: What adjustments should I start with? I assume it’s better to do things incrementally in case of backtracking or not knowing where the fitting process went wrong. I find that certain issues can be red herrings for others…
What would you suggest we notice and fix first before going in too deep? I think I might have to restart my fitting process.
Late to the party, but I hope to gather some insights from you! Thank you for such a complete and resourceful website!
Thanks so much! 🙂 So lovely to hear that. I think you should start with the crotch height and -length adjustment for the pants, because it affects where all the rest of the pants will end up: the hip level, and the waist. Not sure if you’ll be fitting skirts, too, but I’d say the hip position and -circumference for skirts is the first one. For example, if the skirt is too tight around the hips, it will remain too high up and therefore the waist won’t be where it should.
As a beginner sewist, I’m ecstatic to discover this entire website exists. Every post is detailed and informative. Can not wait to get sewing on these projects. This is an invaluable resource.
Wonderful! 🙂 Be sure to check out the Contents-page as it’s easier to find specific tutorials there.