You know how Pattern Magic has a chapter on designs inspired by geometric shapes? Well, I decided to publish something similar: a series of blog posts where I introduce patterns that were inspired by geometrics, starting from the square.
I’ve often been inspired by these shapes, so I chose a few designs from the past, but also came up with a few new ones. I hope you enjoy this “presentation”.
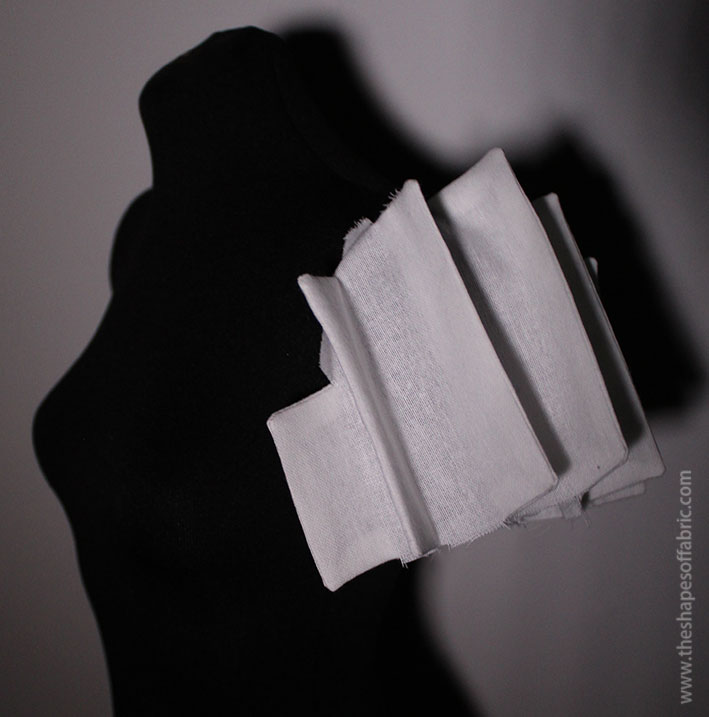
Layered Bodice
The square shape can be created in a variety of different techniques. First, I want to bring back this oldie, the layered bodice. The square shape forms in the center of the four layers. So in this case it’s present in the negative space.

I re-drew the pattern graph so that it’s easier to understand. There are four layers and each layer has a separate facing piece. You need to temporarily rotate the dart to draft the second layer.

The idea is to draft the layers symmetrically on each side of the center line.
Layer 3 will then have a little dart, but it’ll remain hidden under layer 2 edge. You could even choose to gather the dart volume.

If you’re interested in the layering technique, here’s a tutorial.
Panels: Sleeve and Skirt
Another way to use the square shape (or in this case it’s more a rectangular shape) to create designs, is the panel construction.
You might remember this sleeve from an earlier sleeve tutorial.
The rectangular panels create a really particular shape for the sleeve. Here’s the pattern.
In this case the sleeve is divided into 8 panels, and then a rectangular shape is added to both sides of each panel. Only the panels that will be sewn together need to be the same size, so you can play with different sized rectangles.

Here’s how to trace each panel. The example is for panel number 3. It’s a bit tricky to see what to trace. First, find the original panel and then add the rectangular shapes on both sides.

This sleeve got me thinking about a skirt.
Just like you do with a pleated skirt, I divided the dart volume between the various panel seams. Once the panels were ready, I proceeded to add the rectangular shapes on both sides of each.

These are the final pattern pieces. They cover 1/4 of the skirt only, but you get the idea.

I was curious to see what this skirt would look like, so I made a toile.

Pretty interesting, but I still wanted to invent something, so I tried pinning the panels and here’s the final look. I’d see this in taffetà, Roberto Capucci style. 😀 What do you think?

Button Placket Shape
Something more simple: a button placket. Because the square shape can be present even in little details.
The button placket is usually a simple folded section, but you can make it more interesting by drafting a different profile for the edge of the buttonhole side. The buttonholes will be placed along the c-front line and there will be a facing.

To avoid gaps, you need to extend the left side further in from the c-front line. I added an extra 2cm. This of course means that the buttons won’t be sewn in the center of the button placket.
After having sewn the facing, trim the corners and clip the angles before turning the right side out.

Pleated Motifs
You can also separate sections of your garment and decorate them with pleats. Basic tutorial can be found here.
This top is an example on how you can add a simple pleated motif and absorb the darts as you go. I made the bodice a few years ago.

Now I’ve revisited the pattern, eliminating a few seams, because you don’t really need them, except for decorative reasons.
Here you can see how the pleated motif goes through the dart point and the dart therefore gets absorbed into the style line. You can cut the lower section on the fold in this case and only have a little seam at the top.

The rectangle is divided into four sections. Then you add pleats to each. However, as the motif is symmetrical, you only need 2 pieces that will be cut twice. There’s also a plain base under the pleats that will sustain them.
Then I made a new version with the same idea. But instead of just a motif, I did a whole panel.

Here’s the pattern. To make the central panel narrower I moved the dart point a bit. The 3 rectangles form the panel. As before, you only need to add pleats to 2 pieces, which are then repeated.

I think both of these two designs would work better for a T-shirt style, using a dartless bodice as a base. Or if you want to use the basic bodice, then ignore the waist dart and only absorb the bust dart to make it a more loose-fitting garment
Bicolored Pleats
This top has been enhanced with a few 3-dimensional square shapes. You get this look by adding pleats and layers. The bust shape is what creates the 3D effect. If you want to turn it into bicolored piece as I’ve done here, you then separate the pleats so that you can cut them in different colors.


So, first draft the final square shapes onto the basic pattern piece, absorbing the dart. Then add pleats normally, where possible. Near the bust the line is curved, so you need to add a layer instead.
Initially it looks like the square shapes are going to have more seams, but when you separate the different colors at the base of the pleats you get to unite the pattern pieces again.
Bamboo Pleat Decoration
The bamboo bodice type of pleats are actually pretty versatile. I used them to make this top, which is another design inspired by geometrics.

First divide the bodice into four pieces, absorbing the dart, and then divide those pieces into smaller sections. Each line represents a pleat. There are basic box pleats in the center and the rest is bamboo pleats.
Piece number 2 is cut twice, so you only need to add pleats to 3 pieces. If you’re not familiar with bamboo pleats, have a look at this basic tutorial.
When you place these pleats symmetrically, they form square shapes. And pleats of course create kind of a 3D surface.

Fold the pleats towards the center and when sewing, ensure that you match the pleats at the seams.
Inspired by Geometrics: Making Little Boxes
I learned this technique originally from Shingo Sato, but I hadn’t been using it much. So, I decided to re-visit it for this tutorial and got inspired!
Let’s see a bodice first. I made it using the technique as taught by Mr Sato following the TR cutting style. This means, that you plan and build the design directly on the dressform.
Here you can see a basic bodice that I’ve placed on the dressform. I then drew the box shapes around the neckline because that’s where I was going to add them.

Next, I built the boxes in paper, taking measurements from the shapes I drew on the bodice.

You might be wondering how to create the boxes. Well, I drew this little graphic for you. 🙂
As you can see, the box doesn’t need to have a square shape. You just need to draft the walls in a 90 degree angle.

Cut the boxes and tape the corners. Then you tape the boxes on the bodice. I added little “feet” under the box so that it’s easier to tape onto the bodice.

Next, you draw style lines so that you can flatten the pattern. These style lines need to pass through each box corner, so I decided to separate the neckline section and divide it into panels.

Finally, you cut away the fabric from underneath the boxes and then cut along the style lines to separate the pattern pieces. You can add a few notches before this, if needed.

Now, these pieces will become your pattern. So, use them to cut the final fabric. I numbered the pieces as it seemed like they would easily be mixed up!

To sew the piece, I started from the neckline section and first sewed all the pieces together.
Then I proceeded one box at a time closing the corners and completing the panel seams. Trim the corners before turning the right sides out.

After this, I pressed the boxes and then attached the neckline section to the rest of the bodice.

Here’s the final look:

Lantern Sleeve with Boxes
Then I had this idea to make a lantern sleeve with box shapes added on top! I used a similar construction as for the paneled lantern sleeve in this tutorial.
First, draft the basic lantern sleeve as usual.

Then, divide it into panels. The boxes will be added on top. I left out the area that would remain under the arm: panels 1 and 6.

Here’s the original draft. I decided to draft the box patterns directly, linking them together.

I divided the upper section into 3 parts, but you could also cut them in one piece. The boxes don’t cover the whole area to maintain the sleeve cap shape.
At this point I still didn’t know whether this design would even work, but decided to try it out.

To sew this sleeve, I united the 3 sections of the upper part first, and the sewed All the corners (which were many!) See the little arrows.

When both the upper and lower half of the sleeve were ready, and pressed, too, I sewed them together and closed the sleeve seam. BTW, this heavyweight cotton muslin was an absolute darling to work with for this project!
And this is how the sleeve looks like. I was pretty excited. It worked!


This is an excellent way to end this presentation. I have more pieces inspired by geometrics to show you: triangles and circles! But that will be for another time. 🙂
22 Comments
Hi Milan!
Great pieces and inspiration you got here. I could think of a million ways to incorporate these in my designs.
Thank you very much for always sharing your ideas. Its fun reading from you all the time.
Thank you Irene! 🙂 I’m happy to share my ideas and it’s great to hear that they offer inspiration to others.
Bonjour j’ai vu les patrons merci beaucoup ça m’intéresse et j’ai aimé .
Excellent! 🙂 Merci beaucoup.
Your work is astounding!
Thank you! 🙂 Really appreciate it.
Wow…. I am always surprised and amazed at what is possible with fabric. I like to be inspired by you. To me, this is the supreme art of tailoring. I’ve often seen shapes like this on the catwalks and I’ve been puzzled as to how these shapes and patterns are designed. Thank you for your insight into the techniques. Some ideas from the previous blogs are already on my do-it list.
Greetings from Germany
Antje
Awww, thank you! 🙂 I’m grateful to have a chance to inspire people and share my discoveries. It’s also the perfect excuse for me to experiment with patterns. 😀
That is absolutely fascinating.
The photos and the graphics are wonderful.
No kidding, I love you explanations : these complex, technique and challenging constructions end up being attainable goals.
And I never thought of actually wanting to try this myself.
Thank you Julie! 🙂 I’m a bit obsessed with the instructions to make sure they are easy to understand. Therefore I’m so happy to hear this.
Travail très inspirant! Bravo! Cela me donne envie de travailler les volumes et les plis… Merci!
Merci beaucoup! 🙂 I hope you’ll create something beautiful with pleats.
Don’t remember what I was looking for when subscribing to your site but this blog was very interesting and useful for projects in the making. Thanks for sharing
Thank you so much! 🙂 I’m happy to share my projects and what I’ve learned from my various experiments.
Qué maravilla! Me alegra el día cada vez que públicas. Gracias.
Muchas gracias! 🙂
This is indeed work of art 🙌🙌
Welldone
Thanks so much! 🙂
Thank you so much for always sharing… I’m glad I found your page on my first week of learning about fashion designing… You’re such an inspiration… It’s been years now and I am still learning so much from you .. God bless you real good!!
You’re welcome! 🙂 I’m always happy to inspire and share what I’ve learned myself. Thanks so much.
Wow nice one…. pls ma I want you to be my teacher
Thank you! 🙂 You’ll find lots of tutorials here and more at my Instagram.