

Pleating is another way of adding details to your clothes. Probably the first thing that comes to your mind, is a pleated skirt. But pleats can be placed in other ways, too. You can pleat the whole garment or just parts of it. Pleating creates patterns and textures. Here are some examples of my experiments:


Basic tutorial
I made this little tutorial on how to add pleating to a flat pattern. In this case I’m adding knife-pleats. You can use the same method for box-pleats, too, but you’ll probably have to add more volume.
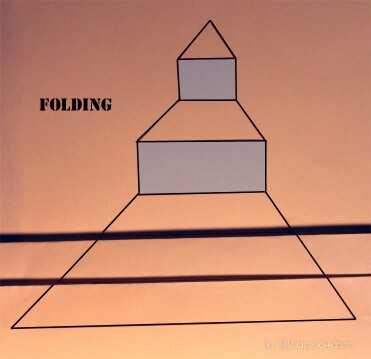
1. Draw lines where you want the pleats to be. Number each and measure the width.

2. Take another piece of paper and start copying from the first space upwards. The maximum width of the pleat would usually be the width of the distance between the pleats. Otherwise you’ll get bulk.
In my example it’s 2cm. Of course you can also add less volume.
Pleat is folded twice, so you’ll need to double the amount of cm you want the final pleat to be. This way I got 4 cm.
Add the volume in a 90 degree angle. Then copy the following space, and continue this way until you finish adding all the pleats.


3. Fold all the pleats so that you’ll see the original shape of your pattern piece. You’ll probably have to correct the lines a bit, so do that before cutting. I also like to add the seam-allowances at this point.
4. Cut and open the folds. Your pattern is ready!

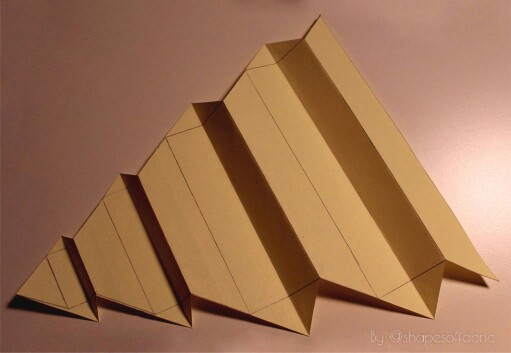
When cutting fabric, remember to clip around each pleat: where it starts and where it ends. Especially if you can’t see it otherwise from the shape of the pattern.
I think this copying method is better than the one where you cut and tape. It’s more precise and involves less hassle. Give it a try if you haven’t already.
Pleated bodice
As usual, I’ll now show an example of adding pleats in a bodice-pattern.
I started by dividing the basic pattern into three sections, absorbing the darts. I had to fiddle with the length of the darts a bit, to draw the lines where I wanted. Basically the one on the right goes all the way up to the bust-point. The other one ends 3cm lower.
More on stylelines here https://www.theshapesoffabric.com/2018/02/28/dart-manipulation-basics/

After separating the three sections, I closed the darts and drew lines where I wanted the pleats to be. My bodice will have 2 sections with pleats and 1 without. The distance between the pleats starts from 0,5cm and gets wider towards the edges of the bodice.

I added volume for each pleat with the method I explained earlier.

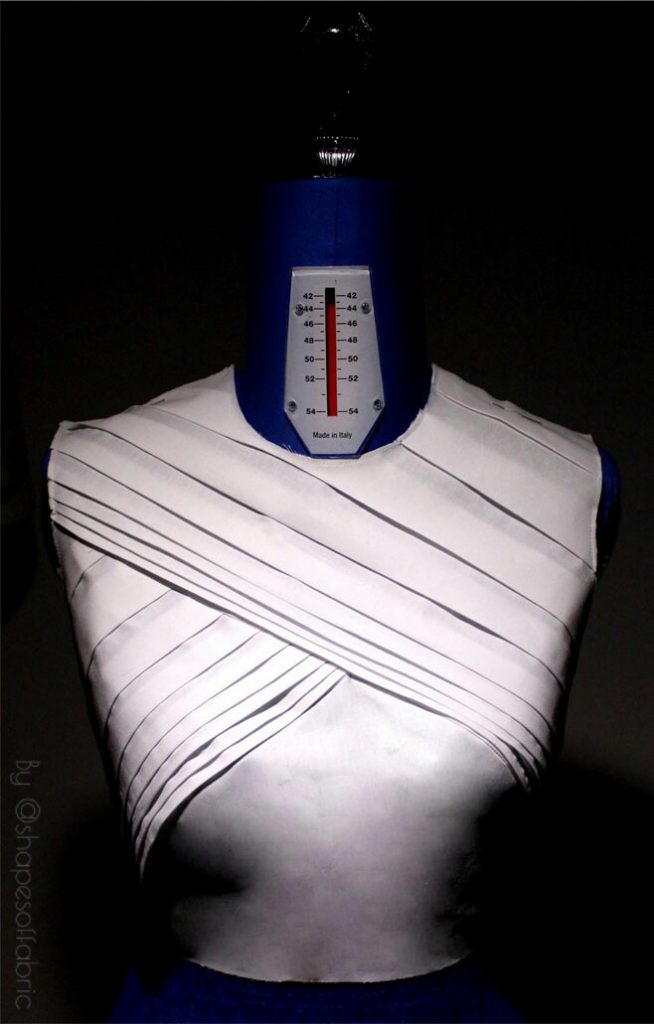
Then I folded the pleats, corrected the lines and added seam-allowances. Here you can see the pattern-pieces after cutting.


When sewing, first I pressed all the pleats and fixed them in place by stitching the edges. Then I had all my 3 sections ready to be sewn together.

And this was the resulting bodice:
I think I’ll write another post on this theme with more examples, as pleating is one of my favorite techniques!
How about you? Do you like pleats?

16 Comments
Thanks so much. Very educating. I will try it out.
You’re welcome. 🙂 Happy pleating.
ممنون برای اشتراک گذاری
من خیلی روشهای الگو سازی حجمی رو دوست دترم
کاتیگ و اوریگامی و …درسهای شما را
You’re welcome. 🙂
Great tutorial , especially your second design is so interesting. All of your pattern techniques are very good. Please if you can make more pleating and layering tutorials and the best way to sew them ,that would be great.
Thank you so much! Sure, I can make more of these. 🙂 I quite love pleated and layered designs, so it’s nice making them. You’ll find some more examples among the posts on my instagram @behind_shapesoffabric
This is very detailed! Thank you so much!
You’re welcome. Happy pleating! 🙂
I just discovered your blog. Thank you for posting it. I am learning so much.
Happy to hear that. 🙂 Welcome.
Thank you for this tutorial! I’ve never been much of a draper- flat pattern drafting always made more sense in my brain- so having this reference is super helpful as I explore a new era (1940s/1950s) of fashion design!
You’re welcome! 🙂 Same here. Love flat patternmaking! Sometimes I try draping but somehow I always find myself back at flat patterns. 😀
Si en algún momento pensé que ya me lo sabia todo, ahora, desde que te conocí, reconozco que estaba bien equivocada. Nunca me cansaré de agradecerte. Clio
Hi Clio, I hope you’ll learn many new things here and get inspired. Greetings from Italy. 🙂
I crack my brain so much on how after pleating ,the bodice will be shorter. I understand you add volume but how did you add it on the fabric
You first prepare a pattern and calculate the amount of volume needed for creating the folds. So that when you cut the fabric using this pattern, you’ll have that extra volume included because you added it at the pattern phase. 🙂