Quite frequently I get requests for tutorials on how to draft a dress pattern. And in fact I don’t have many dress pattern tutorials on my blog, so I decided to do something about that!
Last month I wrote a tutorial on Barbie-sized dresses that you can also make for yourself by changing the measurements. This time it’s back to human size.
For many of us the summer is almost here, so for this tutorial I chose dress designs that go especially well for this season. They are quite easy dress patterns to draft, too!
Start with the Basic Pattern
To draft the dress patterns, you’ll need the basic bodice block. If you haven’t got one yet, you find instructions here.
If your dress will have a sleeve, your pattern needs more ease. So you can follow this rule: 4cm of ease for the sleeved dresses, and 2cm of ease for the sleeveless options.
In case you only have a basic pattern block with 4cm of ease, but you want to make a sleeveless dress, at least move the side seam lines 1cm inwards under the arms (both front and back) and then adjust the armscye lines a bit.
Each dress pattern that follows, starts from copying the basic bodice pattern.
Simple Dress / A-line Dress Pattern
You can make this dress straight, or in an A-line shape. My example is an in-between version. In any case it’s a very simple dress pattern with only a few changes to the basic pattern.
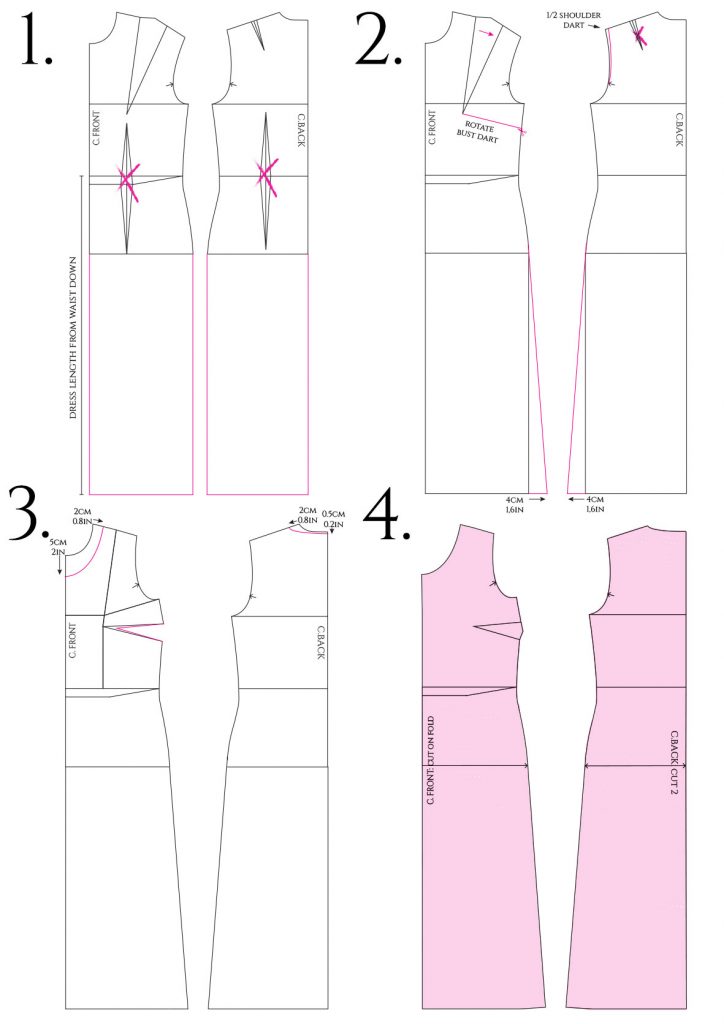
1. You won’t need the waist darts, so you can just ignore them. Add a desired amount of length to the pattern, measured from the waist down. If you have a more sizeable bust, you might need the front piece to be a bit longer, because the front hemline tends to rise.
2. Add some flare to the side seams unless you prefer a straight shape. In this example I added just 4cm/1.6in, starting from the hipline. If you want an A-line shape, you can start from the underarm level instead.
Rotate the bust dart towards the side seam.
Eliminate the back shoulder dart: shorten the shoulder line from the shoulder tip by half of the dart measurement. The rest will remain as ease. If you feel like you won’t be able to absorb that much ease, you can also leave just 0.5cm/0.2in.
3. Draw the new neckline. You can follow the measurements seen in the picture, or make it your own.
Center the new dart point 2-3cm from the bust point. You get the dart intake shape by cutting the side seam of the dress with the dart folded.
4. This is how the final pattern looks like. Now all you have to do is check that the side seams have the same length and that the neckline, armscye line and hemline run smoothly between the front and back piece. Adjust where needed.
There’s a zipper at the c.back. Add a notch where the opening starts, usually at the hipline.
You can finish the neckline and armholes with a facing or bias binding. Or by lining the whole dress.

Adding a Sleeve
What about the sleeve? Well, like I said earlier, you’ll need more ease if there’s a sleeve. But otherwise the dress pattern remains the same.

Copy the basic sleeve pattern that goes with the bodice. You can either make a simple sleeve as in this example, or turn it into a more elaborate design. I have many sleeve tutorials, so check out the sleeves tag.
Here’s how I did with the basic short sleeve. The sleeve length is measured from the top of the sleeve cap. I even kept the same width.

A-line Dress / Trapeze Dress Pattern
Add more flare to the pattern and you get a trapeze dress! I guess this could also be called an A-line Dress..
Start the pattern like you did with the previous example, deciding on the length.
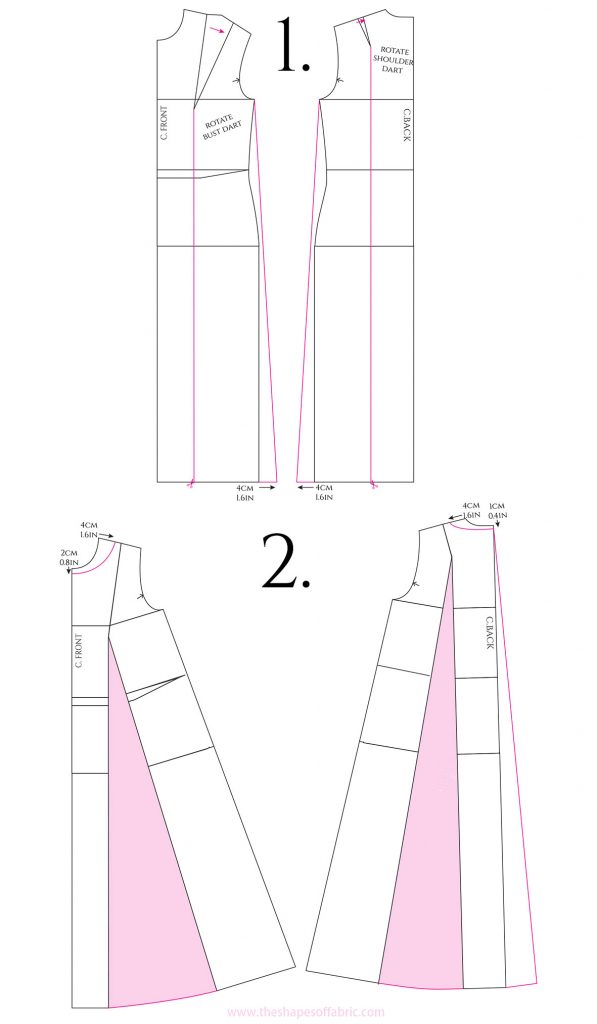
1. Instead of rotating the bust dart towards the side seam, turn it into flare at the hemline. Do the same for the little shoulder dart at the back.
Add more flare to the side seams. This time they will be completely straight, without shaping at the waistline.
2. As the bust dart will produce more flare than the shoulder dart, you can compensate by adding some extra flare to the c.back. This way both front and back piece will have the same amount of flare.
Draw the neckline. I went for an oval shape. Not quite a bateau, but pretty wide in any case.

Here are the pattern pieces. Do the usual checks. As you changed the inclination of the c.back line, you need to adjust the neckline and hemline, too, so that there won’t be angles when you unite the back pieces.
Measure the neckline to see if you’ll need a zipper.
If you want sleeves, follow the instructions above.
My example however is without the sleeves. I love the 60’s feel this fabric print has. It’s some sort of crepe I believe.

Wrap Dress Pattern
Not including a wrap dress here would’ve been just wrong! 😀 So here we go. This example will have flutter sleeves.
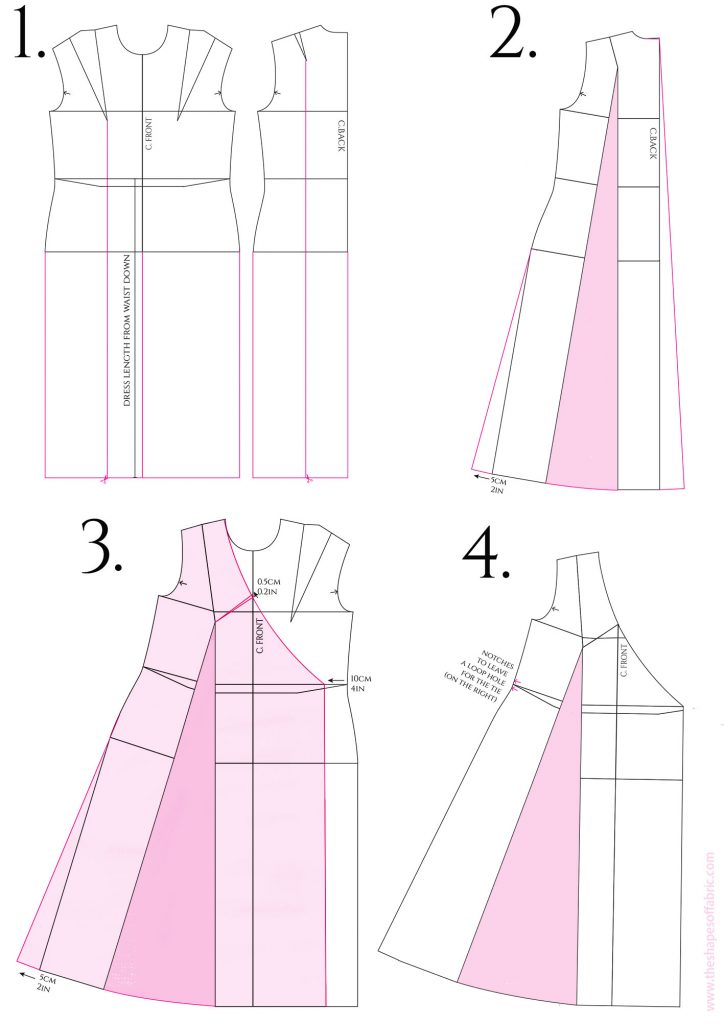
1. The front of the dress is asymmetrical, so you need both sides of the dress front. You don’t need the waist darts. Add length as usual.
Turn the bust dart and shoulder dart into flare at the hemline. At the front you only need to do one side (=the side that will remain on top).
2. Add flare to the side seams. Here 5cm/2in. And compensate the amount of flare at the c.back like before.
3. Draw the neckline as in the picture, ending at the waistline, 10cm/4in inwards from the side seam. This way you’ll have some room to tighten the dress at the waist with the tie belt.
To eliminate some neckline gaping, you can draw a tiny, 0.5cm/0.2in dart that you will then rotate and add to the flare at the hemline. Feel free to draw a larger dart, but it’s quite difficult to guess the size without making a toile. So 0.5cm is a good starting point, that often ends up being enough.
4. Here you can see the final front piece shape. Adjust the neckline after closing the dart. Add notches at the waistline: this will become a loop hole for the tie belt to pass. You only need it on one side.

Above you see the pattern pieces. To calculate the tie belt length, you could do for example 0.75x waist circumference + 50cm/20in. That should be enough to be able to tie a bow at the front.
The belt width is twice the final height + 2x seam allowance.
The Flutter Sleeves
This dress has sleeves, too. I thought flutter sleeves looked nice. Here’s how you can draft the pattern.
Copy the basic sleeve that goes with the bodice pattern. Decide on the length.

1. Start adding 5cm/2in of volume to both sides. Divide the sleeve into sections as in the picture.
2. Add volume with the slash and spread -method. You can use the measurements seen here, or add even more.
Redraw the sleeve cap and hemline when you’re done.
3. The final pattern piece. The grainline is in the middle.
Here’s the sample wrap dress I made with some viscose fabric scraps I had in my stash.
I think I’d finish the neckline with a bias binding.

Maxi Dress Pattern
Actually Any dress here can become a maxi dress by adding enough length. But let’s see this example.

It has a seam at the waistline, uniting a fitted sleeveless bodice and a gathered, flared skirt. But you’ll get both from the basic bodice pattern.

1. Start as usual by defining the length.
2. Then separate the dress at the waistline and work on both parts separately from now on.
The skirt: As this will be a gathered skirt, you can ignore the waist darts. Measure the waistline width and add 50% of extra width to the c.front and c.back.
For example, if your front pattern piece measures 19cm, calculate 19×0,5. The result is 9.5cm. That’s the amount you add to the c.front.
I think 50% is a good amount for gathered skirts, because gathering always causes bulk unless you’re using a very light weight fabric. So adding more than that, will make your waist look bigger.
Add also flare to the side seams. Adjust the waistline to it’s new width.
The bodice: Decide how fitted you want your bodice waist to be and then adjust the waistline accordingly. You can take in at the side seams and at the c.back as seen here. And also make the waist darts bigger if needed.
Rotate the bust dart, uniting it with the waist dart. You can also rotate it to the side, if you prefer to have 2 darts.
Center the new dart point 2-3cm from the bust point. You get the dart intake shape by cutting the waistline of the bodice with the dart folded.
Draw the neckline. This is another wide neckline. To avoid gaping, draw the front neckline first. Then measure the remaining front shoulder line length, and draw the back neckline: Measure from the shoulder tip inwards, using the same measurement you have at the front.
As the back shoulder line of the basic pattern is wider than the front because of the dart, this move will cause a slight outward tension that helps to keep the front neckline straight. Well, that’s the theory at least.
Here’s the pattern. Check all the pieces as usual.

Strap Dress Pattern
Then there’s the short version of the previous dress, with a different kind of fitted bodice.

1. Start by deciding upon the dress length.
2. Separate the skirt and the bodice at the waistline.
For the skirt, work the same way as with the previous dress.
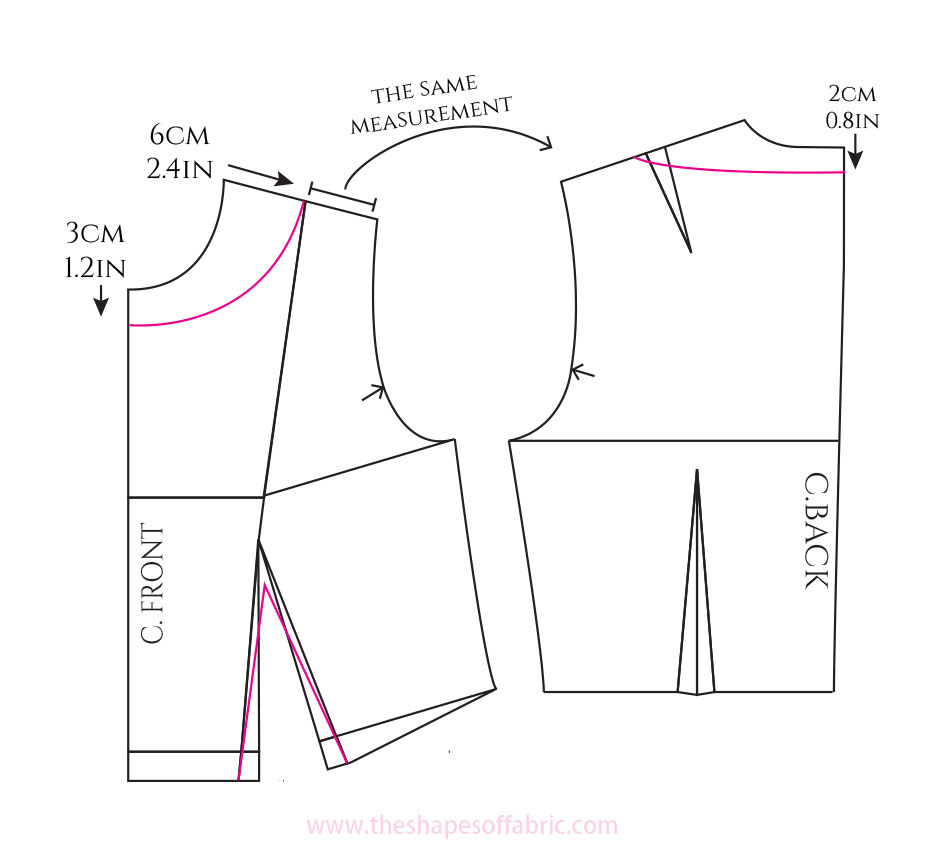
For the top, again, adjust the waistline to your preferred measurement. Draw the sweetheart neckline, ensuring it’s high enough to cover the bust.
With the help of the darts, separate the front piece in two. It’s usually a good idea to increase the bust dart volume by 0.5cm/0.2in as seen in the picture. Otherwise the neckline will be gaping.
If you’re going for a really fitted bodice, you can measure also the under bust circumference and carve the bodice accordingly at the new seam under the bust.
However, this is the kind of pattern that is difficult to nail without doing the fitting, so don’t worry if yours doesn’t fit perfectly at the first attempt.
You can get an idea for the strap length by measuring the distance between the neckline you drew and the shoulder line of the original pattern. But also with the straps, you’ll need to adjust them at the fitting phase.

1. Copy the bodice pieces, including the grainline for the side panel. Check the two front pattern pieces against each other and adjust the neckline and waistline. You’ll probably need to add some length to the side panel to equalize the waistline.
2. Close the back dart and smoothen both sides, eliminating the angles.
3. Check that the side seams have the same length (back piece and the side panel piece) and adjust the waistline and neckline so that it runs smoothly between the pieces.
Here are all the pattern pieces. The strap pattern is missing, but that is just a rectangle. You can fold it lengthwise in half, so the width is twice the desired size + seam allowance on both sides. Once you’ve done the fitting, you can add notches where the strap will be attached.

The easiest solution is to line the top, so you get a nicely finished neckline and also the straps can be sandwiched in between.
And this is what the dress looks like:

I hope you enjoyed my little dress-tutorial. I’ll make another one later, so if you have some dress style requests, let me know!
Remember to sign up for my Newsletter to be notified about new blog posts. 🙂
28 Comments
Thank you so much for this. Now I can make my first ever dress using this and your bodice tutorial. I am so excited!
You’re welcome! Send me a picture then. I’m curious! 😀
Thankyou so much! It is so generous of you to share your amazing knowledge. I am going to try and make my first dress using your basic bodice tutorial and this tutorial!
I would really love to sign up to your newsletter and get the measurements chart. I’ve tried several times…typed in my name and email, ticked the ‘i am not a robot’ box and the subscribe box. It gives me a message to go and look in my email inbox to confirm my address but no email has been sent. I’m not sure what the problem is. Can you help?
You’re welcome. 🙂 I’m happy to share. Looking forward to seeing your dress! I see that you subscribed but it’s unconfirmed, so probably the email is in the spam folder. Let me know if you can’t find it, so I can manually confirm for you.
Wow, these are amazing. Thanks for sharing your knowledge. I really appreciate it.
Thank you! I’m glad you like them. 🙂
Thank you for such detailed tutorial. I’m going to sew a maxi dress as soon as the confinement ends in Paris. Stay safe!
You’re welcome. 🙂 Maxi dresses are gorgeous! I hope you’ll soon be out and about. Here in Italy they started taking down some restrictions today, but most of the shops are still closed -including fabric shops.. And it’s quite a hassle to go anywhere in any case.
Thanks a lot for the overview of dress types and how to adjust the basic pattern accordingly including the muslins to get an idea of the final dress. The tip on how to avoid neckline gaping at the strap dress is very useful and just in time for me because a sundress is next on my sewing list 😉
It was my pleasure. 🙂 I was so happy to actually be posting something that goes with the season. 😀
I must admit that you are real life saver,u are wonderful soul cant thank you enough your tutorial has been really helpful to me,not only on this but to all of your tutorials I love you so much God bless you,am so grateful 🙏🙏🙏
Very pleased to hear that. 🙂 I’m glad that my tutorials are turning out to be useful to so many people.
I love the wrap dress. 🙂
Thanks! 🙂 I’m sure it would look very cute in miniature, too. Or, more miniature (mine is 1/2 scale). 😀
These are truly awesome! I’m using the winifred aldrich basic bodice block – do you think I need to add more ease when making the first version? She has a fitted block and relaxed block, I wonder how to calculate amount of ease needed
Hi Sophie. I was checking the Winifred Aldrich pattern blocks. It says in the instructions how much ease is to be added and they are slightly different to what I usually do. You can easily change the amounts if you want. There’s quite a lot around the armscye line for a fitted bodice if you want to have a snug fit. Otherwise they look quite good. I’d probably add more ease in the back if you intend to have sleeves. You can compare the amounts of ease if you check out my basic bodice tutorials. 🙂
Hello my dear, this is first time am writting a not after viewing and admiring all you wonderful work. Thank you so much for shearing your overview of dress types and how to adjust the basic pattern accordingly to get an idea of the final dress. You just so generous, so intelligent and amzing of the way you illustrate every details. Is very useful and helpful for me. You are blessed. THANKS
Thank you so much! I’m flattered and glad that you found this tutorial useful. 🙂
thank you for your sharing. You are very generous 🙂
You’re welcome. 🙂 It was my pleasure.
Bonjour vos patrons m intéressent beaucoup
Merci beaucoup
Merci bien! 🙂
I really like the designs, really enjoyed reading your article 😉
Thank you so much! 🙂
How do I print
You can use sites such as printfriendly to create a pdf of a web page URL and then print it. 🙂
Hey i really loved these patterns and are very helpful. Can be please add some more complex dress patterns.
Thank-you
Thanks so much. 🙂 Alright, I’ll come up with something.