I recently published a patternmaking guide on Vintage-Inspired Dresses, and there was going to be a tutorial to go with it. So here it is, just in time to accompany my Retro Sewing Challenge, that’s currently (March 2021) live on Instagram. Check out the side panel – or bottom of this page if you’re on mobile – for info.

The 50s style swing dress (upper left corner) got picked as a subject of this tutorial, as it gives me the opportunity to show how to sew the tulle petticoat, too. The dress consist of a fitted, princess cut top with a boat neckline, and a full circle skirt. It’s the easiest of the bunch to draft, too.
I also included a demonstration for the notch collar of the shirt dress, because you might have trouble figuring out how to put it together.
The Swing Dress Materials
For this dress, I chose medium-weight cotton. Even though it’s white, it’s actually not transparent at all. It was also super easy to work with. I chose the most obvious print for a 50s style dress: polkadots! In the end I used less than 2 metres of fabric.
Besides cotton, you could also use, for example, linen or polycotton, or if you want a softer look, try viscose.
For the petticoat you’ll need tulle and about 25cm of light-weight cotton, or similar. Here, I used two different weights of tulle, 1.6 metres each.
I added a light-weight cotton lining for the top, 0.5 metres was enough, and there’s a 60cm long invisible zipper at the back. I hemmed the skirt with bias tape, but that’s optional. You must measure the hemline to know how much bias tape you’ll need.
Especially with natural fibers, wash the fabric before sewing. It might shrink.
Cutting the Dress
My fabric had very randomly placed polkadots, so I didn’t even try matching the print.
Here’s how you can cut the circle skirt without having to use a lot of paper for the pattern. You’ll only need the little center piece that will be cut out (remember to include seam allowance). It’s basically the smaller half circle of your skirt pattern. The one for the half waistline measurement.
You pin it on the fabric. After that you just use a measuring tape to cut the skirt piece directly.
In the picture you can see the front piece being cut. It’s folded in half at the c-front. One end of the measuring tape is placed at the upper corner, and the other end at the hemline (including hem allowance). Then you just move the measuring tape as you cut.

However, you can also draft the whole circle skirt pattern on paper and use that, if this feels too risky. Some fabrics might even be too slippery for this method.
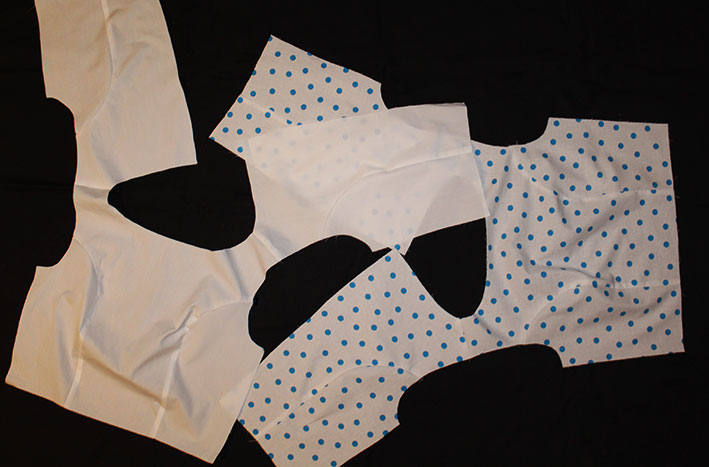
Here are all the pieces cut in the main fabric. Don’t forget to clip the notches! Stay stitch the neckline, the armholes, and the skirt waistline before they stretch.

Sewing the Princess Bodice
Sew the skirt and the bodice separately at first.
Attach the side panels to the c-front and c-back pieces. Clip the seam allowance around the rounded area of the c-front and c-back piece layer only. The seam allowance will be pressed towards the center, so this helps to avoid wrinkles.

Then sew the shoulder seams.
If you line the bodice, there’s no need to finish the seam allowance with a serger etc.
Sew the lining pieces in the same way. This is what you should have at this point:
Now, let’s unite the lining to the main bodice, starting from the neckline. Place right sides together and sew. If you have a larger seam allowance, trim it to 0.5cm after you’re done. Clip the corners and round areas to make it easier to turn, and press. Then you can edge stitch the seam allowance towards the lining.

Next, sew the armholes in the same way. In this case edge stitching will be more difficult, but you can do it in two phases, the front and back armhole separately, ending at the shoulderline.

To complete the bodice, you’ll then sew the main layer and lining side seams in one go like this:

If you don’t want to line the bodice, you can finish the neckline and the armholes with bias binding instead. Then you have to serge the seams as they will remain visible.
The Circle Skirt
As for the circle skirt, unite the front and back pieces, and sew the back seam all the way to the zipper notch. Serge (or zig-zag) the seams.
Then hang the skirt for a day or two. Circle skirts have a tendency to stretch and result in an uneven hem. Some fabrics stretch more than others.
After that, check the hemline length all around, and adjust it by cutting off excess length if needed.

As mentioned before, I used bias tape for hemming. This was the first time I tried this method, and it was quite easy and resulted in a very nice looking hem.
I did need to make two rows of stitches: first attaching the bias tape to the hemline, right sides together (1) and then flipping and pressing the bias tape to the wrong side and sew the actual hem (2). You could also hem by hand, if you don’t want to see the stitches.

Finishing the Swing Dress
Now you have both the bodice and the skirt for the swing dress. So let’s unite the two!
Sew the skirt to the bodice hemline and press the seam allowance towards the bodice.

Then there’s the zipper.
- I usually just pin the first side of the zipper and sew it directly. Love my invisible zipper foot BTW!
- Then I close the zipper and pin the other side so that the waistline matches perfectly. Not trusting Only having the pins, I also baste it before sewing.
- When the main layer of the dress is good, then we still have the lining to attach to the zipper. Here I placed the right sides together and pinned.
- Now using the normal zipper foot, I sewed the lining near the zipper.

The final step was to attach the lining at the waistline. I managed to sew the front area with sewing machine, but needed hand stitching for the back area.

The Tulle Petticoat
The tulle petticoat is a must for a perfect swing dress! The construction follows that of a gypsy skirt.
This allows you to add as much volume as you want by increasing the number of layers that go on top of each other, and the volume you gather.
The first layer can be made in any light-weight fabric (not tulle). It has a casing for an elastic, so you don’t need a zipper.
My petticoat has two layers of tulle attached to the first layer, and then 2 layers attached to each of those two. I doubled the volume each step down towards the hemline. Half of the tulle is heavier weight, and the other half lighter weight.
So, as the uppermost layer was 105cm total, the second layer was 210cm, and the third 420cm.
Except for the third layer of the light-weight tulle, which I bought in double width (3 metres wide) and decided to use the whole width, making the total circumference 6 meters!
The best tool for cutting tulle is the rotary cutter.

Once you have all your “strips” of tulle, unite them into circles to create the layers. Then sew gathering stitch to the upper edge of each, and gather so that the measurement matches with that of the previous layer.
You’ll find it useful to baste together the layers that go on top of each other.

Here are the two tulle “circles” ready.

Then you attach the layers.

I like to make it so that the seam allowance doesn’t end up against the skin. Tulle can be quite itchy. Otherwise you can sew a satin bias tape on top to cover the seams.
Then prepare the top piece, complete with a casing for the elastic. But attach the tulle before adding the elastic.

An alternative view of the tulle petticoat. 😀

Here’s the result:

If you feel like it, you could even add a satin bias binding to the hemline. But that’s a very long hemline…
Swing Dress -the posing section
And this is the swing dress!
Here first on the dressform, without a belt.

A hemline detail. The bias binding gives it a really nice boost!

And here’s me with my new polkadot dress! I happened to have a little fabric scrap in just the right color, so I made a simple belt.

P.S. The Notch Collar
Quite unrelated to the swing dress, but related to the Patternmaking Guide. Here’s a quick demonstration on the notch collar.
This collar consists of the upper and under collar piece. The upper collar is cut on the fold, on grain, and the under collar in two pieces, on the bias.
There’s also a facing because of the lapels.
Each of these pieces should be interfaced.
But how to sew this collar?
- Begin by sewing the two under collar pieces together at the c-back. Then sew the upper and under collar together as shown. Also, attach the facing to the c-front and lapel of the bodice. Clip both the collar and the lapel where the collar notch will be, and trim the seam allowance at the collar and lapel points. Then turn the right sides out and press the pieces. The upper collar is slightly larger than the under collar, so you should see the seam line move towards the under collar. Same goes for the lapel.
- Attach the under collar to the bodice neckline, starting from the collar notch point. The easiest way is to start from the collar notch and sew towards the c-back on both sides. This is to avoid the fabric gathering near the notch.
- Attach the upper collar to the facing. This part might have to be done a few times before it’s perfect.

4. Then, press the seam allowance towards the collar, trim off excess fabric around the collar notch.
5. Top stitch the upper collar to the back neckline of the bodice, folding the seam allowance under.
6. Pin the upper and under collar together, matching the seams as shown. Then either stitch in the ditch with the sewing machine or by hand. The idea is that the stitches remain invisible. This will flatten the collar.

The result:

Let me know if you need help with the other designs in the Guide. I can add sections to this tutorial later. 🙂

10 Comments
Love what you have done with the swing dress. So simple and elegant, and the petticoat sets if off beautifully. Thank you for sharing and inspiring me.
Thanks so much! 🙂 This was a nice sewing project.
Hi, very beautiful dress !
Thanks! 🙂 Yes, it did turn out quite cute. 😀
Super awesome
Thanks! 🙂
I finally finished mine !
This was a great project indeed. Your instructions were very educational and sooo enlightning !
I would never have thought I’d be able to get such results.
The dress is hanging right beside me, waiting with so much impatience to be worn by the friend I made it for : confinement and 2021 were probably the greatest challenges of them all…
Julie
Thanks Julie! 🙂 I’m delighted to hear that the dress was a success. Let’s hope there will soon be an occasion to wear it.
Love the swing dress! Can the sleeves be added?
Thanks so much! 🙂 Well, if you leave a bit more room to the bodice or make the dress in a stretch fabric, you can add sleeves for sure. This one is rather fitted, so the sleeves might not be too comfy.