This hoodie tutorial goes with a Patternmaking Guide of mine. So if you’re interested in learning how to draft the patterns, you can find the Guide here. Besides hoodies, this guide also explains sweater and t-shirt patterns. As the Guides don’t have sewing instructions, I thought it would be nice to publish sew-alongs here on my blog instead.
Materials
Hoodies are usually made of sweatshirt fleece or French terry, but you could choose also double jersey, such as Ponte Roma, or scuba. Two-way stretch knits are better than four-way.
The simple hoodie you see here is made of rather heavy weight sweatshirt fleece from Lafab Tessuti and for the zipper hoodie I chose a more lightweight French terry from Minerva. I washed both fabrics before use.
The sweatshirt fleece:

Here you can see other materials that go in a hoodie.

The hem band and sleeve cuffs are ready-made. If you can’t find those anywhere, get tubular rib knit fabric and make them yourself. There’s also the possibility to use the same fabric you’re making the hoodie with, but that usually doesn’t have enough stretch, so especially the sleeve cuffs will be tricky, as you’ll see later.
You can make buttonholes instead of using grommets if you wish.
Choose the grommet size so that it’s not too small for the cord to pass through. The ones I used have a 6mm (1/4in.) diameter and I’d say that’s the minimum. You’ll also need small pieces of heavyweight fusible interfacing to back up the fabric behind the grommets. In case you don’t have heavyweight interfacing, fuse several pieces of lighter weight interfacing one on top of the other.
If you’d like to cover the neckline and zipper seams with something, you can either use a twill tape or make a facing. The latter option is the easiest among the two.
For fancier drawstrings you could get cord ends, too. I couldn’t find those anywhere.
Staytape will also be used. And for the zipper hoodie, you’ll obviously need an open end zipper.
The Simple Hoodie

Starting from the easier hoodie. No zippers or pockets to worry about yet.
I’m using mainly a serger to sew the hoodies as the fabric has stretch. Other alternative is zig-zag stitch or some other kind of stretch stitch on sewing machine.
Preparing the Hood
First step, the hood. This version has only one layer of fabric as the material is too heavyweight to make it double. So there is a 4cm (1 5/8in.) hem allowance at the hood opening to create a casing for the cord.
I recommend to start from the grommets. That way, if you mess it up, you don’t need to unpick any seams. Feel free to place the eyelets higher up the hood edge if you prefer.
Fuse the interfacing on the wrong side. Depending on which material you’re using, be careful not to burn the fabric. For example fleece might melt in high temperatures.

Then make holes for the grommets. I used this leather punch pliers and then did tiny clips around the hole with scissors. The hammer you see in the picture is actually a jeweler’s tool, but it’s quite handy! The other tools came with the grommets. They are usually easy to attach.

When you’re done with the grommets, you can procede with sewing the hood. 1. First the two pieces together and then 2. the cord casing. You can baste the casing before sewing to make it easier. I folded my 4cm (1 5/8in.)hem allowance twice to get a 2cm (3/4in.) casing. Naturally you can’t stitch this bit with a serger, so use the zig-zag stitch instead.
3. The grommets should end up in the middle of the casing width.
The Hoodie Bodice
To attach the hood, you need to sew the shoulder seams of the bodice. I recommend stay-taping the seam: stitch a strip of staytape on the wrong side of the back shoulder line before sewing the shoulder seams.


Then pin the hood to the neckline, matching the notches and overlapping the right and the left side at the c-front. If you’re using the serger, it’s a good idea to first stitch the hood in place with the sewing machine, and then again with the serger.

With the side seams still open, attach the sleeves (1). Then sew the bodice side seams and sleeve seams in one go (2).

Sleeve Cuffs and Hem Band
Now the hoodie is almost done. It’s only missing the sleeve cuffs and hem band. Fold them in half leaving the seam allowance inside.

Then divide each of them into 4 even parts, placing 4 pins as guidemarks. Do the same division for the hoodie hemline and sleeve hems. This will help you to distribute the volume evenly.
Pin the hem band and sleeve cuffs in place, matching the guidemarks. Notice how much larger the sleeve hemline is compared to the cuff!

You can probably sew the hemband directly with the serger, but attach the sleeve cuffs with the sewing machine first, stretching the cuffs as you go.
Finishing Touches
Pass the cord through the casing and make knots at the ends.
If you prefer, cover the neckline seam with twill tape. This is probably the most difficult part of the whole hoodie, so if you don’t mind seeing the seam, you can skip this part. The twill tape doesn’t have stretch; Check that you still manage to pass your head through the neck opening.

1. Pin one side of the twill tape as close to the original seam as you can and stitch near the edge.
2. Fold the twill tape on top of the seam and baste.
3. Stitch the remaining edge. You might find it easier to use the zipper foot.
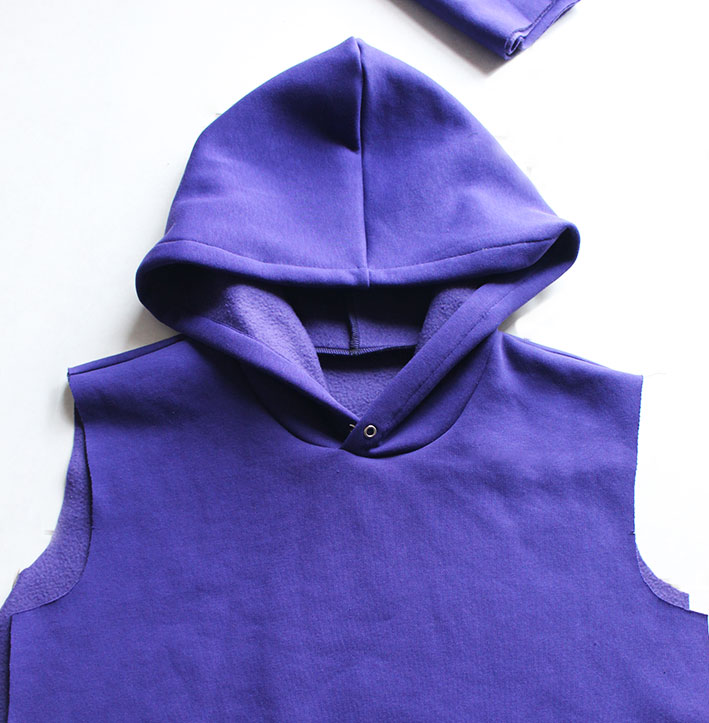
Simple Hoodie, the Result
Here’s how the hoodie looks like in the end. Personally I prefer big hoods, but observing the RTW hoodies, the hoods are usually smaller. However, this can easily be changed.

Zipper Hoodie
The second hoodie in the Patternmaking Guide has extra seams so that you can do color blocking or use different materials. In this case I used the same fabric, French terry.

There’s also a pocket, a facing, and a zipper of course. The hood has two layers, and I also wanted to try using the hoodie fabric for the sleeve cuffs and hem band.
Now I will just show you the parts that are different from the previous example. Btw, for a zipper hoodie, you can make the neck opening smaller, as it no longer needs to be big enough to pass through the head! But in this case, you’ll also need to alter the hood pattern.
Preparing the Hoodie Parts
As all the pieces have been divided in two, you first need to sew them back together. Here you can also see the sleeve cuffs. I made them as small as possible. You can test by stretching the fabric strip next to the sleeve pattern and see how long it needs to be.

The hood has two layers this time. Only the top layer needs grommets. Notice, that this time there’s only a small seam allowance at the hood opening.

Start by 1. sewing both layers separately and then 2. attach them to each other along the hood opening, right sides together. Press flat.
Finally, 3. create the cord casing by stitching at 2cm (3/4in.) from the edge.
The Pocket
In this example, the pocket is made of two layers so that there won’t be any seam allowance showing on the inside. But this creates a lot of bulk, so it’s probably better to do only one layer.

Whether you choose one or two layers, first 1. staytape the pocket opening and the two seams so that they won’t stretch. Then 2. either sew the two layers together or finish the hemline of the pocket opening.
3. Place the two pocket sides on the hoodie front, matching the notches. 4. Sew in place. For one-layered pocket, fold the edges under before stitching.
You can also stitch the two remaining edges to keep them in place.
The Zipper
This time you need to attach the sleeves before the hood. That way you get to close the side seams of the hoodie and attach the hem band.

At this point, you can even attach the sleeve cuffs. As you can see here, they remain quite large and the sleeve hemline almost seems like gathered. You could try narrowing the sleeve hemline before attaching the sleeve cuffs if you have trouble stretching the sleeve cuffs. In any case, I prefer rib knit.

If your fabric stretches lengthwise, it’s a good idea to interface the c-front before attaching the zipper (1). The facing, too.

2. Start by stitching one side of the zipper. Notice that the zipper starts where the hem band will be folded.
3. Then pin the other side so that all the seams and the pockets match when the zipper is closed. You could baste it before sewing.
The Hood and the Facing
Now you can finally attach the hood. Here you can see where the hood should start: right next to the zipper. However, don’t catch the zipper seam allowance into the hood seam if you have a facing.

The facing will cover both the neckline seam and the zipper seams.

Start by 1. attaching it to the hem band of the hoodie as in the picture. Then fold the whole thing up and pin along the c-front and the neckline seam (2-3).
Sew and flip to the wrong side.
Now you can finish the hem band by attaching the inner edge. Leave all seam allowances inside the hem band. Baste it first and then stitch.
Top stitch around the neckline – and if your sewing machine can handle the bulk – also around the zipper. Finally, attach the facing at the shoulder seams, and a few other places, too, if needed.

Insert the cord.
Zipper Hoodie Ready
Here’s the final look. In my opinion, this fabric was a bit too lightweight. It was also four-way stretch, so quite tricky! Between the two examples, I definitely preferred the sweatshirt fleece.

22 Comments
Great tutorial! 🙂
I just made some miniature hoodies too. 🙂 Autumn is here! 🙂
Thanks! 🙂 Awww, mini-hoodies! I must go check them out. Sounds cute.
This is an absolutely excellent tutorial. One of the very best I’ve seen. THANK YOU I wish I could purchase a hard copy or print it.
Thanks so much! 🙂 I think there are websites that create a PDF out of any URL and then you can print it.
Thanks so much .
The hoodie pattern made my day
You’re welcome. 🙂
Love love your post! It’s easy to understand. Keep up the good work, i am a huge fan. Thank you.
Thanks! 🙂 Hoodies are definitely perfect for this period in time. 😀
I really need a help here
You can email me if you need help with something specific. 🙂 Maybe send a picture of your issue.
Is there a one for zip up hoodies
Only the one with the zipper shown in this tutorial. You’re looking for another type?
What a great Hoodie. Thanks for this cool blog post. i have to sew one for me
Thanks so much! 🙂
You are a darling 💋💋💋 i love you for this
Aww, thank you. 🙂
I love your blog 🤍🖤
Thanks so much! 🙂
Please 🙏🏾 I need these materials in Nigeria. How can I do it?
I’m not sure if the shops I mentioned here ship worldwide. You could check at their website. 🙂 Otherwise, you might need to find a local fabric store that sells similar materials.
Great tutorial,thanks so much for taking your time to explain it.
You’re welcome. 🙂