As I’ve now published two Shirt Pattern Guides, Classic and Fitted Shirts, there was definitely a need for a Shirt Sewing tutorial to explain all the tricky details that go into a shirt: button and sleeve plackets, cuffs, yokes, collars, etc. It’s one thing to draft the pattern, but then you need to sew the shirt, too, to be able to wear it.
I prepared some samples, as well as a shirt example from the Fitted Shirts Guide. There’s text on the pictures, so this tutorial might have more pictures than anything else. I tried to cover the most difficult parts of sewing a shirt and I hope that after reading this you’ll feel more confident in starting a shirt project.
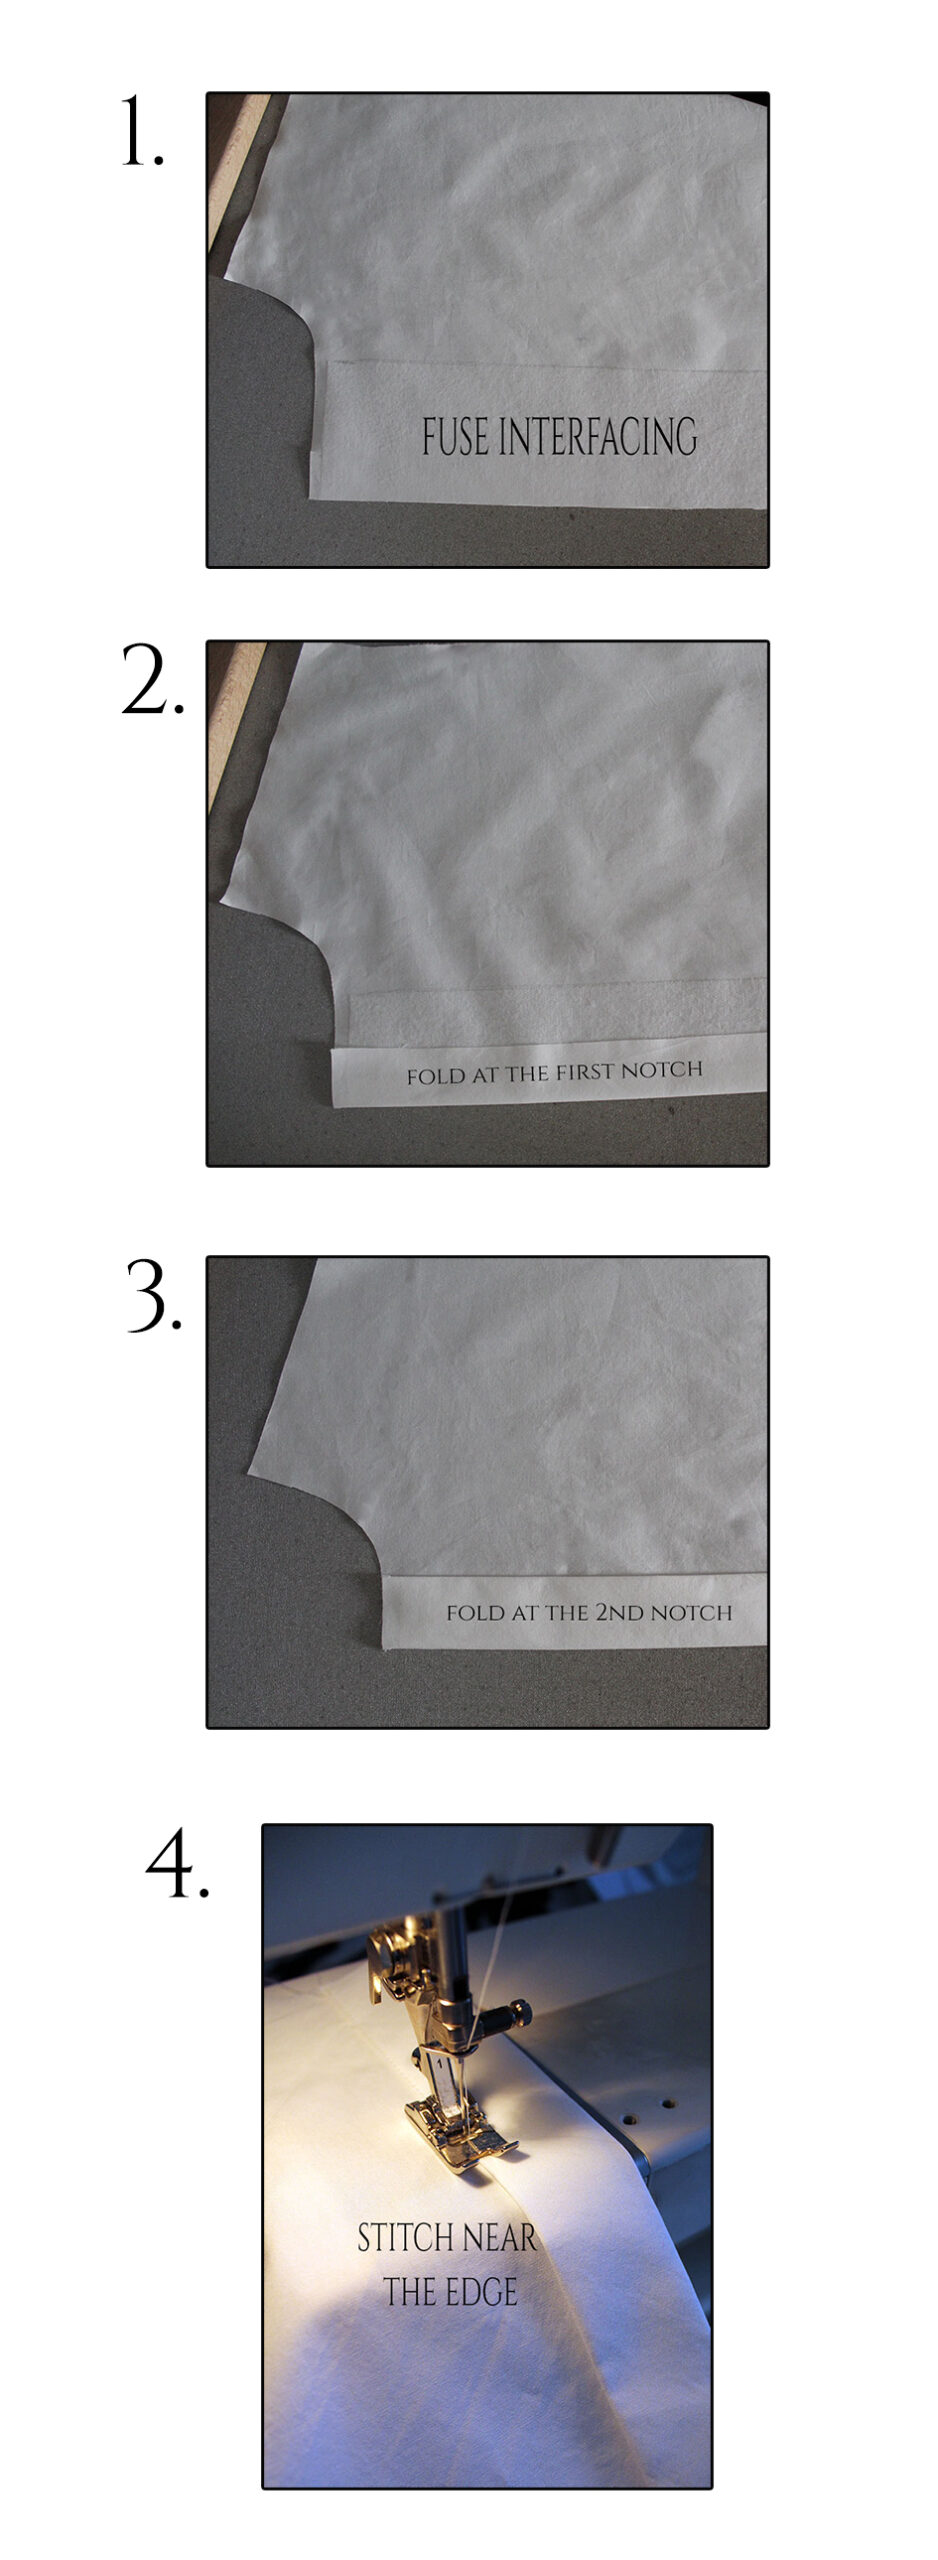
Button Plackets
The first detail is the button placket. You can rarely make a shirt without one! For ladies’ shirts, the buttons go on the left side and the buttonholes on the right. You should always interface the plackets.
Basic Button Placket
This is the easier one. Both sides are identical and there are just two folds. The pattern should have notches where to fold.
The Hidden Button Placket
This is a bit more complex. You only make the buttonhole side different. The button side remains a basic placket. This example is for a 3cm wide placket. It has two folds, a row of stitches in the middle, and then a final fold.
The layer underneath is slightly narrower to remain hidden, and that’s where you make the buttonholes. You probably will want to make them before hemming the shirt or attaching the collar. You can hand stitch the two layers together at a few points if you want afterwards.
P.s. I obviously made the sample randomly and it ended up being the opposite side (=left)…which is not correct.

The Collar
The collar usually has 4 pieces, two collar pieces and two collar stand pieces. The top collar should be interfaced, just like the collar stand piece that will be closer to your neck.
The first example is a collar with rounded points. You’ll later see the whole shirt.
You start by sewing the collar pieces together. Before turning the right side out, trim the seam allowance, especially around the collar points. The rounded points should also have some notches cut.

The interfaced collar and collar stand piece should be on the same side.
If you find it difficult to attach both collar stand pieces in one go, you can first attach one piece to the collar, and then the other, finishing the whole collar stand seam.
Now the collar is ready to be attached to the shirt! In this case it doesn’t have top stitching, but you can do that, too, if you prefer.

Collar Points
Here’s an example on how to make nice collar points using a piece of thread caught between stitches when sewing the two collar pieces together. You can also see how to trim the seam allowance if you have pointy tips. Here the interfaced layer is trimmed more.

When you turn the collar right side out, you can pull the points out with the thread.
After pressing, fold the collar in half to check that you managed to sew both collar points identical.

Attaching the Collar
When attaching the collar, you start by sewing the outer layer of the collar stand to the shirt neckline. Then fold the seam allowance of the inner layer under and topstitch.

The Yoke
The shirt yoke has two layers, so it’s handy to hide the seam allowance inside.
If the shirt has a box pleat or gathers in the back, first prepare those, and then sandwich the back piece between the two yoke pieces, matching the c-back notches. Top stitch near the seam.
Then sew the inside layer of the yoke to the front piece of the shirt. The seam allowance remains on top. This way you get to do the top stitching with the right side up, to attach the top layer of the yoke. Just fold the seam allowance under and stitch!

The Sleeve Plackets
I’ll present two types of sleeve plackets: the classic tower placket and the continuous bound placket. These are the two ways to finish the sleeve slits.
The slit is placed at the back half of the sleeve. You should always sew the sleeve plackets first thing, before closing the seams or stitching the folds of the sleeve.
Continuous Bound Placket
This is the easier of the two. You just need a strip of fabric cut on bias, that should be a bit longer than twice the slit length. In this example, the width is 2cm.
I know some people prefer to not cut the slit at the start, but I think it’s easier this way. Here’s the sequence.

You can trim the seam allowance slightly before turning the bias strip to the wrong side.

Here’s the result. After the placket is ready, you can proceed with stitching the folds and closing the sleeve seam so that you can attach the cuff. The front side of the slit binding should be turned under.
Here’s how this type of placket would look like with a cuff. You can add an overlap and a button.

The Tower Placket
This is the classic sleeve placket. Sometimes it’s made in two pieces, but in this case, it’s an all-in-one solution.
There’s a downloadable tower placket pattern in my resource library, but in both my shirt guides I also explain how you can draft it yourself if you’re interested.
This is how you’d sew the placket. It might look intimidating, but it’s not actually all that difficult. For me, the most difficult part is to make both sleeves look identical!
It’s a good idea to interface the placket piece with light-weight interfacing.
Notice that the higher side of the placket is closer to the sleeve center as this is the overlapping side.

Now you can flip the placket to the right side.

Now the narrower side of the placket is ready and you can make the wider, overlapping side.

The Sleeve Cuff
Continuing with the same sleeve sample, let’s attach a cuff, too!
So now you can stitch the folds in place and close the sleeve seam.
Your cuff could be made of one or two pieces. Basically a rectangle.
Interface the cuff (which I didn’t do here!).
Start by attaching only one edge of the cuff to the sleeve hemline, before even sewing the cuff. Ensure that you leave out a seam allowance at both ends as shown.
Then fold the cuff, right sides together to stitch the short ends. Continue sewing the inner edge of the cuff to the sleeve hemline for as long as you can. The sleeve remains in between the two cuff layers. This can be a bit fiddly.
Trim the corners before turning the right side out. Do the same at the other short end of the cuff.
Finally, you should only have a hole in the middle of the cuff’s inner edge. Fold the seam allowance inside, press, and top stitch all around the cuff.

The result!

The Shirt Example
As promised, there’s also a shirt example. The Romantic Shirt from the Fitted Shirts Guide to be exact.
It has interesting ruffle cuff sleeves and a decorated button placket I wanted to show.
The Ruffle Cuff Sleeves
Let’s start from the sleeves. They are peasant sleeves with the said ruffle cuff. There’s a continuous bound placket and instead of button closure, you tie a knot.

First I prepared the ruffle by hemming the three edges and gathering the piece. Then I attached it to the two cuff pieces, leaving just an opening where the sleeve would be sewn. The center of the top cuff piece is interfaced BTW.

Before attaching the cuff to the sleeve, I sewed the bound placket, closed the sleeve seam, and gathered the hemline to match the cuff.
Then I attached the top layer of the cuff to the sleeve hemline, folded the seam allowance of the inside layer under, and top stitched all around the sleeve cuff to make it nice and flat.
The peasant sleeve also has gathers at the top. So I gathered between the armhole notches to match the bodice armhole.

The Decorated Button Placket
To make this button placket more interesting, it has a little tuck on both sides, as well as two layers of ruffles. The button placket is a separate piece.
First I prepared the ruffles and stitched them at the edge of the bodice front pieces.
Before attaching the button placket, I sewed the tuck, as it was much easier in this order!

Otherwise this is a basic button placket, so it’s just folded twice and stitched. I sewed it following the stitching of the tuck, being careful to catch the edge of the placket underneath.
The top edge of the ruffles remain inside the collar seam.
Buttonhole Template
When marking button placement, I always use a buttonhole template:
I copy just the button placket of the shirt, marking the buttonholes and buttons on it. So basically a 3cm wide slice of paper. Then I pin it on the wrong side of the button placket and mark the buttonholes with basting thread like this:

The Shirt
And here’s the shirt! If this doesn’t have enough ruffles for your taste, you can continue the front ruffles all the way down and add more ruffles to the front piece next to them. How about a layer of ruffled lace on top of the ordinary ruffles?
Definitely check out the Fitted Shirts Guide if you’re interested in making one for yourself. 🙂


10 Comments
Thankyou very much!
You’re welcome. 🙂
Wonderful tutorial thanks!!!!
You’re welcome. 🙂 Was happy to share.
Ohhhhh wow, this is a very usefull tutorial……to bad i finished my shirt before you did…….would have saved me a few brainbreakers with those gorgeous cuffs……now i HAVE to make another one…..thank you so much, really helpfull!!!! Anduhhhhhhhh keep those guides coming…….😊
Thanks! 🙂 Well, I think you managed to sew your cuffs beautifully anyways. Can’t wait to see your next gorgeous shirt!
Thank you very much.
You’re welcome. 🙂
Muy buen contenido saludos desde Mexico
Muchas gracias! 🙂