I wanted to share with you my latest sewing project, wrap pants. Compared to the trench coat I introduced last time, this was a breeze! Very few seams.
My Make Nine grid actually included wrap culottes and I was planning to make those, but the fabric I got wasn’t enough so I decided to make palazzo pants instead.
Last week I published a Culottes Pattern Guide and one of the designs is these very flared wrap culottes. I had my pattern and fabric ready, but then I decided they would actually look better if they were a bit longer. And that was that. So, I will make them another time.
This however gave me a perfect excuse to try the wrap design with an actual pants pattern and I´m going to share it with you now.
Wrap Pants Pattern
To make this pattern, you will need a basic pants block. I have instructions here. Ensure that you have fitted and adjusted the basic block before using it.
We will first turn it into palazzo pants with a lowered waist, and then add the wrap element.
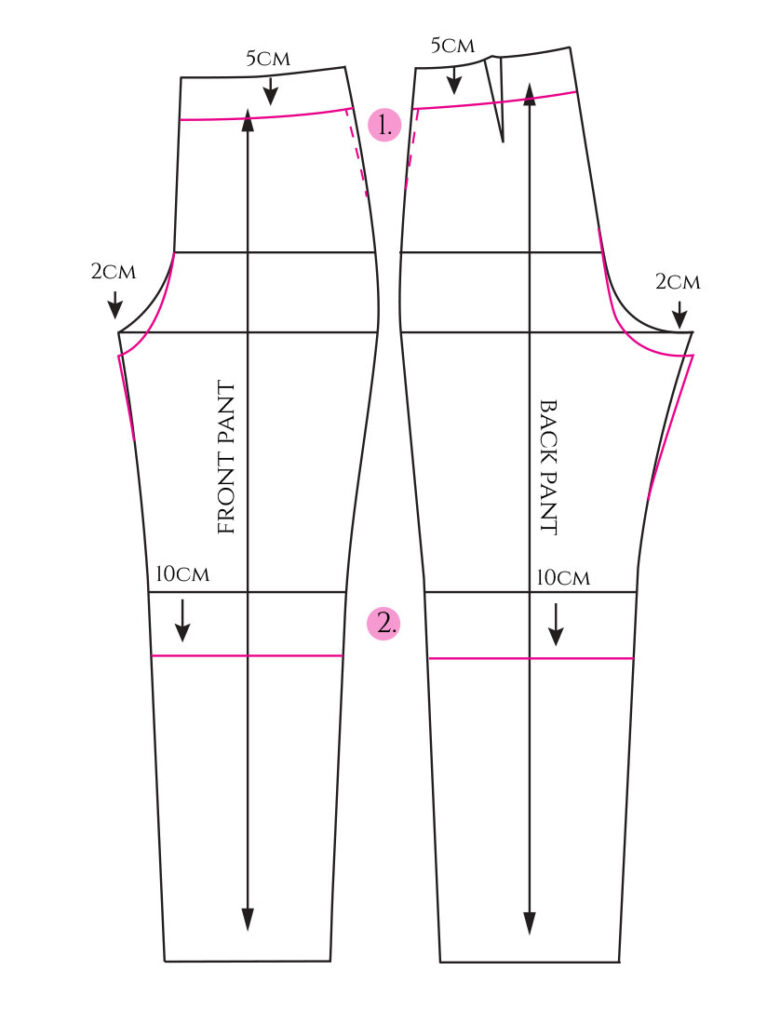
1. To create the dropped waist, lower the waistline by your desired amount. In this example, it’s 5cm. Follow the original waistline shape. You might need to take in a bit at the side seams for a good fit (see the dashed line).
Wrap pants usually have a comfy fit, so you should also drop the crotch seam a bit. I lowered it by 2cm. Sorry about the proportions in the drawing! 😀
2. Then, decide how long you want your pants to be. I opted for 10cm below the knees. This is a summer garment after all. Draw the new hemline.
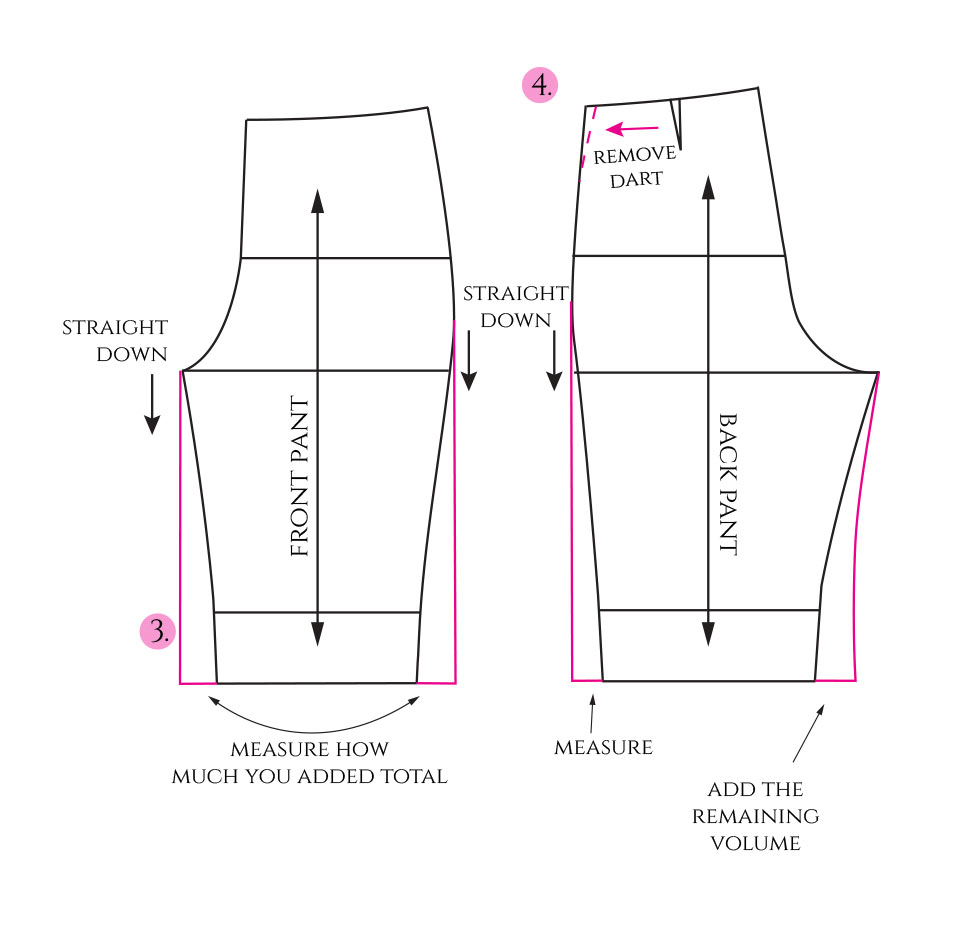
3. To create the palazzo pant look, first draw a line straight down from the front crotch point and side seam as shown. For the side seam, start at the widest point, which should be at the hipline.
Measure how much you added at the front hemline, so that you can add the same amount to the back hemline.
Draw a straight line for the back side seam, too. Measure how much you added at the hemline, and then add the remaining amount to the opposite side. As the back crotch line is longer, you need to curve slightly to finish the inseam.
4. Depending on the width of the remaining back dart, you might be able to remove it from the side seam. If there would be more that 1cm to remove, leave it.
The Wrap
So, now you’ve got the palazzo pants and we can turn them into wrap pants like this:
5. Separate a section of both the front and back piece by drawing a straight line from the waist down. I found that a good amount was a bit over half of the waist width. The wrap pants don’t have side seams. These pieces will create an overlap instead.
You will then copy these sections and attach them to the front and back palazzo pant pieces as shown. The side seams are straight, so you should be able to do this easily. There will be a large “dart” at the top where the hip curve is.
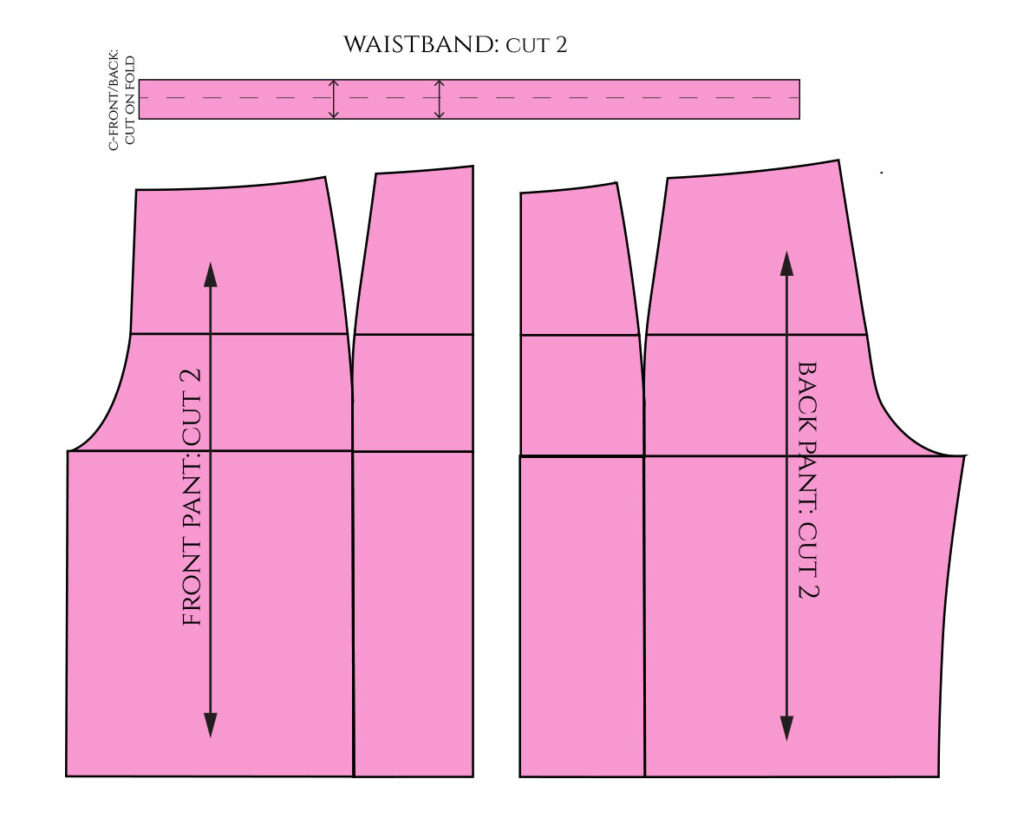
Measure the waist, front and back pieces separately, so that you can draft the waistband.
There will be two waistbands: one for the front and one for the back of your wrap pants.

This is a straight waistband. The height is twice the final waistband height because it will be folded lengthwise in half. Mine was 2.5cm x 2 = 5cm high.
The length includes both the front/back piece and the overlap section measurements, plus however long you want the ties to be. Usually the front and back waist have different measurements, so you’ll need separate patterns for them.
If you don’t want a seam at the c-front and c-back, your fabric size will tell you the maximum waistband length. For example, I had 1.6m of fabric, so I made my waistband piece 1.6m long (total).
Here are the pattern pieces:
Sewing the Wrap Pants
Now to the easiest part: sewing the pants!
I bought 1.6 metres of chambray fabric, that looks very much like lightweight denim. This seemed the most perfect fabric for my summer pants. I had a second candidate, which was viscose, but in the end I preferred chambray.
I pre-washed the fabric, because it was made of cotton, which means that it would shrink when washed.
Then I cut the six pieces that were going to become my pants: 2 front pant pieces, 2 back pant pieces, and 2 waistband pieces.
Here’s the sewing sequence that followed:
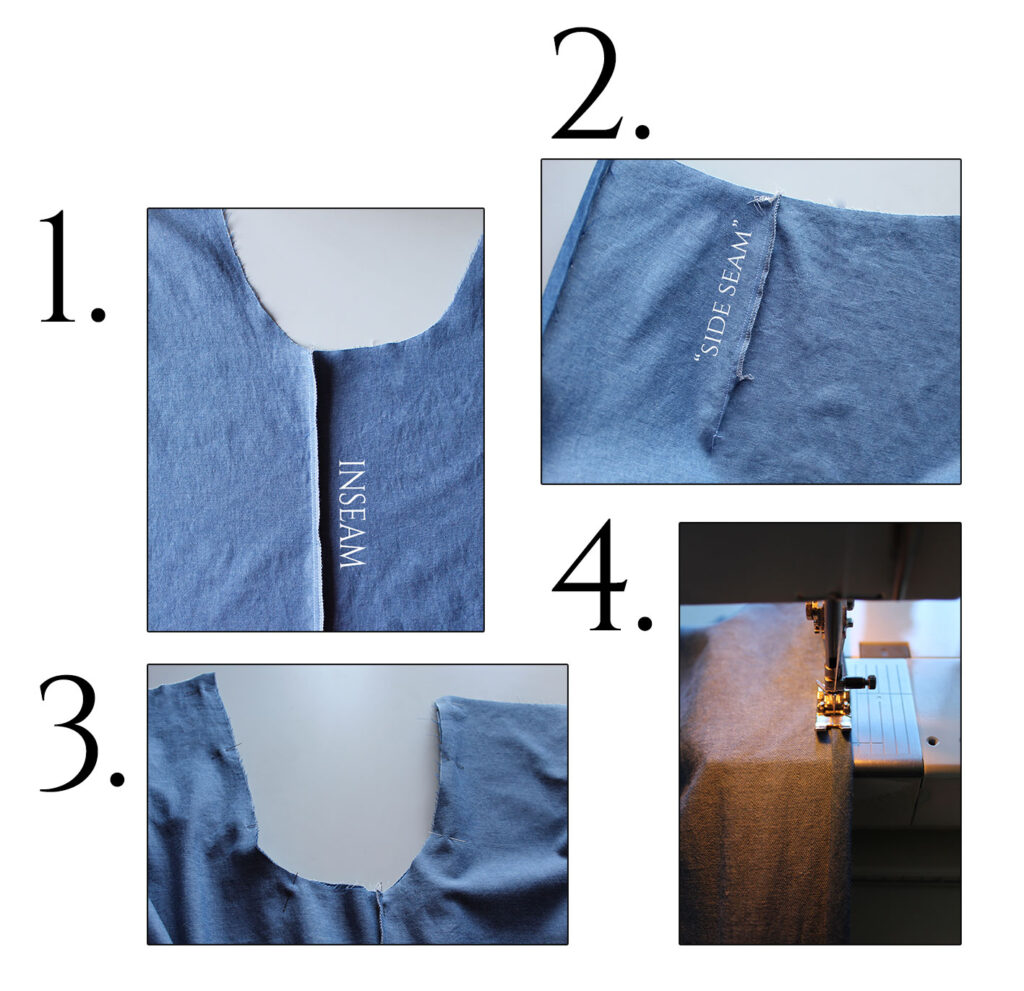
- First I sewed the inseams, attaching the front and back pieces together.
- Then I closed the “side seams” that were more like darts. There were four to be sewn.
- I sewed the crotch seam uniting the left and right sides of the pants.
- Finally, I pressed and sewed the hemlines and the vertical edges.
At this point the pants were already almost done! Only the waistband was missing.
I decided not to interface the waistband because I wanted to keep the whole piece soft and drapey. And besides there were going to be two waistbands one on top of the other so less bulk was better.
Here below you can see my waistband pieces. To be honest, I didn’t even have a pattern for them, I just cut two strips of fabric using the tape measure. 😀 Yeah, I’m lazy..
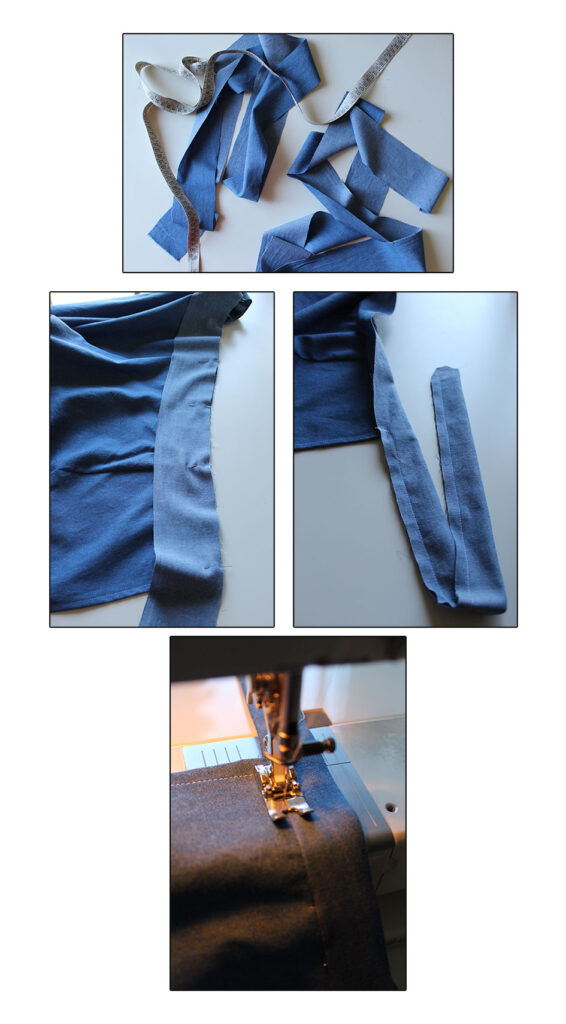
Then I centered and pinned one edge of the waistband to the pants waist, right sides together, and sewed.
After this I sewed the ties, turned the right sides out (which took the most time of the whole project I might add), and pressed them. There are four ties.
To complete the waistbands, I pressed and pinned the remaining seam allowance under and top stitched on the right side of the waistband.
Trying on my new wrap pants I came to a conclusion that there needed to be loops so that the front waistband would sit better. It’s the one that’s tied at the back. Here’s how I did those:
I pinned the “side seams” together to see where the overlap ends and sewed a vertical buttonhole onto the waistband. I placed the second buttonhole symmetrically on the other side of the c-back seam.

Here above you can see the final result.
As a last minute addition I decided to decorate the edges with narrow selvage strips. I kind of liked the idea to accentuate the overlapping sections.

The Wrap Pants
Here are the resulting wrap pants. They feel really light and airy. I definitely think I’m going to be wearing these in the summer! I made the shirt a few years ago. It’s another quick make.
Related to this theme, you can check out my Women’s Pants and Culottes Pattern Guides. 🙂 Culottes are easier to make because they are based on the basic skirt block rather than the basic pants block.


12 Comments
Hi Minna,
I wish everything is going well,
Thanks a lot for sharing your Wrape pants project, which is very interesting, i will make a sample as soon as possible, and I got a question: Did you make some pockets on these nice pants?
Thaks in advance for you respond.
Best Regards
Rafael.
Sewing, Patterns & Pixels
Hi Rafael. 🙂 You’re welcome. No, I didn’t add pockets, because there’s no real side seam and the “pocket area” is overlapped, so you’d need to invent another way to add them.
Love the tute! And, I love how your strap pants came out 💗
I was making these 43 years ago! You have inspired me to make some again (in my 60th year!)
Best,
April
Thank you April! 🙂 Wow, you definitely should make another pair, then. I loved how quick they were to make.
This is unique……I love it
Welldone Minna 😘
Thanks so much! 🙂
love that u included darts! last time I tried wrap pants the fit was a lil weird, so this got me inspired to try them out again! 🥰
Thanks. 🙂 Yes, they darts definitely help shaping the waist.
Hi!
I love the style of wrap pants but I do have a very practical question. How is this pattern specifically for going to the bathroom in? I can’t tell if the button holes you’ve added would make the process a little easier than other wrap pant patterns I’ve come across that don’t have this.
Hello! Yes, I suppose it is a bit easier, because this way the “wrap” won’t open completely and so you can treat them more like normal pants and it’s easier to arrange them back on.
Fantastic, thank you
You’re welcome. 🙂