

I just realized there are only two months of 2022 left and my Make Nine grid still has four projects I haven’t even started! So, last week I made myself a silk shirt.
The shirt is based on a design present in my Fitted Shirts pattern guide. I just modified the bow by making it bigger. The silk I used is crepe de chine, which is one of the least difficult silks to sew. I say least difficult, because that doesn’t mean it’s easy to sew. Not having sewn with silk in a long while, I did struggle a bit!
The Features
This silk shirt has big bishop sleeves with high sleeve cuffs. There are gathers at the yoke seam, both front and back. It has a hidden button placket and a large pussy bow collar.
The shirt has quite a loose fit, although I drafted it out of the basic bodice block.
As mentioned above, the fabric is black crepe de chine that has just the right amount of sheen. I also used some fusible interfacing for the button placket and silk taffeta to make the sleeve cuffs slightly more structured. The material of the buttons is mother of a pearl. I didn’t have enough black buttons for the sleeve cuffs, so I improvised and used red buttons instead.
It was actually quite difficult to photograph black silk in a way that you could see the details. So, I brightened the pics in Photoshop. I will also link to other tutorials that explain the same things using a different fabric.
The First Steps
This shirt required quite a lot of fabric. Something like 2.5 metres or a bit more. It’s because the collar is cut on the bias. Also the big sleeves took up a large chunk of material. I actually cut the sleeves on the bias, too.
The yoke is cut twice on the fold so that you get two layers. The sleeve cuff needs to be cut four times because it’s slightly curved, which means you can’t simply fold it.

To sew this shirt, I first prepared all the different sections separately and then united the pieces.
The Yoke
- I gathered the bodice back to match the yoke, and then sewed it sandwiched between the two yoke pieces. In this case, the seam was curved, so I trimmed the seam allowance before pressing. It came out nice and flat as it was. You can also top stitch near the seam if it won’t lay flat otherwise. Many shirts have a pleat instead of gathers.
- Then, I gathered the front pieces to match the yoke seam length.
- This time, you need to sew one layer at a time. I prefer to start from the layer that will remain on the wrong side. Press the seam allowance towards the yoke.
- Finally, I pinned the remaining layer on top of the seam I just sewed, with the seam allowance folded under, and stitched near the fold.

As you can see, the gathers are all centered. I like to keep the edges “clean” so to speak.
There’s another version of a shirt yoke in this tutorial.
The Seams
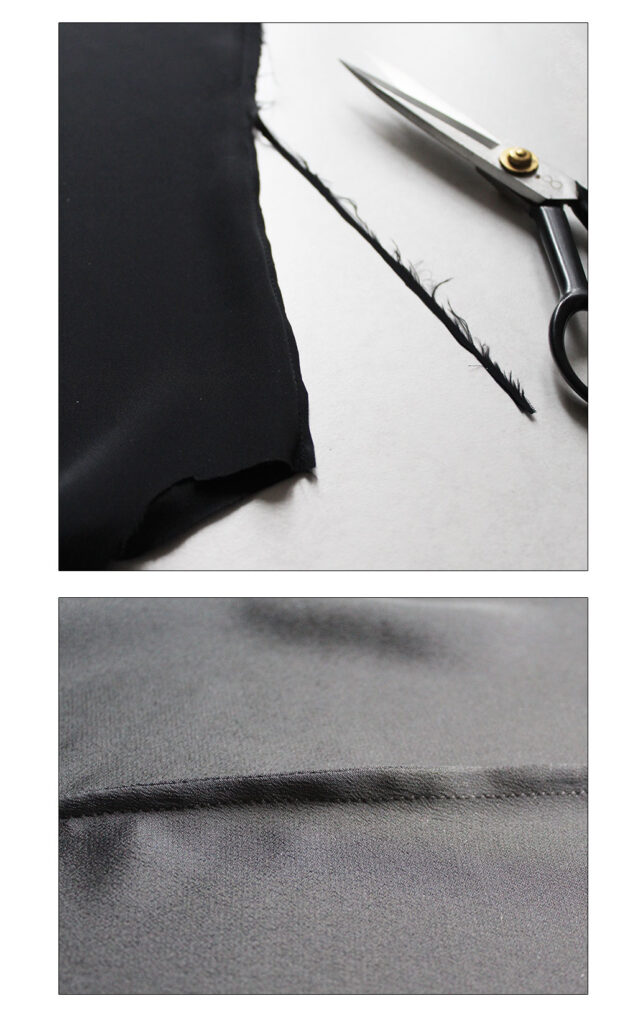
After having united the three bodice pieces at the top, I sewed the side seams. In this case I preferred the French seams.
If you’re new to sewing, there are two steps to sewing the French seam:
First, you sew the wrong sides together, for example, at a 0.6cm (1/4in.) distance from the edge and trim off half of the seam allowance.
Then, you press the seam allowance flat on one side and sew the right sides together at a 0.6cm (1/4in.) distance from the edge again, encasing the previous raw edge within the seam.
The Hidden Button Placket
This type of a button placket needs to be folded differently on the buttonhole side and it takes up more fabric. So, you need to take it into account already when drafting the pattern. The button side has a regular button placket.
The buttonholes go on the right side in a women’s shirt.
Here’s a picture of the folds. Basically, it’s folded twice and stitched (almost) in the middle, leaving one side slightly wider.

I didn’t want to interface the whole button placket because I didn’t want it to become too stiff. It would’ve created too much of a contrast to the rest of the shirt that was all flowy and soft.
So, I only interfaced the innermost layer on both sides of the shirt opening. Meaning the section closest to the edge. This gave just enough structure to sew the buttonholes and attach the buttons.
The pussy bow collar doesn’t reach the edge of the button placket, so this created another issue: how to finish the top edge? I decided to fold the seam allowance inside before sewing the button placket, and then simply hand stitch the top edge. Normally, the collar will cover this area completely, so there’s no problem.

I added quite a few pins before sewing, because the silk just wouldn’t stay put. It was wiggling in all directions. Button plackets are so much easier to sew in cotton!
Here above you can see the central seam of the hidden button placket and how the inner layer is slightly smaller when folded down. It’s where the buttonholes will be sewn.
I actually didn’t stitch the button side of the placket and decided that the buttons would be enough to hold it. There’s a picture below.
As always, I prepared a template to mark the button placement with a basting thread. The buttonholes are vertical and slightly wider than the buttons.

Final touch: I did a few tiny hand stitches at regular intervals to keep the two layers of the hidden button placket together. Nothing shows on the right side of the shirt.

Here’s the button side that is held together only by the buttons. I think it looks nice without that visible stitching.

The Pussy Bow Collar
Next, I prepared the collar.
This collar consists of four pieces: to finish the edges you need two layers and there’s a seam at the c-back of the collar. I didn’t interface the pieces, because I wanted it to remain soft like the rest of my silk shirt.
Notice that this kind of collar cut on the bias will easily stretch.
I started by sewing the c-back seams and pressing them open. Then, I sewed all around the collar to unite the two layers together, leaving just an opening where the collar would be attached to the shirt neckline (see the arrows).
Before turning the right sides out and pressing the collar flat, I trimmed the seam allowance, as you can see in the photo. It took quite a while to press this collar. It’s really long!
This is a rather high collar (10cm), but it will be folded in half around the neck and the height is basically there just for the bow.

The Big Sleeves
Besides a big bow, my silk shirt also has big sleeves. The sleeves have two sections: the sleeve and the cuff.
The Sleeve Plackets
The first thing was to sew the continuous bound plackets while the sleeves were till laying flat. This is an easier way to create a slit than the classic tower placket. But nonetheless, it was probably the fiddliest part of sewing this shirt.
Here’s the slit I cut, and the bias strip that is twice as long as the slit, plus a few extra centimeters, just to be sure. The slit goes to the back half of the sleeve. As you can see, the silk was already being wiggly.

First, I sewed one edge of the bias strip to the edge of the slit, right sides together, with the sleeve side on top, so that I could see where I was sewing once I got to the turning point. You see, you need to sew as close to the end point of the slit as possible (see the arrow).

Then, I pressed the bias strip to the wrong side, folding the remaining edge under, pinned, and stitched near the edge.
The last step was to bring both sides of the binding together on the wrong side and sew diagonally across at the very top.

You can also refer to the already-mentioned tutorial for sewing sleeve plackets.
After the bound placket was ready, I sewed the French seams and then two rows of gathering stitches at the hemline, so that I could gather them to match the cuffs.
There was very little ease at the sleeve cap, but I still prefer to sew at least one row of gathering stitches between the armhole notches, because I find that it makes it easier to attach the sleeves.
The Cuffs
Shirt cuffs are usually interfaced, but for my silk shirt I wanted a softer look even for the cuffs. Still, they did need some sort of structure, so I decided to see if silk taffeta would work. And it did!
I cut one layer of taffeta.
To prepare the cuffs, I sewed them partially before attaching them to the sleeves: the hemline, and part of the lateral seams. Before turning the right sides out, I trimmed the seam allowance.

Then, I gathered the sleeves to match the cuff. Silk creates these really nice soft gathers.
You attach the outer layer of the sleeve cuff first, right sides together, and press the seam allowance towards the cuff. The first arrow points to the cuff’s lateral seam allowance that extends beyond the edge of the sleeve.
The next step is to sew the remaining side of the cuff to the sleeve hemline, while at the same time finishing the lateral seams.
This might sound impossible, but if you begin from where you left off with the cuff’s lateral seams, it’s easier to figure out how to proceed with the sleeve hemline. You need to sew this in two parts, first one side and then the other, and you will be left with a little hole in the middle. Trim the corners before turning the right sides out.

Finally, you top-stitch the upper edge of the sleeve cuff. This way you flatten the edge and at the same time close the hole. The more classic sleeve cuffs can be topstitched all around.

Next up were the buttonholes and buttons. The cuff has 4 buttons. I might change them into black or white buttons later.

After the sleeves were completely done, I attached them to the bodice with French seams.
Attaching the Collar
The last step – besides hemming – was to attach the collar. I didn’t want it getting in the way until the rest of the shirt was ready.
This was quite straightforward: first, I sewed the outer edge of the collar, right sides together, to the shirt’s neckline. I pressed the seam allowance towards the collar and folded the edge of the remaining collar layer under as well.
Then, I pinned it in place and stitched near the fold to complete the shirt.

DIY Silk Shirt is Ready
Here are a few pics of my new shirt. I thought it looked nice paired with a skirt, but it would work with pants, too. Even jeans, if I ever happened to wear them. The purple skirt obviously is waiting for me to swap the buttons! And the red skirt is actually culottes. 😀

Details. I noticed the taffeta inside the sleeve cuffs makes them act like taffeta, so they hold their shape really well and I can fold them upward, too.

I wonder if I manage to finish my MakeNine grid in time. Well, I’m going to try for sure! Did you participate this year? If so, how’s it going?


2 Comments
Wow! this is a lot of work and great ideas. Thanks for all your beautiful creations and ideas and the time to figure all these ideas out!
Thanks so much! 🙂 It’s nice to write about my makes sometimes and manage to turn it into some kind of a tutorial that will be useful to others, too.