It’s time to reveal my this year’s costume post!
All year I’ve been waiting for inspiration, expecting it to come from a movie or a series. But in the end it came from a totally unexpected source: one of my favorite cartoons from the 80’s. Jem and the Holograms!
Jem and The Holograms
If you’re younger, you might have never heard of this cartoon. The series revolves around music industry and a record company called Starlight Music. Jem and the Holograms are the main band, Misfits (and the Stingers) their rivals. Jem, the singer, is actually called Jerrica who owns the record company. Her singer alter ego is an illusion created by a computer called Synergy, meaning Jerrica can turn into Jem at will.
There are a total of three seasons of the series and a movie called Truly Outrageous. I think I still have the VHS of the movie somewhere! Watched it like a million times as a kid. Loved the outfits, make-up, and the colorful hair. All very 80’s.
I noticed most of these are available to watch on YouTube, if you’re interested.
They recently (2015) did a live-action movie, too, but it was quite different from the animated version.
Anyways, I thought it would be interesting to try and make garments from a cartoon and bring them to life. At the same time it’s like a homage to my old favorite.
The Outfits
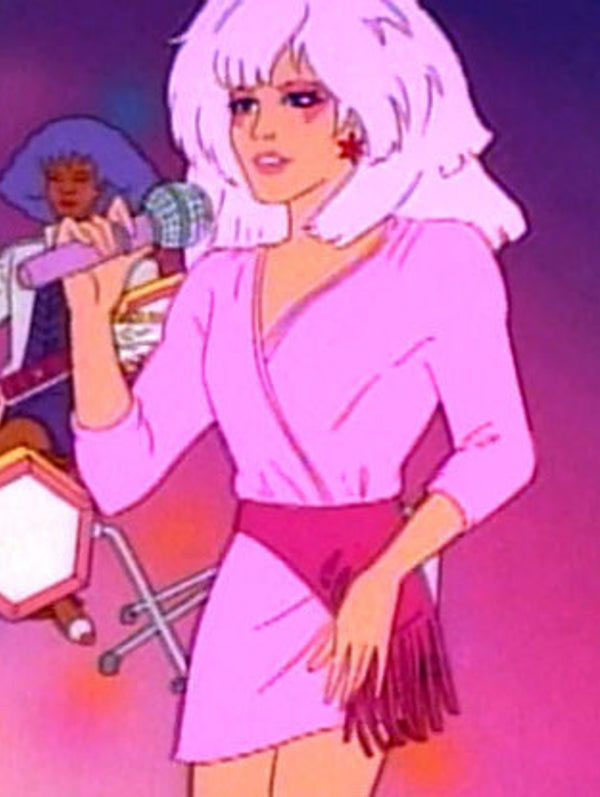
I picked 3 outfits: the iconic pink wrap dress seen above, a fancy strapless dress Jem wore at a party, and an interesting power suit I paid no attention to as a kid, but now it kind of intrigued me.
The pictures are actually screenshots from videos, so the quality is what it is…
The outfits here are in half scale. I didn’t do any test garments. This means, that what you see is the first version of each and they could do with some little tweaks to be perfect.
Jem’s Pink Wrap Dress
This is also the easiest one to make.

If you look at the picture above, you’ll see there are no seams where the armholes should be. This means, that the sleeves and the bodice are cut in one piece. There’s a neckband and an asymmetrical hemline shape.
I’d recommend using a knit fabric – or woven fabric with elastane – to make it more comfortable to wear.
I used the dartless bodice block as a base and drafted batwing sleeves to it. 4cm of ease along the underarm line is enough, because the dress is quite fitted.
Here’s how I turned the basic pattern into this wrap dress.
- As this is an asymmetrical dress, copy both sides of the front piece. When you draw the batwing sleeve, lift the line by 0.5cm at the shoulder tip (x). Continue the line until you get to your desired sleeve length, measured from point x. Observing the picture, I’d say the sleeve hemline is about 10cm below the elbow. The hemline is rather narrow. I made it 13cm wide here (=half of the final hemline circumference). Ensure that there’s a right angle.
- Fold the pattern in half and trace an identical sleeve shape to the opposite side.

3. Enlarge the neckline by 3cm to make space for the neckband. Then, draw both sides forming a V-shape, as shown. Ideally, the two sides should be identical. The slightly curved neckline ends at the waist level.
4. Draw the the side seams, curving in at the waistline. Decide how long you want the dress to be on both sides. I created a 10cm difference between the right and left sides. You can measure from the waist down. Continue the side seams until the dress is the correct length. The skirt seems slightly flared at the sides.
The overlapped sections shouldn’t reach the side seam. Leave about 4-5cm on both sides so that you have room to tighten the dress.
5. Once you have the front piece ready, copy the shape to create the back piece. Notice, that you need to mirror it. Complete the pattern piece by drawing the back neckline to match the front.
Ensure also, that the hemline flows smoothly between the front and the back pieces.

Here are the final pattern pieces. Add notches at the original shoulder tip and the waist line. You will leave a hole around the waist notch at the right side seam so that you can pass through the left side tie.
Measure the neckline to calculate how long your neckband needs to be. Depending on how elastic your fabric is, you can calculate between 80 to 90% of the neckline length for it.
For example, let’s say your neckline measures 46cm. You calculate 46cm x 0.85= 39.1cm. This means, your neckband will be 39.1cm long calculating an 85% length.
It will be folded in half, so, the height is twice the final neckband height + seam allowance on both sides.

Sewing
Sewing this dress was really easy. It only has a couple of seams and the hems.
I took a pic while attaching the neckband to show you how it’s smaller than the neckline. But it really helps to remove any gaping. After pressing the piece, it lays nice and flat.

Here’s another picture. It’s the hole at the right side seam with the tie passing through.

The Belt
This Jem outfit will also need to fringed belt! I think it could be made in fabric or leather. Or maybe you could also just use a scarf.
In any case, I made some kind of a pattern for it using a basic skirt pattern. This is quite literally winging it!
I placed the front and back pattern pieces overlapped at the side seam like this to eliminate the volume covered by the two darts. Then, I drew the belt shape on top.

As this only covers half of the circumference, I continued the shape on both sides until it had the correct measurement. I was going to use jersey fabric, so I actually made the belt tiny bit tighter than the waist measurement. You’ll then need a button closure.
Just cut the belt longer than your pattern is to create the fringed section.
The Final Look
Without the belt, this wrap dress looks like a bath robe! 😀 I suppose you could use something more glam than basic jersey to make it more fabulous.

But other than that, I think it looks quite a lot like the original and I probably wouldn’t modify the pattern.
This is the most recognizable dress from the cartoon because it’s present during the opening theme of the show. So, if you plan on making yourself a Jem and the Holograms dress, you should go with this one!
Jem Outfit Number 2: The Party Dress
I’m pretty sure this was one of my favorites back in the 80’s. You can’t really tell which material it’s made of, but I kind of saw it as a stretch velvet top and made the skirt out of lightweight, slightly shiny crepe.

The top is strapless, very fitted, and there are gathers at the c-front. The skirt hemline has some sort of torn, or worn out look.
I started from the basic bodice block for knits and made these modifications:
- First, I drew the final bodice shape. The bodice is quite long, so I made the c-front hip-length, and raised the line by 5cm at the side seam.
- Before adding volume to create the gathers, I decided the area where the gathers would go to and added notches. Then, I measured the area between the notches. This is the target length. At this point, it’s a good idea to draft the skirt pattern, so skip ahead and then come back to the bodice.

3. After this, I added volume with the slash and spread method. In this example, I added 4cm between each section. Then, I re-drew the lines to complete the pattern piece.
I decided to go for a facing to finish the neckline. The skirt will be sewn to the hemline.

The Skirt
To draft the skirt, you’ll need the basic skirt pattern as a reference.
- Take your top pattern pieces and place them onto the skirt block pieces, aligning the waistlines. This way you’ll manage to copy the shape of the top’s hemline.
- Complete the skirt shape by adding some flare, as shown here. This skirt will also be gathered, so measure the top edge of the skirt pieces to calculate how much to add.

3. In this example, I’m going to make the skirt out of lightweight fabric, so now I can double the skirt volume to add gathers. 1/3 of the volume goes to the c-front and c-back, and the other 2/3 in the middle, as shown. This is because of the curved shape of the top edge; it’ll be easier to re-draw the line if you divide the volume between more sections.

Both the front and the back piece will be cut on the fold, because this dress doesn’t have a zipper. I gathered the skirt so that it was large enough to pass through the hips.
Sewing
Velvet was just as nerve wracking to sew as I remembered! The pieces kept shifting as I sewed, no matter how many pins there were.
Here’s the front of the top before and after having gathered the volume. I used an elastic to gather. It needs to be somewhat shorter than the target measurement.

Here’s a picture of the skirt hem being cut. It’s easier to do this before gathering.
I think I could’ve gone for more rounded cuts, but this was quicker. For a full-sized skirt it might be a good idea to create a paper template so that you can plan the shape before cutting.

The Final Look
This is how the dress came out. Sadly I wasn’t able to find the exact colors, but at least they go together.
Here I’d have a few modifications to do: I’d raise the top’s hemline slightly more at the side seam and maybe make the skirt a bit longer. The cartoon characters have probably been drawn elongated so even though the skirt length was above knee in the original drawing, it looks visually shorter when you use real measurements.

A silicone tape along the top edge of the bodice will be a good idea.
Complete the outfit with tights, faux pearl necklace, and a big hair bow!
80s Power Suit Jem Style
I saved the most difficult piece for last. If you have already drafted jacket patterns before, this one’s for you!
Here are the blurry screenshots. As you can see, we have a pencil skirt paired up with a fitted jacket that has pointed sleeves with cuffs, and a cool decoration detail along the hem in a contrasting color that matches with the collar and lapels.
I went for shantung and taffetà, because I remember many fancy dresses in the 80’s were made of these kinds of materials and the sleeve will definitely benefit from the structure. However, I think something softer would work as well if you have a way to sustain the sleeves.

The Pencil Skirt
Before the jacket, let’s draft the pencil skirt. It’s about knee-length. You’ll only need to do a few modifications to your basic skirt block:
Re-draw the side seams making the hemline narrower. Here, I only removed 3cm on both sides, but you might remove more. Measure around your legs at knee level to get an idea on how much room you’ll need to walk.
There’s also a slit at the c-back. I made it 11cm high. Just add 3+3cm. This way you can use the same pattern piece for both the left and the right sides.
Draw the facing pieces onto the skirt pattern and then trace them onto another piece of paper ignoring the darts.

This is what my skirt looks like when sewn:

The Jacket
The basic block here is the fitted jacket pattern. I don’t have a tutorial on my blog for it, but there’s my Fitted Jackets Guide in the Shop, if you want to learn about jacket patterns.
I added princess seams that you can’t see in the cartoon version, because it would be difficult to make a jacket in this kind of shape without them.
Start by copying the fitted jacket block.
- The fitted jacket block doesn’t have a usual side seam, so, first we need to move it in the center.
- Add a back waist dart. Don’t worry about the placement too much, because you might end up moving it anyways when drawing the princess seam. The width of the dart depends on how fitted you want your jacket waist to be.
- Remove the back shoulder dart by shortening the shoulder line by 1cm at its tip. The remaining amount will become ease.
- Lower the break point so that it’s at the waist level. Then, re-draw the lapel’s roll line.

5. Next, draw the new lapel and collar.
The lapel tip will be lower than that of the basic jacket block. I measured 13.5cm from the shoulder down the roll line. The center line of the lapel is 11cm long. After you’ve drawn the center line, you can draft the lapel shape around it, starting from the break point.
The collar starts near the roll line making the lapel point rather long. Also the collar point is 12cm long and there’s a large gap between the collar and the lapel. The c-back of the collar is 7cm high.
I know it all sounds really complicated, but if you have the basic jacket block with its collar and lapel shapes as a reference, it’s quite easy to build the new collar and lapel around them. You can also fold the pattern along the roll line and draw the shapes on the wrong side of the paper to get an idea of how the jacket will look like.

6. Draw the princess seams absorbing the darts. The front princess seam should pass through the bust point. Move the back waist dart if needed, to create a nicer line. Add notches, as shown.
7. The jacket has slits both front and back (if the one at the front can be called a slit..) In this example, I moved the front tip 8cm inward measuring from the c-front line. This way, when the jacket is closed with the left and right sides overlapped, there’s still a rather sizable gap in between.
Draw a curved hemline, as shown, and finish with a slit at the c-back that also has a little gap.
8. Draw a line where the front facing will end. I followed the original bust dart edge at the top.
9. Because of the puffed sleeves, shorten the shoulder line by 3cm both front and back. Then, re-draw the armscye lines.
Trace all the pattern pieces. Remember to include notches also where the waistline is, and where the collar starts.

10. The next step is to create a pattern for the decorative border. To do that, tape the jacket pieces together at the hemline. You can keep the front and back separate.
Then, draw the shape directly on top, the way you want the final piece to be. Try to avoid curves that are too small as they are difficult to sew! I started at the roll line and kind of invented as I went, because you can’t really see the actual shape in the screenshot.

Once you’re happy with the shape, draw a second line below to create the facing piece. Trace both pieces. Then, trim off the section outside the facing pieces: the jacket pieces will start at the base of the facing.
Here are all the pattern pieces. The facing piece was also traced from the original draft. I just added an extra 3mm around the lapel. Same goes for the upper collar. I didn’t do a lining, because this was just a half scale jacket.

The Pointed Sleeve
Our jacket still needs a sleeve pattern! This is from one of my Bonus Sleeve Guides with a few modifications. It’s a pointed cowl sleeve where the extra volume creates a pointed tip instead of drapes.
As you know, the jacket block comes with a two-piece sleeve, but in this case I’m using a normal sleeve instead. I simply used the basic jacket block and drafted the sleeve pattern as explained in the dartless bodice tutorial. This is because the dartless bodice sleeve is slightly larger than the one that goes with the basic bodice and this is a good thing for a jacket.
Once you have the new sleeve block, trace it, and then:
- Raise the sleeve cap by 3cm. Remove 2.5cm from the hemline. This is half of the future sleeve cuff height. Cut the sleeve along the elbow line. We will later re-attach it.
- Draw these lines onto your sleeve pattern and slash each of them open, separating the two uppermost pieces completely. Take another piece of paper and draw a guideline in the center so that you can spread both sides of the sleeve evenly around it. Add 6cm of extra volume to the armscye, both front and back to create gathers. In the end, you should have 10cm on both sides of the guide line at the top, as shown.

3. Re-attach the lower section of the sleeve and re-draw the lines. The top of the sleeve should be completely straight.
Mark a notch at the hem, in the center of the back side. This is where you’d normally place a slit, but in this case it’s where the opening of the cuff will be.
Measure the hemline. This information is needed to decide if there will be a pleat.

4. The Cuff
This cuff has two sections (although they’re cut in one piece) and it will be folded upward.
Start by deciding the cuff circumference so that you can draw the initial rectangle. Remember, that this is a jacket. Add 2cm for the overlap. I made the rectangle 5cm high.
The part that will be folded on top is higher and without the overlap. In this example it’s 7cm high. This is the visible part, so in a way it’s the actual cuff height.
Complete the cuff pattern by adding pointed angles like in the drawing.
Now, compare the cuff circumference (without the overlap) with your sleeve hemline width. These two should match. So, if the sleeve hemline is wider, you need to add a pleat.
Here are the sleeve pattern pieces. The cuff will be cut four times and you should add an interfacing.
The sleeve cap has two extra notches. You fold it in half at the top where the central notch is, and sew the section between the fold and the other two notches to create the pointed shape. Then, gather the area between the armhole notches.

Sewing
Here are a few pics I took during the sewing process. The contrasting color is too dark, but it was the only darker violet/purple available.
There’s the jacket bodice without the border. I prepared the border separately before attaching it to the jacket’s hemline.
I also completed the sleeves before attaching them.
The undercollar and the upper collar pieces were cut in different colors. The upper collar is the one that remains visible, just like the facing of the jacket.

Here are pictures of the cuff in the makes.

The Jacket Outfit
This is the result. Besides the colors being different, I think the front of the jacket needs to be slightly shorter and the cuff a bit higher
For the rest, there’s the same elongated figure that distorts the proportions.
I was a bit tempted to change the colors in Photoshop and remove the extra seams to see if it looks more similar! 😀

So, there you have all three outfits if you should ever happen to want to dress up as Jem from Jem and the Holograms. Or, why not, maybe these will be useful for other sewing projects instead.
It was fun re-creating these outfits. If you have any other cartoon ideas for me, just leave a comment!
This also counts as my costume entry for this year’s MakeNine grid.
12 Comments
I love Jem and the holograms! I still have the cassette tapes that came with the dolls. You have amazing patternmaking skills. I love the blazer.
How cool! Cassette tapes, too? Wow! I think the dolls never made their way to Finland when I was a kid. Otherwise I would’ve definitely wanted one! 😀
Hi Mina, always so interesting to read your posts! I love reading them!
That’s wonderful to hear! 🙂 Wanted to do something quite niche this time.
This is brilliant! I have been called Jem my whole life by family and friends (short for Jema) and when I was young my older sister and I loved this show and of course pretended I was Jem. I had totally forgotten about it until I was at a party a few years ago and introduced myself to someone as “Jem” and they sang the theme tune to me! What a blast from the past. It prompted me to go watch an episode on YouTube 😂
I am definitely bookmarking this to make my Halloween costume next year, thanks!
What a fun story! Not to mention a great name. 😀 You must sent pics if you end up making the costume.
Your ambition is inspiring – thanks for sharing!
Thanks so much! 🙂 It’s my pleasure.
Do you plan on doing more of Jem’s outfits and other characters from the show? I hope you do! I was born in the 2000s but luckily Netflix introduced me to Jem and the Holograms. And I thought the show was truly outrageous!!
Well, I didn’t before, but now that you asked, maybe I Could do. 🙂 Netflix has the show? It must be a regional thing as it’s not available here in Italy.
Hey there ! thanks for your article its very interesting as I was also watching JEM when I was a kid and it was one of my favorite cartoon, because of fashion. Recently I decided to launch my new collection BERRI’N COUTURE SS2024 inspired by JEM & HOLOGRAMS Im so thrilled ! and can’t wait to buy the fabrics and draw my designs. Your article is perfect thanks again (Got to watch the movie also released in 2015)
All the best for you!
Nawel
BERRI’N COUTURE
FASHION WEEK TOUR
ALGER FASHION WEEK
Wow! So cool that your collection will be inspired by Jem & The Holograms. 🙂 It will surely look fantastic! Best of luck with the creation.