There are lots of sleeve pattern posts here at my blog, but not much about how to sew sleeves unless it’s part of a specific sewing project.
So here it is: my how to sew different sleeves -tutorial! I hope it will be a helpful addition to the sleeve pattern tutorials and my sleeve guide Mad about Sleeves, whether you have the digital or physical book version of it.
I have included various types of sleeves here that represent so called main categories. They should help you sew also other similar sleeves. But first, let’s talk about sleeve basics.
Sleeve Basics
This is what a basic sleeve pattern looks like. Depending on the method it has been drafted with, yours might look slightly different. For example, the front and the back sides might be on the opposite sides.
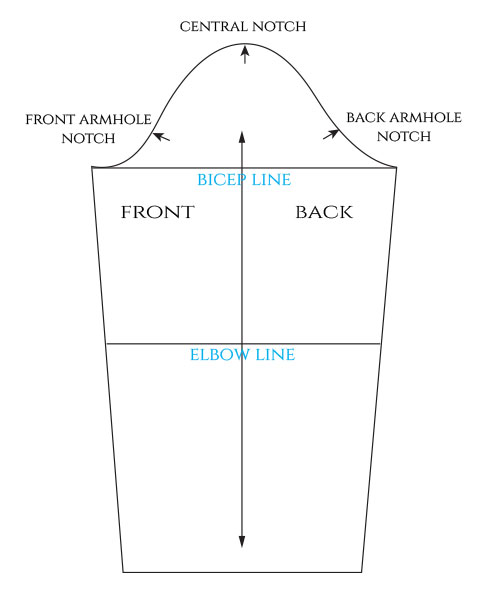
The bodice pattern has the corresponding armhole notches that should match with those of the sleeve.
The central notch is also called the cap notch. In fact, the section above the bicep line is called the sleeve cap. The central notch matches with the shoulder seam of the bodice.
If you observe the shape of the sleeve cap, you’ll notice that the front side is more curved under the armhole notch. This is because the arm usually bends forward, so you need less fabric at the front side.
If you’re unsure which is the front and which is the back of the sleeve after you’ve cut it, you can check the shapes. Commercial patterns often mark the back side with two notches.
The bicep line length corresponds to the circumference of the sleeve just under the armpit. Measuring it allows you to get an idea on how tight the sleeve is going to be once sewn.
The grainline of a sleeve is usually perpendicular to the hemline, unless you’re making something like a cowl sleeve that will benefit from cutting the sleeve on the bias.
The Cap Ease
Sleeve patterns for woven fabrics have ease at the sleeve cap. It creates extra space to accommodate the roundness of the arm. For knit fabrics it’s not necessary because the fabric itself will stretch.
If you’ve drafted the basic bodice blocks using my tutorials, you’ll have 10% of ease at the sleeve cap above the armhole notches, both front and back.
The sections below the armhole notches don’t have ease.

10% is a good basic amount of ease that shouldn’t cause any visible gathers after the sleeve has been attached. However, some fabrics are more “dry”, such as silk, and you might want to reduce the amount of ease. Also, for flared sleeves that have enough room for the arm anyways, you can reduce the ease.
Checking and Modifying the Amount of Ease
If you haven’t drafted the pattern yourself, you might not even know how much ease it has. The “walking” method is probably the best way to check this.
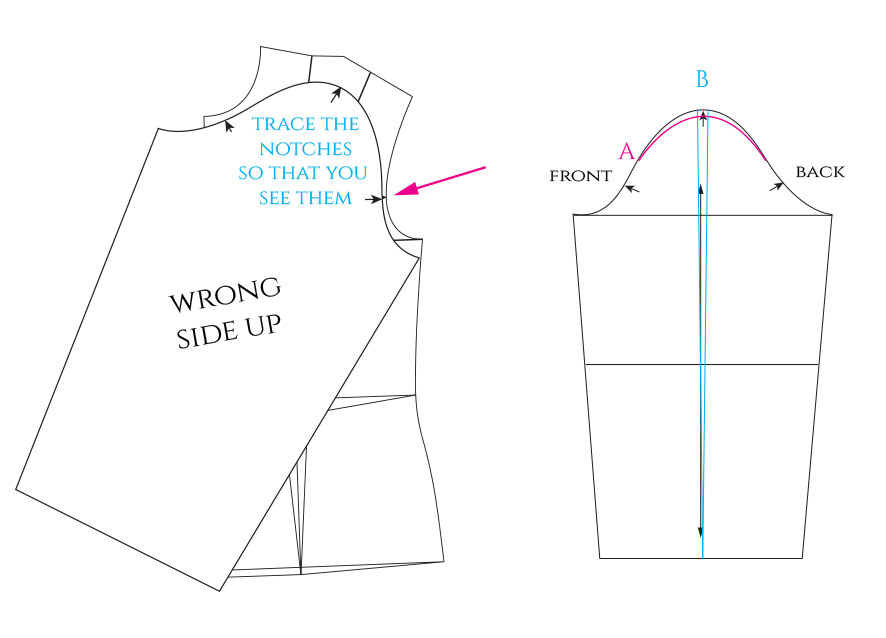
Match the armhole notches as shown, and “walk” the sleeve upward towards the shoulder line of the bodice. Use a sharp object to make it easier to pivot the sleeve pattern as you “walk” it along the bodice armscye.
The sleeve cap is bigger than the armhole when it has ease. Once you arrive to the shoulder line, mark where the bodice ends onto your sleeve pattern. Ease is what you have between the mark and the central notch of the sleeve.
Control both front and back pieces the same way.
To calculate 10%, measure your bodice armscye between the armhole notch and the shoulder line. Divide the measurement by 10. For example, if it measures 12cm, 10% of ease will be 1.2cm. I don’t recommend having more ease than that. Otherwise you will have gathers.
The drawing on the right shows you how to reduce the amount of ease.
You can either, A: lower the sleeve cap randomly until it has the correct measurement. Or B: find out exactly how much to eliminate on both sides of the central notch, draw a “dart” around the notch and close it.
Method A maintains the sleeve as wide as it was. Method B results in a narrower sleeve.
With the same technique, you can also increase the amount of ease working in the opposite direction.
Special Cases
Sometimes the sleeve might cover just a part of the armhole.
Such is the case with the cap sleeve, that only covers the upper section of the armhole (from the armhole notches up), and the cold shoulder sleeves, that only cover the lower section (from the armhole notches down).

How to Sew the Basic Sleeve
Now that you know the basics, let’s see how to sew sleeves, starting from the basic sleeve.
Remember to make little cuts where the notches are, because they will be your reference for attaching the sleeve.

Start by closing the inseam of the sleeve. Pin the right sides together and sew.
To ease the sleeve, sew two rows of gathering stitches between the armhole notches. Ideally these stitches remain inside the seam allowance.

You can also hem the sleeve at this point, if you already know that the length will work for you.
Next. turn your bodice wrong side out and the sleeve right side out. Ensure that you have the correct sleeve. Place the sleeve inside the bodice so that the seam allowances point in the same direction.
Match the central notch with the shoulder seam and pin. Match the front or back armhole notches, and pin.
- Here you can see the extra volume of the sleeve between the back armhole notch and the central notch that needs to be eased in.
- Gather until the sleeve matches the armhole. Distribute the gathers evenly and pin.

3. The same with the front armhole. Here’s the extra volume that needs to be gathered.
4. Gather the sleeve to match the armhole, distribute the gathers evenly, and add a few pins.
Finally, match the sleeve inseam with the bodice side seam and pin.
If you’re new to sewing sleeves, you might want to baste the sleeve before sewing. Otherwise, you can just go ahead and sew it directly. Sew with the sleeve side on top.

Press the seam allowance towards the bodice.
Here’s the result. As you can see, there are no visible gathers. Instead, the sleeve is slightly rounded at its upper edge.

With this same method, you can sew several other sleeves, such as the flutter, trumpet, and bell sleeve. Also with less ease, I find that the gathering stitches make it easier to pin the sleeve in place.

Sleeve Cap with Gathers
Some sleeves require you to gather more at the sleeve cap. It’s part of the style. Think about puff sleeves, or the leg-o-mutton sleeve.
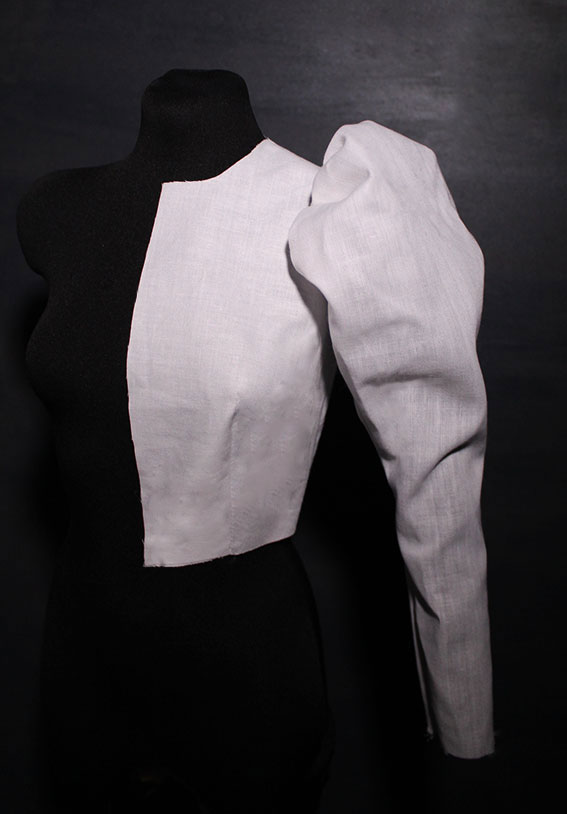
Sewing these is no different really. You just have more to gather.
Here’s a short puff sleeve with gathers at the top as an example. You can already see how the sleeve cap is much larger than that of the basic sleeve.

But similarly to the basic sleeve, you first close the inseam and stitch the hem. Then, sew two rows of gathering stitches between the armhole notches and gather the sleeve to match the armhole of the bodice before attaching the sleeve.

The only thing here is that the gathers will easily move while you sew, so just try to keep them in place as you go.

Here’s the resulting sleeve. If you find that the sleeves make you look really wide at the shoulders, you can shorten the shoulder seam a bit.

Sleeve Hem with Gathers
How about the sleeves that have gathers at the hem, such as the bishop sleeve?
Well, in this case you will first prepare the hem and attach the cuff. I think it’s easier to attach the cuff partially before sewing the inseam of the sleeve.
Sew two rows of gathering stitches at the hem. Mark the central point with a pin. This is because it’s easier to see once you start gathering. Also the cuff piece should have the center point marked.
Gather to match the cuff. Distribute the gathers evenly. Add pins and sew.

If you will hand stitch the opposite edge of the sleeve cuff, you can edge stitch at this point to flatten the seam allowance.

Then, sew the inseam, including the sleeve cuff. Ensure that the cuff seam will match.

Press the seam allowance towards the back and the remaining cuff seam allowance inside.
Turn the sleeve wrong side out and pin the cuff edge in place, aligning it with the previous stitches. Hand stitch.

After this, sew the rest of the sleeve as usual.
Here’s the finished sleeve. I didn’t have enough fabric for the bodice though.

I have also done a little video on YouTube about the bishop sleeve.
Gathers Both at the Hem and the Sleeve Cap
You might also have gathers at both ends of your sleeve. As an example, there’s the balloon sleeve, but also a peasant sleeve, that is very similar to the bishop sleeve. Here’s a video.
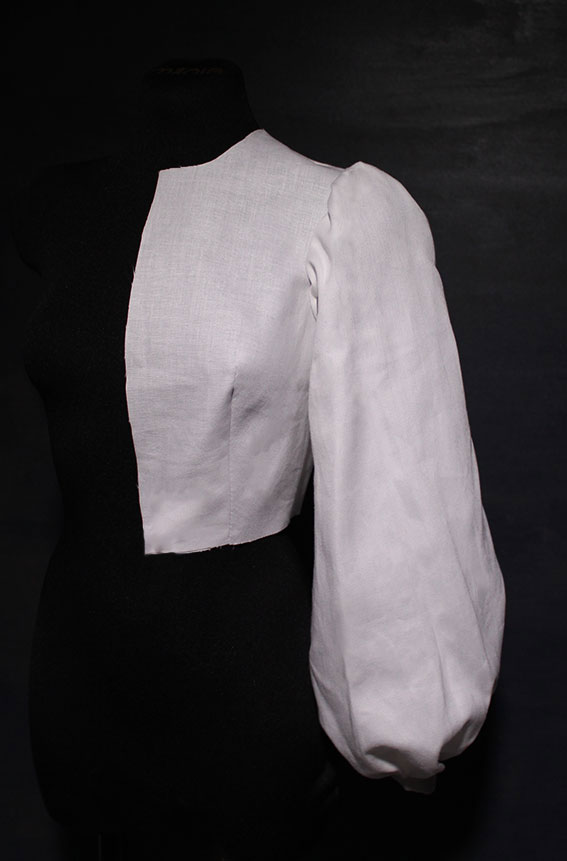
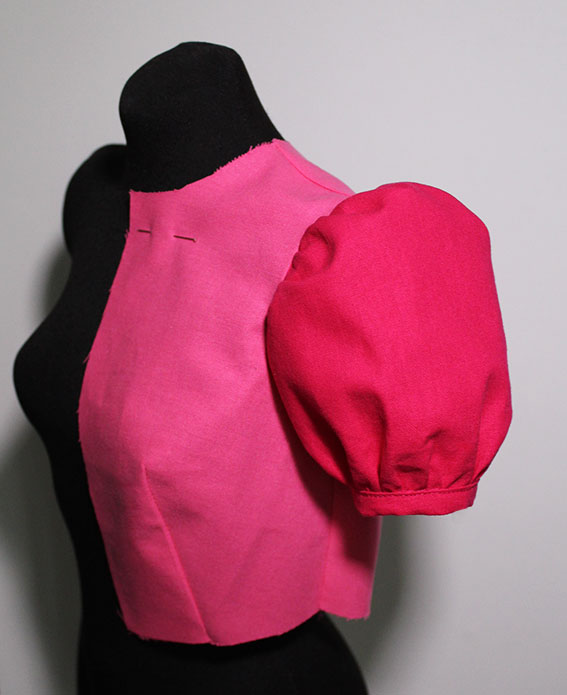
Let’s see the balloon sleeve. In this case, you need to sew gathering stitches both at the sleeve cap and the hemline. Mark the central notch and the center of the hemline with a pin. The sleeve cuff should have a notch in the center, too.

Gather the sleeve hem to match the cuff. Distribute the gathers evenly, pin, and sew. Press the seam allowance towards the cuff.

Sew the inseam, press the remaining edge of the sleeve cuff inwards.

Pin the inside edge of the sleeve cuff in place. I prefer to pin and stitch with the right side up, because it’s the visible side. Stitch near the previous seam.

If you want to avoid the cuff, another option is to create a casing for an elastic and gather that way.
Now that the hem is ready, you can gather the sleeve cap to match the armhole of the bodice as normal.
Sew the sleeve in place.

Here’s what this balloon sleeve looks like.
If you prefer video format, here’s one.
Speaking of sleeve cuffs, if you’re curious about the classic shirt cuff, check out this tutorial.
Others
Besides gathers, your sleeve might have pleats or tucks. This means, that instead of gathering, you prepare the pleats or tucks before attaching the sleeve. In addition to that, you might still need to gather slightly as well.
Here are two examples.

The idea is always to first bring the sleeve cap to its original measurements, whatever type of volume you might have, and then proceed normally.
Darted Sleeve Cap
Here’s a special example: a sleeve cap with two darts that create a square shape. This is from Mad about Sleeves.
In order to get to the original measurements, you first sew the darts. Press the dart allowance outward.

Then, you can sew the sleeve as usual: close the inseam, hem, and attach to the bodice.

This is what the darted sleeve cap looks like when the sleeve is ready.

Cowl Sleeves
Also with cowl sleeves, there’s a step you need to do first to get to the original sleeve cap shape.
I have a video about the basic cowl sleeve here.
There are variations to the basic cowl sleeve, such as these two, that are sewn in the same way. Just with added gathers.

If you’re curious, they are from my Bonus Sleeve guides.
But for this tutorial I picked the pleated cowl sleeve. Just a side note: cotton is not an ideal fabric for cowl sleeves, especially if you make them in half scale. Use something drapier.
So, in this case, you need to first fold the pleats. There are two pleats on both sides of the sleeve cap. The notches show where to fold.

Stitch the pleats in place along the edge. Then, fold the sleeve lengthwise in half, right sides together, and sew the top edge.
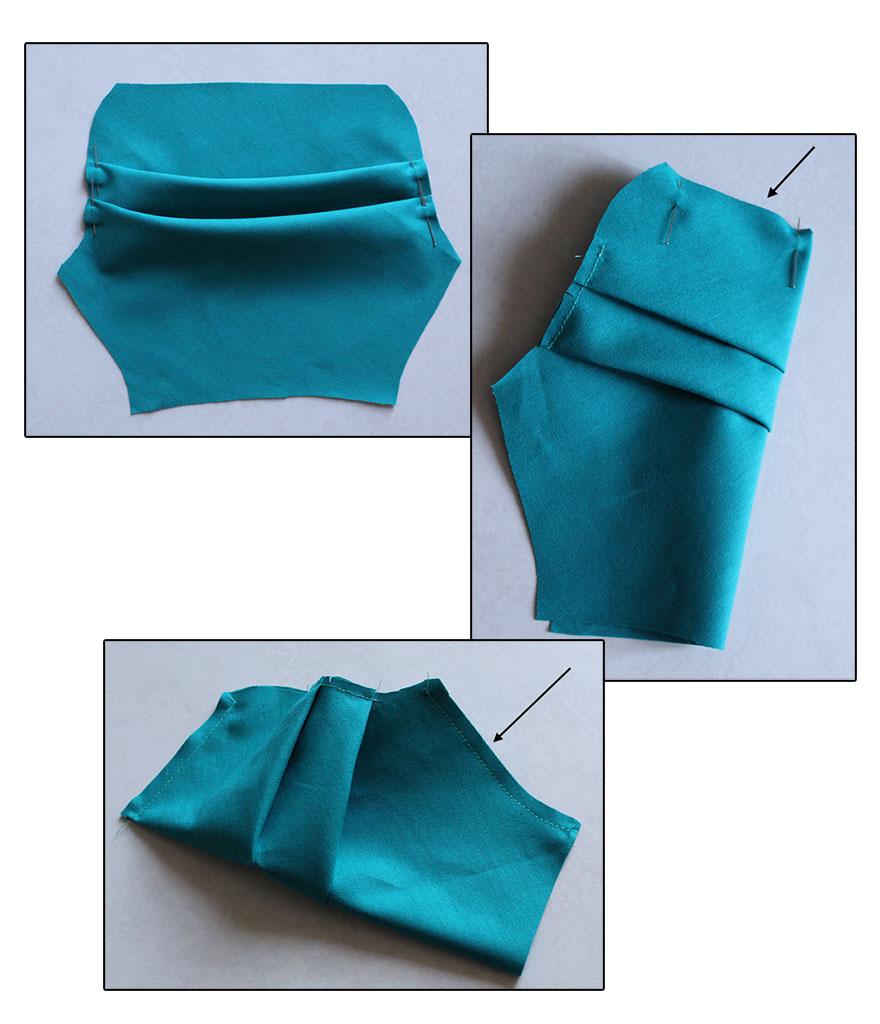
Sew the inseam and hem the sleeve. Then, you can attach the sleeve normally.
If you didn’t watch the video, the basic cowl sleeve is sewn exactly the same way, just skip the part about the pleats.
The half scale cotton pleated cowl sleeve looks like this. This material is too stiff even when cut on the bias. The folds should actually drape down.

Sleeves that Consist of 2 or More Pieces
Sometimes you have more than one sleeve piece to sew together. I have the lantern and the tulip sleeve as examples here, but you might also have several panels. The idea with these is to first prepare the sleeve by sewing all the different pieces together, and then attach the sleeves to the bodice.
Lantern Sleeve
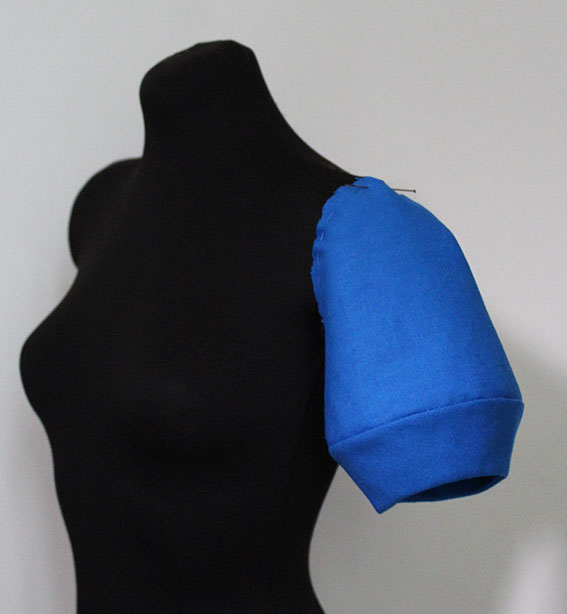
Let’s see the lantern sleeve first. This is a short lantern sleeve, but yours could also be long or paneled.

The easiest way to finish the hemline is to cut the lower piece twice to create a facing. It will also give structure to the lantern shape.

Take one of the pieces and attach it to the upper piece. Both should have a notch in the center.
The shapes are not identical although they are the same length. Start by matching the central notches, and then add more pins.

Once you’ve sewn the pieces together, trim or cut notches to the seam allowance and press it downward.
Next, sew the facing piece to the hem. Clip the seam allowance before turning the right sides out. Press flat.

Press the remaining edge of the facing inward. Sew the inseam, including that of the facing.

Pin the free edge of the facing aligned to the existing seam. You can hand stitch it in place to make it easier.
Attach the sleeve as usual. Here’s my sleeve.
Tulip Sleeve
Also the tulip sleeve consists of two pieces: the front piece and the back piece that are overlapped.
The back piece could have some extra gathers to create a more interesting shape. Here you can see how the back piece has a larger sleeve cap due to this extra volume.

As the hemlines are curved, the easiest way to finish them is to line the sleeve pieces. Alternatively, you can make a narrow rolled hem or use the serger.
If you choose to line the pieces, start by pinning and sewing the lining to the hemline of the main pieces. Trim the seam allowance before turning the right sides out. Then, press flat.

After this, unite the two pieces by sewing the inseam as shown here:

Now your tulip sleeve has this weird shape. Sew gathering stitches at the cap of both pieces.
Both pieces should have notches at their sleeve cap to help you gather the volume to match the armhole of the bodice. In this case you can temporarily pin both pieces to the bodice separately to gather them.

Then, place the back side on top of the front piece along the sleeve cap, aligning the central notches and stitch the two sides in place before attaching to the bodice.
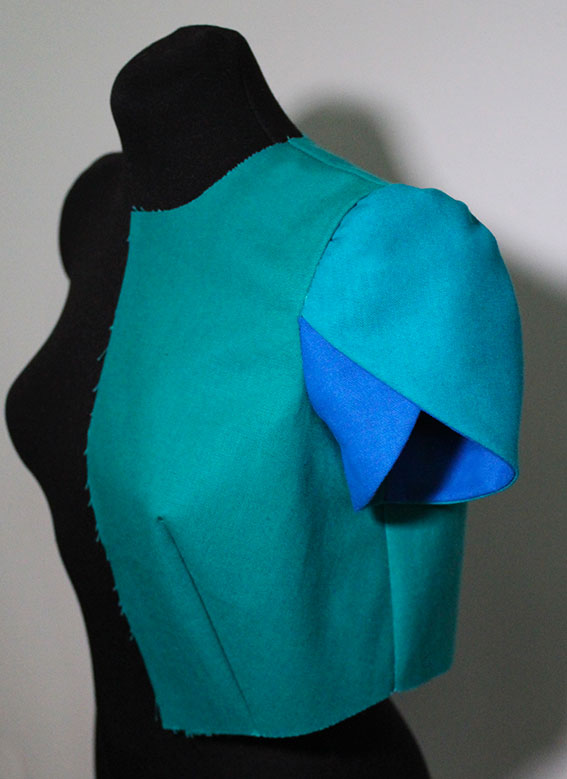
Here’s also a video about the tulip sleeve.
Gathers in the Middle
We can also throw gathers in the mix!
The sleeve could have gathers in the middle of the sleeve, either vertically or diagonally, as in this example. It means that the sleeve has been divided into two pieces that both need to be gathered before you can unite them.
I placed pins where the notches are. It’s where the two pieces will have to match.
Why is there a measuring tape in the picture? It’s because in this case, I know the final length the seam needs to be, so I gather both pieces until I get to the correct measurement.

Then, distribute the gathers and match the notches marked with pins to attach the two pieces together.
Press the seam allowance open. You could stay-tape the seam.

After this, just sew the inseam and sew gathering stitches to the sleeve cap as usual.
Here’s the gathered sleeve.

Sew the Raglan Sleeve
The final example is the raglan sleeve, which is a bit different. Firstly, there’s no sleeve cap, because the raglan sleeve extends further in and covers also part of the bodice.
Secondly, the sleeve consists of a separate front and back sleeve. In some cases, however, these two have been united into one.
As there’s no sleeve cap, there’s no cap ease either. In fact, the raglan bodice and sleeve seams are the same lengths. No easing involved here.
I’m making half a bodice. These are the two bodice and the two sleeve pieces. They all have armhole notches.

First, unite the two sleeve pieces by sewing the central seam. There should be a notch at the shoulder tip. Press the seam allowance towards the back.
Then, sew the inseam and hem the sleeve. Prepare the bodice as well.
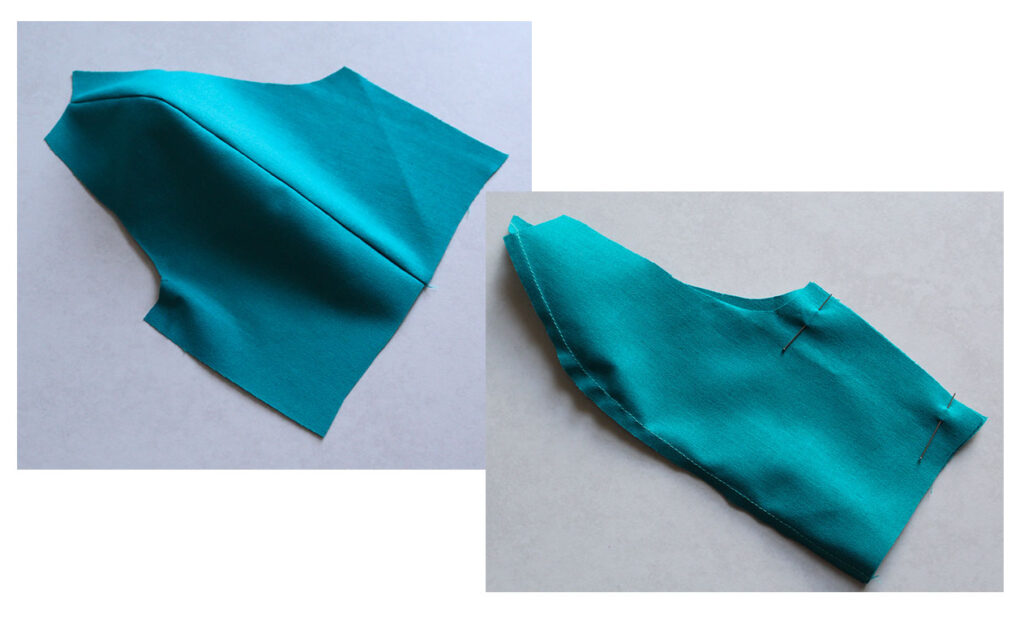
Leave the sleeve’s right side out. Pin the bodice to the raglan seam, matching the armhole notches and the side seam with the sleeve’s inseam. Sew.
Press the seam allowance towards the sleeve this time. It’s because the raglan seam’s curve makes it naturally turn that way.

By the way, when working with knits, the sewing order might be a bit different. You’ll sew the sleeve’s inseam with the bodice side seam in one go.
Anyways, here’s our raglan sleeve.

There are variations to the basic raglan sleeve. These three, for example, all have just one sleeve piece instead of a separate front and back piece. They also show you how the raglan, too, can have gathers or pleats. Or have part of the sleeve missing.

You might be wondering about the two-piece jacket sleeve. Here’s a link to another tutorial. It’s all about jackets.
I hope these instructions will be useful and assist you with sewing many types of different sleeves.
The idea of a set-in sleeve might be intimidating but once you get the hang of it, you’ll be attaching sleeves in no time!
Even though there are a large variety of different sleeves (my sleeve guide together with the bonus designs and other tutorials on my blog cover something like 80 styles!) the main instructions remain the same. So, in a way, if you learn how to sew just a few different sleeves, you’ll be able to sew them all. 🙂


16 Comments
A Modelagem encanta nos pequenos detalhes sou pesquisadora dessa ferramentas que faz parte de nossas vidas.
Yes, patternmaking is such an interesting topic. 🙂
Somehow the colored fabrics you used brought these designs to life. I hadn’t imaged gathers (I call ’em “bunches”) could look so good. Or maybe it was the colors, too – anyway. Thank you, Minna!
Thank you Ashley. 🙂 Yeah, it felt like making whole different sleeves, too! I also enjoy coloring my white samples with computer to see what they look like in color. Mostly when I’m supposed to be doing something else… 😀
It’s always a great experience visiting your page… You have no idea how much I have learnt from you… Thank you for being so generous… Thank you for the time you invest in sharing your knowledge and experience… God bless you more…
Love from Nigeria.
Oh, that’s so wonderful to hear! I’m grateful to have the opportunity to share what I’ve learned myself during the years. 🙂
Thank u !!:)))
You’re welcome! 🙂
This is an absolute treasure of information! I was searching for the name of a certain sleeve type, and now I’ve got it plus examples of how to play with it. Thank you for sharing your skill and knowledge here
Perfect! 🙂 You’re welcome. Always happy to write tutorials on sleeve patterns.
They all look so beautiful.
Thank you. 🙂
These are really, really fabulous designs, and pieces. Glad I found this page. Thank you for sharing.
Welcome to my blog. 🙂 And thanks so much. Sleeves are my favorite theme.
this is such amazing and helpful detailed information. Thank you!
Glad it was useful! 🙂 I figured there needed to be a sleeve-sewing tutorial. 😀